

Hello my beautiful loves! There is something so incredibly special about gathering in the kitchen when the golden hour light is just hitting the countertops, isn’t there? Lately, I have been feeling so inspired by the way food can bring us all together, creating little pockets of joy and comfort in our busy lives. I’ve spent the last few weeks testing, tasting, and obsessing over the most viral trends making waves online, and I am so excited to finally share my curated favorites with you all.
This isn’t just about following a trend; it’s about finding those magical recipes that actually nourish our souls and make our homes feel like a soft, warm embrace. Whether you are looking for a high-protein treat to fuel your day or a whimsical cake that feels like a scene from a fairytale, I’ve gathered the very best here just for you. Grab a cup of tea, settle into your favorite cozy chair, and let’s dive into this month’s most delicious viral sensations together.
The Secret To Making A Perfect Low Carb Chicken Crust Pizza

Why we love this
Finding a way to enjoy our favorite comfort foods while still feeling light and nourished is a true gift to ourselves. This chicken crust pizza is the ultimate game changer for those cozy Friday nights when you want something savory but don’t want the heavy carb slump afterward. It’s incredibly high in protein and manages to get surprisingly crispy, satisfying every single one of those deep pizza cravings we all get. You will be so shocked at how simple it is to whip up, making it a staple for your busy weeknight rotations.
Ingredients
- 1 lb ground chicken (93% lean works best)
- 1/2 cup grated parmesan cheese
- 1 large egg
- 1 tsp garlic powder
- 1 tsp dried oregano
- 1/2 tsp salt and black pepper
- Sugar-free pizza sauce
- Shredded mozzarella cheese
- Fresh basil for garnish
How to make it
- Preheat your oven to 400°F (200°C) and line a baking sheet with high-quality parchment paper to prevent sticking.
- In a medium mixing bowl, combine the ground chicken, grated parmesan, egg, garlic powder, oregano, salt, and pepper until fully integrated.
- Transfer the mixture to the parchment paper and place another piece of parchment on top to roll it out into a thin, even circle or rectangle.
- Remove the top parchment and bake the crust alone for 20 minutes until the edges are golden brown and the surface feels firm to the touch.
- Remove from the oven, spread your favorite pizza sauce, sprinkle generously with mozzarella, and add any low-carb toppings you desire.
- Place back in the oven for another 8-10 minutes until the cheese is bubbly and starting to brown, then let it rest for 5 minutes before slicing.
Homemade Banana Bread Syrup For The Best Iced Coffee

Why we love this
There is nothing quite like the aroma of freshly baked banana bread wafting through the house on a lazy Sunday morning. This viral syrup captures that exact essence and bottles it up, allowing you to transform your everyday morning coffee into a gourmet café experience. It’s sweet, warming, and has that perfect hint of spice that makes every sip feel like a gentle hug for your taste buds. Plus, making it at home means you know exactly what’s going into it, which always makes it taste just a little bit sweeter.
Ingredients
- 2 overripe bananas, mashed
- 1 cup water
- 3/4 cup brown sugar
- 1/4 cup granulated sugar
- 1 tsp vanilla extract
- 1/2 tsp ground cinnamon
- A pinch of sea salt
How to make it
- In a small saucepan over medium heat, combine the water, brown sugar, and granulated sugar, stirring until the sugar is completely dissolved.
- Add the mashed bananas, cinnamon, and salt to the syrup mixture and bring it to a gentle, rolling simmer.
- Lower the heat and let the mixture bubble softly for about 10-15 minutes, allowing the banana flavor to deeply infuse into the liquid.
- Remove from the heat and stir in the vanilla extract, then let the syrup cool slightly for easier handling.
- Strain the mixture through a fine-mesh sieve or cheesecloth into a glass jar, pressing on the solids to extract every drop of flavor.
- Store your syrup in the refrigerator and add 1-2 tablespoons to your favorite iced coffee or cold brew with a splash of oat milk.
The Most Beautiful Bridgerton Inspired Tea Party Cake

Why we love this
Stepping into a world of lace, tea sets, and delicate floral scents is exactly what this cake feels like with every single bite. Inspired by our favorite regency drama, this dessert isn’t just a treat; it’s an experience that invites you to slow down and savor the beauty of the moment. The layers are light as air, infused with subtle botanical notes that make you feel like you’re attending the most exclusive garden party in London. It’s the perfect centerpiece for a brunch with your closest friends where the conversation flows as easily as the tea.
Ingredients
- 2 1/2 cups cake flour
- 1 1/2 cups granulated sugar
- 1 tbsp baking powder
- 1/2 cup softened unsalted butter
- 1 cup whole milk
- 1 tsp Earl Grey tea leaves (finely ground)
- 1 tsp vanilla bean paste
- 4 large egg whites
- Edible dried rose petals and lavender for decoration
How to make it
- Preheat your oven to 350°F (175°C) and grease two 6-inch round cake pans, lining the bottoms with parchment paper circles.
- Whisk together the cake flour, sugar, baking powder, and ground Earl Grey tea leaves in a large bowl to ensure even distribution.
- Cream the butter and vanilla bean paste until fluffy, then gradually add the milk and flour mixture in alternating batches.
- In a separate clean bowl, beat the egg whites to stiff peaks and gently fold them into the batter to maintain a light, airy texture.
- Divide the batter evenly between the pans and bake for 25-30 minutes, or until a toothpick inserted in the center comes out clean.
- Once cooled, frost with a light vanilla buttercream and decorate the top with a whimsical wreath of edible flowers and rose petals.
The Viral Pink Jello Recipe For A Low Calorie Dessert

Why we love this
Sometimes we just need a little something sweet and nostalgic to brighten our day without feeling heavy or overly indulgent. This viral pink jello fluff is the perfect solution, offering a cloud-like texture and a burst of fruity flavor that feels like a childhood dream. It is incredibly light, low in calories, and has a beautiful pastel hue that looks stunning in individual glass coupes. It’s the ideal treat for those nights when you’re craving dessert but want to stay mindful of your wellness goals while still feeling satisfied.
Ingredients
- 1 package (0.3 oz) sugar-free strawberry or raspberry jello
- 1 cup boiling water
- 1/2 cup cold water
- 1 cup non-fat Greek yogurt (or blended cottage cheese)
- 1 cup sugar-free whipped topping
- Fresh strawberries for topping
How to make it
- Dissolve the sugar-free jello powder in 1 cup of boiling water, stirring constantly for at least two minutes until no granules remain.
- Stir in the 1/2 cup of cold water and let the mixture sit in the refrigerator for about 15-20 minutes until it is slightly thickened but not set.
- Whisk in the Greek yogurt (or blended cottage cheese) until the mixture is completely smooth and turns a beautiful light pink color.
- Gently fold in the sugar-free whipped topping using a spatula, being careful not to deflate the air bubbles that create the fluff texture.
- Pour the mixture into individual serving dishes or a large glass bowl and refrigerate for at least 4 hours, or until completely firm.
- Serve with a dollop of extra whipped topping and a few slices of fresh, juicy strawberries on top for the perfect finish.
Crispy Tator Tot Casserole That Everyone Will Love

Why we love this
Choosing to nourish our bodies with wholesome ingredients shouldn’t mean sacrificing the joy of a warm, comforting meal that hits the spot. This tator tot casserole brings back all those nostalgic childhood memories but elevates them with a texture that is perfectly crispy and satisfyingly rich. It is the ultimate one-pan wonder that brings the whole family together around the table, sharing stories and laughter over a steaming dish of goodness. You’ll love how the golden-brown topping crunches perfectly against the savory, seasoned filling in every single delicious forkful.
Ingredients
- 1 lb lean ground beef or turkey
- 1 small onion, diced
- 2 cloves garlic, minced
- 1 can (10.5 oz) cream of mushroom soup (low sodium)
- 1 cup frozen peas and carrots
- 1 tbsp Worcestershire sauce
- 2 cups shredded cheddar cheese
- 1 bag (32 oz) frozen tator tots
- Salt and pepper to taste
How to make it
- Preheat your oven to 425°F (220°C) to ensure the tator tots get as crispy as possible during the baking process.
- In a large skillet, brown the ground meat with the diced onion and minced garlic over medium-high heat until cooked through.
- Drain any excess fat, then stir in the cream of mushroom soup, frozen vegetables, and Worcestershire sauce until well combined.
- Transfer the meat mixture to a 9×13 inch baking dish and spread it out into an even, flat layer across the bottom.
- Sprinkle half of the shredded cheese over the meat, then arrange the tator tots in neat, tight rows over the entire surface.
- Bake for 30 minutes, then sprinkle the remaining cheese over the top and bake for another 5 minutes until the tots are golden and the cheese is melted.
The Best Homemade Caesar Dressing For A Perfect Wrap
Why we love this
There is a world of difference between store-bought dressings and a version made from scratch with love in your own kitchen. This Caesar dressing is incredibly creamy, punchy, and has that perfect balance of salty and bright notes that elevate any simple wrap. It turns a basic lunch into something you genuinely look forward to all morning, providing that restaurant-quality flavor with just a few pantry staples. Once you try this velvety version, you will never want to go back to the bottled stuff again, I promise you that!
Ingredients
- 1/2 cup high-quality mayonnaise
- 1/4 cup grated parmesan cheese
- 2 tbsp fresh lemon juice
- 1 tsp anchovy paste (or 1 small minced anchovy)
- 1 tsp Dijon mustard
- 1 clove garlic, finely minced
- 1/2 tsp black pepper
- 1/2 tsp Worcestershire sauce
How to make it
- In a small mixing bowl or a wide-mouth mason jar, combine the mayonnaise, grated parmesan, and fresh lemon juice.
- Add the anchovy paste, Dijon mustard, minced garlic, and Worcestershire sauce to the base mixture.
- Whisk vigorously with a small wire whisk or a fork until the dressing is completely emulsified and has a silky, uniform texture.
- Taste the dressing and adjust the seasoning with extra pepper or lemon juice if you prefer a bit more zing or spice.
- Cover and refrigerate for at least 30 minutes before using to allow the garlic and anchovy flavors to mellow and meld together.
- Drizzle over crisp romaine lettuce, grilled chicken, and extra parmesan inside a warm flour tortilla for the most incredible wrap experience.
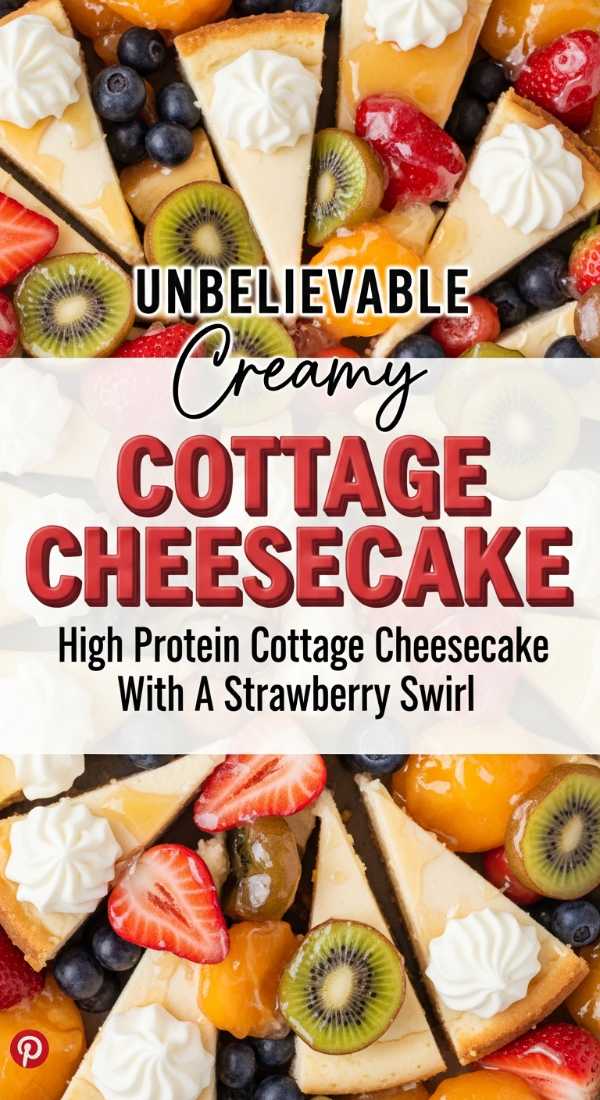
High Protein Cottage Cheese Cheesecake With A Strawberry Swirl
Why we love this
We all know that cottage cheese has been having a massive moment lately, but this strawberry swirl cheesecake is truly the crowning jewel of the trend. It transforms a humble fridge staple into a decadent, creamy masterpiece that packs a serious protein punch without any of the heavy guilt. The strawberry swirl adds a beautiful pop of color and a tart sweetness that balances the rich, velvety texture of the cheesecake base perfectly. It’s the kind of dessert that makes your body feel just as good as your taste buds do, which is always the goal.
Ingredients
- 2 cups low-fat cottage cheese
- 2 large eggs
- 1/3 cup honey or maple syrup
- 1 tsp vanilla extract
- 2 tbsp almond flour
- 1/4 cup strawberry fruit preserves (no sugar added)
- Optional: Graham cracker crust
How to make it
- Preheat your oven to 350°F (175°C) and prepare a small springform pan or a pie dish with a light coating of cooking spray.
- Place the cottage cheese in a high-speed blender and process until it is completely smooth and free of all lumps or curds.
- Add the eggs, honey, vanilla, and almond flour to the blender and pulse a few times until the batter is well-integrated and creamy.
- Pour the cheesecake batter into your prepared dish, smoothing out the top with a spatula to ensure an even bake.
- Drop small spoonfuls of the strawberry preserves onto the top of the batter and use a toothpick to gently swirl them into a marble pattern.
- Bake for 35-40 minutes until the edges are set and the center has a slight jiggle, then cool completely and refrigerate for at least 4 hours before serving.
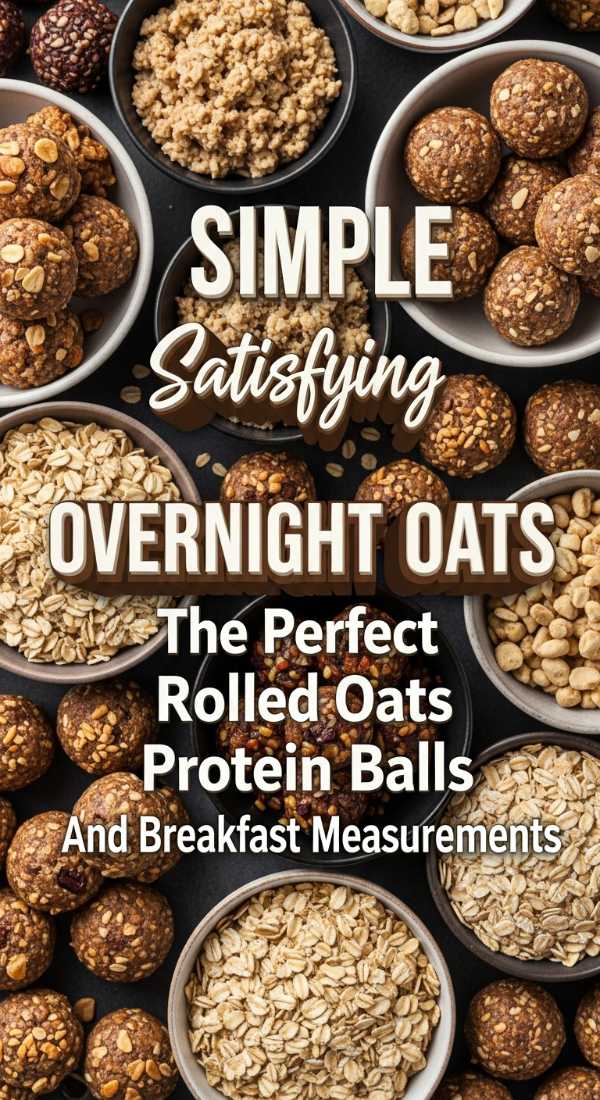
The Perfect Rolled Oats Protein Balls And Breakfast Measurements

Why we love this
Mornings can be such a whirlwind, which is why having a reliable, nutritious snack ready to go is a total life saver for my busy loves. These protein balls are like little bites of energy that keep you going through your morning meetings or after a refreshing workout session. They are packed with fiber and healthy fats, and the texture is so satisfyingly chewy that they feel much more like a treat than a health food. Plus, you can customize them with whatever mix-ins you have on hand, making them a versatile staple for your pantry.
Ingredients
- 2 cups old-fashioned rolled oats
- 1/2 cup vanilla protein powder
- 1/2 cup creamy peanut butter or almond butter
- 1/3 cup honey or agave nectar
- 1/4 cup mini dark chocolate chips
- 1 tsp cinnamon
- 1-2 tbsp water (if needed for binding)
How to make it
- In a large mixing bowl, combine the rolled oats, protein powder, and cinnamon, stirring to ensure the powder is evenly distributed.
- Add the nut butter and honey to the dry ingredients, using a sturdy spatula or your hands to mix everything together until a thick dough forms.
- If the mixture feels too dry or crumbly, add water one tablespoon at a time until it holds its shape when pressed together.
- Gently fold in the mini chocolate chips so they are scattered evenly throughout the protein ball dough.
- Scoop out about one tablespoon of dough at a time and roll it between your palms to form a smooth, round ball about 1 inch in diameter.
- Store the finished protein balls in an airtight container in the refrigerator for up to a week, or freeze them for an easy grab-and-go breakfast.
Better Than Store Bought Homemade Sloppy Joes Recipe

Why we love this
There is something so undeniably comforting about a messy, flavorful Sloppy Joe that takes us right back to simpler times around the dinner table. This homemade version skips the canned sauce in favor of a rich, complex flavor profile that is sweet, tangy, and savory all at once. It’s a wonderful way to serve a crowd without a lot of fuss, and the smell of the simmering sauce filling the house is absolutely intoxicating. Your family will be asking for seconds (and maybe thirds!) of this elevated classic that truly beats any store-bought alternative.
Ingredients
- 1 lb lean ground beef
- 1/2 small green bell pepper, finely diced
- 1/2 small onion, finely diced
- 3/4 cup ketchup
- 1 tbsp brown sugar
- 1 tsp yellow mustard
- 1/2 tsp garlic powder
- Salt and pepper to taste
- Toasted brioche buns
How to make it
- In a large skillet over medium heat, brown the ground beef until no pink remains, breaking it up into small crumbles as it cooks.
- Add the diced bell pepper and onion to the skillet and sauté for 5-7 minutes until the vegetables are soft and translucent.
- Stir in the ketchup, brown sugar, mustard, and garlic powder, mixing well to coat all of the meat and vegetables in the sauce.
- Reduce the heat to low and let the mixture simmer gently for about 10-15 minutes, allowing the sauce to thicken and the flavors to develop.
- Season with salt and pepper to taste, adjusting the sweetness or tanginess by adding a touch more sugar or mustard if desired.
- Spoon the hot mixture onto toasted brioche buns and serve immediately with a side of pickles or crispy potato chips.
Cute Flower Cake Pops For Your Baby In Bloom Party
[IMAGE_10]
Why we love this
Creating something beautiful with your own two hands is such a fulfilling way to celebrate a new chapter or a special occasion with loved ones. These flower cake pops are almost too pretty to eat, featuring delicate petals and soft colors that perfectly capture the “baby in bloom” theme. They are as fun to make as they are to display, and they add such a thoughtful, artisanal touch to any party dessert table or favor bag. Watching your guests’ faces light up when they see these little floral treasures is a joy that makes every minute of decorating totally worth it.
Ingredients
- 1 pre-baked vanilla cake (cooled and crumbled)
- 1/2 cup vanilla frosting
- White and pink candy melts
- Lollipop sticks
- Green fondant for leaves
- Yellow nonpareils for flower centers
How to make it
- In a large bowl, mix the crumbled cake with the vanilla frosting until it reaches a consistency similar to damp sand that holds together when squeezed.
- Roll the mixture into small, even balls (about the size of a ping pong ball) and place them on a parchment-lined tray to chill in the freezer for 15 minutes.
- Melt a small amount of candy melts, dip the end of a lollipop stick into it, and insert it halfway into each chilled cake ball.
- Once the sticks are set, dip the entire cake ball into the melted pink or white candy, tapping off the excess gently to create a smooth finish.
- While the coating is still wet, use a piping bag with a small tip to pipe five small circles around the top to resemble flower petals.
- Place a few yellow nonpareils in the center of the petals and add a tiny fondant leaf to the stick to complete the floral look.
Bringing the Trends Home With Love
I hope these recipes bring as much light and warmth into your kitchens as they have into mine this month, my loves. There is such magic in the simple act of creating something delicious, whether it’s a quick protein snack or a beautifully decorated cake for a celebration. Remember that the best ingredient in any recipe is the love and intention you pour into it while you cook. I can’t wait to see which of these viral favorites you decide to try first! Don’t forget to share your beautiful creations with me, and as always, stay cozy and keep nourishing your beautiful selves.
Frequently Asked Questions
Can I make the chicken crust pizza ahead of time?
Yes! You can bake the chicken crust in advance and store it in the fridge for up to 2 days. When you’re ready to eat, just add your toppings and bake until the cheese is melted and bubbly.
How long does the homemade banana bread syrup last?
The syrup will stay fresh in an airtight glass jar in your refrigerator for about 2 weeks. Make sure to give it a little shake before using as some of the natural spices may settle at the bottom.
Are the flower cake pops difficult for beginners?
They do take a little bit of patience, but they are very beginner-friendly! The secret is making sure your cake balls are properly chilled so they don’t fall off the sticks while you are dipping them in the chocolate.
Can I use a different vegetable in the tator tot casserole?
Absolutely! This recipe is very forgiving. You can swap the peas and carrots for green beans, corn, or even chopped broccoli depending on what your family enjoys most.