
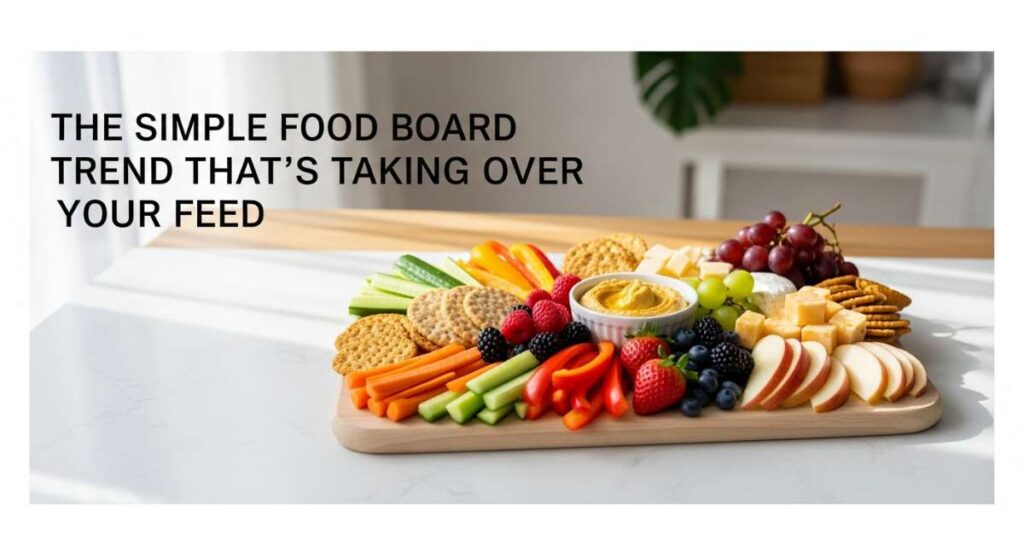
Have you ever scrolled through your feed and felt a sudden, overwhelming sense of peace from a perfectly arranged platter? There is something undeniably magical about the ‘Simple Food Board’ trend currently sweeping our screens. It’s not just about the food; it’s about the intentionality of gathering, the vibrant colors of fresh produce, and the way a single board can tell the story of a season or a celebration. It feels like a warm hug for the eyes, inviting us to slow down and savor the little things.
As someone who spends a lot of time in the kitchen, I’ve realized that the most viral moments aren’t the ones that require three days of prep. They are the moments where we take a few high-quality components and present them with love. Whether you are hosting a graduation brunch or just trying to survive a Tuesday with a toddler, these food board staples bring a touch of whimsy and artisanal flair to your daily routine. Let’s dive into the recipes and crafts that are making our boards—and our hearts—so full lately.
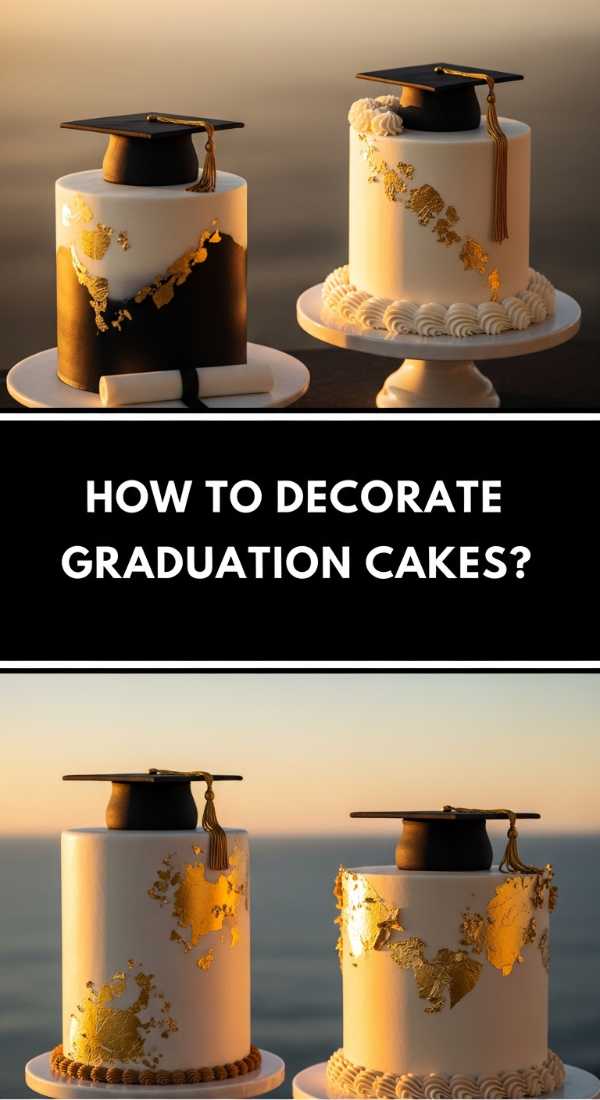
How to Decorate Graduation Cakes?
Why we love this
There is an incredible sense of pride that comes with a graduation cake, and decorating it is like putting the final punctuation mark on a long, hard-earned sentence. We love this because it transforms a simple sponge into a vessel of achievement, utilizing silky smooth buttercream and elegant toppers. The contrast between a pristine white frosting and the bold, celebratory colors of school ribbons creates a visual centerpiece that is as sophisticated as it is sentimental. Every swirl of the piping bag feels like a tribute to late-night study sessions and bright futures ahead.
Ingredients
- Pre-baked 8-inch round layer cake
- 4 cups vanilla swiss meringue buttercream
- Black fondant (for the cap)
- Gold luster dust
- Food-grade gold leaf
- Gel food coloring (school colors)
- Small cardboard square (for cap structure)
How to make it
- Begin by crumb-coating your chilled cake layers with a thin layer of buttercream to lock in moisture and stray crumbs; chill for 30 minutes until firm to the touch.
- Apply a thick secondary layer of frosting using an offset spatula, spinning your turntable slowly while holding the spatula at a 45-degree angle to achieve a professional, razor-sharp edge on the top and sides.
- Roll out your black fondant to a 1/8-inch thickness and cut a perfect square for the top of the mortarboard and a thick strip for the base; let these dry over a form for several hours to ensure they hold their shape without drooping.
- Mix a drop of vodka with gold luster dust to create a paint-like consistency, then carefully brush the edges of the fondant square and the graduation year numbers for a high-end, metallic finish.
- Place the fondant cap in the center of the cake, securing it with a small dollop of frosting, and use a star tip to pipe a decorative border around the base of the cake in the graduate’s primary school color, ensuring even pressure for uniform peaks.
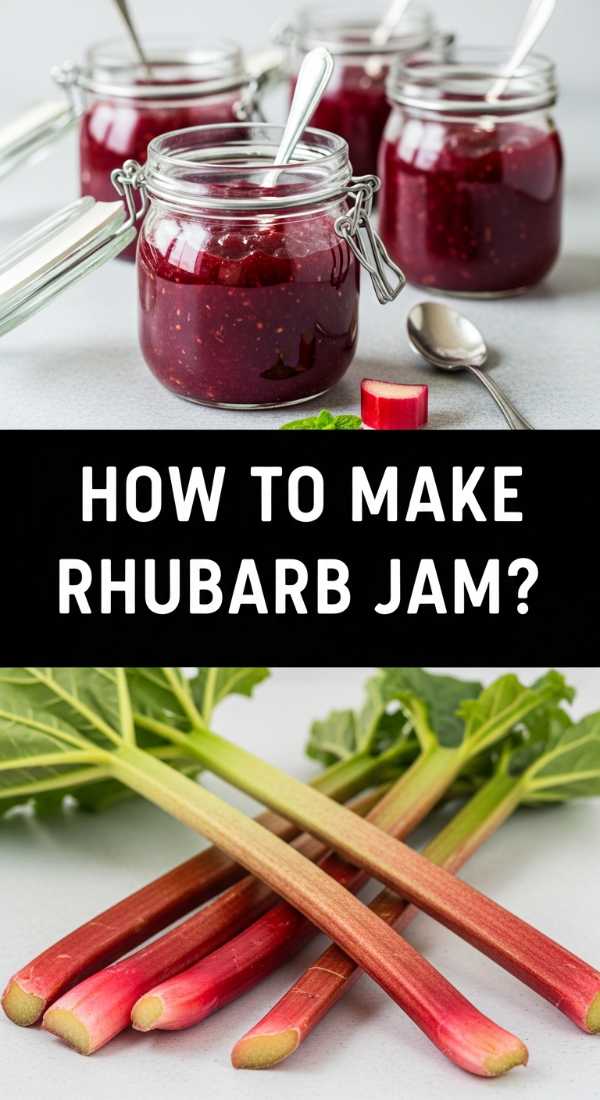
How to Make Rhubarb Jam?
Why we love this
Rhubarb jam is the ultimate herald of spring, offering a tart, zesty wake-up call to your taste buds that store-bought jams simply cannot replicate. We love the way the ruby-red stalks break down into a luscious, thick ribbons of neon pink, releasing a fragrance that is simultaneously earthy and floral. It’s the perfect balance of sugar and acid, providing a sophisticated zing that cuts through the richness of buttered toast or creamy goat cheese on a brunch board. The texture is pleasantly pulpy, reminding you with every bite of the garden-fresh origins of this vibrant preserve.
Ingredients
- 2 lbs fresh rhubarb stalks, chopped into 1/2 inch pieces
- 3 cups granulated sugar
- 1/4 cup fresh lemon juice
- 1 tsp lemon zest
- 1 vanilla bean (split and scraped)
- Pinch of kosher salt
How to make it
- In a large, heavy-bottomed non-reactive pot, combine the chopped rhubarb and sugar, stirring well to ensure every piece is coated; let this sit for about an hour until the rhubarb releases its natural juices and forms a syrupy base.
- Place the pot over medium-high heat and add the lemon juice, zest, vanilla bean seeds, and salt, stirring constantly until the sugar has completely dissolved and the mixture reaches a hard boil.
- Reduce the heat to medium and maintain a steady simmer, skimming off any foam that rises to the top with a metal spoon to ensure the final jam is clear and brightly colored.
- Continue to cook for 15-20 minutes, stirring frequently to prevent scorching on the bottom, until the mixture thickens and reaches 220°F (104°C) on a candy thermometer, or passes the ‘plate test’ where a drop of jam wrinkles when pushed with a finger.
- Carefully ladle the hot jam into sterilized glass jars, leaving a 1/4 inch of headspace, and wipe the rims clean before sealing with lids to create a vacuum seal as they cool to room temperature.
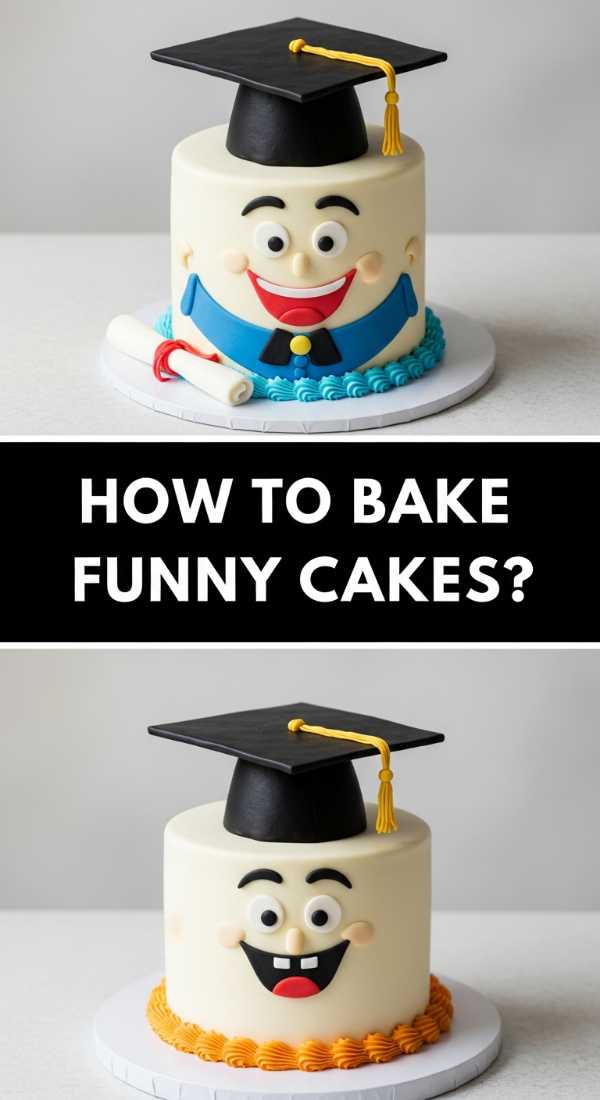
How to Bake Funny Cakes?
Why we love this
Funny cakes are a nostalgic nod to classic Americana baking, known for their unique ‘upside-down’ construction where a gooey chocolate sauce is poured over a golden yellow cake batter. We love the element of surprise when the chocolate sinks to the bottom during the baking process, creating a built-in fudge sauce that contrasts perfectly with the light, airy crumb of the cake. It’s a playful, rustic dessert that doesn’t take itself too seriously, filling the kitchen with the comforting, dual aromas of warm vanilla and rich cocoa. It is the definition of a ‘comfort board’ centerpiece.
Ingredients
- 2 cups all-purpose flour
- 1 1/2 cups sugar
- 1/2 cup whole milk
- 1/2 cup unsalted butter, softened
- 2 large eggs
- 2 tsp baking powder
- 1 cup boiling water
- 1/2 cup cocoa powder
- 1 cup sugar (for the sauce)
How to make it
- Preheat your oven to 350°F (175°C) and generously grease a 9×13 inch baking pan with butter, ensuring the corners are well-coated to prevent the fudge layer from sticking.
- In a large mixing bowl, cream together the softened butter and 1 1/2 cups of sugar until the mixture is pale and fluffy, then beat in the eggs one at a time until fully incorporated and light.
- Whisk together the flour and baking powder in a separate bowl, then gradually add it to the creamed mixture, alternating with the milk, until a thick, smooth batter forms.
- Spread the cake batter evenly into the prepared pan using a spatula to ensure it reaches all the edges.
- In a small bowl, whisk together the remaining sugar, cocoa powder, and boiling water until the cocoa is fully dissolved and the mixture is glossy, then carefully pour this liquid directly over the raw cake batter without stirring.
- Bake for 35-40 minutes; you will know it’s done when the cake has risen through the chocolate and the top is golden brown, while a toothpick inserted into the cake part comes out clean, leaving the molten chocolate layer at the bottom.
How to Bake Rhubarb Pie?
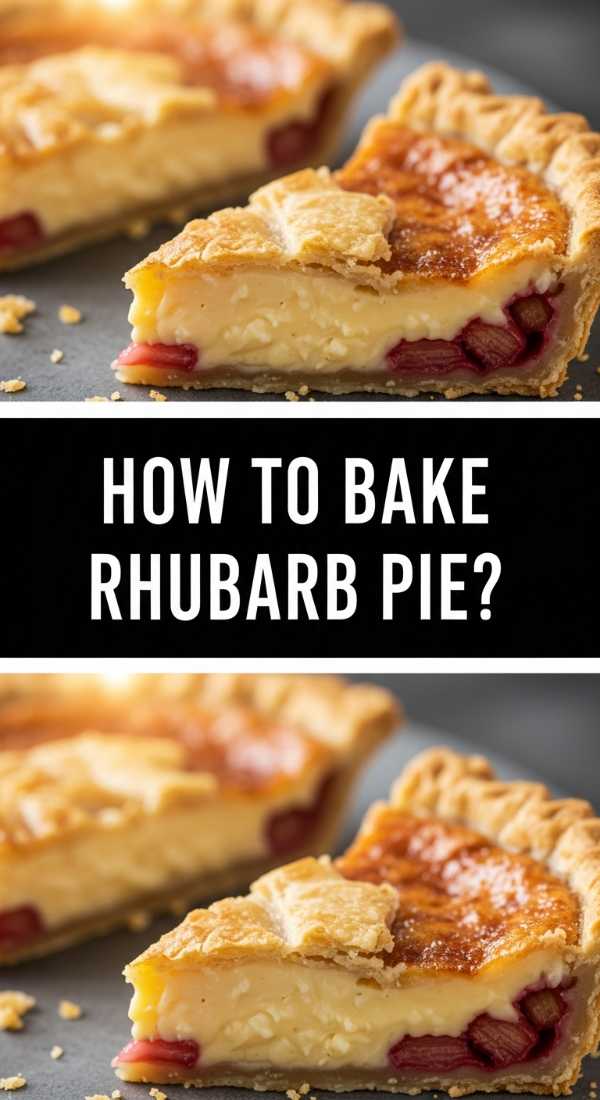
Why we love this
There is nothing quite like the architectural beauty of a lattice-topped rhubarb pie, where the golden-brown crust cracks to reveal a bubbling, jewel-toned filling underneath. We love the dramatic contrast between the flaky, buttery pastry and the sharp, assertive tartness of the rhubarb, which mellows into a silky compote when baked. Each slice offers a multi-sensory experience: the crunch of coarse sugar on top, the tender give of the crust, and the warm, fruity steam that carries hints of cinnamon and citrus. It’s a timeless classic that brings a rustic, farmhouse elegance to any spread.
Ingredients
- Double pie crust (homemade or store-bought)
- 5 cups rhubarb, cut into 1/2 inch pieces
- 1 1/4 cups granulated sugar
- 1/4 cup cornstarch
- 1 tsp cinnamon
- 1 tbsp cold butter, cubed
- 1 egg (for egg wash)
- Coarse sparkling sugar
How to make it
- Roll out the bottom half of your chilled pie dough on a floured surface to about 12 inches in diameter, then gently drape it over a 9-inch pie plate, pressing it into the bottom and sides without stretching the dough.
- In a large bowl, toss the chopped rhubarb with the sugar, cornstarch, and cinnamon until every piece is evenly coated; let it sit for 10 minutes to allow the sugar to start drawing out the juices which will thicken during baking.
- Pour the filling into the prepared crust and dot the top with the small cubes of cold butter to add a rich, silky mouthfeel to the fruit filling.
- Roll out the second piece of dough and cut into 1-inch wide strips, then weave them over the top of the pie in a lattice pattern, trimming the excess and crimping the edges together to seal the juices inside.
- Brush the lattice with a beaten egg and sprinkle generously with coarse sugar for a professional sparkle and crunch.
- Bake at 425°F (220°C) for the first 15 minutes, then reduce the heat to 375°F (190°C) and continue baking for 45-50 minutes until the crust is a deep golden brown and the fruit juices are bubbling vigorously through the lattice gaps.
How to Make Graduation Cupcakes?
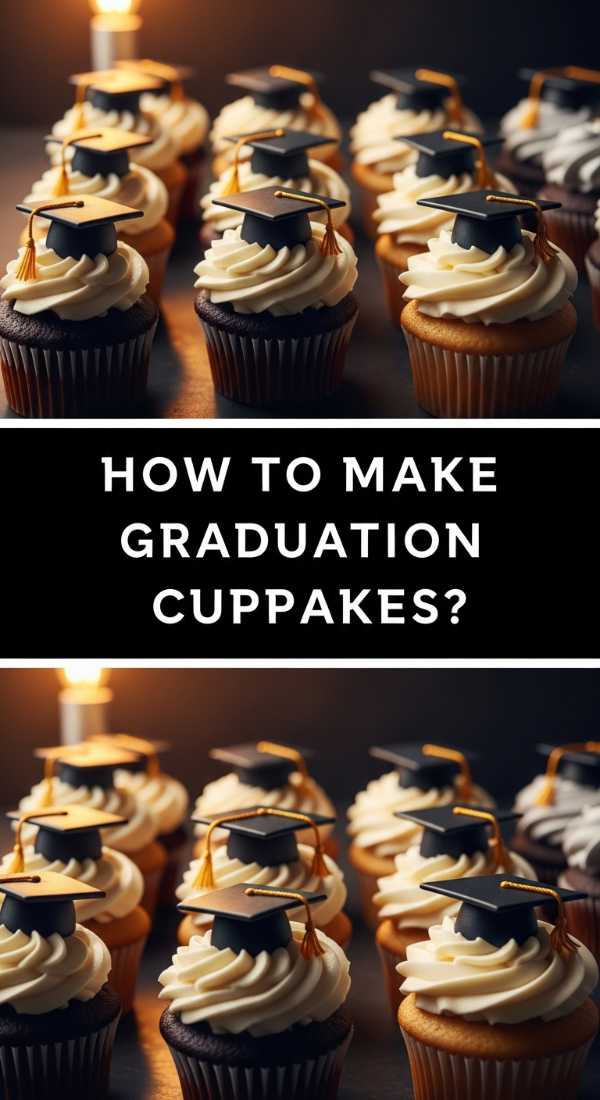
Why we love this
Graduation cupcakes are the perfect bite-sized celebration, offering all the joy of a full cake in a portable, Pinterest-worthy format. We love how they allow for individual creativity—you can have an entire ‘class’ of cupcakes each featuring a different diploma or tassel color. The soft, moist crumb topped with a high swirl of frosting creates a decadent texture that melts in your mouth, while the chocolate-and-candy toppers add a delightful crunch. They are festive, fun, and provide the perfect pop of color for a celebratory food board meant for sharing with friends and family.
Ingredients
- 12 baked vanilla or chocolate cupcakes
- 3 cups stiff vanilla frosting
- 12 square chocolate thin mints or chocolate squares
- 12 mini peanut butter cups (unwrapped)
- Sour rope candy (for tassels)
- M&Ms or small round candies
- Melted chocolate (for assembly)
How to make it
- Prepare your cupcakes and allow them to cool completely to room temperature, as any residual heat will cause your frosting and decorations to slide off.
- Pipe a flat, thick swirl of frosting onto each cupcake using a large round tip, creating a stable base for the graduation ‘hat’.
- To assemble the hats, place a mini peanut butter cup upside down on a piece of parchment paper, apply a small dot of melted chocolate to the bottom, and press a square chocolate thin on top to create the mortarboard.
- Cut a 1-inch piece of sour rope candy and fray one end with a knife to look like a tassel; attach it to the center of the chocolate square with another dot of melted chocolate.
- Place a single M&M on top of the tassel connection point to mimic the button on a real graduation cap.
- Once the chocolate ‘hats’ have set in the fridge for 10 minutes, carefully place one on top of each frosted cupcake, pressing slightly so it stays secure during transport.
How to Make Lemon Pesto?
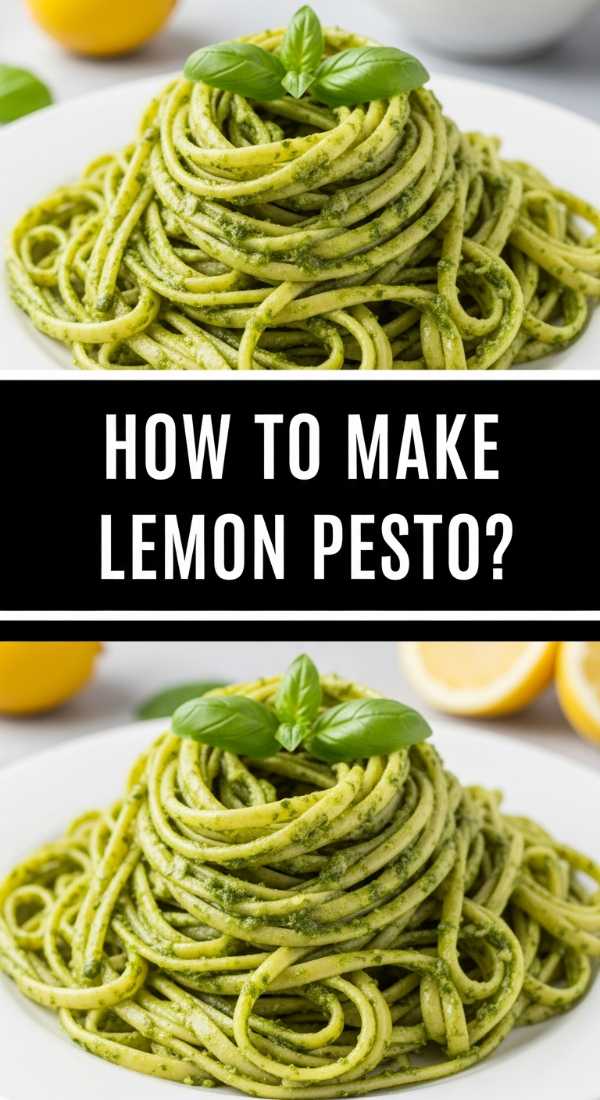
Why we love this
Lemon pesto is a vibrant, sun-drenched twist on the traditional Genovese version, replacing some of the heavy earthiness with a bright, citrusy lift. We love the way the fresh basil leaves bruise into a deep, aromatic green paste, while the lemon zest adds tiny bursts of acidity that wake up the palate. The texture is intentionally rustic—a coarse blend of toasted pine nuts and salty parmesan that provides a satisfying grit when spread over toasted baguette slices. It smells like an Italian summer garden and brings an instant hit of freshness to any savory appetizer board.
Ingredients
- 2 cups fresh basil leaves, packed
- 1/2 cup extra virgin olive oil
- 1/3 cup pine nuts (toasted)
- 2 cloves garlic, peeled
- 1/2 cup grated Parmesan cheese
- Zest of 2 large lemons
- 2 tbsp fresh lemon juice
- 1/2 tsp sea salt
How to make it
- Start by toasting your pine nuts in a dry pan over medium-low heat for 3-5 minutes, tossing frequently until they are fragrant and golden brown; this step is crucial for a deep, nutty flavor profile.
- In a food processor, pulse the garlic cloves and toasted pine nuts until they are broken down into small, uniform pieces.
- Add the fresh basil leaves and lemon zest to the processor, pulsing in short bursts to prevent the heat from the blades from wilting the basil and turning it brown.
- With the processor running on low, slowly drizzle in the extra virgin olive oil in a steady stream to emulsify the sauce into a thick, cohesive paste.
- Transfer the mixture to a bowl and stir in the Parmesan cheese, lemon juice, and salt by hand; this preserves the texture of the cheese and allows you to adjust the seasoning to your preference.
- Serve immediately or store in a jar with a thin layer of olive oil on top to prevent oxidation, ensuring the pesto stays a brilliant, appetizing green.
How to Whip Coffee Drinks?
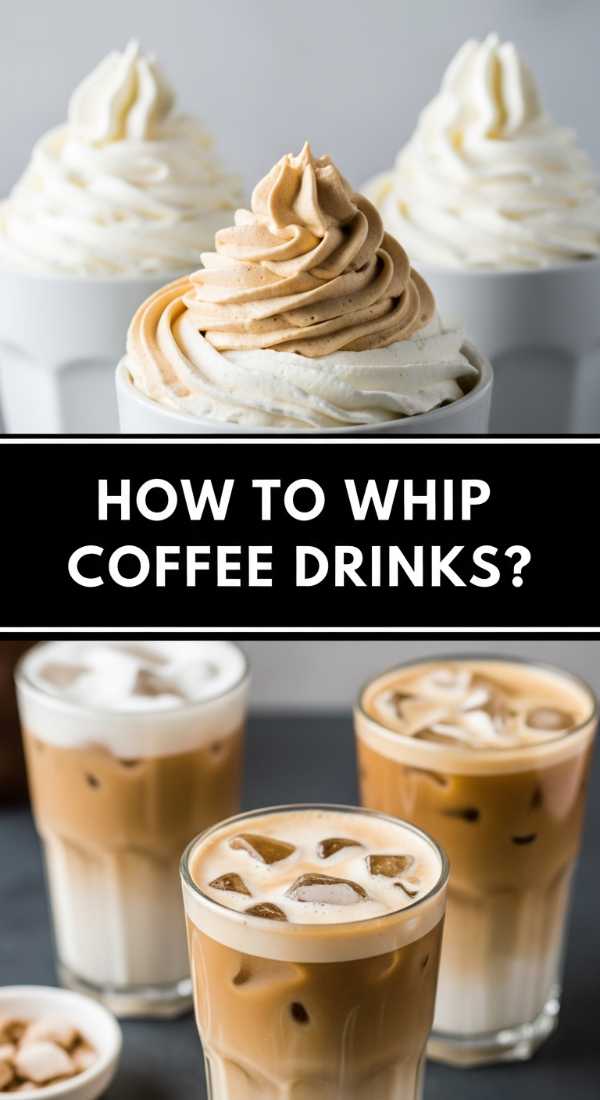
Why we love this
The whipped coffee trend, or Dalgona coffee, is pure sensory theater, turning basic pantry staples into a cloud-like, caffeinated masterpiece. We love the alchemy of it—the way dark, bitter instant coffee transforms into a stiff, caramel-colored foam that sits atop cold milk like a soft pillow. The contrast between the intense, bittersweet foam and the creamy, ice-cold milk below creates a layered drinking experience that feels like a luxury cafe treat made in your own kitchen. It’s thick, velvety, and incredibly satisfying to stir, watching the colors marble together in a beautiful dance.
Ingredients
- 2 tbsp instant coffee granules
- 2 tbsp granulated sugar
- 2 tbsp hot water (near boiling)
- 1 cup milk of choice (dairy or oat works best)
- Ice cubes
- Optional: Cinnamon or cocoa powder for dusting
How to make it
- In a medium-sized mixing bowl, combine the instant coffee, sugar, and hot water; ensure the water is very hot to help the coffee and sugar dissolve rapidly.
- Using a hand mixer or a stand mixer with a whisk attachment, beat the mixture on high speed for approximately 3 to 5 minutes.
- Watch for the visual cues: the mixture will transition from dark brown to a light tan, and it is finished when it holds stiff, glossy peaks similar to a meringue.
- Fill a tall glass with ice cubes and pour in your milk, leaving about two inches of space at the top for the coffee foam.
- Use a spoon to dollop the whipped coffee mixture onto the milk, smoothing it out or creating decorative peaks as you see fit.
- For a final touch, sprinkle a bit of cinnamon or cocoa powder over the top and serve with a straw so you can marble the foam into the milk as you drink.
How to Make Rhubarb Crumble?
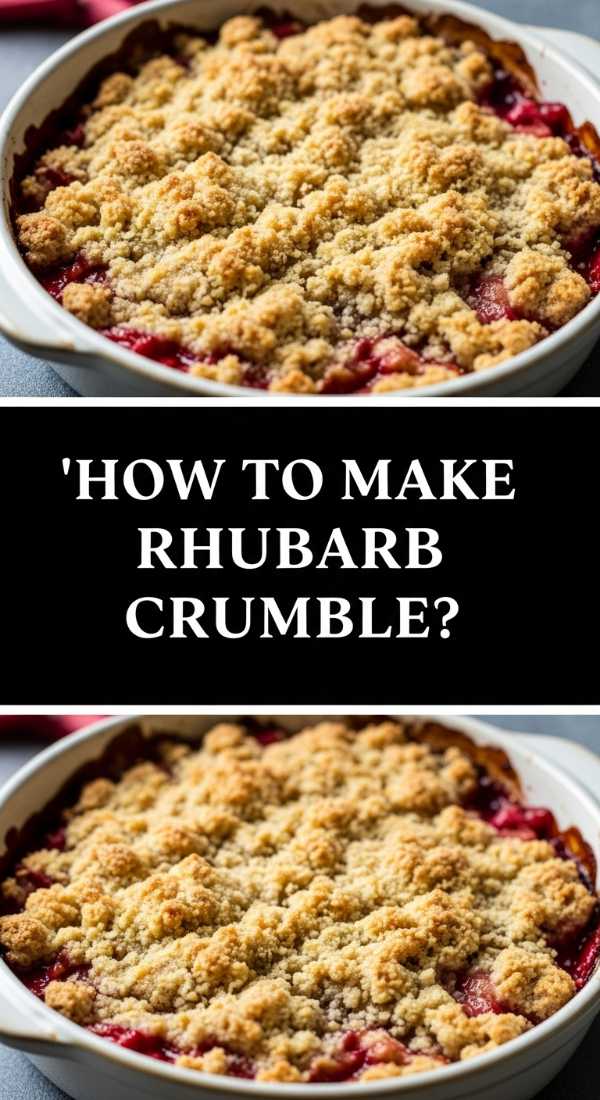
Why we love this
Rhubarb crumble is the ultimate ‘unfussy’ dessert, celebrating the beauty of imperfection with its craggy, golden-brown topping and bubbling fruit lava. We love the textural play between the crunchy, buttery oat clusters and the tender, softened fruit that collapses into a sweet-tart sauce. The aroma of toasted oats and melted butter wafting from the oven is the essence of homey comfort, promising a warm, satisfying treat that is best enjoyed with a melting scoop of vanilla bean ice cream. It is the perfect rustic addition to a dessert board, inviting everyone to dig in with a spoon.
Ingredients
- 6 cups rhubarb, cut into 1-inch chunks
- 3/4 cup granulated sugar
- 1 tbsp cornstarch
- 1 cup old-fashioned rolled oats
- 1 cup all-purpose flour
- 1 cup brown sugar, packed
- 1/2 cup cold unsalted butter, cubed
- 1 tsp ground ginger
How to make it
- Preheat your oven to 375°F (190°C) and place the chopped rhubarb in a 9×9 inch baking dish, tossing it directly in the dish with the granulated sugar and cornstarch until the fruit is well-coated.
- In a separate mixing bowl, combine the oats, flour, brown sugar, and ground ginger, stirring to break up any large clumps of brown sugar.
- Add the cold, cubed butter to the dry ingredients and use a pastry cutter or your fingertips to rub the butter into the mixture until it resembles coarse crumbs with some pea-sized pieces remaining.
- Scatter the crumble mixture evenly over the rhubarb, ensuring you don’t pack it down; leaving it loose allows for better air circulation and a crunchier topping.
- Bake for 35-45 minutes; the crumble is ready when the topping is a deep golden brown and the rhubarb juices are thick and bubbling up around the edges of the dish.
- Allow it to cool for at least 15 minutes before serving to let the fruit juices set slightly, ensuring you get a perfect balance of fruit and topping in every scoop.
How to Prep Toddler Lunches?
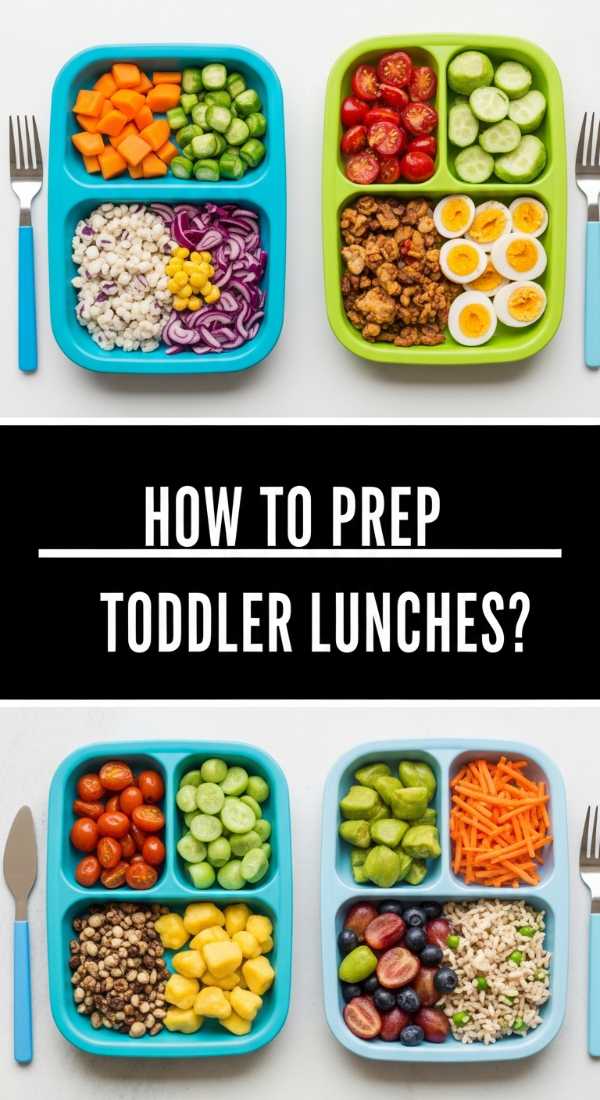
Why we love this
Prepping toddler lunches on a board is a game-changer for picky eaters and busy parents alike, turning a meal into an interactive discovery zone. We love the rainbow of colors and the variety of shapes that make healthy eating feel like play, from star-shaped cucumbers to rolled-up turkey ‘cigars.’ This approach encourages independence, allowing little hands to reach for different textures and flavors at their own pace. It’s a low-stress way to introduce new foods alongside familiar favorites, all while creating a visually stunning lunch that looks just as good as it tastes.
Ingredients
- Whole grain crackers or mini rice cakes
- Sliced deli turkey or ham rolls
- Mild cheddar cheese cubes or shapes
- Cucumber slices (cut into stars)
- Blueberries and sliced strawberries
- Hummus or yogurt dip
- Hard-boiled egg (halved)
How to make it
- Start by washing and thoroughly drying all fruits and vegetables; use small vegetable cutters to create fun shapes like hearts or stars out of cucumbers and peppers to increase visual appeal for a toddler.
- Steam any harder vegetables like carrots or broccoli for 2-3 minutes until ‘fork tender’ but not mushy, ensuring they are soft enough for easy chewing while maintaining their shape.
- Quarter small round items like grapes or cherry tomatoes lengthwise to eliminate choking hazards, a critical safety step for this age group.
- Arrange the components on a small wooden board or a divided plate, keeping different textures separate to cater to typical toddler preferences for non-touching foods.
- Place a small, colorful ramekin of hummus or Greek yogurt in the center to serve as a ‘dip station,’ which makes the eating experience more engaging and tactile.
- Finish the board by adding a small ‘surprise’ like a couple of yogurt-covered raisins or a single graham cracker to keep the meal exciting and rewarding.
How to Icing Graduation Cookies?
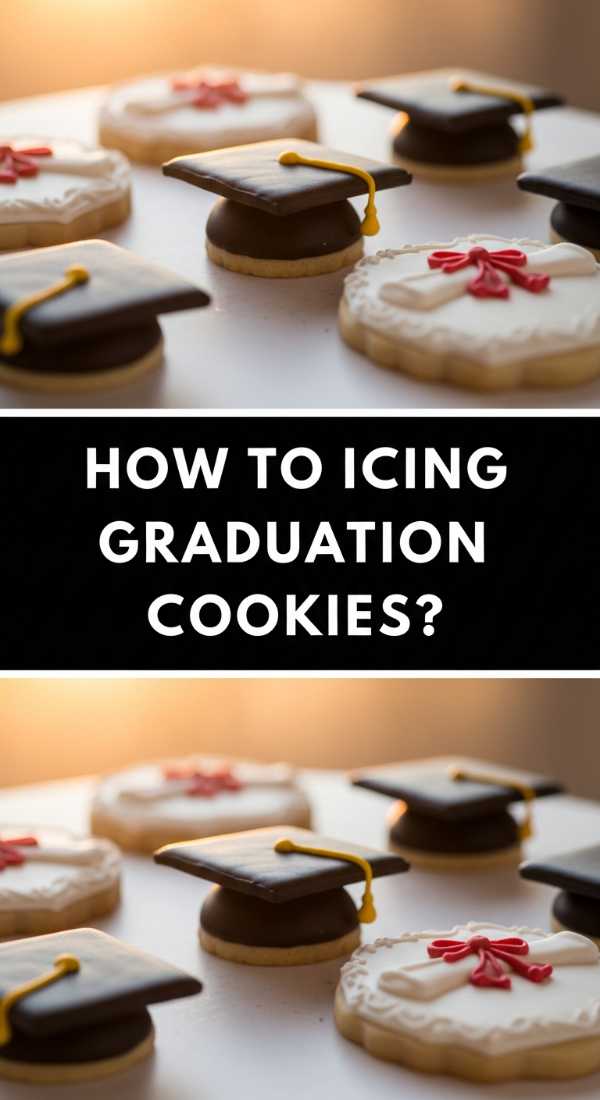
Why we love this
Icing graduation cookies is a meditative craft that results in edible art, perfect for gifting or anchoring a dessert board. We love the smooth, glass-like finish of royal icing and the precision of a well-piped border that defines the iconic shape of a graduation gown or diploma. There is something incredibly satisfying about ‘flooding’ a cookie and watching the icing settle into a flawless, shiny surface. It allows for high levels of customization, from matching school colors to piping individual names, making every cookie a tiny, delicious celebration of a massive milestone.
Ingredients
- Batch of sugar cookies (shaped like caps and diplomas)
- 4 cups powdered sugar
- 3 tbsp meringue powder
- 5-7 tbsp warm water
- Gel food coloring
- Piping bags and small round tips
- Toothpicks (for popping bubbles)
How to make it
- In a large bowl, whisk the powdered sugar and meringue powder together, then gradually add warm water while beating on medium speed for 7-10 minutes until the icing forms stiff, glossy peaks.
- Divide the icing into smaller bowls and add gel food coloring, mixing thoroughly until you achieve the desired school colors.
- Thin out a portion of each color by adding water a few drops at a time until it reaches ’15-second consistency’ (when a line drawn in the icing disappears in 15 seconds); this is your flooding icing.
- Keep a small amount of ‘stiff’ icing in a separate bag with a fine tip to pipe the outlines of the cookies first, creating a dam that prevents the flood icing from running off the edges.
- Fill the center of the outlined cookie with the thinner flood icing, using a toothpick to gently move the icing into corners and pop any tiny air bubbles for a perfectly smooth finish.
- Allow the base layer to dry completely (about 6-8 hours) before using stiff icing to pipe final details like the tassel on the cap or the ribbon on the diploma scroll.
Conclusion
The beauty of the simple food board trend lies in its versatility and the way it celebrates the joy of the ‘everyday.’ Whether you’re carefully weaving a rhubarb pie lattice or arranging a whimsical lunch for a toddler, you are creating more than just a meal—you’re creating a memory. These projects invite us to be present in our kitchens, to play with textures and colors, and to share something beautiful with the people we love. So grab a board, pick a recipe, and start your own viral-worthy spread today!