
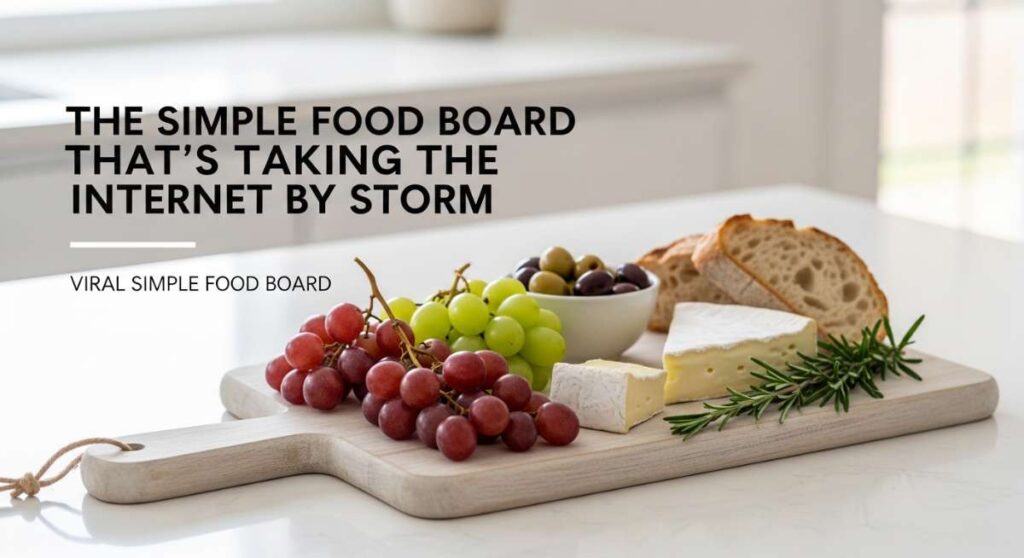
The Simple Food Board That’s Taking the Internet by Storm
There is something inherently magical about gathering around a table where the food isn’t just a meal, but a vibrant tapestry of colors and textures meant for sharing. I remember the first time I laid out a giant wooden board covered in fresh, seasonal ingredients; the room instantly filled with a warm, communal energy as friends reached for skewers and salads. It’s not just about the convenience of having everything in one place—it’s about the celebration of simplicity and the way a well-curated board invites everyone to linger a little longer over their favorite flavors.
Lately, the internet has been obsessed with this ‘Simple Food Board’ concept because it removes the stress of formal plating while elevating every single ingredient. Whether you’re hosting a backyard bash or just want to make a Tuesday night feel like a special occasion, these ten recipes are the building blocks of the ultimate viral board. Each dish brings its own unique flare, from the smoky char of grilled salmon to the refreshing burst of a watermelon salad, creating a balanced feast that looks like a work of art and tastes like home.
Ready to transform your hosting game? Let’s dive into the step-by-step secrets for the ten dishes that make this board a true showstopper. Grab your favorite oversized platter and let’s get cooking!
How to make grilled salmon?

Why we love this
There is nothing quite like the sound of a salmon fillet hitting a hot grill, the sizzle signaling the start of a culinary masterpiece. We adore this dish for its incredible buttery texture that practically melts on your tongue, contrasted beautifully by those signature smoky grill marks and a crisp, caramelized exterior. The aroma of citrus-infused smoke wafting through the air is enough to make anyone’s mouth water, and when paired with a bright herb garnish, it becomes the sophisticated centerpiece that every food board needs for a touch of luxury.
Ingredients
- 2 lbs fresh Atlantic salmon fillets
- 3 tablespoons extra virgin olive oil
- 2 tablespoons fresh lemon juice
- 2 cloves garlic, minced
- 1 teaspoon smoked paprika
- Salt and cracked black pepper to taste
- Fresh dill for garnish
How to make it
- Begin by removing your salmon fillets from the refrigerator about 20 minutes before cooking to bring them to room temperature, which ensures even cooking throughout the flesh.
- Preheat your grill to medium-high heat (about 400°F) and meticulously clean the grates with a wire brush, then oil them heavily using a folded paper towel dipped in oil to prevent the delicate skin from sticking.
- In a small bowl, whisk together the olive oil, lemon juice, minced garlic, smoked paprika, salt, and pepper until well combined, then generously brush this marinade over the flesh side of the salmon.
- Place the salmon skin-side down on the grill; close the lid and let it sear undisturbed for about 6 to 8 minutes depending on the thickness, watching for the fat to begin rendering and the skin to crisp up.
- Using a wide, thin metal spatula, carefully flip the fillets over and cook for an additional 2 to 4 minutes on the flesh side until the internal temperature reaches 135°F for a perfect medium-rare, then let it rest for 5 minutes to allow the juices to redistribute before serving.
How to make shrimp tacos?

Why we love this
Shrimp tacos are the ultimate crowd-pleaser because they pack an explosion of flavor into every single bite, combining zesty heat with cooling toppings. The snap of the perfectly seared shrimp provides a satisfying textural contrast to the soft, warm tortillas and the crunch of a fresh cabbage slaw. There is a playful, vibrant energy to serving these on a board—it’s a hands-on experience that lets your guests customize their spice levels, making the meal feel interactive, fresh, and deeply satisfying for a sunny afternoon gathering.
Ingredients
- 1 lb large shrimp, peeled and deveined
- 1 tablespoon taco seasoning (cumin, chili powder, onion powder)
- 1 tablespoon lime juice
- Small corn tortillas
- 2 cups shredded red cabbage
- 1/2 cup sour cream mixed with lime and cilantro (crema)
- Fresh cilantro and lime wedges for serving
How to make it
- In a medium bowl, toss the cleaned shrimp with your taco seasoning and a drizzle of oil, ensuring each shrimp is thoroughly coated in the spices for maximum flavor impact.
- Heat a large cast-iron skillet over high heat until it’s nearly smoking; add the shrimp in a single layer, making sure not to overcrowd the pan so they sear rather than steam.
- Cook the shrimp for exactly 1.5 to 2 minutes per side until they turn opaque and pink with charred edges, then immediately remove them from the heat and squeeze fresh lime juice over them.
- While the shrimp rest, char your corn tortillas directly over a low gas flame or in a dry pan for 30 seconds per side until they are soft, pliable, and have slight blister marks.
- Assemble the tacos by layering the cabbage slaw, three or four shrimp, and a generous drizzle of the lime crema, finishing with a sprig of cilantro and a final spritz of lime for that essential acidic brightness.
How to grill summer corn?
Why we love this
Nothing says ‘summer’ quite like the sweet, earthy aroma of corn husks charring over an open flame. When you grill corn, the natural sugars inside each kernel caramelize, intensifying the sweetness and adding a complex, smoky depth that boiling simply cannot replicate. We love the way the kernels pop with juiciness against the slightly bitter char of the outside, and when slathered in herb butter, it becomes a decadent, golden treasure that brings a rustic, nostalgic charm to your food board display.
Ingredients
- 6 ears of fresh sweet corn, husks removed
- 4 tablespoons unsalted butter, softened
- 1 teaspoon sea salt
- 1/2 teaspoon chili powder
- 1/4 cup crumbled cotija cheese
- Fresh chopped parsley
How to make it
- Prepare your grill for direct medium-high heat and ensure the grates are clean; meanwhile, lightly brush each ear of corn with a small amount of neutral oil to facilitate even browning.
- Place the corn directly onto the hot grates, positioning them perpendicular to the bars to get those beautiful, distinct grill lines across the kernels.
- Grill the corn for about 10 to 12 minutes, turning every 2 to 3 minutes with tongs, until the kernels are tender and charred in spots all the way around the cob.
- In a small bowl, mash the softened butter with sea salt and chili powder, then use a brush or knife to coat the hot corn immediately after it comes off the grill so the butter melts into the crevices.
- Finish by rolling the buttered corn in crumbled cotija cheese and a sprinkle of parsley for a salty, herbaceous finish that elevates the humble vegetable to a gourmet side dish.
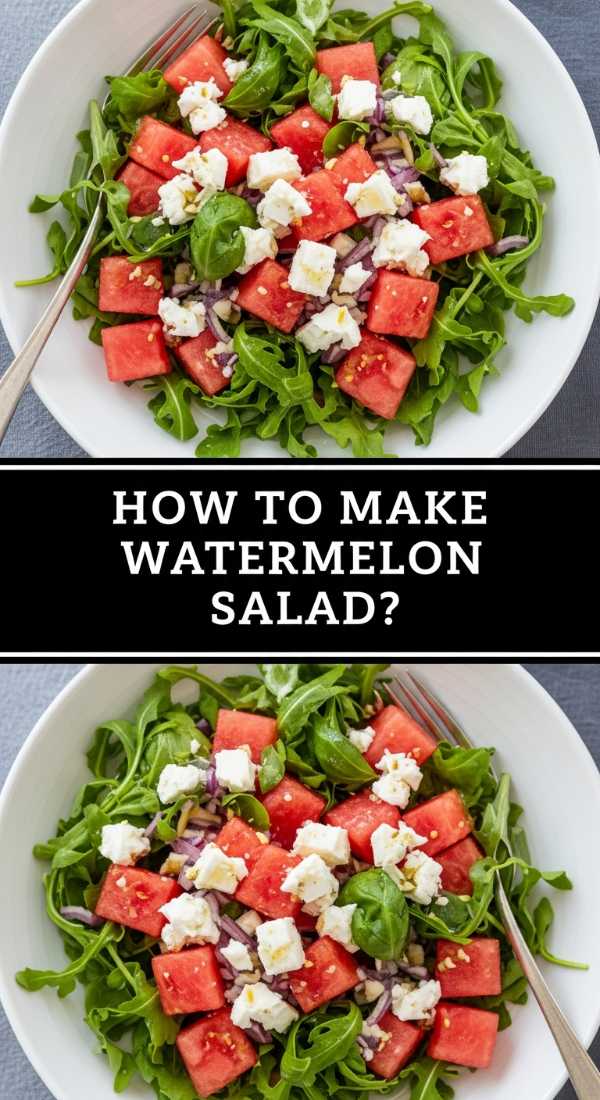
How to make watermelon salad?
Why we love this
This salad is the definition of refreshing, acting as a palate cleanser that surprises the senses with its bold combination of sweet and salty notes. The crisp, cold cubes of watermelon provide a hydrating base that pairs unexpectedly well with the creamy, tangy crumbles of feta cheese and the sharp, aromatic punch of fresh mint. It looks stunning on a board, with its bright pink and green hues, offering a light and breezy contrast to heavier grilled items while providing a burst of sunshine in every forkful.
Ingredients
- 4 cups seedless watermelon, cut into 1-inch cubes
- 1/2 cup crumbled feta cheese
- 1/4 cup fresh mint leaves, torn
- 1/2 small red onion, very thinly sliced
- 2 tablespoons extra virgin olive oil
- 1 tablespoon balsamic glaze
- Flaky sea salt
How to make it
- Start by chilling your watermelon in the refrigerator for at least two hours before preparation; cold fruit is essential for the structure and refreshing quality of this specific salad.
- Carefully cube the watermelon into uniform 1-inch pieces and place them in a large, wide serving bowl or directly onto your food board, spreading them out to create a vibrant base layer.
- Scatter the thinly sliced red onion over the watermelon; if the onion is too sharp, soak the slices in ice water for 10 minutes beforehand to mellow the flavor and increase the crunch.
- Evenly distribute the crumbled feta cheese and torn mint leaves over the top, then drizzle with high-quality extra virgin olive oil to add a silky mouthfeel.
- Just before serving, finish with a decorative drizzle of balsamic glaze and a pinch of flaky sea salt, which draws out the juice of the watermelon and balances the sweetness of the fruit.
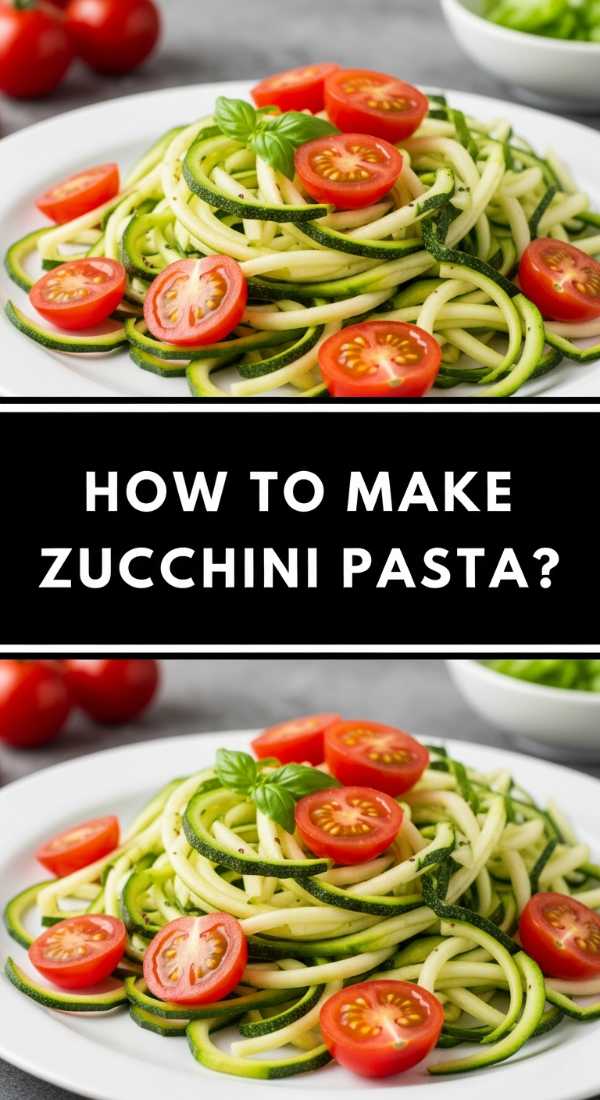
How to make zucchini pasta?
Why we love this
Zucchini pasta, or ‘zoodles,’ is a revelation for those who want the comforting feel of a pasta dish without the heaviness, making it a perfect light addition to a communal board. We love the way the thin ribbons of squash soak up garlic-infused oil and lemon zest, offering a tender yet slightly al dente texture that feels incredibly fresh. It’s a garden-to-table staple that smells of sautéed garlic and herbs, providing a vibrant, emerald-green swirl of nutrition that balances out the richer proteins on your platter.
Ingredients
- 4 medium zucchini
- 3 tablespoons olive oil
- 3 cloves garlic, thinly sliced
- 1/2 teaspoon red pepper flakes
- 1/4 cup grated Parmesan cheese
- Juice and zest of one lemon
- Handful of fresh basil
How to make it
- Use a spiralizer or a julienne peeler to turn the zucchini into long, noodle-like strands, stopping when you reach the seedy core to prevent the ‘pasta’ from becoming too mushy.
- Place the zucchini strands in a colander and sprinkle with a pinch of salt; let them sit for 10 minutes to draw out excess moisture, then gently pat them dry with a clean kitchen towel.
- In a large skillet, heat the olive oil over medium heat and add the garlic slices and red pepper flakes, cooking for about 1-2 minutes until the garlic is golden and fragrant but not burnt.
- Increase the heat to medium-high and add the zucchini noodles to the pan, tossing them quickly with tongs for only 2 to 3 minutes; you want them heated through and slightly softened but still retaining a ‘bite.’
- Remove from heat immediately to stop the cooking process, then toss with lemon juice, zest, Parmesan cheese, and fresh basil before mounding it onto your board for a beautiful, nested presentation.
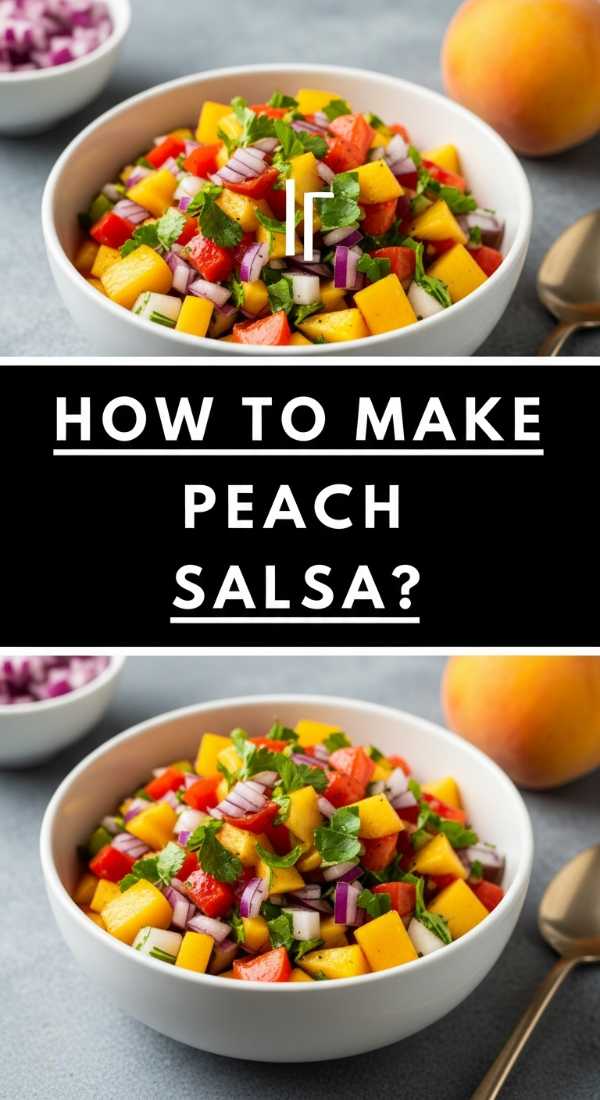
How to make peach salsa?

Why we love this
Peach salsa is like a jar of summer bottled up, offering a luscious, juicy sweetness that dances perfectly with the heat of jalapeños. We love how the velvety texture of a ripe peach contrasts with the sharp bite of red onion and the herbaceous finish of cilantro. It serves as a versatile condiment on the board, adding a pop of bright orange color and a fruity zing that cuts through the fattiness of grilled meats, making every bite feel dynamic and complex.
Ingredients
- 3 ripe peaches, diced
- 1/2 red bell pepper, finely diced
- 1/4 cup red onion, minced
- 1 jalapeño, seeded and minced
- 1/4 cup fresh cilantro, chopped
- 2 tablespoons lime juice
- Pinch of cumin and salt
How to make it
- Select peaches that are fragrant and slightly soft to the touch; peel them if you prefer a smoother texture, or leave the skin on for extra color and nutrients, then dice them into small, even pieces.
- In a non-reactive glass or stainless steel bowl, combine the diced peaches, red bell pepper, minced onion, and jalapeño, tossing gently to avoid bruising the delicate fruit.
- Stir in the chopped cilantro, lime juice, cumin, and salt, ensuring the lime juice coats all the peach pieces to prevent oxidation and keep the colors vibrant.
- Cover the bowl and let the salsa macerate in the refrigerator for at least 30 minutes; this allows the salt to draw out the peach juices, creating a natural dressing that binds all the flavors together.
- Give it one final stir and a taste test before serving, adjusting the lime or salt as needed, then pile it into a small bowl in the center of your board for easy dipping.
How to make chicken skewers?

Why we love this
Chicken skewers are the ultimate finger food for a board because they are as fun to eat as they are delicious to look at, with their perfectly charred edges and tender, juicy centers. The smell of marinating spices caramelizing over the heat is absolutely intoxicating, creating a savory aroma that anchors the entire meal. We love how the individual portions make serving a breeze, allowing guests to grab a skewer and enjoy the smoky, herb-crusted goodness while they mingle and graze.
Ingredients
- 1.5 lbs boneless skinless chicken thighs, cut into 1-inch pieces
- 1/4 cup Greek yogurt
- 2 tablespoons olive oil
- 1 tablespoon dried oregano
- 1 teaspoon garlic powder
- 1/2 teaspoon turmeric
- Wooden or metal skewers
How to make it
- If using wooden skewers, soak them in water for at least 30 minutes prior to grilling to prevent them from catching fire or splintering under the high heat.
- In a large bowl, whisk together the Greek yogurt, olive oil, oregano, garlic powder, turmeric, and salt to create a thick, creamy marinade that will tenderize the meat and create a beautiful golden crust.
- Add the chicken pieces to the marinade and toss until every piece is fully submerged; refrigerate for at least 1 hour, or up to 4 hours for maximum flavor penetration.
- Thread the chicken onto the skewers, leaving a tiny bit of space between each piece to ensure the heat can circulate and cook the meat evenly from all sides.
- Grill over medium-high heat for 10 to 12 minutes, turning occasionally, until the chicken reaches an internal temperature of 165°F and develops dark, crispy charred spots that signify deep flavor.
How to make berry bowls?

Why we love this
Berry bowls bring a touch of natural elegance and antioxidant-rich sweetness to the board, acting as a healthy ‘dessert’ or a tart companion to savory cheeses. There is something so visually appealing about the deep purples of blackberries, the ruby reds of raspberries, and the matte blues of blueberries all huddled together in a bowl. The scent is floral and fresh, and the experience of popping a perfectly ripe, sun-warmed berry into your mouth is a simple joy that reminds us of the beauty of seasonal eating.
Ingredients
- 2 cups fresh strawberries, hulled and halved
- 1 cup fresh blueberries
- 1 cup fresh raspberries
- 1 tablespoon honey or agave
- Fresh mint sprigs
- Optional: dollop of mascarpone or whipped cream
How to make it
- Gently wash your berries in a bowl of cold water with a splash of vinegar to remove any debris, then drain them thoroughly and pat them dry with a paper towel to prevent them from becoming soggy.
- In a clean mixing bowl, combine the prepared strawberries, blueberries, and raspberries, tossing them very lightly with your hands to distribute the colors without crushing the delicate fruit.
- Drizzle the honey or agave over the berries and toss once more; the sweetener will create a glossy sheen that makes the fruit look irresistible on the board.
- Divide the berries into small, attractive ceramic bowls or let them spill out of a single large bowl for a more rustic, ‘plenty’ look on your board.
- Garnish with fresh mint leaves to add a pop of green and a refreshing scent that complements the natural tartness of the berries perfectly.
How to bake lemon chicken?
Why we love this
Baked lemon chicken is a timeless classic that brings a bright, sunny acidity to your food board, offering a lean yet flavorful protein option that everyone enjoys. We love the way the lemon slices caramelize in the oven, their rinds becoming edible and intensely flavored while the chicken skin turns a beautiful, crackly gold. The juices from the pan, infused with garlic and rosemary, create a built-in sauce that keeps the meat incredibly moist and aromatic, making it a comforting and sophisticated addition to your spread.
Ingredients
- 4 chicken breasts or 6 bone-in thighs
- 2 large lemons, one sliced into rounds and one juiced
- 4 cloves garlic, smashed
- 3 sprigs fresh rosemary
- 3 tablespoons melted butter
- Salt and pepper to taste
How to make it
- Preheat your oven to 400°F (200°C) and lightly grease a large baking dish or a rimmed sheet pan with olive oil or cooking spray.
- Pat the chicken dry with paper towels—this is a crucial step for achieving that coveted golden-brown skin—and season generously with salt and pepper on both sides.
- In a small bowl, combine the melted butter, lemon juice, and smashed garlic; pour this mixture over the chicken, ensuring each piece is well-coated.
- Arrange the lemon slices and rosemary sprigs around and on top of the chicken pieces; the heat will release the oils from the rosemary and lemons, infusing the meat as it bakes.
- Bake for 25 to 30 minutes (longer for bone-in thighs) until the chicken is cooked through and the skin is golden and crispy; let the chicken rest for 10 minutes before slicing it into strips to place on your board.
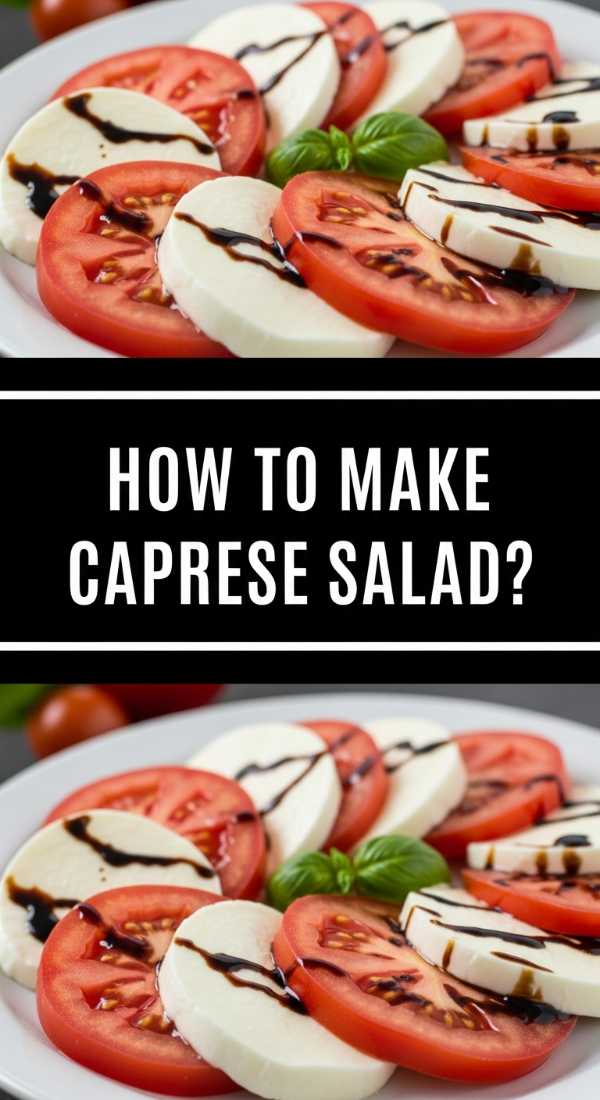
How to make caprese salad?
[IMAGE_10]
Why we love this
The Caprese salad is the ultimate tribute to the colors of the Italian flag and the perfection of fresh ingredients. We adore the combination of the milky, soft buffalo mozzarella against the firm, acidic bite of heirloom tomatoes and the peppery aroma of fresh basil. It’s a dish that relies on quality rather than complexity, and when drizzled with a thick balsamic reduction, it becomes a decadent, savory-sweet treat that looks absolutely stunning as a repeated pattern of red, white, and green on your board.
Ingredients
- 3 large heirloom tomatoes, sliced
- 8 oz fresh mozzarella (preferably Buffalo or Bocconcini)
- 1 bunch fresh large-leaf basil
- Extra virgin olive oil
- Balsamic glaze
- Flaky sea salt and cracked black pepper
How to make it
- Slice your heirloom tomatoes into 1/2-inch thick rounds, choosing a variety of colors like red, yellow, and purple to add visual interest to the board.
- Slice the fresh mozzarella into rounds of similar thickness to the tomatoes, or if using small bocconcini pearls, simply tear them in half for a more rustic look.
- On your board or a dedicated plate, create an overlapping pattern by alternating a slice of tomato, a slice of mozzarella, and a large, fresh basil leaf.
- Continue this pattern in a circular or linear fashion until all ingredients are used, ensuring the basil leaves are peeking out to provide that essential herbal fragrance.
- Just seconds before serving, drizzle the entire arrangement with high-quality olive oil and balsamic glaze, then finish with a generous sprinkle of flaky sea salt and cracked black pepper to make the tomato flavors pop.
Crafting the Ultimate Shared Experience
Creating a food board is more than just a culinary trend; it’s a way to bring people back to the table in a relaxed, joyful environment. By combining these ten diverse and vibrant recipes, you’re offering your guests a journey of flavors—from the smoky depths of the grill to the bright, acidic notes of fresh fruit. Remember that there are no rules when it comes to layout; let the colors guide you and don’t be afraid to let things overlap. The beauty of the board is in its abundance. So, gather your loved ones, pour some drinks, and enjoy the simple pleasure of a meal shared from one beautiful, viral-worthy platter.