
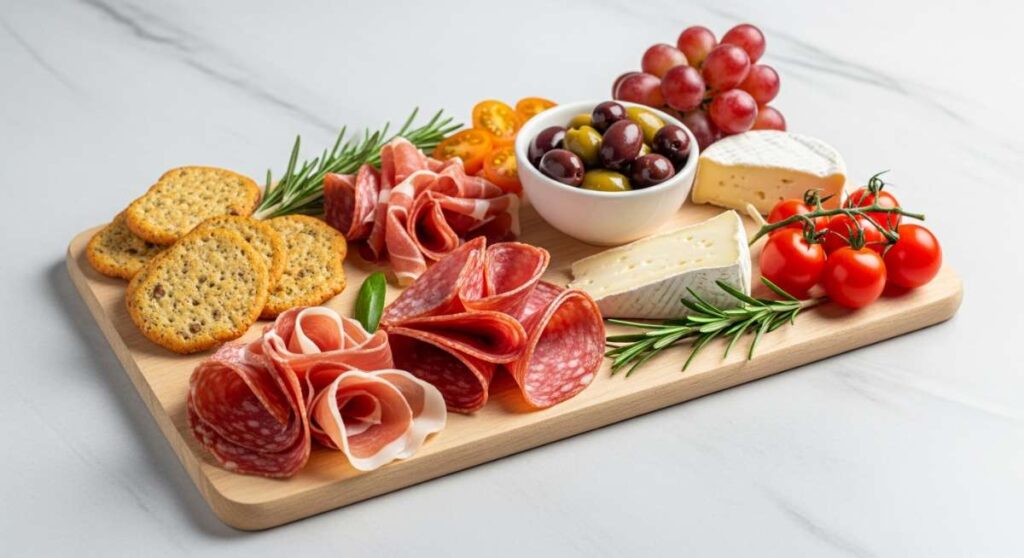
The Secret to the Simple Food Board That Everyone is Sharing
There is something inherently magical about a gathering that doesn’t feel forced. We’ve all been there—staring at a kitchen counter covered in flour, stressed about a multi-course meal while our guests are laughing in the living room without us. The secret to the viral ‘Simple Food Board’ isn’t about being a professional chef; it’s about the art of curation. It’s about taking those beautiful, seasonal elements and laying them out in a way that invites everyone to lean in, grab a plate, and share a story.
Lately, my feed has been flooded with these effortless spreads, and I realized why they resonate so deeply. We are all craving connection over perfection. When you move away from formal plating and toward these interactive, vibrant boards, the energy in the room shifts. It becomes tactile, colorful, and completely customizable. Whether it’s a sunny afternoon on the porch or a cozy rainy morning indoors, these recipes are designed to be the heart of your next great memory.
How to bake spring cookies?

Why we love this
There is nothing quite like the scent of lemon zest and dried lavender wafting through a sun-drenched kitchen. These cookies offer a delicate, buttery crumb that practically melts on the tongue, followed by the bright, floral punch of spring. They aren’t just a dessert; they are a sensory experience that reminds you of the first bloom of the season. The texture is perfectly crisp on the edges with a tender, slightly chewy center that feels like a warm hug in every bite.
Ingredients
- 2 cups all-purpose flour
- 1 cup unsalted butter, softened to room temperature
- 3/4 cup granulated sugar
- 1 large egg yolk
- 2 tablespoons fresh lemon zest
- 1 teaspoon culinary-grade dried lavender, finely crushed
- 1/2 teaspoon salt
- 1 teaspoon vanilla extract
How to make it
- Begin by creaming your softened butter and granulated sugar in a large stand mixer bowl. Use the paddle attachment on medium speed for about 3-4 minutes until the mixture is pale, light, and fluffy, which ensures a delicate cookie structure.
- Add the egg yolk, lemon zest, and vanilla extract. Beat on low until just incorporated. The egg yolk adds a richness to the shortbread-style dough without making it too cakey.
- In a separate bowl, whisk together the flour, salt, and crushed lavender. Gradually add the dry ingredients to the wet mixture, mixing on the lowest speed. Stop as soon as the flour streaks disappear; overmixing will develop gluten and make the cookies tough.
- Turn the dough out onto a piece of parchment paper and roll it into a log about 2 inches in diameter. Wrap tightly and refrigerate for at least 2 hours. This chilling phase is critical for preventing the cookies from spreading too much in the oven.
- Preheat your oven to 350°F (175°C). Line a baking sheet with silicone mats or parchment.
- Slice the chilled log into 1/4-inch thick rounds and space them 2 inches apart. Bake for 10-12 minutes. You are looking for the edges to be just barely golden brown, while the tops remain pale. Let them cool on the pan for 5 minutes before transferring to a wire rack.
How to make summer pasta?

Why we love this
Summer pasta is the definition of ‘less is more.’ This dish relies on the explosive flavor of vine-ripened cherry tomatoes that have been blistered until they release their sweet, jammy juices. When paired with a cool, creamy ball of burrata, the contrast in temperature and texture is nothing short of heavenly. The aroma of toasted garlic and fresh basil creates a Mediterranean atmosphere right at your dinner table, making every forkful feel like a vacation on the Amalfi coast.
Ingredients
- 1 lb penne or rigatoni pasta
- 2 pints cherry tomatoes
- 4 cloves garlic, thinly sliced
- 1/2 cup extra virgin olive oil
- 1/2 teaspoon red pepper flakes
- 1 cup fresh basil leaves, torn
- 2 balls of fresh burrata cheese
- Salt and cracked black pepper to taste
How to make it
- Bring a large pot of heavily salted water to a rolling boil. Add your pasta and cook it for about 1 minute less than the package directions for true ‘al dente’ texture. Reserve 1 cup of pasta water before draining.
- While the pasta cooks, heat the olive oil in a large skillet over medium heat. Add the sliced garlic and red pepper flakes. Sauté for about 2 minutes until the garlic is golden and fragrant, but be careful not to burn it, as bitter garlic will ruin the delicate sauce.
- Increase the heat to medium-high and add the cherry tomatoes. Cook them, tossing occasionally, for 8-10 minutes. Use the back of a wooden spoon to gently pop some of the tomatoes as they soften, creating a rustic, chunky sauce.
- Add the drained pasta directly into the skillet with the tomatoes. Pour in half of the reserved pasta water. Toss vigorously over medium heat for 2 minutes. The starch in the water will emulsify with the oil to create a silky coating for the noodles.
- Turn off the heat and stir in the fresh basil. The residual heat will wilt the leaves just enough to release their oils without turning them brown.
- Plate the pasta in a large shallow bowl and break the burrata balls over the top, allowing the creamy centers to ooze into the warm pasta. Season with a final flourish of black pepper and sea salt.
How to use sourdough discard?

Why we love this
If you’re a sourdough baker, you know the guilt of throwing away discard, but these scallion pancakes turn that waste into the star of the show. The discard provides a complex, tangy depth of flavor that complements the sharp, fresh bite of green onions perfectly. As they fry in the pan, the edges become incredibly lacy and shatteringly crisp, while the interior remains chewy and savory. It’s a rustic, umami-rich snack that feels both indulgent and sustainable.
Ingredients
- 1 cup sourdough discard (unfed)
- 1 bunch scallions, thinly sliced
- 2 tablespoons soy sauce (for dipping)
- 1 tablespoon sesame oil
- 1 teaspoon honey
- Vegetable oil for frying
- A pinch of sea salt
How to make it
- In a medium bowl, stir your sourdough discard to ensure it is smooth. If it has been in the fridge, let it sit for 15 minutes to take the chill off, which helps it spread more easily in the pan.
- Gently fold in about 3/4 of your sliced scallions directly into the discard. The discard itself acts as the batter, so no extra flour or liquid is usually needed unless your starter is exceptionally thick.
- Heat a cast-iron skillet over medium-high heat and add enough vegetable oil to generously coat the bottom. You want the oil to be shimmering and just starting to whisps smoke before you add the batter.
- Pour the discard mixture into the center of the pan and use a spatula to spread it into a thin, even circle. Sprinkle the remaining scallions and a pinch of sea salt over the wet top.
- Fry for about 3-4 minutes on the first side. Look for the edges to turn a deep golden brown and for small bubbles to form on the surface, similar to a pancake.
- Carefully flip the pancake and cook for another 3 minutes, pressing down with the spatula to ensure maximum contact with the hot oil for a crispy finish.
- Whisk together the soy sauce, sesame oil, and honey for a quick dipping sauce. Slice the pancake into wedges and serve immediately while the exterior is still piping hot and crunchy.
How to host spring brunch?

Why we love this
Spring brunch is all about celebrating the light. A beautifully curated board replaces the need for individual plating, allowing guests to graze on soft-boiled eggs, artisanal cheeses, and vibrant spring radishes. The visual appeal of a brunch board—with its pops of green, pink, and gold—creates an instant centerpiece that feels generous and welcoming. It’s the perfect way to spend a slow Sunday, sipping mimosas and enjoying the crunch of fresh sourdough paired with smoky salmon and creamy spreads.
Ingredients
- 6 soft-boiled eggs (6.5 minute eggs)
- 1 bunch breakfast radishes, halved
- 8 oz smoked salmon
- 1 cup herbed whipped cream cheese
- 1 loaf artisan sourdough bread, sliced and toasted
- 1 cup fresh berries
- Small jar of capers and sprigs of fresh dill
How to make it
- Start by preparing your eggs. Place cold eggs into boiling water and simmer for exactly 6 minutes and 30 seconds. Immediately transfer them to an ice bath for 5 minutes. This ensures a jammy, golden yolk and a fully set white. Peel and slice them in half just before serving.
- Toast your sourdough slices in a pan with a little butter or olive oil until they are golden brown and sturdy enough to hold toppings.
- Choose a large wooden board or a flat marble slab as your canvas. Place the larger items first: the bowl of herbed cream cheese in the center and the piles of toasted bread at the corners.
- Arrange the smoked salmon in loose ribbons to create height and texture. Place the halved soft-boiled eggs nearby, seasoning them immediately with flaky salt and pepper.
- Fill in the gaps with the vibrant breakfast radishes and fresh berries. The radishes provide a peppery crunch that cuts through the richness of the salmon and cheese.
- Garnish the entire board with fresh dill sprigs and a scattering of capers over the salmon. Provide small spreading knives and tongs so guests can easily build their own perfect bites.
How to cookout side dishes?
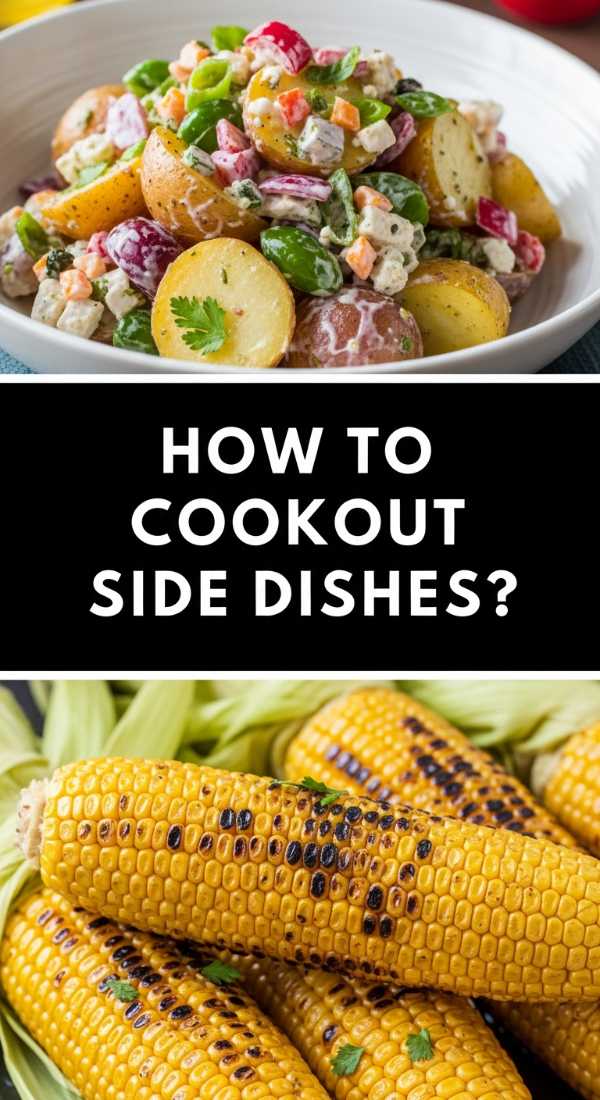
Why we love this
No cookout is complete without a side dish that can hold its own against grilled meats, and this charred corn elote salad is exactly that. It captures the smoky essence of the grill and mixes it with the creamy, tangy, and spicy notes of traditional Mexican street corn. Every bite is an explosion of textures—from the pop of the corn kernels to the crumble of salty cotija cheese. It’s bright, refreshing, and the ultimate crowd-pleaser for any outdoor gathering.
Ingredients
- 6 ears of fresh sweet corn, husks removed
- 1/4 cup mayonnaise
- 1/4 cup sour cream or Mexican crema
- 1/2 cup crumbled cotija cheese
- 1/4 cup chopped fresh cilantro
- 1 teaspoon chili powder
- 2 limes, cut into wedges
- 1 tablespoon butter, melted
How to make it
- Preheat your grill to a high heat (around 400-450°F). Lightly brush the shucked corn with melted butter and a sprinkle of salt.
- Place the corn directly on the grill grates. Grill for about 10-12 minutes, turning every 2-3 minutes. You want the kernels to be tender but with significant charred black spots on all sides for that smoky flavor.
- Once the corn is charred, let it cool slightly until you can handle it. Stand each ear upright in a large bowl and use a sharp knife to slice the kernels off the cob.
- In a small mixing bowl, whisk together the mayonnaise, sour cream, chili powder, and the juice of one lime until smooth and creamy.
- Pour the dressing over the warm corn kernels. Add the crumbled cotija cheese and the chopped cilantro.
- Toss everything together until the corn is evenly coated. Taste and adjust seasoning with more lime or chili powder if desired. Serve warm or at room temperature, garnished with extra cilantro and lime wedges on the side.
How to create summer desserts?

Why we love this
Summer desserts should feel effortless and celebrate the bounty of the season without requiring hours in front of a hot oven. These strawberry and cream parfaits are the epitome of simple elegance. By macerating the strawberries in a little sugar and balsamic, you draw out a deep, ruby-red syrup that contrasts beautifully with the snowy-white, velvety whipped cream. It’s light, airy, and carries the nostalgic sweetness of a summer garden in every spoonful.
Ingredients
- 1 lb fresh strawberries, hulled and sliced
- 2 tablespoons granulated sugar
- 1 teaspoon balsamic glaze
- 2 cups heavy whipping cream (very cold)
- 1/4 cup powdered sugar
- 1 teaspoon vanilla bean paste
- Shortbread crumbs or crushed meringue for crunch
How to make it
- Place the sliced strawberries in a medium bowl. Sprinkle with the granulated sugar and the balsamic glaze. Toss gently and let them sit at room temperature for at least 30 minutes. This maceration process creates a natural sauce that is intensely flavorful.
- In a chilled large bowl, combine the heavy whipping cream, powdered sugar, and vanilla bean paste. Using a hand mixer or stand mixer, whisk on medium-high speed until stiff peaks form. Be careful not to over-beat, or the cream will become grainy and turn toward butter.
- Prepare your serving glasses (clear glass jars or wine glasses work beautifully for showing off the layers).
- Start with a spoonful of the crushed shortbread or meringue at the bottom for a structural base.
- Add a generous layer of the macerated strawberries, making sure to drizzle some of the red juice down the sides of the glass.
- Top with a large dollop of the whipped vanilla cream. Repeat the layers once more, finishing with a final strawberry and a sprig of fresh mint for a professional, restaurant-quality look. Serve immediately or chill for up to two hours.
How to master grilling recipes?

Why we love this
Mastering the grill is about understanding the balance between high-heat searing and the gentle caramelization of sugars. These honey-garlic chicken and peach skewers are a masterclass in that balance. The saltiness of the chicken paired with the dripping sweetness of a charred peach creates a flavor profile that is complex and deeply satisfying. The smell of the fruit sugars caramelizing over open flames is the quintessential scent of summer, promising a meal that is both juicy and charred to perfection.
Ingredients
- 1.5 lbs chicken thighs, cut into 1-inch pieces
- 3 firm but ripe peaches, sliced into wedges
- 1/4 cup honey
- 3 cloves garlic, minced
- 2 tablespoons soy sauce
- 1 tablespoon apple cider vinegar
- Wooden or metal skewers
How to make it
- If using wooden skewers, soak them in water for at least 30 minutes to prevent them from burning on the grill.
- Whisk together the honey, minced garlic, soy sauce, and apple cider vinegar in a small bowl. Reserve about 1/4 of this mixture to use as a fresh glaze later.
- Toss the chicken pieces in the remaining marinade and let them marinate for at least 20 minutes in the refrigerator.
- Thread the skewers, alternating between a piece of chicken and a wedge of peach. Don’t crowd them too tightly; leaving a tiny bit of space ensures even heat distribution and better browning.
- Preheat your grill to medium-high. Clean and oil the grates thoroughly to prevent the delicate peach skin from sticking.
- Place the skewers on the grill and cook for 5-6 minutes per side. Use tongs to turn them carefully. The chicken should reach an internal temperature of 165°F (74°C).
- During the last 2 minutes of cooking, brush the reserved glaze over the skewers. This allows the honey to bubble and tack up without burning. Remove from the grill and let rest for 3 minutes before serving to allow the juices to redistribute.
How to mix hummingbird nectar?

Why we love this
There is a quiet, meditative joy in tending to the creatures that visit our gardens. Mixing your own hummingbird nectar is a simple act that yields incredible rewards—the shimmering flash of wings and the tiny chirps of these remarkable birds. By making it yourself, you ensure that the nectar is free from harmful dyes and preservatives, providing a pure, high-energy fuel that mimics the natural sweetness of flower nectar. It’s a beautiful way to connect with the rhythm of nature right outside your window.
Ingredients
- 1 cup granulated white sugar (do not use honey or brown sugar)
- 4 cups filtered water
- Extra water for boiling
How to make it
- Combine the 1 cup of white sugar and 4 cups of filtered water in a medium saucepan. It is vital to use refined white sugar, as other types contain iron or minerals that can be toxic to hummingbirds.
- Place the pan over medium-high heat and stir constantly until the sugar is completely dissolved.
- Bring the mixture to a low boil for 2 minutes. Boiling the water helps to neutralize any impurities and slows down the growth of bacteria or mold once the nectar is in the feeder.
- Remove the pan from the heat and let the solution cool to room temperature. Never put hot nectar into a plastic feeder, as it can warp the plastic and release chemicals.
- Once cooled, fill your hummingbird feeders. Store any leftover nectar in a clean, airtight glass jar in the refrigerator for up to two weeks.
- Remember to clean your feeders every 3-5 days (more often in hot weather) with hot water and a brush to keep your tiny visitors healthy.
How to decorate spring cakes?

Why we love this
Spring cakes should look like they were plucked straight from a meadow. Using pressed edible flowers is a sophisticated yet surprisingly easy way to achieve a high-end, artisanal look. The delicate petals of pansies, violas, and borage pressed into a smooth buttercream create a tapestry of color that feels romantic and ethereal. When you slice into a cake decorated this way, the aroma of vanilla and the visual of the blooms create a moment of pure delight that guests will be talking about long after the last crumb is gone.
Ingredients
- A double-layer 8-inch sponge cake
- 3 cups vanilla swiss meringue buttercream
- 1 box of food-grade edible flowers (pansies, violas, cornflowers)
- Offset spatula
- Tweezers (for precise flower placement)
How to make it
- Start with a completely cooled cake. If the cake is even slightly warm, your buttercream will melt and the flowers won’t adhere properly.
- Apply a thin ‘crumb coat’ of buttercream to the cake and refrigerate for 20 minutes. This seals in the crumbs and provides a stable base.
- Apply the final thick layer of buttercream. Use your offset spatula to smooth the sides and top. For a rustic spring look, you don’t need it to be mathematically perfect; a few soft swoops can look very intentional and charming.
- Prepare your flowers by gently removing any long stems. If the flowers are very thick, you can lightly press them between parchment paper for an hour beforehand to flatten them.
- Using tweezers, gently press the largest flowers onto the side of the cake first. Think about ‘growing’ the design from the bottom up, like a garden.
- Fill in the spaces with smaller petals and blooms. Don’t be afraid to let some flowers overlap or ‘trail’ off the top edge of the cake.
- Once finished, chill the cake for 30 minutes to set the buttercream and lock the flowers in place. Serve at room temperature for the best texture and flavor.
How to prepare family dinner?

Why we love this
The best family dinners are the ones where the cleanup is as easy as the preparation. Sheet pan salmon and asparagus is a weeknight hero that feels like a weekend luxury. The salmon becomes flaky and succulent under a crust of lemon and herbs, while the asparagus roasts to a perfect crisp-tender finish in the fish’s natural juices. The bright, zesty aroma of roasted lemon slices fills the house, signaling that a healthy, vibrant, and delicious meal is just minutes away from being shared around the table.
Ingredients
- 4 salmon fillets (6 oz each)
- 1 lb thin asparagus, woody ends trimmed
- 2 tablespoons olive oil
- 1 lemon, thinly sliced
- 2 tablespoons fresh parsley, chopped
- 1 teaspoon garlic powder
- Salt and pepper to taste
How to make it
- Preheat your oven to 400°F (200°C) and line a large rimmed sheet pan with parchment paper for effortless cleanup.
- Place the salmon fillets in the center of the pan and arrange the asparagus spears in a single layer around the fish.
- Drizzle the olive oil over both the salmon and the asparagus. Use your hands or a brush to ensure everything is evenly coated.
- In a small bowl, mix the garlic powder, salt, and pepper. Sprinkle this generously over the entire tray.
- Top each salmon fillet with 2-3 thin slices of lemon. These will release their juice directly into the fish as it bakes, keeping it moist and adding a concentrated citrus punch.
- Roast in the center of the oven for 12-15 minutes. The internal temperature of the salmon should reach 145°F, and the asparagus should be slightly charred at the tips.
- Remove from the oven and immediately sprinkle with fresh parsley. Serve directly from the pan for a rustic family-style feel, or plate individually with a side of quinoa or roasted potatoes.
Conclusion
Creating a lifestyle that feels both beautiful and manageable is all about choosing recipes and traditions that foster connection. The ‘Simple Food Board’ isn’t just a trend; it’s a reminder that we can host, create, and nourish our families without losing our peace of mind. Whether you’re baking lavender cookies or grilling peaches, remember that the most important ingredient is the joy you find in the process. Happy hosting!