
The Secret to a Viral-Worthy Garden: Easy Tips for Beginners
There is something undeniably magical about stepping into a garden that feels like a living, breathing extension of your home. I remember the first time I managed to grow a single, vibrant peony; the way the heavy, fragrance-laden bloom bowed its head in the morning dew felt like a tiny triumph. It wasn’t just about the flower; it was about the peace that settled over me while I sipped my coffee, watching the sunlight filter through the leaves. We all crave that sanctuary—a place where the chaos of the digital world fades into the rustle of the wind.
Creating a viral-worthy outdoor space doesn’t require a master’s degree in horticulture or a bottomless bank account. It’s about the small, intentional touches that transform a patch of dirt into a Pinterest-perfect retreat. Whether you are working with a sprawling backyard or a tiny balcony, the secret lies in layering textures, embracing color, and adding those handcrafted details that tell your unique story. Today, I’m sharing my favorite secrets from our Viral Simple Home & Garden board to help you cultivate a space that stops the scroll and starts the soul-soothing.
How to Design a Lush Flower Bed for Instant Curb Appeal

Why we love this
A well-designed flower bed is like a warm hug for your home’s exterior. Imagine walking up to your front door greeted by the intoxicating scent of jasmine and the soft, velvety texture of lamb’s ear brushing against your shins. The visual depth created by varying heights—from towering foxgloves to low-creeping thyme—creates a rich tapestry that feels both curated and wild. It’s the ultimate way to invite pollinators and neighbors alike to pause and admire the vibrant, living art you’ve cultivated with your own two hands.
Essential Elements:
- A mix of perennials and annuals for year-round color.
- Soil conditioner and organic compost.
- Varying heights: Thrillers (tall), Fillers (medium), and Spillers (ground cover).
- Mulch (shredded bark or cedar) to retain moisture.
- Garden edging (stone, metal, or wood).
How to make it
- Begin by outlining your bed’s shape using a garden hose or spray paint to visualize the curves; organic, flowing lines generally look more professional than stiff rectangles.
- Excavate the area by removing grass and weeds, digging down at least 6-8 inches to ensure you have a clean slate for your roots to expand.
- Amend your soil by tilling in 3-4 inches of high-quality compost or aged manure to provide a nutrient-rich foundation that encourages explosive growth.
- Arrange your plants while they are still in their nursery pots, placing the tallest varieties in the back (or center if it’s a 360-degree bed) and layering down to the shortest at the edge.
- Dig holes twice as wide as the root ball, gently tease the roots if they are pot-bound, and plant at the same depth as the nursery container, firming the soil around the base to eliminate air pockets.
- Apply a 2-inch layer of mulch across the entire surface, being careful not to pile it directly against the plant stems, which can cause rot.
- Water deeply and immediately with a soft shower setting to settle the soil and give your new additions a refreshing start.
How to Build a Simple Outdoor Shower for Refreshing Summer Days

Why we love this
There is no sensation quite as liberating as rinsing off under the open sky, feeling the cool mist of water against sun-warmed skin while the aroma of damp cedar and garden mint fills the air. It turns a mundane task into a spa-like ritual, connecting you intimately with the elements. Whether you’re washing away the salt of the beach or the soil of a long day in the garden, an outdoor shower offers a sensory escape that makes every summer day feel like a luxury vacation in your own backyard.
Essential Elements:
- Weather-resistant wood (Cedar or Ipe) for the enclosure.
- Outdoor shower kit (showerhead and valve).
- Garden hose adapter or PEX piping for water supply.
- Gravel or drainage stones for the base.
- Privacy screening or lattice panels.
How to make it
- Select a location that offers both privacy and easy access to a water source, ensuring the ground is level or slightly sloped away from your home’s foundation.
- Dig a shallow pit about 4 inches deep for your drainage area and fill it with decorative river rocks or pea gravel to allow water to permeate the ground without creating a muddy mess.
- Construct a simple three-sided wooden frame using 4×4 pressure-treated posts as the corners, sinking them into the ground or using post anchors for stability.
- Attach horizontal cedar slats to the posts, leaving small 1/2-inch gaps between them to allow for airflow and a peek of the surrounding greenery while maintaining total privacy.
- Mount your shower plumbing to a central vertical support beam, ensuring the height is comfortable for the tallest member of your household.
- Connect your water source—either by plumbing in a dedicated line or using a high-quality braided garden hose attached to an outdoor spigot with a quick-connect valve.
- Install a few weather-resistant hooks for towels and a small wooden bench or shelf to keep your organic soaps and loofahs within easy reach.
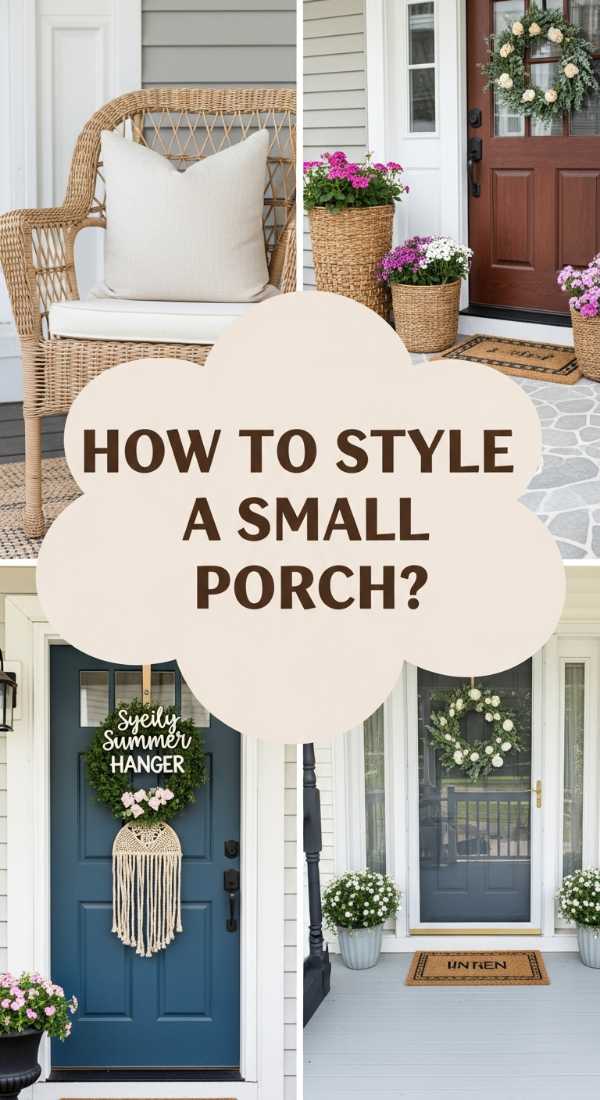
How to Style a Small Porch for a Charming Welcome
Why we love this
A small porch shouldn’t be an afterthought; it is the prologue to the story of your home. When styled correctly, it becomes a cozy nook where the texture of a chunky knit throw meets the smooth finish of a wicker chair, all illuminated by the flickering glow of a lantern. The air feels still and welcoming here, scented perhaps by a pot of lavender or the crisp smell of a new seasonal wreath. It’s a tiny footprint that packs a massive emotional punch, offering a moment of transition from the busy world to your private sanctuary.
Essential Elements:
- All-weather seating (bistro set or a single accent chair).
- Layered doormats (a patterned rug under a natural coir mat).
- Vertical greenery or hanging planters.
- Ambient lighting (lanterns, string lights, or a stylish sconce).
- Decorative accents like pillows and seasonal signage.
How to make it
- Clear the space entirely and give the floor and walls a deep scrub to create a bright, fresh canvas for your decor.
- Layer your floor textiles by placing a larger, colorful outdoor rug down first, then centering a classic coir doormat on top for that trendy, dimensional look.
- Choose furniture that fits the scale; for very tight spaces, opt for a folding bistro table or a slim wooden bench that doesn’t obstruct the walkway.
- Utilize vertical space by installing hooks for hanging baskets or a tiered plant stand to bring life and color to eye level without cluttering the floor.
- Add a “hero” piece of decor, such as an oversized lantern with a flameless timer candle that will automatically cast a warm glow every evening at sunset.
- Soften the hard surfaces with high-quality outdoor pillows in contrasting textures like linen or heavy weave to create an inviting, lived-in feel.
- Finish the look with a seasonal wreath on the door that ties your color palette together, ensuring the first thing guests see is a cohesive and thoughtful design.
How to Create Handcrafted Garden Labels for an Organized Backyard

Why we love this
Organization has never looked so whimsical. These handcrafted labels bring a touch of artisanal charm to your vegetable patches and herb pots, replacing plastic nursery tags with something tactile and beautiful. There is a quiet joy in seeing the elegant script of “Rosemary” or “Thyme” written on a smooth, river-washed stone or a piece of reclaimed wood. It grounds the garden in a sense of history and care, making the act of harvesting your evening herbs feel like a curated experience rather than a chore.
Essential Elements:
- Smooth river stones or wooden stakes.
- Acrylic paint pens (fine tip for lettering).
- Outdoor-grade clear sealant (UV resistant).
- Sandpaper (if using wood).
- Rubbing alcohol (to clean stones).
How to make it
- Gather your base materials; if using stones, look for flat, smooth surfaces; if using wood, cut lath or scrap cedar into 6-inch strips and sand the edges smooth.
- Clean your stones thoroughly with rubbing alcohol to remove any oils or dirt that might prevent the paint from adhering properly.
- Practice your lettering on paper first to determine the layout; a mix of botanical sketches and clean typography usually yields the most “viral” look.
- Use a high-quality acrylic paint pen to write the names of your plants, applying steady pressure to ensure a crisp, opaque line.
- Allow the paint to dry completely for at least two hours in a dust-free environment to avoid any smudging or imperfections.
- Apply two thin coats of clear, matte, or gloss UV-resistant sealant over the entire surface to protect your handiwork from rain, sun, and dirt.
- Place your labels at the base of your plants, ensuring they are slightly tilted toward the light so they are easy to read during your morning garden walks.
How to Transform a Mobile Home for Modern Living
![]()
Why we love this
There is a profound beauty in the metamorphosis of a mobile home into a modern masterpiece. It’s about stripping away the dated and embracing the airy, light-filled potential of a compact space. We love the way crisp white walls catch the afternoon sun, making the interior feel expansive and fresh. It’s a testament to the idea that “home” is defined by creativity and comfort rather than square footage. The result is a sleek, intentional dwelling that feels high-end yet remarkably cozy and grounded.
Essential Elements:
- Light-colored paint for walls and ceilings (off-white or light grey).
- Luxury vinyl plank (LVP) flooring.
- Updated hardware (matte black or brushed gold).
- Large mirrors to reflect light and create depth.
- Modern light fixtures and recessed lighting.
How to make it
- Start by removing any outdated wall paneling strips or trim, and use a high-quality primer specifically designed for slick surfaces to ensure your new paint bonds perfectly.
- Paint the entire interior in a bright, reflective shade to instantly double the perceived size of the rooms and create a clean, modern backdrop.
- Install luxury vinyl plank flooring throughout the entire unit; a continuous floor without transitions between rooms makes the layout feel significantly more spacious.
- Replace standard, builder-grade faucets and cabinet pulls with contemporary matte black or brass options to add an immediate sense of luxury.
- Update the window treatments by removing heavy drapes and installing simple, clean-lined roman shades or sheer panels that allow maximum natural light to flood in.
- Swap out old, clunky light fixtures for modern pendants or low-profile LED discs that provide better illumination without drawing the ceiling down.
- Incorporate multi-functional furniture, like a built-in banquette with hidden storage, to maximize every square inch while keeping the aesthetic clutter-free and polished.
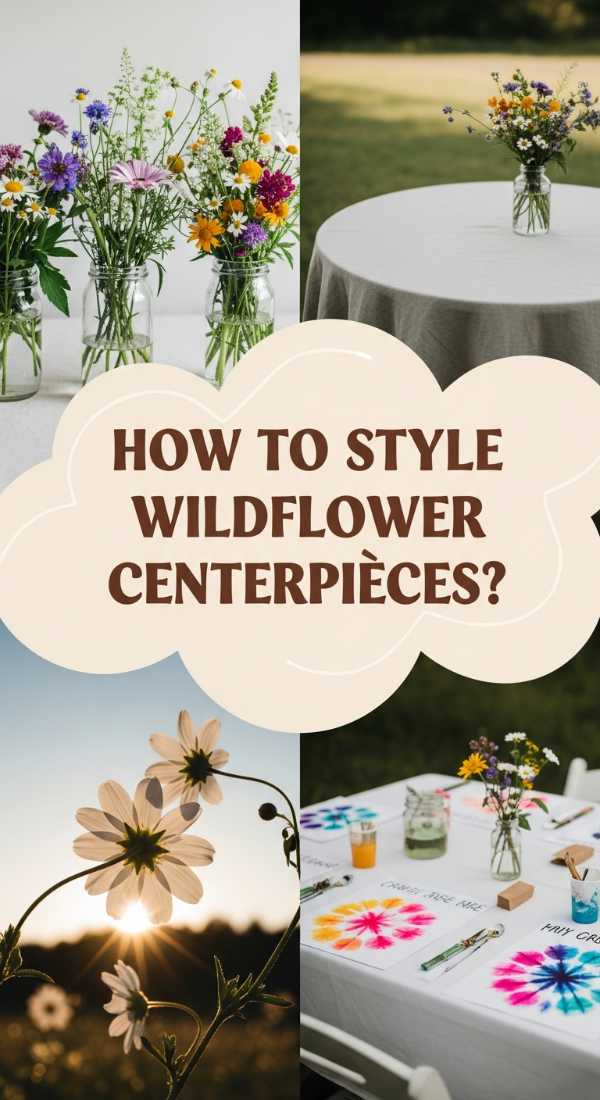
How to Style Wildflower Centerpieces for a Whimsical Garden Party
Why we love this
There is an effortless, romantic grace to a centerpiece that looks like it was gathered during a sunrise stroll through a meadow. The wild, unruly stems of Queen Anne’s Lace mingled with the bold pops of poppies and cornflowers create a sensory delight that smells like sweet nectar and green grass. These arrangements don’t demand perfection; they celebrate the charming asymmetry of nature. They bring a soft, poetic energy to any table, inviting guests to lean in, relax, and enjoy the fleeting beauty of the season.
Essential Elements:
- An assortment of local wildflowers and foraged greenery.
- Vintage glass jars or stoneware pitchers.
- Floral shears or sharp scissors.
- Floral tape or a frog (to hold stems).
- Fresh, cool water.
How to make it
- Harvest your flowers in the early morning when they are most hydrated, and immediately place the stems into a bucket of cool water to prevent wilting.
- Strip all the leaves from the bottom half of the stems so that no greenery sits below the water line, which prevents bacterial growth and keeps the arrangement fresh.
- Prepare your vessel by creating a grid of clear floral tape across the top or placing a metal floral frog at the bottom to provide structure for your stems.
- Start by placing your larger, sturdier “focal” flowers at varying heights to establish the overall shape and volume of the centerpiece.
- Add “filler” flowers and airy greens, like ferns or grasses, to fill in the gaps and create that signature “just-picked” look.
- Incorporate a few long, wandering stems that reach out or drape over the side of the vase to break the symmetry and add a touch of whimsy.
- Place the finished arrangements on a linen runner, scattered with a few loose petals or small tea lights for a magical, ethereal party vibe.
How to Craft Mud Kitchen Rock Food for Endless Creative Play

Why we love this
There is nothing quite like the sound of children’s laughter echoing through the garden as they “cook” up a storm in their mud kitchen. Crafting rock food is a tactile delight—the heavy, cool weight of the stones in small hands, the bright, cheerful colors of painted strawberries and eggs, and the gritty, earthy fun of mixing them with real soil and water. It’s a project that bridges the gap between art and nature, sparking deep imaginative play that smells like rain-washed earth and pure childhood joy.
Essential Elements:
- Smooth, round or oval river rocks in various sizes.
- Non-toxic outdoor acrylic paints.
- Assorted paintbrushes (including fine tips for details).
- A bowl of water and old towels for cleaning.
- Clear outdoor sealant (non-toxic).
How to make it
- Take a “rock hunting” expedition in the garden or at a local creek to find stones that naturally resemble food shapes, such as triangles for pizza or ovals for potatoes.
- Wash the stones thoroughly with soapy water and let them dry completely in the sun to ensure the paint adheres smoothly to the surface.
- Apply a white base coat to the rocks if they are dark; this acts as a primer and makes your food colors look vibrant and “delicious.”
- Paint your “food” designs—think bright red for tomatoes, green with stripes for watermelons, and brown with speckles for baked potatoes.
- Add fine details like seeds, eyes on a “rock fish,” or grill marks using a fine-tipped brush or a permanent marker once the base color is dry.
- Once the paint is fully cured, apply two coats of a durable, non-toxic outdoor sealant to protect the rocks from the inevitable mud and water of play.
- Present the “food” in a set of old pots and pans in the garden, and watch as the rocks are transformed into a five-star mud-pie feast.
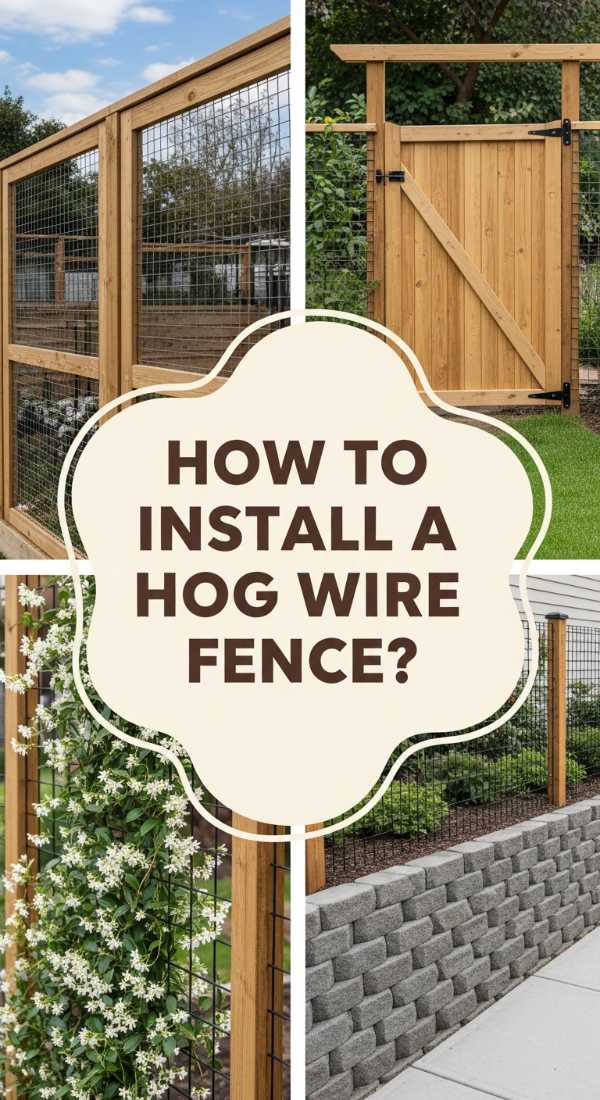
How to Install a Hog Wire Fence for a Modern Rustic Look
Why we love this
A hog wire fence is the perfect marriage of industrial strength and rustic charm. It provides a clear, unobstructed view of your hard-earned garden while creating a sturdy boundary that keeps pets and wildlife in their proper places. We love the way the silver galvanized mesh contrasts against the warm, rich tones of stained wood posts. It feels modern and clean, yet it disappears into the landscape, allowing the textures and colors of your flowers and shrubs to take center stage without feeling boxed in.
Essential Elements:
- Hog wire panels (galvanized steel).
- Pressure-treated 4×4 posts.
- 2×4 or 2×6 cedar boards for the frame.
- Heavy-duty staples or fencing clips.
- Concrete mix for setting posts.
How to make it
- Mark your fence line and dig post holes every 6 to 8 feet, ensuring they are at least 2 feet deep to provide a stable foundation against wind and tension.
- Set your 4×4 posts in concrete, using a level to ensure they are perfectly vertical, and allow the concrete to cure for at least 24-48 hours.
- Construct a “picture frame” between the posts using your 2×4 cedar boards, creating a top and bottom rail that will hold the wire panel in place.
- Measure and cut your hog wire panels using heavy-duty bolt cutters, ensuring the panel is slightly smaller than the opening of your wooden frame.
- Position the wire panel inside the frame and secure it using galvanized fencing staples, hammering them in every 6-12 inches along the wood.
- Add a decorative top cap (a flat 2×6 board) across the top of the posts and the top rail to give the fence a finished, architectural look and protect the post tops from rot.
- Apply a high-quality exterior stain or sealer to the wood to protect it from the elements and enhance the natural grain, contrasting beautifully with the metal mesh.
How to Select the Perfect Color Palette for Your Home

Why we love this
Color is the soul of a home; it dictates the mood and energy of every room. Selecting the perfect palette is like composing a symphony—you want a lead melody that is supported by harmonious undertones. We love the way a well-chosen sage green can bring the tranquility of the garden indoors, or how a warm terracotta can make a kitchen feel like the heart of a sun-drenched Mediterranean villa. It’s about creating a cohesive flow that guides the eye and settles the spirit, making your space feel unified and deeply personal.
Essential Elements:
- Paint swatches and sample pots.
- A color wheel (to understand complements).
- Large white poster boards (for testing).
- Different lighting sources (natural, LED, incandescent).
- Fabric and flooring samples.
How to make it
- Start by identifying a “hero” element in your home that you already love—like a favorite rug, a piece of art, or even the view from your window—to serve as your color inspiration.
- Select 3 to 5 colors: one main neutral for the majority of the walls, one secondary color for cabinets or accent walls, and two small “pop” colors for decor.
- Paint your chosen samples onto large white poster boards rather than directly on the wall; this allows you to move the color around the room to see how it reacts to different shadows.
- Observe the samples at three different times of day: morning light (which is cool/blue), afternoon light (warm/yellow), and evening light (artificial).
- Check the undertones—hold your samples against a true white piece of paper to see if that “grey” is actually leaning too purple or if that “beige” looks a bit too pink.
- Carry your palette swatches with you when shopping for furniture and textiles to ensure every new purchase aligns with your master plan for a cohesive look.
- Commit to your favorite and apply it with confidence, knowing that a fresh coat of the right color is the single most transformative tool in your design arsenal.
How to Make a Spring Chalkboard for a Seasonal Vibe

Why we love this
A spring chalkboard is a living document of the changing seasons. There is something so satisfying about the scratch of chalk against a dark board, creating crisp lines and soft gradients that celebrate the return of the sun. Whether it’s a list of garden goals or a hand-lettered quote about new beginnings, it adds a layer of personality and intentionality to your decor. We love the dusty, matte texture of the chalk and the way it can be wiped clean, offering a fresh start and a new creative outlet whenever the mood strikes.
Essential Elements:
- A framed chalkboard or chalkboard paint on a wooden board.
- High-quality chalk or liquid chalk markers.
- A damp cloth and a dry microfiber towel.
- A pencil (for sketching).
- A ruler for straight lines.
How to make it
- Season your chalkboard first by rubbing the side of a piece of traditional chalk over the entire surface and then wiping it off; this prevents “ghosting” where your first drawing stays visible forever.
- Sketch your design lightly with a pencil first; pencil lead shows up just enough on the chalkboard surface for you to follow without being permanent.
- Start from the top left corner (if you are right-handed) and work your way down to avoid smudging your work with your palm as you write.
- Use a mix of fonts—try a bold, blocky style for the main word like “SPRING” and a delicate, flowing script for the smaller details or dates.
- Incorporate simple botanical illustrations like tulips, bees, or leafy vines to frame your text and add a professional, artistic touch.
- If using traditional chalk, dip the tip of the chalk in water before writing; it will look faint at first but dry into incredibly vibrant, opaque lines.
- Display your masterpiece in a high-traffic area like the kitchen or entryway, and don’t be afraid to add little checkmarks as your spring garden projects come to life.
Conclusion
Creating a home and garden that feels like a viral masterpiece is less about following strict rules and more about leaning into what makes you feel most alive. From the structured beauty of a hog wire fence to the whimsical charm of hand-painted rocks, these projects are invitations to slow down and appreciate the details. Your space is a canvas, and every plant you tuck into the earth or coat of paint you apply is a stroke of your own personal expression. So, grab your gloves, pick up a brush, and start cultivating the sanctuary you’ve always dreamed of. Your perfect, Pinterest-worthy retreat is just one project away!