
The Minimalist’s Blueprint for Chic, Museum-Grade Nail Art
Hello, my loves. Grab a warm cup of matcha, wrap yourself in your favorite cashmere throw, and let’s take a deep, grounding breath together. Today, we are turning our focus inward—to our hands, the very things that help us create, hold, and touch the world every single day. There is something so profoundly healing about slow living, and for me, that often manifests in the quiet ritual of a DIY manicure.
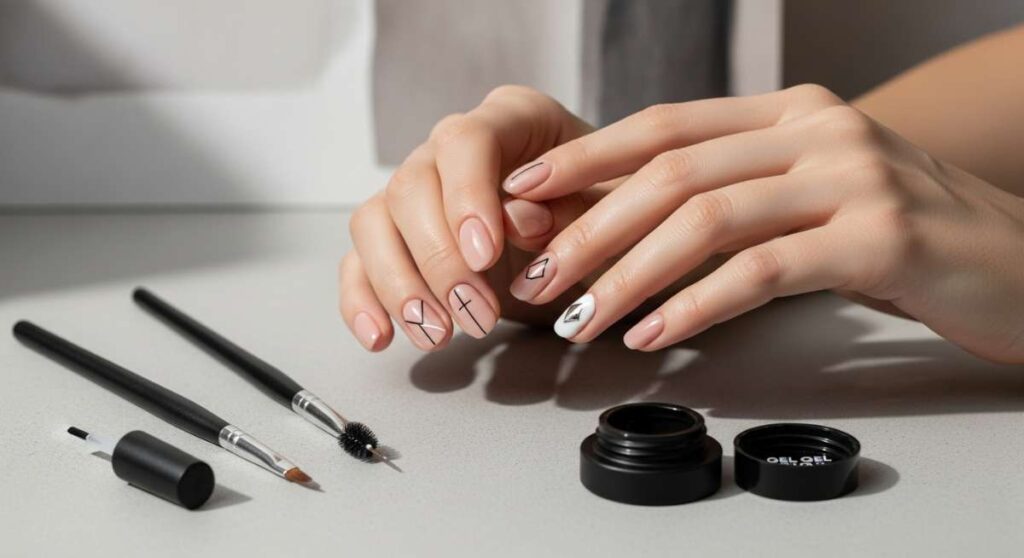
You don’t need a crowded salon or a loud environment to feel polished. In fact, I believe the most stunning art happens in the stillness of our own homes. We’re moving away from the chaotic and toward the curated. Think of your nails as tiny, porcelain canvases—minimalist, chic, and absolutely museum-grade. Let’s dive into this masterclass of soft aesthetics and effortless beauty.
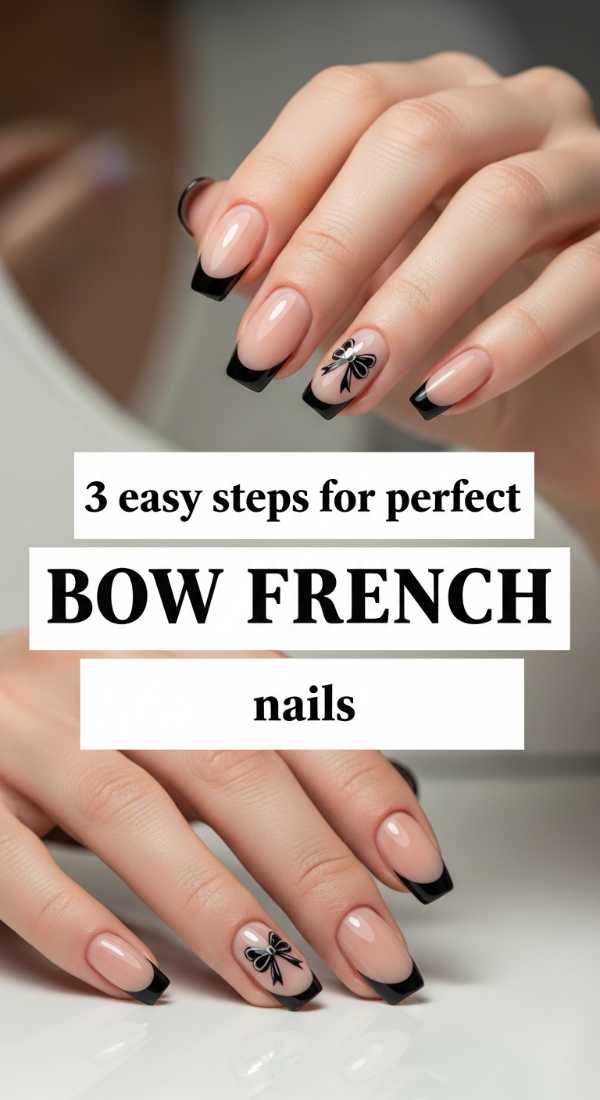
3 Easy Steps for Perfect Bow French Nails
Why to love these Nails:
These nails are the epitome of the ‘coquette’ aesthetic, blending timeless French elegance with a touch of whimsical femininity. They feel like a soft whisper on your fingertips, perfect for those days when you want to feel a little more delicate and intentional.
Essential Items:
- Sheer nude base coat
- Opaque white liner polish
- A fine-tip detailing brush
- Top coat
How to Prepare:
- Paint a classic thin white French tip across the edge of your nail.
- Using the detailing brush, paint two small loops meeting in the center of the French line.
- Add two tiny ‘ribbon’ tails extending downward and seal with a high-shine top coat.
Budget Range
- Essie Ballet Slippers ($10.00)
- Holo Taco Precision Brush ($8.00)
- Sally Hansen Insta-Dri White ($6.00)
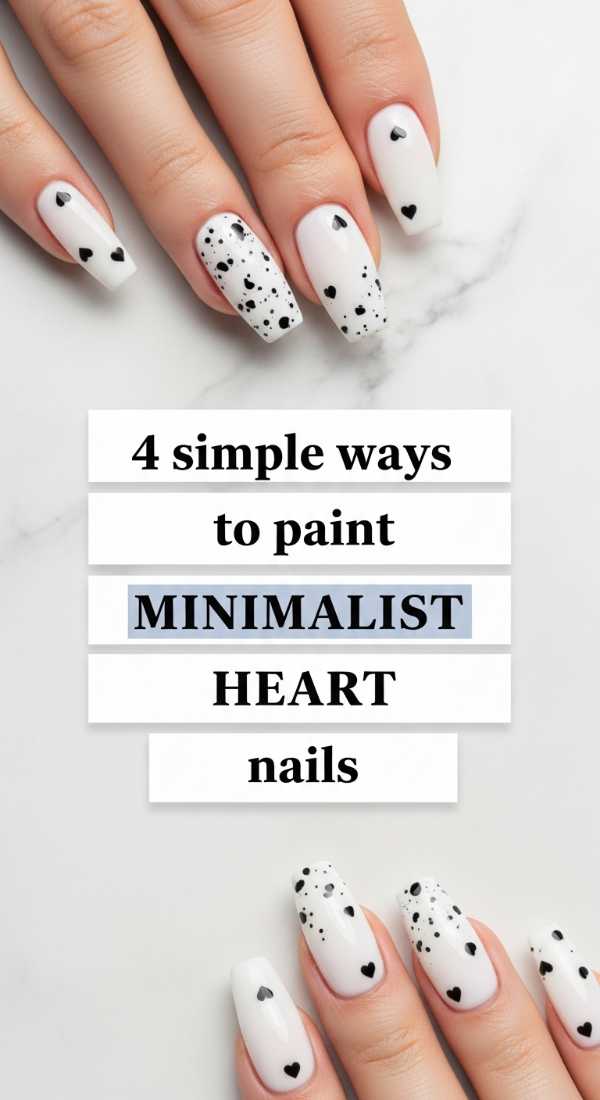
4 Simple Ways to Paint Minimalist Heart Nails
Why to love these Nails:
Sometimes the smallest details carry the most love. These tiny hearts are subtle enough for the office but sweet enough for a date night. They represent a quiet romance with yourself, a little secret shared between you and your hands.
Essential Items:
- Soft pink or milky white base
- Deep red or black polish
- A wooden toothpick or dotting tool
How to Prepare:
- Apply two coats of your milky base and let dry completely.
- Place two small dots of color side-by-side where you want the heart to live.
- Use the toothpick to drag the polish from the center of each dot downward into a ‘V’ shape.
- Allow to dry for five minutes before applying a matte or glossy top coat.
Budget Range
- OPI Bubble Bath ($11.50)
- Olive & June Red Poppy ($9.00)
- Dotting Tool Set ($5.00)
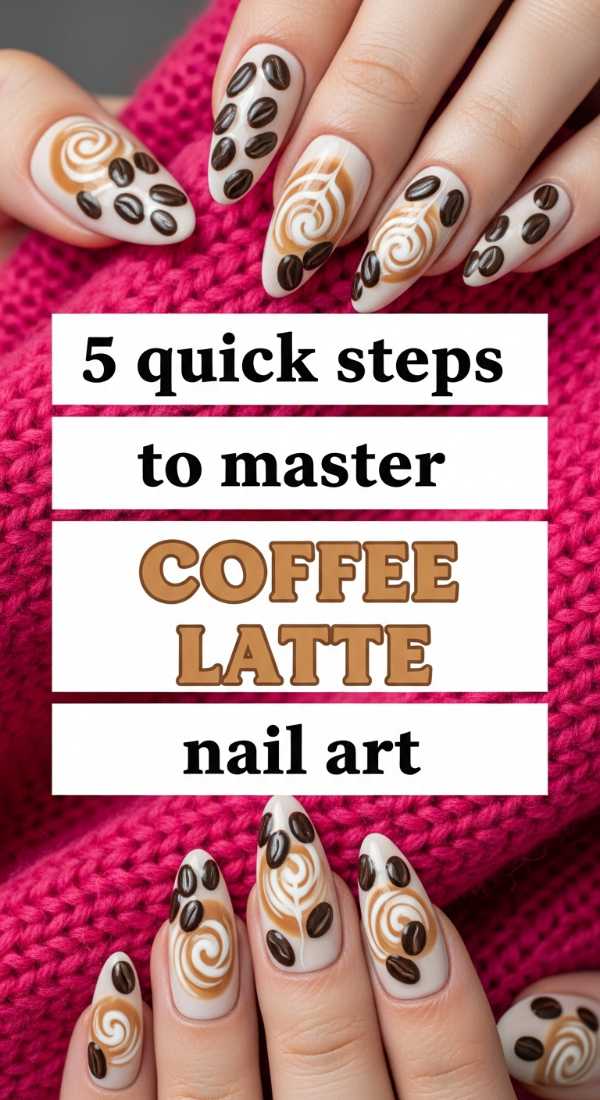
5 Quick Steps to Master Coffee Latte Nail Art
Why to love these Nails:
Imagine the swirl of cream hitting a fresh espresso on a rainy Tuesday morning. This nail art is warm, grounded, and incredibly sophisticated. It uses earthy tones to create a marbled effect that looks much more complicated than it actually is.
Essential Items:
- Espresso brown polish
- Caramel tan polish
- Cream white polish
- Clear mixing polish or base
How to Prepare:
- Apply the caramel tan as your primary base color.
- While the base is still slightly tacky, place small drops of brown and cream randomly.
- Use a clean brush or toothpick to gently swirl the colors together in a circular motion.
- Add a drop of clear polish over the swirls to help them bleed and soften.
- Finish with a thick gel-effect top coat for depth.
Budget Range
- Zoya ‘Kateri’ Brown ($12.00)
- Orly ‘Coffee Break’ ($15.00)
- Revlon Top Speed ($7.00)
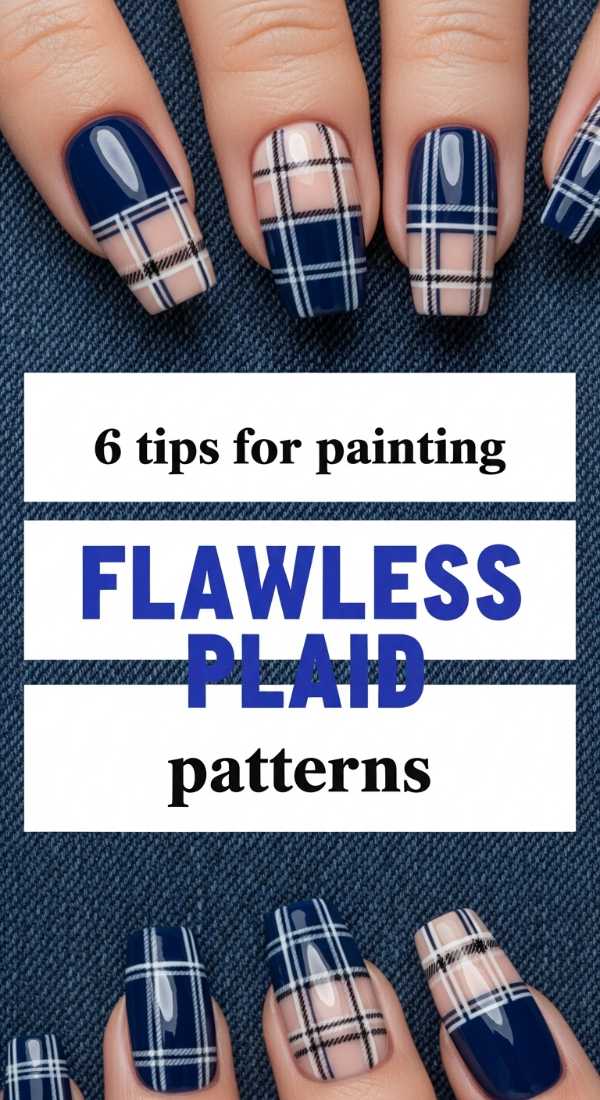
6 Tips for Painting Flawless Plaid Patterns
Why to love these Nails:
Plaid doesn’t have to be loud; in neutral tones, it’s the ultimate academic chic. It’s structured and orderly, providing a sense of calm and precision to your overall look. It’s like wearing a favorite vintage blazer on your nails.
Essential Items:
- Matte taupe base
- Striping tape or a very long-haired liner brush
- Charcoal grey and white polish
How to Prepare:
- Apply two coats of taupe and let dry until 100% hard.
- Paint one thick vertical line off-center using charcoal.
- Paint one thick horizontal line near the base of the nail.
- Add two very thin white lines parallel to your thick lines.
- Ensure all lines are straight by resting your painting hand on a flat surface.
- Seal with a matte top coat for that fabric-like texture.
Budget Range
- Beetles Gel Liner Set ($19.00)
- Essie ‘Satin Sister’ ($10.00)
- NYX Matte Finish ($6.00)
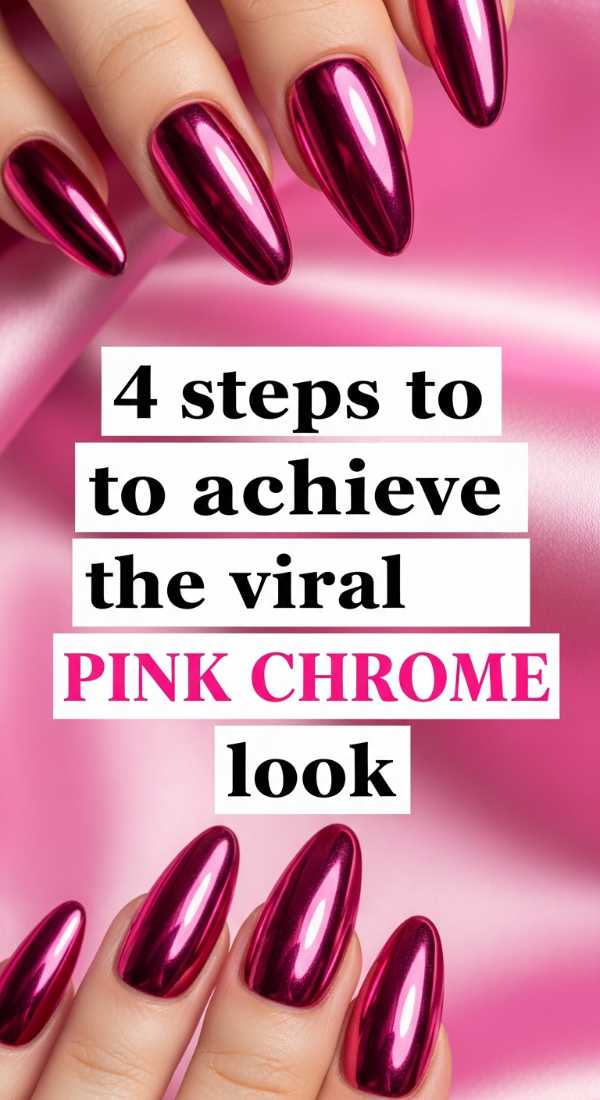
4 Steps to Achieve the Viral Pink Chrome Look
Why to love these Nails:
We’ve all seen the ‘glazed donut’ trend, but the pink chrome version adds a soft, ethereal glow that feels like a sunset on your fingertips. It’s futuristic yet incredibly soft and wearable.
Essential Items:
- Pale petal pink polish
- Pearl or iridescent chrome powder
- Sponge applicator
- No-wipe top coat (crucial for chrome)
How to Prepare:
- Apply your pink base and a layer of no-wipe top coat; cure or dry until just barely set.
- Dip the sponge into the chrome powder and buff it vigorously onto the nail surface.
- Wipe away excess powder with a soft brush.
- Apply a final layer of top coat to lock in that metallic mirror shine.
Budget Range
- Artdone Chrome Powder ($8.00)
- Gelish Mini Pink ($12.00)
- Amazon Makeup Sponges ($3.00)
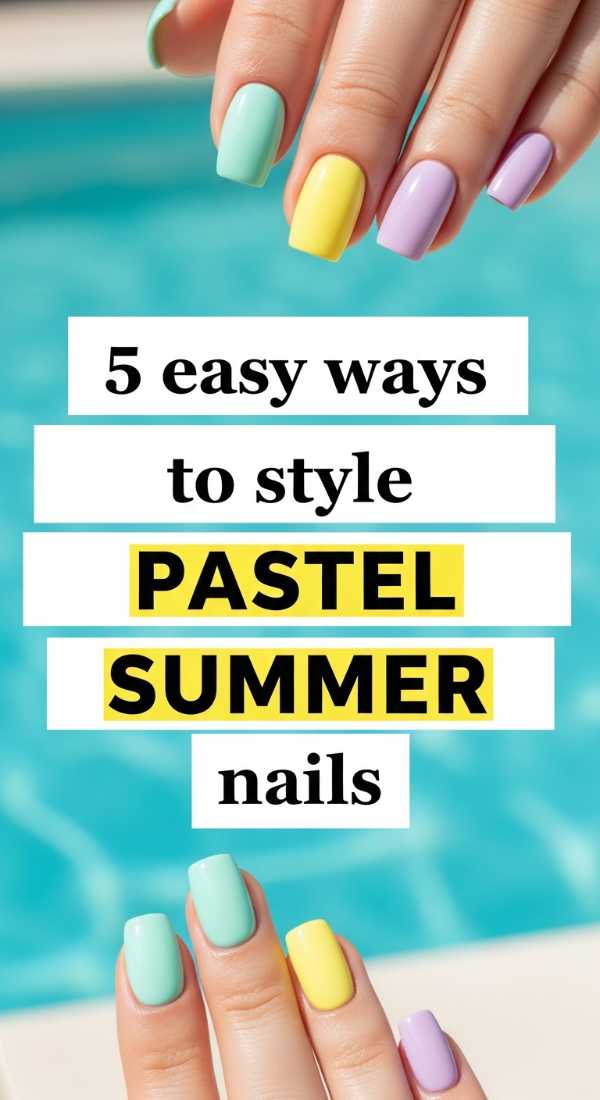
5 Easy Ways to Style Pastel Summer Nails
Why to love these Nails:
These are for the dreamers. Pastel summer nails are like a basket of wildflower petals. They are light, airy, and bring a sense of playfulness to your aesthetic without being overwhelming.
Essential Items:
- Lavender, Mint, and Lemon pastel polishes
- Matte top coat
How to Prepare:
- Choose a different pastel for each finger for a ‘skittles’ minimalist look.
- Keep the shapes short and rounded for a clean appearance.
- Use a matte top coat to give them a ‘candy shell’ vibe.
- Limit your jewelry to thin gold bands to let the colors breathe.
- Moisturize your cuticles with rose oil to enhance the soft look.
Budget Range
- Deborah Lippmann Pastel Set ($36.00)
- Wet n Wild Wild Shine ($2.00)
- Barry M Gelly Hi Shine ($6.00)
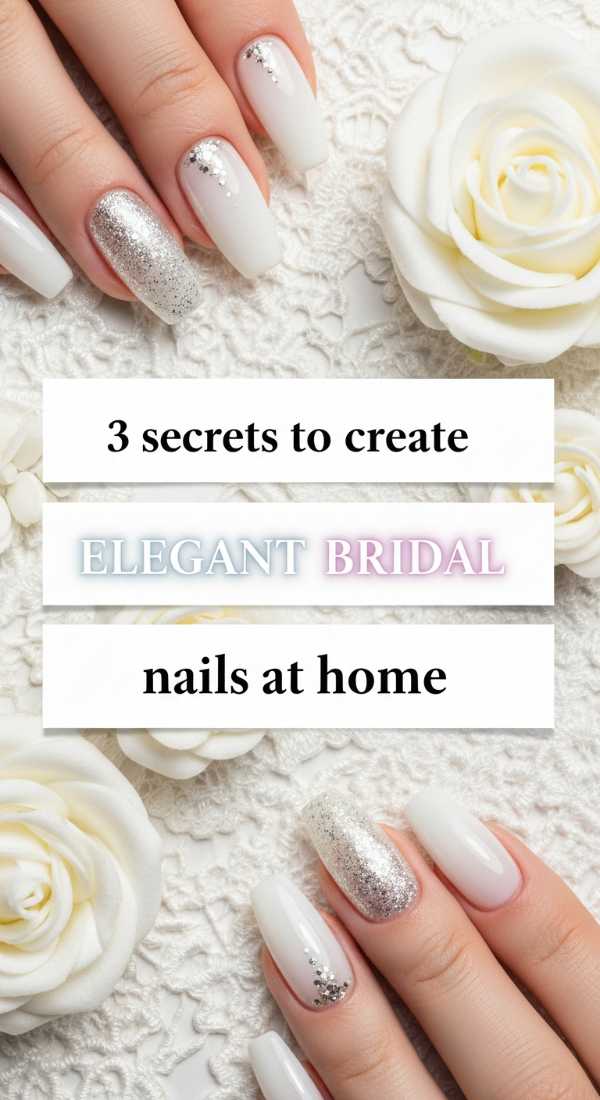
3 Secrets to Create Elegant Bridal Nails at Home
Why to love these Nails:
Whether you’re walking down the aisle or just love the ‘clean girl’ aesthetic, bridal nails are about perfection through simplicity. They focus on healthy-looking nail beds and a hint of sparkle that catches the light beautifully.
Essential Items:
- Sheerest pink ‘your nails but better’ polish
- Micro-fine silver glitter
- High-quality cuticle oil
How to Prepare:
- Focus heavily on the prep; push back cuticles and buff the nail to a natural shine.
- Apply one coat of sheer pink, followed by a tiny ‘dusting’ of glitter only at the very base of the nail.
- Finish with two coats of ‘plumping’ top coat to give the illusion of professional gels.
Budget Range
- Chanel Le Vernis ($32.00)
- Dior Abricot Oil ($30.00)
- Essie Gel Couture Top Coat ($13.00)
4 Simple Methods for Sparkling Glitter Almond Nails
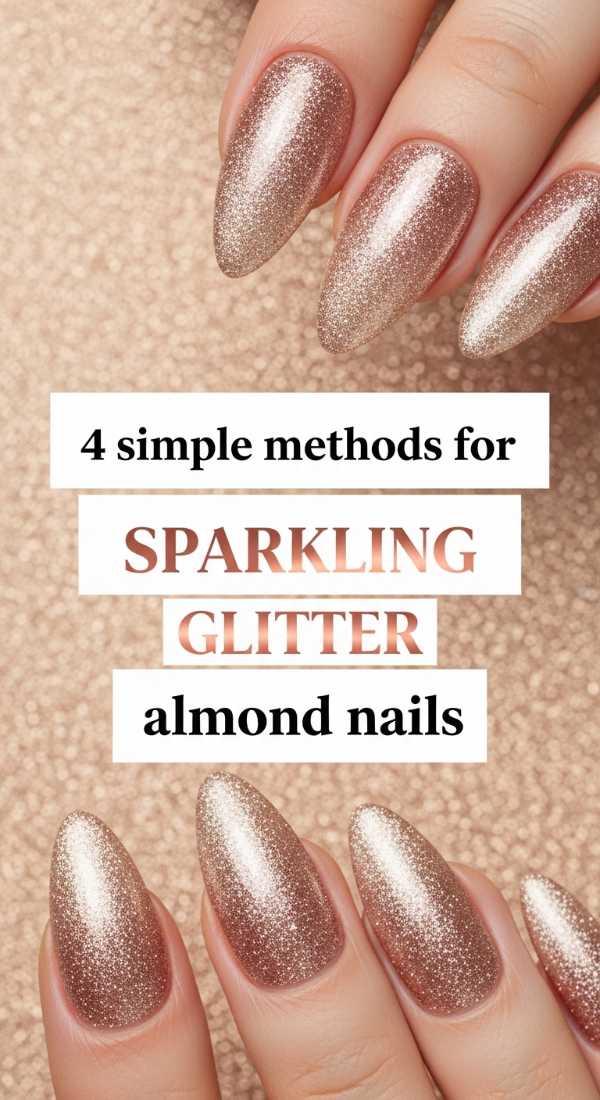
Why to love these Nails:
The almond shape is the most flattering for elongating the fingers, and adding a touch of glitter makes it feel like a celebration. It’s sophisticated sparkle—think champagne bubbles rather than craft store glitter.
Essential Items:
- Almond-shaped nail file (glass is best)
- Champagne or gold glitter polish
- Make-up sponge
How to Prepare:
- File nails into a soft point, ensuring the sides are symmetrical.
- Dab glitter onto a sponge rather than painting it on; this removes excess liquid for a denser sparkle.
- Press the sponge onto the tips of the nails for a gradient ‘ombre’ effect.
- Seal with a thick clear coat to ensure a smooth surface.
Budget Range
- ILNP Champagne Blush ($10.00)
- Mont Bleu Glass Nail File ($12.00)
- Seche Vite Dry Fast Top Coat ($9.00)
6 Steps to Shape and Design Trendy Coffin Nails
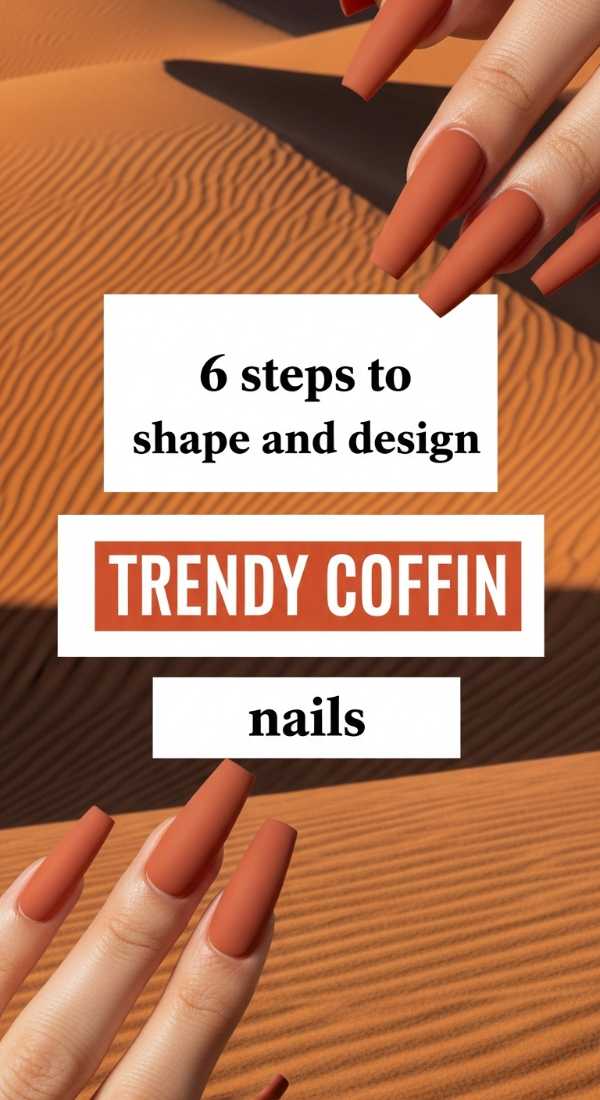
Why to love these Nails:
Coffin nails (or ballerina nails) are for the bold minimalist. They offer a larger canvas for art while maintaining a very modern, architectural silhouette. They feel empowering and sharp.
Essential Items:
- Strong base strengthener
- Square-edge file
- Neutral ‘greige’ polish
How to Prepare:
- Grow your nails out or use high-quality press-ons.
- File the sides straight and then taper them inward toward the tip.
- File the very tip perfectly flat to create that signature ‘coffin’ look.
- Apply a strengthener to prevent the corners from snapping.
- Paint with a neutral greige to keep the bold shape grounded.
- Add a single vertical line down the center for an elongated look.
Budget Range
- Modelones Press-on Kit ($15.00)
- NailTek Strengthener ($10.00)
- OPI ‘You Don’t Know Jacques’ ($11.50)
5 Rules for the Ultimate Minimalist Manicure
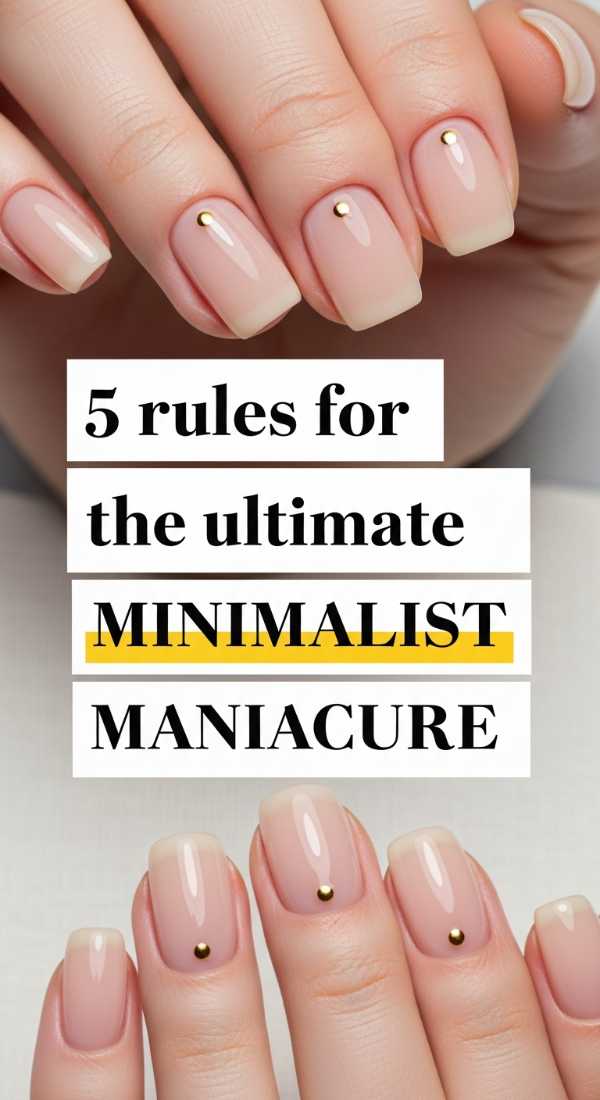
Why to love these Nails:
This isn’t just a style; it’s a philosophy. The ultimate minimalist manicure is about the health of the nail and the intention behind the color. It’s for the person who finds beauty in the ‘negative space’.
Essential Items:
- Quality glass file
- Cuticle remover gel
- Buffing block
How to Prepare:
- Rule 1: Prioritize skin health; a minimalist look fails if the cuticles are dry.
- Rule 2: Stick to a palette of 3 colors (Nude, White, Black).
- Rule 3: Embrace negative space; don’t feel the need to cover the whole nail.
- Rule 4: One accent nail is enough; don’t over-decorate.
- Rule 5: Always finish with a high-quality oil to keep the ‘museum’ glow alive.
Budget Range
- Blue Cross Cuticle Remover ($6.00)
- Flowery Buffing Block ($2.00)
- L’Occitane Shea Oil ($20.00)
Embrace Your Inner Artist
Creating beauty with your own two hands is a form of meditation. I hope these blueprints inspire you to carve out twenty minutes this weekend just for yourself. Remember, my loves, beauty isn’t about perfection; it’s about the feeling of being cared for by the person who knows you best—yourself. Tag me in your museum-grade creations!