

The Lazy Girl’s Guide to the Ultimate Viral Food Board
Let’s be real: we all want that Pinterest-perfect lifestyle, but most days, the thought of spending four hours in the kitchen feels like a personal attack. I’ve spent way too many Friday nights scrolling through gorgeous viral food boards, feeling both inspired and slightly exhausted by the sheer effort they seem to require. But what if I told you that the secret to a viral-worthy spread isn’t actually about being a professional chef? It’s about the art of the ‘lazy’ assembly—choosing high-impact, simple recipes that look stunning but let you spend more time on the couch with a glass of wine.
This guide is my love letter to all of us who want the aesthetic without the agony. We’re talking about a Viral Simple Food Board that balances sweet, savory, hot, and cold, all while keeping the ‘effort’ meter firmly in the green. Whether you’re hosting a last-minute girl’s night or just want to treat yourself to a beautiful solo dinner, these ten elements are the building blocks of a spread that will have your followers hitting that ‘save’ button faster than you can say ‘bon appétit.’ So, grab your biggest wooden board, and let’s get into the low-stress magic.
How to make fresh strawberry dessert

Why we love this
There is something undeniably romantic about the scent of sun-ripened strawberries mingling with clouds of whipped cream and a hint of vanilla. This dessert is the epitome of effortless elegance; it tastes like a breezy July afternoon in a coastal garden. The contrast between the bright, acidic pop of the berries and the velvety, cool richness of the cream creates a sensory experience that feels far more decadent than it actually is. It’s the perfect light finish to a heavy board, cleansing the palate with its natural sweetness and vibrant, ruby-red hue.
Ingredients
- 2 lbs fresh organic strawberries
- 1 pint heavy whipping cream
- 1/4 cup powdered sugar
- 1 tsp vanilla bean paste
- Fresh mint leaves for garnish
- Shortbread cookies (crumbled)
How to make it
- Begin by washing your strawberries in cold water and patting them completely dry with a paper towel; moisture is the enemy of a crisp dessert. Slice the tops off and quarter the larger berries, leaving the smaller ones whole for textural variety.
- In a chilled glass bowl, pour in your heavy whipping cream. Using a hand mixer on medium speed, whisk until soft peaks begin to form. This usually takes about 3-5 minutes.
- Gradually sift in the powdered sugar and add the vanilla bean paste. Turn the mixer to high and beat until stiff peaks form—be careful not to overbeat, or you’ll end up with vanilla butter!
- To assemble for the board, place a large bowl of the whipped cream in the center and surround it with the sliced berries. Sprinkle the crumbled shortbread over the top for a buttery crunch and tuck fresh mint leaves around the edges for that ‘viral’ pop of green.
How to grill juicy chicken
Why we love this
Nothing beats the smoky, charred aroma of perfectly grilled chicken wafting through the air during a backyard hangout. When done right, the skin is impossibly crisp and golden, while the meat inside remains incredibly tender and bursting with savory juices that run down your chin with every bite. It’s the ultimate protein anchor for your food board, offering a satisfying heartiness that pairs beautifully with cool salads and sharp cheeses. The combination of heat, smoke, and seasoning creates a complex flavor profile that feels both rustic and sophisticated.
Ingredients
- 4 boneless, skinless chicken breasts
- 1/4 cup olive oil
- 3 cloves minced garlic
- 1 tbsp smoked paprika
- Salt and cracked black pepper
- Fresh lemon wedges
How to make it
- Start by pounding your chicken breasts to an even thickness (about 1/2 inch) using a meat mallet. This ensures the chicken cooks at the same rate and stays juicy throughout.
- Whisk together the olive oil, minced garlic, paprika, salt, and pepper in a bowl. Coat the chicken thoroughly and let it marinate for at least 30 minutes at room temperature to take the chill off.
- Preheat your grill to medium-high heat (about 400°F). Clean the grates and lightly oil them to prevent sticking. Place the chicken on the grill and close the lid.
- Cook for 6-7 minutes per side. Do not move the chicken once it hits the grill until it naturally releases from the grates—this is how you get those beautiful grill marks. Use an instant-read thermometer to check for an internal temperature of 165°F. Let the meat rest for 5-10 minutes before slicing into strips for your board.
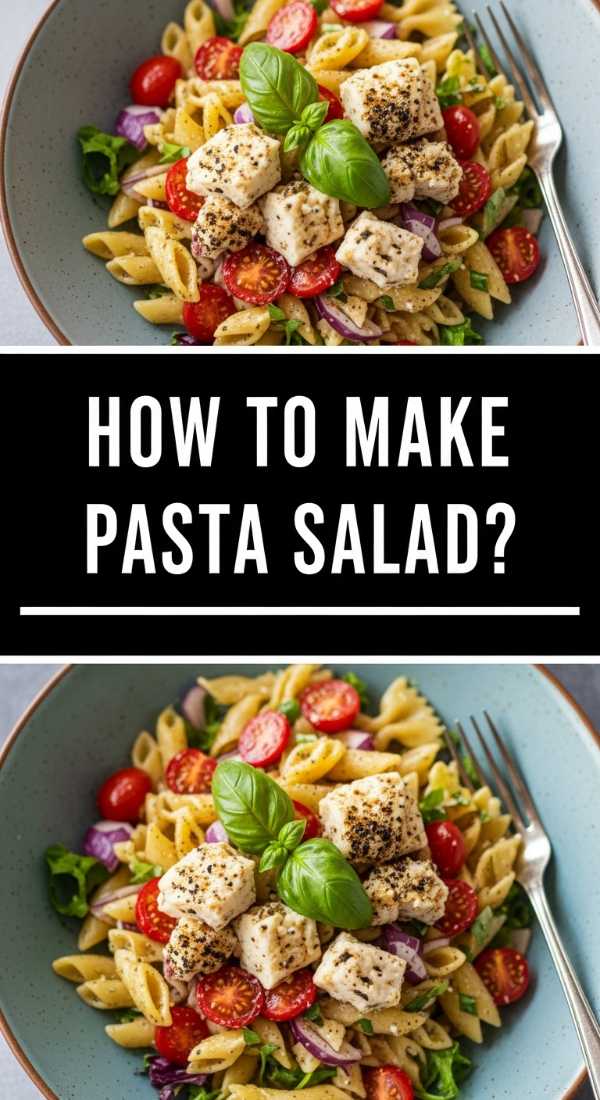
How to make summer pasta salad
Why we love this
Summer pasta salad is the ultimate ‘lazy girl’ hack because it actually tastes better when you make it ahead of time. It’s a riot of colors and textures—the chewiness of the al dente pasta, the snap of fresh bell peppers, and the creamy tang of feta cheese all swirled together in a zesty vinaigrette. Every forkful feels refreshing and light, making it the perfect side dish to balance out grilled meats. It’s a crowd-pleaser that looks stunning on a board, especially when you use fun pasta shapes like rotini or bowties to catch all that delicious dressing.
Ingredients
- 1 lb rotini pasta
- 1 cup cherry tomatoes, halved
- 1 cucumber, diced
- 1/2 red onion, finely sliced
- 1/2 cup crumbled feta
- Italian vinaigrette dressing
- Fresh parsley
How to make it
- Boil a large pot of heavily salted water. Add the pasta and cook for exactly one minute less than the package directions suggest for ‘al dente.’ This prevents the pasta from getting mushy once it absorbs the dressing.
- Drain the pasta and immediately rinse it under cold running water to stop the cooking process and remove excess starch. This keeps the salad light and prevents the noodles from sticking together.
- In a large mixing bowl, combine the cooled pasta, halved cherry tomatoes, diced cucumber, and red onion. Pour the Italian dressing over the mixture and toss gently with a large spoon.
- Fold in the crumbled feta cheese and chopped parsley. Cover and refrigerate for at least two hours before serving. Just before placing it on your board, give it one more toss and add a splash more dressing if the pasta has soaked it all up.
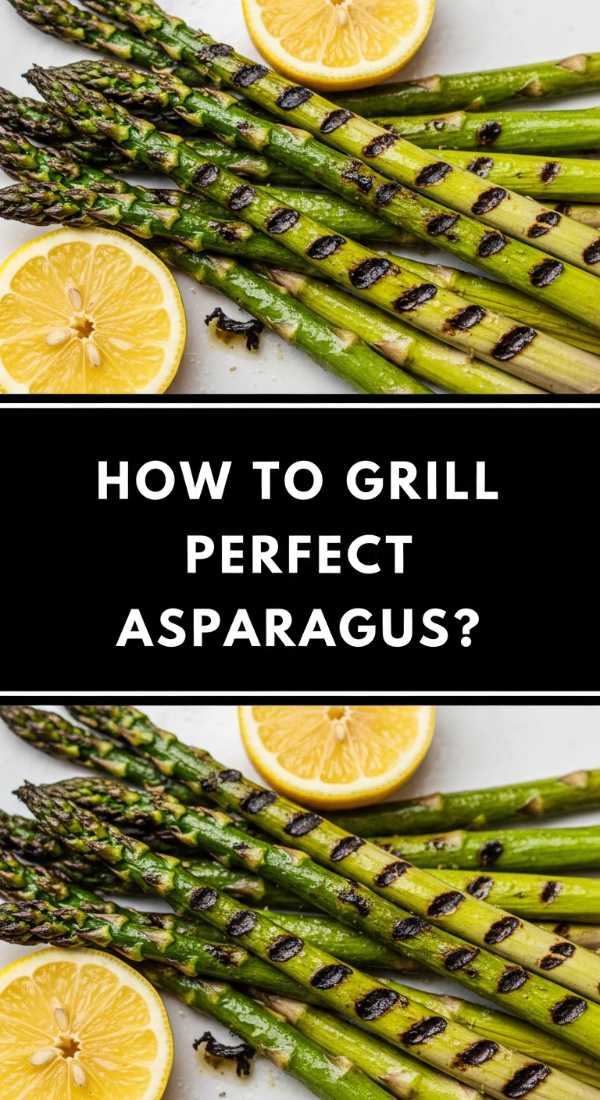
How to grill perfect asparagus

Why we love this
Asparagus is the unsung hero of the vegetable world, especially when it meets the high heat of a grill. The tips become wonderfully crispy and almost nutty in flavor, while the stalks remain tender with just the right amount of ‘snap’ left in them. Drizzled with a bit of lemon and a shower of sea salt, it adds a vibrant, healthy green element to your food board that feels high-end but takes mere minutes to prepare. The charred exterior provides an earthy depth that complements everything from steak to seafood.
Ingredients
- 1 bunch fresh asparagus
- 2 tbsp extra virgin olive oil
- Flaky sea salt
- 1/2 tsp garlic powder
- Lemon zest
How to make it
- Trim the woody ends off the asparagus. A pro tip: hold a stalk at both ends and bend it until it snaps; it will naturally break exactly where the tender part starts. Use that as a guide to trim the rest of the bunch.
- Toss the stalks in a bowl with olive oil, salt, and garlic powder. Ensure every spear is evenly coated to prevent burning and maximize flavor.
- Place the asparagus directly onto the grill grates over medium-high heat, perpendicular to the grates so they don’t fall through. Grill for 3-5 minutes, turning occasionally with tongs.
- Look for the stalks to turn a bright, vivid green with light char marks. Remove from heat while they still have a slight bite. Immediately finish with a grating of fresh lemon zest to brighten the flavors before arranging them in a neat row on your board.
How to make refreshing mocktails
Why we love this
A great food board needs a signature drink to wash it all down, and these mocktails bring all the vibes without the hangover. Picture a tall glass filled with sparkling bubbles, floating berries, and the sharp, cooling scent of muddled mint. It’s sophisticated, icy, and incredibly photogenic for your social media feed. The balance of tart citrus and sweet fruit makes it an addictive companion to salty snacks and savory appetizers, ensuring everyone at the table feels included in the celebration.
Ingredients
- Sparkling water or club soda
- Fresh raspberries and lime slices
- Agave nectar or simple syrup
- Fresh mint sprigs
- Crushed ice
How to make it
- Place 5-6 fresh raspberries and 3 mint leaves in the bottom of a sturdy glass. Add a teaspoon of agave nectar or simple syrup.
- Use a muddler or the back of a wooden spoon to gently crush the berries and mint. You want to release the juices and oils without pulverizing the leaves into tiny bits.
- Fill the glass to the brim with crushed ice. This keeps the drink colder for longer and gives it that professional ‘bar’ look.
- Pour sparkling water over the ice until the glass is full. Use a long spoon to stir from the bottom, bringing the muddled fruit upward for a beautiful gradient effect. Garnish with a lime wheel and a fresh sprig of mint before serving alongside your board.
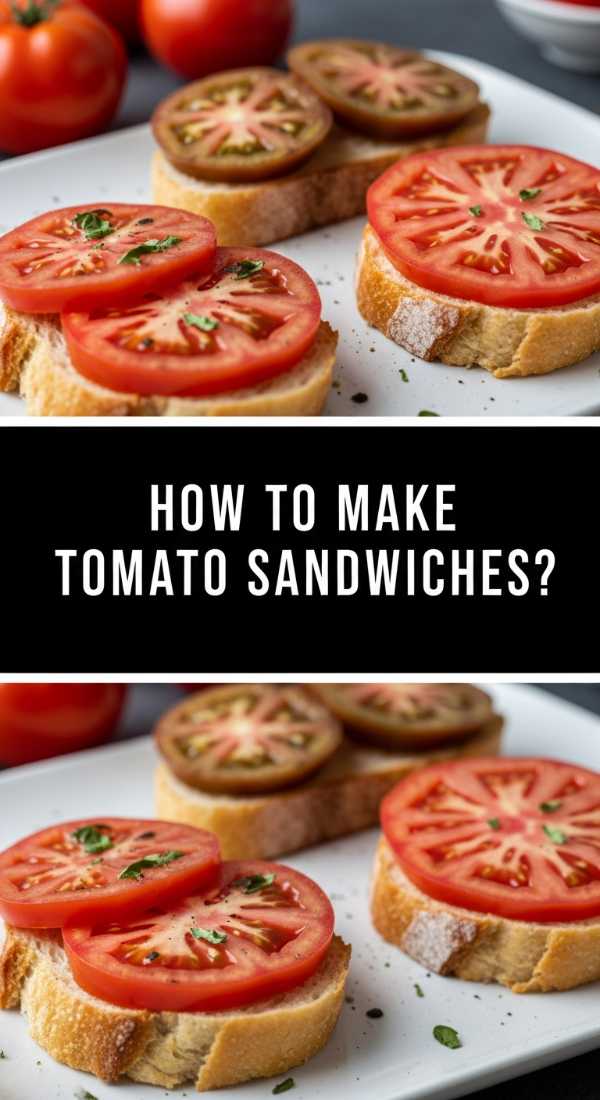
How to make tomato sandwiches

Why we love this
The humble tomato sandwich is a masterclass in simplicity, evoking memories of slow summer afternoons and garden harvests. When you use thick slices of heirloom tomatoes at the peak of their season, the result is a savory, juicy, and slightly sweet bite that is purely addictive. The creamy mayo acts as the perfect buffer against the acidity of the fruit, while a heavy hand with salt and pepper brings out every nuance of flavor. It’s a nostalgic comfort food that looks surprisingly rustic and chic when cut into small, crustless triangles for a board.
Ingredients
- High-quality white bread (brioche or sourdough)
- Large heirloom tomatoes
- Duke’s or Kewpie mayonnaise
- Flaky sea salt and coarse black pepper
- Fresh basil leaves
How to make it
- Slice your heirloom tomatoes into thick, 1/2-inch slabs. Lay them out on a paper towel for 5 minutes and sprinkle with a little salt; this draws out excess moisture so your bread doesn’t get soggy.
- Generously spread a thick layer of mayonnaise on both sides of your bread. Don’t be shy here—the mayo is what creates that iconic velvety texture.
- Layer the tomato slices onto the bread, slightly overlapping them to ensure every bite is full of fruit. Add a generous crack of black pepper and a few fresh basil leaves.
- Close the sandwich and, using a very sharp serrated knife, cut off the crusts. Slice into small squares or triangles. Arrange them on your board with the cut side facing up so the beautiful colors of the tomatoes are visible.
How to make hamburger casserole

Why we love this
Sometimes your board needs something warm, cheesy, and deeply comforting to act as a centerpiece, and that’s where the hamburger casserole shines. It’s essentially a deconstructed cheeseburger in a dish—think savory ground beef, melty cheddar, and tender pasta all baked together into a bubbling, golden masterpiece. The aroma of toasted cheese and browned beef is enough to make anyone’s mouth water. It provides a grounded, nostalgic element to your spread that appeals to the inner child in everyone, making the meal feel cozy and complete.
Ingredients
- 1 lb ground beef
- 1 small onion, diced
- 2 cups elbow macaroni
- 1 can tomato sauce
- 2 cups shredded sharp cheddar cheese
- 1 tsp garlic powder
How to make it
- Preheat your oven to 375°F. In a large skillet, brown the ground beef with the diced onion over medium-high heat until the meat is fully cooked and the onions are translucent. Drain the excess fat.
- While the beef is browning, cook the elbow macaroni in salted water until just barely tender (it will finish cooking in the oven). Drain and set aside.
- Stir the tomato sauce and garlic powder into the beef mixture. Simmer for 5 minutes to let the flavors meld. Then, fold in the cooked macaroni and half of the shredded cheese.
- Transfer the mixture to a baking dish and top with the remaining cheese. Bake for 15-20 minutes until the cheese is bubbling and slightly browned on the edges. Serve small portions in ramekins on your board for a neat presentation.
How to cook delicious soup

Why we love this
There is nothing more soul-warming than a bowl of carefully crafted soup. The way the flavors develop over time, with the sweetness of sautéed aromatics blending into a rich, savory broth, is pure culinary magic. Whether it’s a creamy tomato or a clear vegetable broth, a small cup of soup adds a layer of sophistication and warmth to a food board, especially during the cooler months. It’s an invitation to slow down, dip a piece of crusty bread, and savor the deep, concentrated flavors that only a slow simmer can produce.
Ingredients
- 4 cups vegetable or chicken broth
- 2 carrots, 2 stalks celery, 1 onion (mirepoix)
- 2 cloves garlic, minced
- 1 can crushed tomatoes (optional for tomato-base)
- Fresh thyme and bay leaf
- Olive oil
How to make it
- In a large heavy-bottomed pot, heat olive oil over medium heat. Add your finely diced onion, carrots, and celery. Sauté for about 8-10 minutes until they are soft and fragrant; this ‘sweating’ process is key to a deep flavor base.
- Add the minced garlic and cook for just 60 seconds until fragrant, being careful not to let it burn. If you’re making a tomato-based soup, add the crushed tomatoes now and stir.
- Pour in your broth and add the fresh thyme and bay leaf. Bring the mixture to a boil, then immediately reduce the heat to low. Cover and let it simmer gently for at least 30 minutes.
- Taste and adjust the seasoning with salt and pepper. For a viral look, serve the soup in mini mugs or espresso cups on your board, topped with a tiny swirl of cream or a single crouton.
How to bake plum cakes

Why we love this
Plum cakes are a visual and textural delight, featuring pockets of jammy, tart fruit nestled inside a sweet, buttery sponge. As they bake, the plums release their deep purple juices, staining the golden cake with beautiful, vibrant streaks. The scent of vanilla and baking fruit is absolutely intoxicating, filling the house with a sense of warmth and hospitality. These little cakes offer a sophisticated alternative to traditional cookies, providing a moist, fruity bite that feels artisanal and perfectly ‘cottagecore’ for your board’s aesthetic.
Ingredients
- 1/2 cup softened butter
- 3/4 cup sugar
- 2 eggs
- 1 cup all-purpose flour
- 1 tsp baking powder
- 4-5 large plums, pitted and sliced
How to make it
- Preheat your oven to 350°F and grease a small square baking tin or individual muffin liners. Cream the softened butter and sugar together until the mixture is light and fluffy.
- Beat in the eggs one at a time, ensuring each is fully incorporated before adding the next. Sift in the flour and baking powder, folding gently with a spatula until just combined. Over-mixing will make the cake tough!
- Pour the batter into the tin and smooth the top. Arrange the plum slices in a decorative pattern over the batter, pressing them in slightly.
- Bake for 40-45 minutes (less for individual cakes) until a toothpick inserted into the center comes out clean. Let the cake cool completely before slicing into small squares. Dust with powdered sugar for a professional, viral-ready finish.
How to make crockpot chicken
[IMAGE_10]
Why we love this
Crockpot chicken is the ultimate ‘lazy’ secret weapon because it does all the heavy lifting while you go about your day. By the time you’re ready to assemble your board, you’re greeted with meat that literally falls apart at the touch of a fork. It’s incredibly versatile, soaking up whatever spices or sauces you choose to include, resulting in a tender, flavorful protein that can be piled onto crackers or tucked into mini sliders. It’s the definition of ‘low effort, high reward,’ providing a succulent, reliable base for your spread.
Ingredients
- 2 lbs chicken thighs (bone-in or out)
- 1 cup chicken broth
- 1 tsp onion powder
- 1 tsp dried oregano
- Salt and pepper
- 2 tbsp butter
How to make it
- Place the chicken thighs in the bottom of your slow cooker in a single layer. Season generously with salt, pepper, onion powder, and oregano.
- Pour the chicken broth around the sides of the chicken (don’t pour it directly over the seasoning or you’ll wash it off!). Top each piece of chicken with a small pat of butter for extra richness.
- Cover and cook on ‘Low’ for 6-7 hours or ‘High’ for 3-4 hours. The ‘Low’ setting is preferred for the most tender, melt-in-your-mouth results.
- Once the chicken is finished, remove it from the pot and use two forks to shred it into bite-sized pieces. Toss the shredded meat with a few tablespoons of the cooking liquid to keep it moist before piling it into a rustic bowl for your food board.
Wrapping Up Your Viral Spread
And there you have it—a stunning, multi-dimensional food board that looks like it took days to prepare but was actually a series of simple, manageable steps. The key to the ‘Lazy Girl’ method is variety: mixing textures, colors, and temperatures to create a feast for the eyes as much as the palate. Remember, the best boards aren’t the ones that are perfect; they’re the ones that invite people to dig in and enjoy. So, put down the phone (after you take your photos, of course!), grab a fork, and enjoy the fruits of your very minimal labor!