
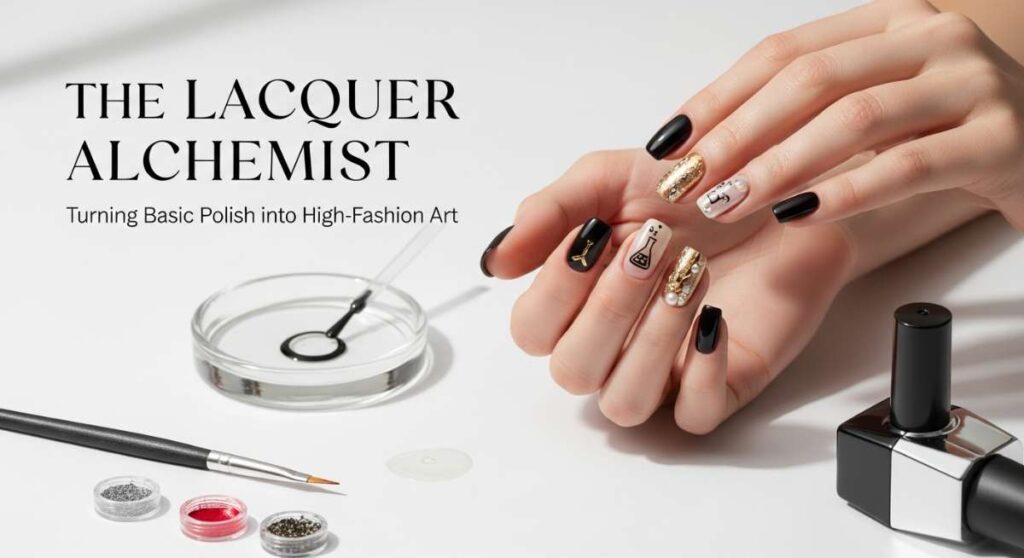
The Lacquer Alchemist: Turning Basic Polish into High-Fashion Art
Hello, my loves. Welcome back to this little corner of the internet where we turn the mundane into magic. I’ve been thinking a lot lately about how our hands do so much for us—they hold the coffee mugs that wake us up, they type the words that build our dreams, and they reach out to touch the people we love. Why shouldn’t they be adorned in a way that feels like a soft, velvet hug?
Today, we aren’t just painting nails; we’re practicing a form of modern alchemy. We are taking simple bottles of pigment and turning them into high-fashion statements that whisper elegance and scream confidence. Whether you’re a beginner or a seasoned pro, I want you to feel the warmth of creativity flowing through your fingertips as we dive into these tutorials together.
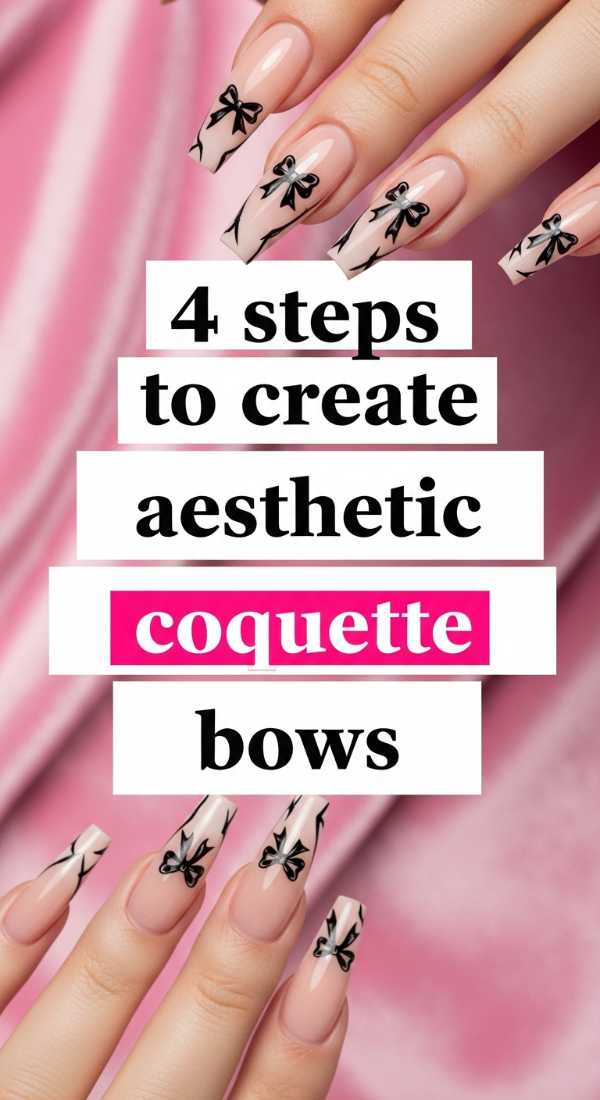
4 steps to create aesthetic coquette bows
Why to love these Nails:
There is something so tender and nostalgic about the coquette aesthetic. It’s all about embracing your softest, most feminine side with a touch of vintage charm. These tiny bows make your hands look like a gift wrapped just for you.
Essential Items:
- Pale pink or sheer base polish
- Ultra-fine nail art liner brush
- White or cream acrylic paint/gel
- Glossy top coat
How to Prepare:
- Apply two coats of your sheer base and let it dry completely.
- Using your liner brush, draw two small triangles meeting at a central point.
- Add two delicate ‘tails’ flowing from the center point of the triangles.
- Seal the design with a thick layer of top coat to smooth out any texture.
Budget Range
- Essie Ballet Slippers ($10)
- Beetles Nail Art Brushes ($8)
- Modelones White Gel Liner ($7)
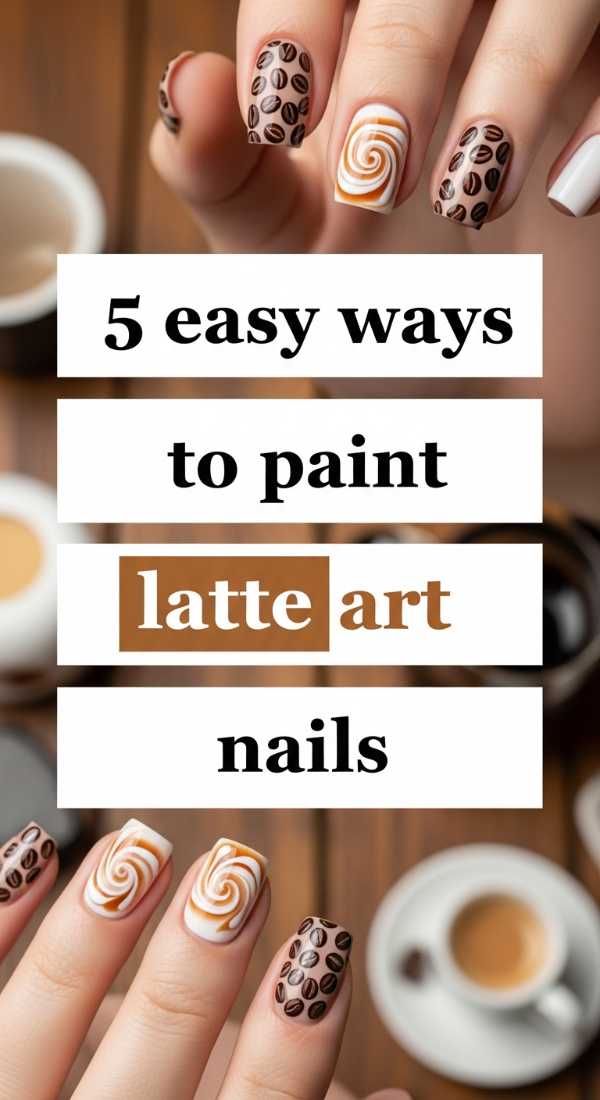
5 easy ways to paint latte art nails
Why to love these Nails:
Imagine the swirling steam of a fresh cappuccino caught in time. Latte nails are the ultimate ‘clean girl’ transition into sophistication, using warm browns and creams to create a delicious, marbled effect that looks expensive yet cozy.
Essential Items:
- Espresso brown polish
- Caramel tan polish
- Creamy white polish
- Toothpick or marbling tool
How to Prepare:
- Dot random blobs of all three colors onto the nail while they are wet.
- Use a toothpick to swirl them in a ‘figure 8’ pattern.
- Add a ‘drop of milk’ (white) in the center and drag through it.
- Apply a second layer of swirls for depth if needed.
- Finish with a matte top coat for a soft-touch finish.
Budget Range
- OPI Espresso Your Inner Self ($11)
- Sally Hansen Coffee Shift ($7)
- Zoya Caramel ($12)
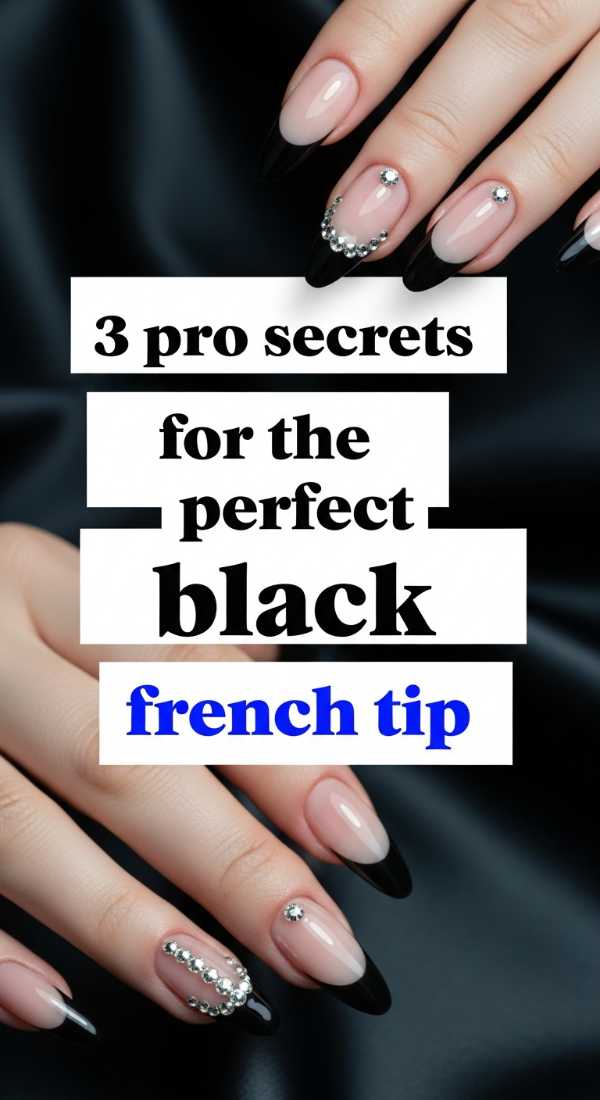
3 pro secrets for the perfect black french tip
Why to love these Nails:
The black French tip is the cool, older sister of the classic white tip. It’s edgy, sleek, and adds an instant high-fashion ‘editorial’ vibe to any outfit, especially when the line is razor-sharp.
Essential Items:
- Nude-to-pink base coat
- True black pigment polish
- Silicone nail stamper
How to Prepare:
- Apply black polish directly onto the silicone stamper head.
- Press your nail tip into the stamper at a 45-degree angle.
- Use a brush dipped in acetone to clean the ‘smile line’ for a perfect curve.
Budget Range
- Holo Taco One-Coat Black ($13)
- Olive & June Pink Sand ($9)
- Vixi Silicone Stamper ($6)
6 simple techniques for trendy plaid nail designs
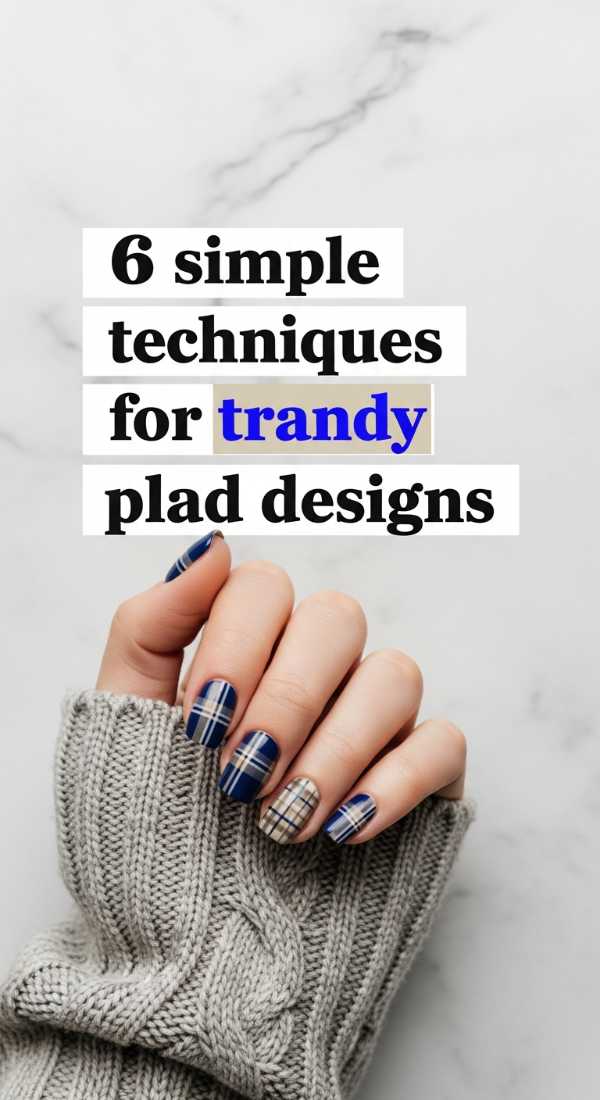
Why to love these Nails:
Plaid isn’t just for autumn scarves! It’s a structured, rhythmic pattern that feels incredibly intentional and chic. It gives off a ‘dark academia’ vibe that is just so cozy and scholarly.
Essential Items:
- Deep forest green or burgundy base
- Gold stripping tape
- Contrasting liner polishes
How to Prepare:
- Paint your base color and dry.
- Draw two thick vertical lines in a medium shade.
- Draw two thick horizontal lines crossing over them.
- Add thin, bright ‘accent’ lines in gold or white.
- Use a sponge to slightly blur intersections for a flannel look.
- Top coat to level everything.
Budget Range
- Revel Nail Plaid Set ($15)
- Liners by Gellen ($12)
- Nail Art Striping Tape ($5)
4 quick tips for minimalist heart nail art
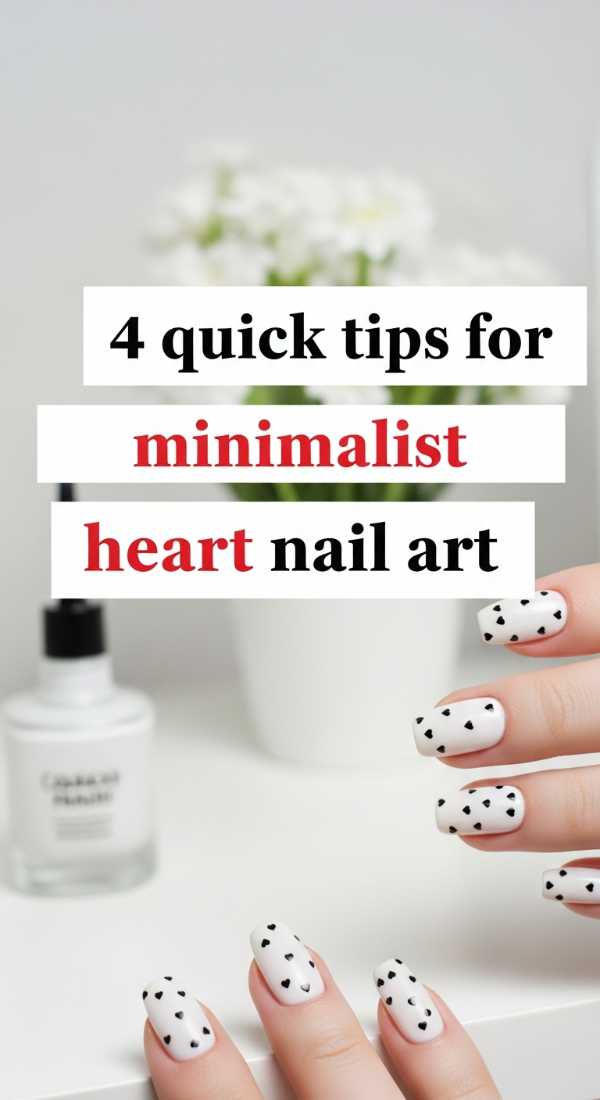
Why to love these Nails:
Minimalism is a love letter to simplicity. A tiny heart on a naked nail is like a secret smile shared with yourself every time you look down. It’s sweet without being overwhelming.
Essential Items:
- Dotting tool
- Red or pink polish
- Clear base
How to Prepare:
- Place two dots of color side-by-side with your dotting tool.
- Pull the bottom of each dot downward to meet in a ‘V’ shape.
- Keep the placement off-center for a modern look.
- Use a high-shine top coat for a glass-like finish.
Budget Range
- Dotting Tool Set from Amazon ($5)
- Revlon Red ($6)
- Seche Vite Top Coat ($9)
3 minutes to get the viral pink chrome look
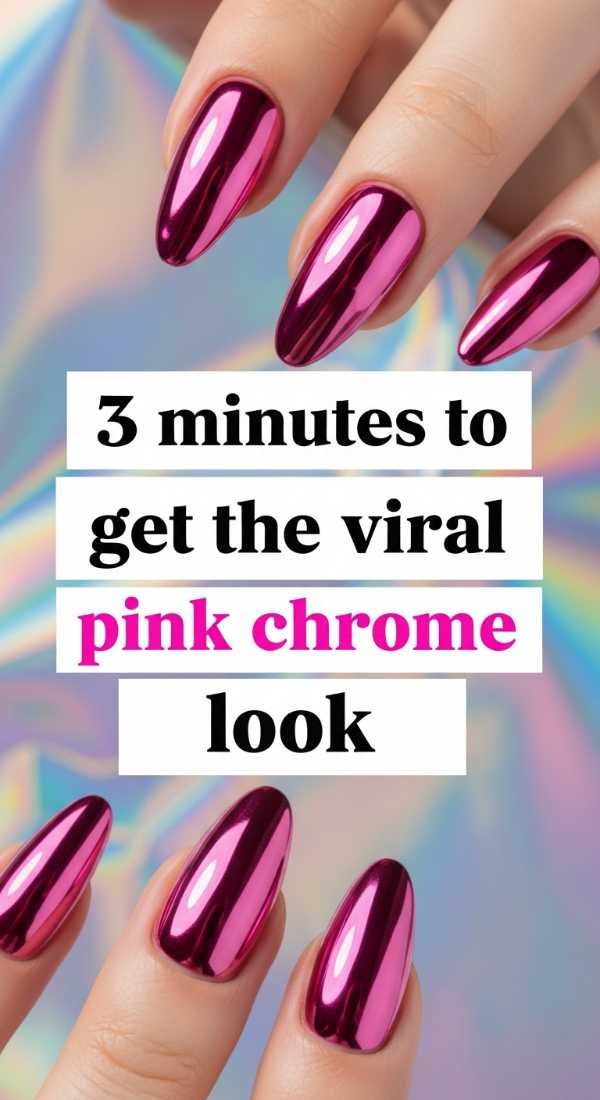
Why to love these Nails:
The ‘glazed donut’ obsession hasn’t left—it just evolved. The pink chrome look is ethereal and futuristic, making your nails look like they were dipped in liquid pearls or sunset clouds.
Essential Items:
- Light pink gel polish
- No-wipe top coat
- Pink pearl chrome powder
How to Prepare:
- Apply and cure your pink base and top coat.
- Rub the chrome powder onto the warm top coat with a sponge applicator.
- Gently brush off excess and seal with one final top coat.
Budget Range
- Artdone Chrome Powder ($8)
- Born Pretty Gel Polish ($7)
- SUNUV LED Lamp ($25)
5 best ways to shape your almond nails at home
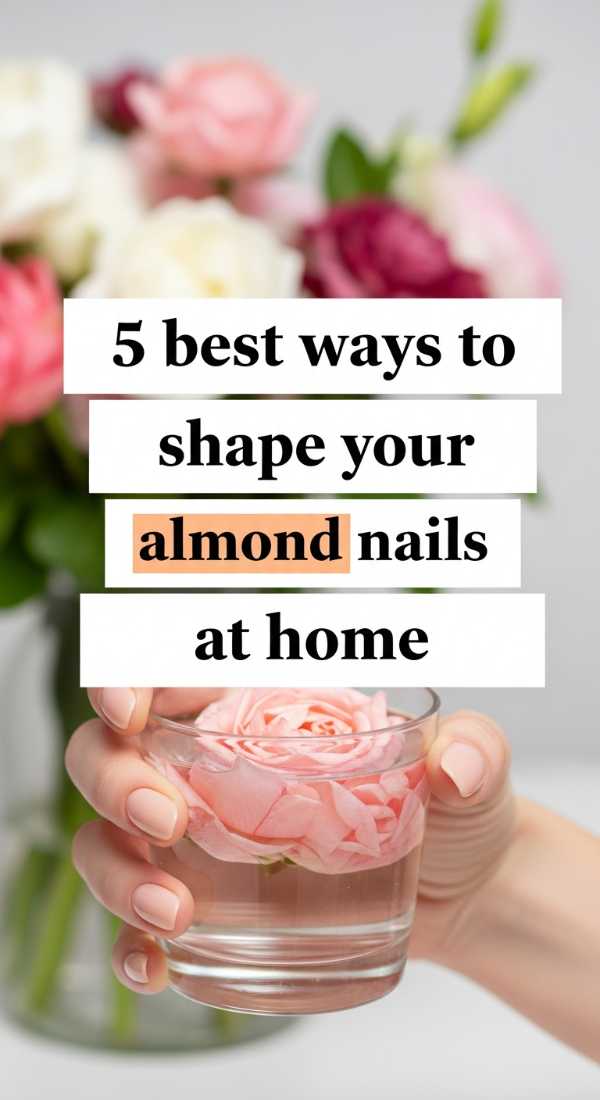
Why to love these Nails:
Almond nails are the most flattering shape for almost every hand. They elongate the fingers and provide a sophisticated canvas for any art style. They are the ‘little black dress’ of nail shapes.
Essential Items:
- 180-grit nail file
- Buffer block
- Cuticle oil
How to Prepare:
- Mark the center of your nail tip with a dot of polish.
- File the sides at an angle toward that center point.
- Round off the peak to avoid a ‘stiletto’ look.
- Smooth the edges with a glass file to prevent peeling.
- Hydrate with oil immediately.
Budget Range
- Bona Fide Glass Nail File ($12)
- Cuccio Milk & Honey Oil ($10)
- Flowery Buffer ($4)
4 elegant methods to add classy glitter to gel nails
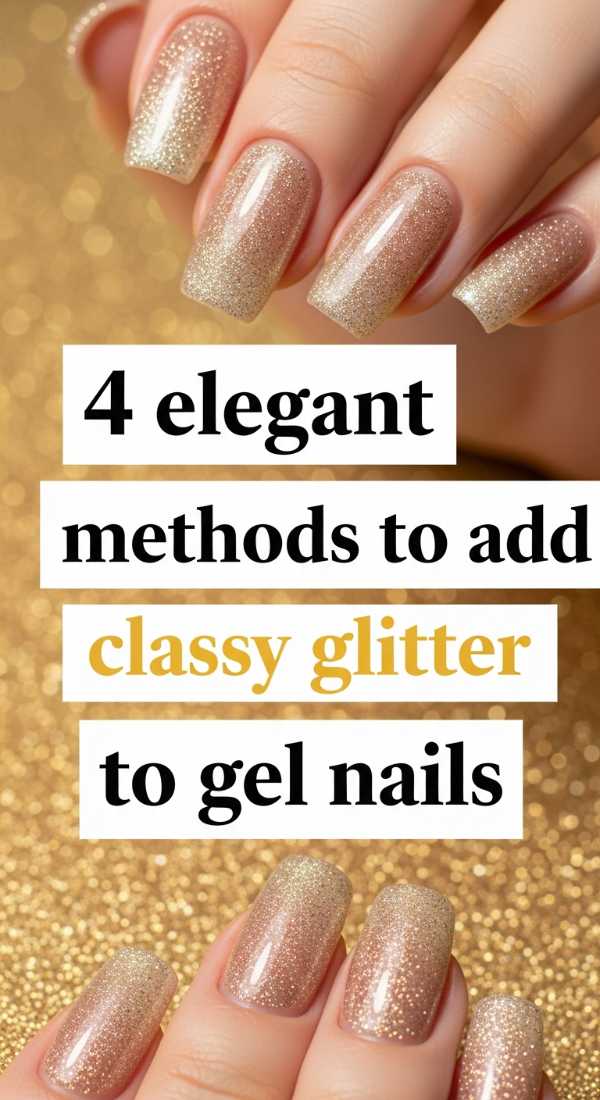
Why to love these Nails:
Glitter doesn’t have to be loud; it can be a whisper of stardust. These methods focus on ‘sophisticated sparkle’ that catches the light in the most enchanting, understated way.
Essential Items:
- Loose fine glitter
- Makeup sponge
- Clear gel builder
How to Prepare:
- Dab glitter onto the tips for a ‘gradient’ effect.
- Mix glitter into your top coat for a ‘shimmer veil.’
- Place individual large glitters near the cuticle for a ‘galaxy’ look.
- Burnish extra-fine glitter into a tacky layer for a metallic sheen.
Budget Range
- Tiptopy Loose Glitter ($9)
- Kiara Sky Gel Base ($14)
- Wedge Sponges ($3)
7 cute ideas for your next summer manicure
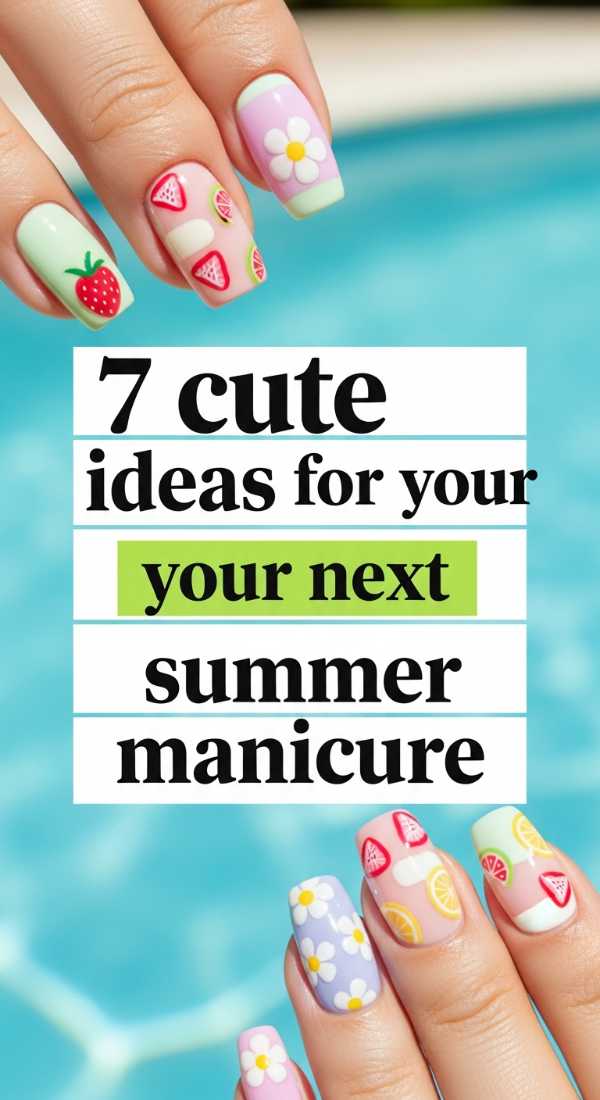
Why to love these Nails:
Summer is for play! These ideas are about sunshine, fruit, and bright pops of color that match the vibrant energy of a beach day or a garden party. They are pure joy in a bottle.
Essential Items:
- Neon palette
- Fruit decals
- Matte and Glossy top coats
How to Prepare:
- Try ‘Skittles’ nails (each finger a different neon).
- Add a tiny lemon or cherry decal to the ring finger.
- Paint a soft yellow ombre.
- Use ‘negative space’ waves in turquoise.
- Try a matte neon coral.
- Add ‘water droplets’ with 3D gel.
- Finish with a bright white French tip.
Budget Range
- Lights Lacquer Summer Bundle ($50)
- Decals by Tattly ($8)
- Sinful Colors Neon ($3)
3 steps to achieve a timeless bridal nail aesthetic
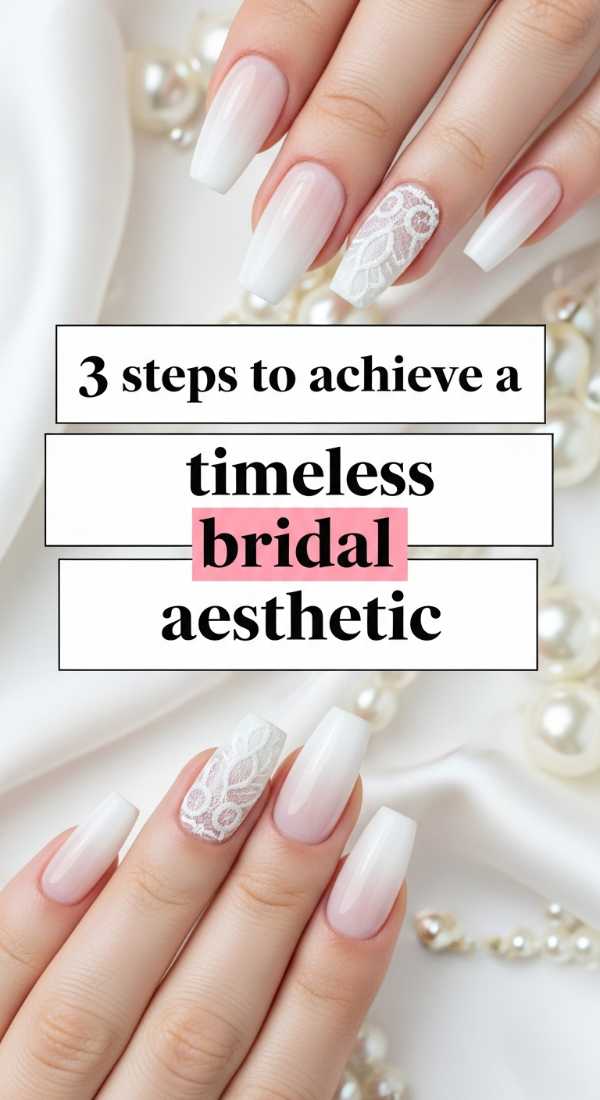
Why to love these Nails:
Bridal nails are about grace. It’s the manicure you’ll look back on in photos for decades, so we focus on ‘your nails but better’—glowing, healthy, and perfectly polished.
Essential Items:
- Sheer milky white polish
- Cuticle remover
- Soft buffing cream
How to Prepare:
- Clean the nail plate thoroughly and push back cuticles for a clean ‘canvas.’
- Apply two thin, even coats of milky white—avoiding any streaks.
- Add a tiny, single pearl at the base of the ring finger for a touch of luxury.
Budget Range
- DND Milky White ($12)
- Sally Hansen Cuticle Remover ($6)
- Swarovski Nail Pearls ($10)
Conclusion: Your Hands are Your Masterpiece
As we wrap up this journey through colors and textures, I want you to remember that nail art is a form of self-love. It’s the time you take for yourself, the quiet moments of focus, and the joy of seeing your personality reflected in the sparkle of a polish. You don’t need a professional studio to create high-fashion art; you just need your beautiful self and a little bit of patience. Go forth and shine, my loves. Your hands are ready to create wonders.