

The Curated Cottage: Dreamy DIY Projects for Every Room
There is a unique kind of magic that happens when you stop seeing your home as just a set of walls and start seeing it as a canvas for your soul. We’ve all felt that spark of inspiration while scrolling through beautiful feeds, but there is nothing quite like the tactile satisfaction of rolling up your sleeves and creating something with your own two hands. It’s about more than just aesthetics; it’s about the soft hum of a quiet afternoon spent painting, the smell of freshly cut cedar, and the way the light hits a newly finished corner of your living room. When we curate our spaces, we aren’t just decorating; we are building a sanctuary that reflects the very best versions of ourselves.
Welcome to our latest guide, where we dive deep into the projects that turn a house into a dreamy, lived-in cottage. Whether you are looking to illuminate your garden or bring a sense of coastal serenity into your bedroom, these projects are designed to be approachable yet transformative. Grab a cup of tea, find your favorite pair of work gloves, and let’s explore how small, intentional changes can bring a massive dose of joy and beauty into your daily life. Every room has a story waiting to be told, and today, we are going to write a few more chapters together.
How to Build Glowing Garden Planters for Magical Summer Nights

Why we love this
Imagine stepping out into your backyard as the sun dips below the horizon, greeted by the soft, ethereal glow of planters that seem to hold the stars themselves. There is something profoundly calming about the way light dances against the textured ceramic, casting long, romantic shadows across your patio tiles and highlighting the delicate emerald leaves of your favorite ferns. It transforms a simple garden into a midnight oasis, where the scent of damp earth and blooming jasmine mingles with the warmth of an ambient light that feels both modern and mythical. This project isn’t just about illumination; it’s about creating a mood that invites you to linger over a glass of wine under the moonlight, surrounded by a gentle, golden radiance.
Essential Elements:
- Large weather-resistant ceramic or resin planters
- Battery-operated or solar-powered waterproof LED puck lights
- Frosted glass stones or translucent river pebbles
- Clear outdoor-rated waterproof adhesive
- Potted plants (ferns or hostas work beautifully)
- Plastic risers or inner pots
How to make it
- Begin by cleaning the interior and exterior of your planters to ensure no dust or debris interferes with the adhesive bonding; allow them to dry completely in the sun for at least two hours.
- Apply a generous bead of waterproof adhesive to the back of your LED puck lights and press them firmly against the inner rim of the planter, approximately two inches from the top edge. Space them evenly for a balanced glow.
- Place a plastic riser or an inverted smaller pot inside the large planter to create a shelf for your plant; this ensures the plant doesn’t sit directly on the lights or the heavy stones.
- Carefully pour the frosted glass stones into the gap between the inner pot and the outer planter wall, filling it until the stones completely cover the LED lights but remain just below the planter’s rim.
- Insert your potted plant into the center riser, ensuring the foliage drapes slightly over the edges to catch the light from below.
- Set the timer on your lights or wait for dusk to trigger the solar sensors, checking for a uniform diffusion of light through the glass stones—the light should look soft and misty rather than sharp.
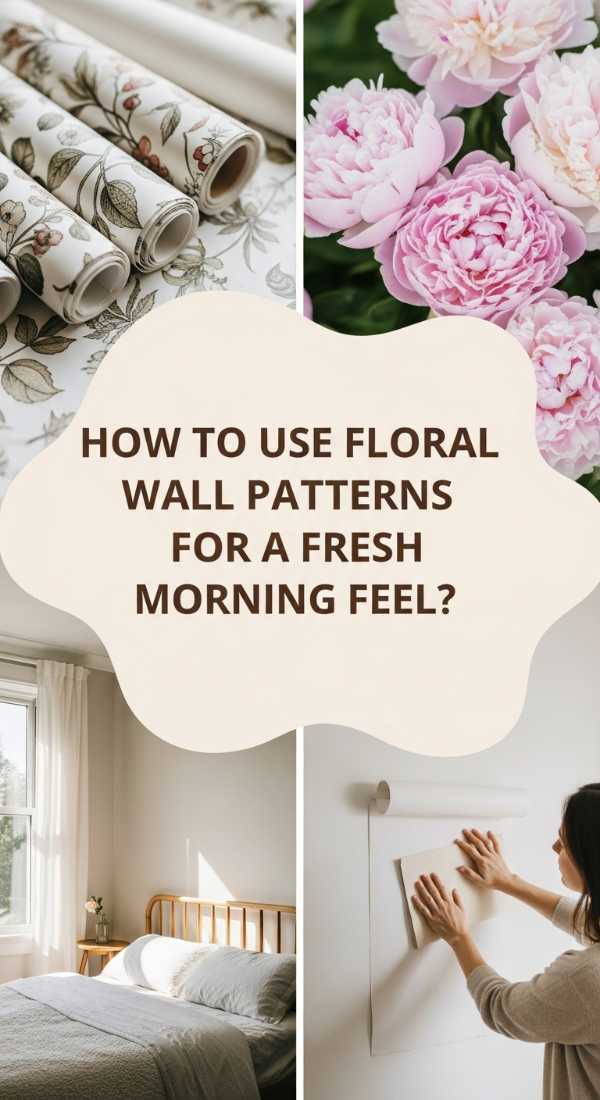
How to Use Floral Wall Patterns for a Fresh Morning Feel
Why we love this
Waking up in a room adorned with delicate floral patterns is like opening your eyes inside a perpetual spring morning, regardless of the weather outside. The visual texture of winding vines and soft petals creates a rhythmic, organic energy that breathes life into static walls, making the air feel lighter and the ceiling seem higher. You can almost smell the faint, imaginary scent of wild roses and lavender as the morning sun hits the pigment, revealing the intricate details of the design. It’s a design choice that marries vintage charm with a crisp, modern sensibility, providing a backdrop that feels both sophisticated and incredibly cozy for your morning coffee rituals.
Essential Elements:
- Large-scale floral stencils or high-quality peel-and-stick wallpaper
- Matte finish interior paint in soft botanical hues (sage, dusty rose, or cream)
- High-density foam rollers and detail brushes
- Painter’s tape and a spirit level
- Wallpaper smoothing tool or a soft microfiber cloth
- Measuring tape and a pencil
How to make it
- Prepare your surface by wiping the wall with a damp cloth to remove oils and dust; for wallpaper, ensure the wall is primed with a non-glossy base to prevent peeling later.
- Use your spirit level and pencil to mark a faint vertical plumb line down the center of the wall; this acts as your North Star, ensuring your patterns don’t drift diagonally as you work outward.
- If stenciling, secure the template with painter’s tape and load your foam roller with a very small amount of paint—the key is a “dry brush” technique to prevent bleed-through under the stencil edges.
- Apply the paint in light, circular motions, building the color slowly until you reach the desired opacity; wait roughly 10 minutes before carefully peeling the stencil back to reveal the crisp edges.
- For wallpaper, peel back only the top six inches of the backing, align it with your plumb line, and press it firmly to the top of the wall, using the smoothing tool to push air bubbles from the center toward the edges.
- Continue downward in small sections, overlapping the patterns by a fraction of an inch if necessary to maintain a seamless floral flow, and trim the excess at the baseboard with a sharp utility knife for a professional finish.
How to Build Stone Garden Borders for a Polished Backyard Look

Why we love this
There is a grounding, timeless quality to natural stone that instantly elevates the architecture of a garden, providing a sturdy and elegant frame for the vibrant colors of your flower beds. The cool, grey tones of slate or the warm, sandy hues of flagstone offer a wonderful tactile contrast to the soft mulch and delicate stems they protect. Walking through a garden with defined stone borders feels like wandering through a manicured English estate, where every plant has its place and the landscape feels intentional and permanent. It’s the ultimate way to achieve curb appeal that looks weathered and wise, yet perfectly tidy and cared for.
Essential Elements:
- Natural landscaping stones (cobblestones, slate, or fieldstone)
- Levelling sand or fine-grit pea gravel
- Landscape fabric (weed barrier)
- Garden spade and a rubber mallet
- Stakes and masonry string
- Marking paint or flour
How to make it
- Outline the desired curve or straight line of your border using marking paint or a sprinkle of flour to visualize the flow before you begin digging.
- Dig a trench along your mark that is approximately 4 inches deep and slightly wider than your stones; use your spade to keep the walls of the trench vertical and the base as flat as possible.
- Lay a strip of landscape fabric into the trench to prevent weeds from pushing through the gaps in your stones, then pour a 1-inch layer of leveling sand over the fabric.
- Place your first stone at the highest point of your yard, pressing it into the sand and tapping it firmly with a rubber mallet until it sits at the desired height; use the masonry string to ensure a consistent level.
- Nestle the subsequent stones tightly against one another, rotating them to find the best fit like a puzzle; for a natural look, avoid perfectly straight lines and allow for slight variations in stone thickness.
- Fill the small gaps between the stones with additional sand or fine gravel, then backfill the backside of the trench with soil, tamping it down with your boots to lock the border into place.
How to Arrange a Cozy Campsite for the Ultimate Nature Retreat

Why we love this
Creating a cozy campsite is all about merging the rugged beauty of the great outdoors with the plush, indulgent comforts of home, turning a simple tent into a woodland sanctuary. There is nothing quite like the sensory symphony of a crackling fire, the smell of pine needles underfoot, and the sight of a perfectly styled outdoor lounge illuminated by flickering lanterns. It’s about the feeling of soft wool blankets against your skin while the cool night air nips at your nose, and the profound peace that comes from being disconnected from the digital world and reconnected with the earth. This setup encourages long conversations, slow mornings, and a deep, restorative sleep under a canopy of whispering trees.
Essential Elements:
- Canvas bell tent or high-quality dome tent
- Outdoor weather-resistant rugs and floor cushions
- Portable fire pit and kiln-dried firewood
- String lights (battery or solar) and hurricane lanterns
- Inflatable mattress with high-thread-count linens and wool throws
- Folding wooden side tables and a pour-over coffee kit
How to make it
- Choose a flat, well-drained site away from low-lying areas where moisture might collect; clear all sharp rocks and sticks before laying down a heavy-duty footprint or tarp.
- Pitch your tent with the entrance facing away from the wind to prevent drafts, ensuring all guy lines are taut to create a smooth, crisp silhouette that can withstand evening breezes.
- Layer the interior floor with outdoor rugs to provide insulation from the cold ground and a soft surface for bare feet; place your mattress in the center, furthest from the door for maximum warmth.
- Create an outdoor “living room” by placing a weather-resistant rug in front of the tent entrance, surrounding a portable fire pit with comfortable folding chairs and plush floor cushions.
- Drape string lights over the tent’s peak and nearby branches, ensuring cables are tucked away to prevent tripping; place lanterns on small side tables to create pockets of warm, golden light.
- Set up a dedicated coffee station on a wooden crate or table, pre-staging your beans and kettle so that your first morning task is a slow, aromatic ritual as the forest wakes up around you.
How to Style a Rosy Sanctuary for Total Inner Peace

Why we love this
A rosy sanctuary is more than just a room filled with pink hues; it is a dedicated space for softness, vulnerability, and deep emotional restoration. The gentle warmth of blush tones and terracotta creates a cocoon-like environment that lowers the heart rate and invites the mind to drift away from the stresses of the day. Imagine the texture of velvet pillows against your back, the scent of rosewater drifting through the air, and the way the setting sun turns the walls into a glowing, coral-colored dreamscape. It is a place where you can breathe deeply, read slowly, and reconnect with your inner self in an environment that feels like a constant, warm embrace.
Essential Elements:
- Blush, mauve, and terracotta textiles (curtains, rugs, throws)
- Salt lamps or dimmable amber-hued lighting
- Velvet and linen throw pillows in varying shades of pink
- Fresh roses or dried eucalyptus in ceramic vases
- Aromatherapy diffuser with rose and sandalwood oils
- Plush area rug with a high pile
How to make it
- Select a base wall color in a very pale, warm white or a muted plaster-pink to provide a soft backdrop that reflects light without feeling overwhelming.
- Layer your windows with sheer rose-colored curtains that allow natural light to filter through, casting a warm, healthy glow across the entire room during the daytime.
- Arrange your seating area using a mix of textures; place linen pillows for breathability and velvet pillows for luxury, ensuring they are plumped and staggered for an inviting, lived-in look.
- Position your salt lamps in corners or on low tables; the warm orange-pink light they emit mimics the “golden hour” of sunset, which is scientifically proven to aid in relaxation and sleep prep.
- Incorporate natural wood elements, such as a small side table or picture frames, to ground the pink tones and prevent the space from feeling too sugary or artificial.
- Mist the textiles with a light rosewater spray and keep your diffuser running with a floral blend to engage the olfactory senses, completing the immersion into your private sanctuary.
How to Construct a Dreamy Duck Sanctuary for Your Feathery Friends

Why we love this
There is a whimsical, storybook quality to a well-designed duck sanctuary that brings an immediate sense of charm and life to any backyard. Watching ducks glide across a pristine pond while the sun glints off their iridescent feathers is a meditative experience that connects you to the rhythms of nature in a profound way. The sound of happy splashing and gentle quacking provides a soundtrack of contentment, while the lush greens of the surrounding plants flourish in the moisture-rich environment. It’s a project that rewards you with both beauty and companionship, creating a picturesque focal point that feels like a living painting in your own garden.
Essential Elements:
- Pre-formed pond liner or heavy-duty EPDM rubber liner
- Solar-powered water pump and fountain head
- Pressure-treated timber for a secure enclosure
- Predator-proof hardware cloth (1/2 inch mesh)
- Smooth river stones and aquatic plants (like water lilies or reeds)
- A cozy, elevated duck house with straw bedding
How to make it
- Excavate a hole for your pond that is slightly larger than your liner, ensuring the bottom is perfectly level and free of sharp stones; add a 2-inch layer of damp sand to the bottom for cushioning.
- Drop the liner into place and begin filling it with water, pausing periodically to tuck the edges and smooth out any wrinkles as the weight of the water pulls the material into the contours of the hole.
- Construct a perimeter fence using pressure-treated posts and hardware cloth, burying the mesh at least 6 inches into the ground to prevent burrowing predators from gaining access to the sanctuary.
- Install your solar pump in the center of the pond to keep the water oxygenated and moving, which prevents stagnation and discourages mosquitoes from breeding.
- Place large, smooth river stones around the edge of the pond to hide the liner and provide easy entry and exit points for the ducks, ensuring there are no sharp edges that could injure their feet.
- Position the duck house on a slightly elevated, dry patch of land within the enclosure, filling it with thick layers of clean straw and ensuring the door faces away from prevailing winds for a cozy night’s rest.
How to Plan Professional Landscaping for Incredible Curb Appeal

Why we love this
Professional-grade landscaping is the ultimate handshake between your home and the world, offering a preview of the beauty and care that lies within. A thoughtfully designed front yard uses a symphony of heights, colors, and textures to guide the eye toward the entrance, creating a sense of arrival that feels both grand and welcoming. The crisp edges of a freshly mulched bed, the structural elegance of boxwood hedges, and the seasonal pops of color from perennial blooms all work together to create a multi-dimensional masterpiece. It’s a transformation that doesn’t just increase property value; it fills you with a sense of pride every time you pull into your driveway and see your home framed by nature’s best work.
Essential Elements:
- A scaled site plan or sketch of your property
- Evergreen structural plants (boxwood, yew, or arborvitae)
- Perennial flowers (lavender, hydrangeas, or coneflowers)
- Premium dark hardwood mulch
- Steel or heavy-duty plastic landscape edging
- Slow-release organic fertilizer and high-quality topsoil
How to make it
- Start with a clear plan by measuring your yard and sketching the “zones”—use taller evergreens at the back of beds to provide a year-round green backdrop and smaller flowers in the front for color.
- Remove all existing weeds and grass from your designated bed areas using a sharp spade, then till the soil to a depth of 8 inches, mixing in organic compost and topsoil to create a nutrient-rich foundation.
- Install your edging material along the perimeter of the beds to create a sharp, permanent line that prevents grass from encroaching on your display.
- Place your plants (still in their nursery pots) in their planned locations, stepping back to view the arrangement from the street; adjust for spacing to ensure each plant has room to reach its mature size.
- Dig holes twice as wide as the root balls, tease the roots gently to encourage outward growth, and plant them at the same depth they were in the pots, tamping the soil down firmly to remove air pockets.
- Apply a 3-inch layer of premium mulch across the entire bed, keeping it an inch away from the base of the stems to prevent rot, then water deeply to settle the plants and activate the fertilizer.
How to Master an Azure Palette for a Relaxing Coastal Vibe

Why we love this
There is an inherent tranquility in the color blue that mirrors the vastness of the ocean and the clarity of a summer sky, making it the perfect foundation for a home that breathes ease and relaxation. An azure palette brings a cool, refreshing energy to a room, tricking the brain into feeling a gentle sea breeze even in the heart of the city. When you pair these deep, watery tones with sun-bleached woods and crisp whites, the result is a sophisticated coastal aesthetic that feels timeless rather than trendy. It’s the feeling of salt on your skin and sand between your toes, captured in the fabric of your sofa and the paint on your walls, creating a space where the world’s noise simply fades away.
Essential Elements:
- Paint swatches in navy, sky blue, and true azure
- Natural fiber rugs (jute, sisal, or seagrass)
- White linen slipcovers or upholstery
- Driftwood accents and weathered wood furniture
- Glass decor in sea-glass green and cobalt blue
- Woven baskets and nautical-inspired hardware
How to make it
- Select your “anchor” blue—a deep navy or rich azure—for a focal point such as an accent wall or a large piece of furniture like a velvet sofa or a painted sideboard.
- Balance the intensity of the blue by painting the remaining walls in a crisp, cool white with blue undertones to keep the room feeling bright and airy.
- Introduce texture through natural fibers; lay down a large jute rug to provide a sandy-colored base that grounds the blue elements and adds a tactile, organic feel to the floor.
- Swap out heavy drapes for light-filtering white linen or cotton panels that move with the air, mimicking the sails of a ship and allowing the azure accents to pop against the light.
- Layer in your “sea glass” elements by placing blue glass vases or bowls on windowsills where they can catch the light, creating shimmering reflections that mimic the surface of the water.
- Incorporate weathered wood through picture frames or coffee tables; the grey-washed finish provides the perfect neutral contrast to the vibrancy of the azure tones, completing the coastal narrative.
How to Install Outdoor Post Lighting for a Safe Illuminated Walkway

Why we love this
Outdoor post lighting is the perfect marriage of form and function, providing a guiding light that ensures safety while adding a touch of classic architectural beauty to your landscape. There is something deeply welcoming about a path that is clearly defined by warm, glowing beacons, leading you and your guests safely to the door through the evening shadows. These lights act as silent sentinels, highlighting the textures of your walkway and the colors of your nighttime garden while adding a layer of security that feels elegant rather than industrial. It’s about creating a sense of transition—a bridge between the wild darkness of the night and the cozy safety of your home.
Essential Elements:
- Post-mount light fixtures (traditional or modern)
- 4×4 pressure-treated wooden posts or pre-fabricated metal posts
- Quick-set concrete mix
- Direct-burial electrical cable (UF-B) or solar post caps
- Post-hole digger and a level
- Wire strippers and waterproof wire nuts
How to make it
- Map out your lighting path, spacing the posts approximately 6 to 8 feet apart to ensure overlapping light pools without creating dark spots or blinding glare.
- Dig holes for each post that are at least 18 inches deep (or deeper if you live in a frost-prone climate) using a post-hole digger to keep the diameter narrow and the walls stable.
- If using hardwired lights, dig a trench between the holes at a depth of 12 inches for your electrical cable, following local building codes for outdoor wiring safety.
- Set each post in its hole, using a level to check for perfect vertical alignment on two adjacent sides, then pour in the quick-set concrete and add water according to the package instructions.
- Once the concrete is cured (usually 30-60 minutes), thread your wiring through the center of the post or along the side in a protective conduit, then secure the light fixture to the top of the post.
- Connect the wiring using waterproof wire nuts, test the circuit to ensure all lights are functioning, then backfill the holes and trenches with soil and sod to hide the installation.
How to Incorporate Spring Flower Textures for a Constant Seasonal Glow

Why we love this
Incorporating the varied textures of spring flowers into your home is like inviting a living, breathing art installation into your everyday life. From the papery delicacy of poppies to the waxen strength of tulips and the soft, ruffled layers of peonies, these textures provide a sensory richness that synthetic decor can never replicate. The sight of fresh blooms in the morning light provides an immediate boost to your mood, while their subtle fragrances—sweet, spicy, or earthy—layer the air with a natural perfume that changes as the day warms. It’s a way to keep your home in sync with the cycles of the earth, ensuring that your space feels fresh, vibrant, and full of the promise of new beginnings.
Essential Elements:
- A variety of seasonal spring bulbs (tulips, daffodils, hyacinths)
- Textured greenery (seeded eucalyptus, ferns, or dusty miller)
- Assorted vases in varying heights (clear glass, ceramic, and brass)
- Floral shears and floral tape or a flower frog
- Fresh water and flower food
- A dedicated cool spot for overnight storage
How to make it
- Start by selecting a “hero” flower with significant texture, such as a multi-petaled peony or a fringed tulip, to serve as the focal point of your arrangement.
- Cut your stems at a 45-degree angle under lukewarm water; this increases the surface area for water absorption and prevents air bubbles from blocking the “veins” of the flower.
- Build a structural base in your vase using “filler” greenery like eucalyptus or ferns; criss-cross the stems to create a natural grid that will hold the more delicate flowers in place.
- Insert your largest, most textured blooms first at varying heights, ensuring the most visually interesting flowers are at eye level or slightly below for maximum impact.
- Add “airy” textures like baby’s breath or lace-flower to fill in the gaps, which creates a soft, misty halo around the denser blossoms and adds a sense of movement to the arrangement.
- Change the water every two days and trim a quarter-inch off the stems each time; this keeps the vessels clear of bacteria and ensures the flowers continue to “glow” with health for as long as possible.
The Joy of a Hand-Built Home
As we wrap up our journey through the Curated Cottage, remember that the most beautiful homes aren’t built in a day—they are grown through small, intentional projects and a whole lot of love. Each stone laid in the garden and each brushstroke on the wall is a testament to your creativity and your commitment to making life a little more beautiful. We hope these DIYs inspire you to look at your space with fresh eyes and a ready heart. Your home is your sanctuary, and there is no limit to the magic you can create within its walls. Happy making!