

The Art of Living: Aesthetic Decor Ideas for a Dreamy Home
There is a special kind of magic in the way a home breathes when it is filled with intention and light. For me, home has always been more than just four walls; it is a living canvas where we paint our daily joys and find solace from the buzzing world outside. Whether it is the soft flicker of a candle at dusk or the way a fresh bouquet of peonies transforms a kitchen counter, these small aesthetic choices cultivate a lifestyle of serenity and beauty that nourishes the soul.
Creating a dreamy home isn’t about following every fleeting trend, but rather about curating moments that resonate with your personal story. It is about textures that invite you to stay a little longer, scents that evoke childhood summers, and spaces that celebrate the people you love. Join me as we explore how to elevate the everyday into something extraordinary, from sun-drenched patios to the most whimsical holiday tablescapes.
How to Create a Poolside Paradise for Total Summer Bliss
Why we love this
There is nothing quite like the shimmering reflection of turquoise water against a backdrop of crisp white linens to make you feel like you’ve been transported to a Mediterranean villa. We love this look because it prioritizes ultimate relaxation, combining the cooling sensation of a light breeze with the plush comfort of oversized lounge cushions and the rhythmic sound of water. It’s a sensory experience where the scent of coconut sunblock meets the refreshing sight of potted palms, creating an outdoor sanctuary that feels both high-end and deeply restorative.
Essential Elements:
- Weather-resistant oversized floor cushions
- Canvas cantilever umbrellas for architectural shade
- Large terracotta or ceramic planters with tropical greenery
- Outdoor-safe jute or woven rugs
- Battery-operated lanterns for evening ambiance
- A designated refreshment station with a galvanized tub
How to make it
- Begin by defining your ‘zones’ to prevent the pool deck from looking cluttered; establish a sun-soaking area with loungers and a separate shaded conversation nook.
- Layer your flooring by placing a large, neutral outdoor rug beneath your main seating group to anchor the space and protect feet from hot tiles.
- Install a cantilever umbrella at a 45-degree angle over your primary lounge spot to provide architectural height and essential UV protection.
- Incorporate greenery by grouping three different-sized planters in corners, ensuring you use ‘thriller, filler, and spiller’ plants for a lush, professional look.
- Style your loungers with high-denier outdoor pillows in tonal shades of blue or sand, ensuring they are positioned toward the water for the best view.
- Set up a low-profile bar cart stocked with acrylic glassware and citrus-infused water to ensure hydration is always within reach.
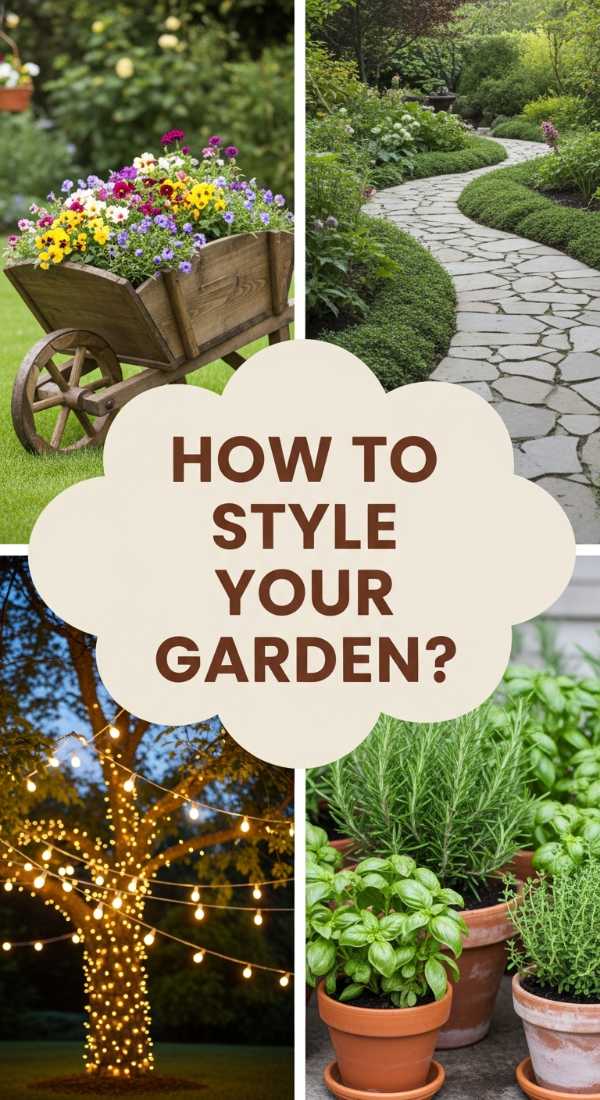
How to Design a DIY Garden Haven for Pure Serenity

Why we love this
A garden haven is a love letter to the earth, a place where the chaotic noise of the city fades into the gentle hum of bees and the rustle of leaves. We adore this because it allows for a tactile connection to nature, where the damp scent of soil after a rain and the vibrant colors of blooming perennials create a living tapestry of peace. It’s a space that encourages slow living, providing a private nook where you can sip morning tea while surrounded by the delicate fragrance of jasmine and the soft textures of ornamental grasses.
Essential Elements:
- Flagstone or pea gravel for winding pathways
- A reclaimed wooden bench or iron bistro set
- A mix of perennial flowers (lavender, hydrangeas, roses)
- Solar-powered fairy lights or copper lanterns
- A stone birdbath or small bubbling water feature
- Vertical trellises for climbing vines
How to make it
- Start by mapping out a curved pathway using flour or spray paint to create a natural flow through your yard, then excavate 2 inches of soil and fill with pea gravel.
- Choose a focal point, such as a large hydrangea bush or a vintage garden bench, and arrange your seating to face this highlight.
- Plant your tallest greenery and trellises at the back of the garden beds to create a sense of enclosure and privacy from neighbors.
- Install a solar-powered water fountain on a level stone base; the sound of trickling water is key for masking neighborhood noise and attracting local birds.
- Weave warm-toned fairy lights through the branches of trees or across the top of a pergola to extend the garden’s usability into the twilight hours.
- Mulch all garden beds with dark wood chips to retain moisture, suppress weeds, and provide a clean, professional finish to your landscaping.
How to Bake Easter Treats for Your Sweetest Spring Celebration
![]()
Why we love this
Baking for Easter is an exercise in pure whimsy, bringing the pastel palette of spring directly into the heart of the kitchen. We love these treats because they combine the nostalgic warmth of vanilla and lemon zest with the artistic joy of decorating with royal icing and edible flowers. The kitchen fills with the scent of browning butter and sweet sugar, creating an atmosphere of anticipation and celebration that makes the house feel truly alive as family gathers to sneak a taste of the festive decorations.
Essential Elements:
- High-quality unsalted butter and Madagascar vanilla bean paste
- Pastel-colored gel food dyes (mint, blush, lilac)
- Decorative piping bags and various star tips
- Miniature chocolate eggs and edible gold leaf
- Fresh lemon zest and spring-themed cookie cutters
- Cardstock or ribbon for gift packaging
How to make it
- Cream your room-temperature butter and sugar for at least 5 minutes until the mixture is pale and fluffy, which ensures a light, melt-in-the-mouth texture.
- Incorporate your dry ingredients slowly on a low mixer speed to avoid overworking the gluten, which keeps your sugar cookies or cakes tender.
- Chill your cookie dough for at least 2 hours before cutting shapes; this prevents spreading in the oven and maintains those crisp Easter bunny edges.
- Bake at 350°F (175°C) until the edges are just barely golden; for cupcakes, check with a toothpick at the 18-minute mark for a clean pull.
- Prepare a stiff royal icing for outlining and a thinner ‘flood’ consistency for filling, using a toothpick to pop any tiny air bubbles for a glass-like finish.
- Apply gold leaf accents using a dry, clean paintbrush once the icing has set completely, adding a touch of sophisticated shimmer to your pastel creations.
How to Transform an Apartment Patio for Cozy City Living

Why we love this
An apartment patio is a tiny gateway to the sky, and transforming it into a cozy retreat is the ultimate way to claim your piece of the urban landscape. We love the challenge of maximizing small square footage to create a high-impact ‘outdoor room’ that feels like an extension of the indoors. With the soft glow of Edison bulbs overhead and the comfort of a weather-proof rug underfoot, a balcony becomes a private observatory where you can watch the sunset over the skyline in total comfort.
Essential Elements:
- Folding wooden bistro set to save floor space
- Vertical herb garden or wall-mounted planters
- Weather-resistant outdoor area rug
- Strand of globe string lights (Edison style)
- Privacy screen made of bamboo or faux ivy
- Soft outdoor throw blankets and velvet pillows
How to make it
- Begin by thoroughly cleaning the balcony floor and walls to create a fresh slate; then, lay down interlocking deck tiles or an outdoor rug to mask industrial concrete.
- Install a privacy screen along the railing using zip ties; this creates an intimate atmosphere and hides the view of surrounding traffic or utility boxes.
- Mount a vertical planter or a series of ‘S’ hooks on the wall to grow herbs and flowers upward, preserving valuable floor space for seating.
- Select furniture that is proportional to the space—folding chairs are ideal as they can be tucked away during inclement weather.
- String your lights in a zig-zag pattern across the ceiling or along the railing, ensuring they are rated for outdoor use and have a nearby power source.
- Finish the space by adding a small side table for books and coffee, and drape a chunky knit throw over a chair to encourage late-night lounging.
How to Host a Mother’s Day Brunch for the Best Family Memories

Why we love this
Mother’s Day brunch is a soulful celebration of the women who ground us, and there is no better way to honor them than with a beautifully curated morning feast. We love the elegance of a table laden with fresh berries, sparkling mimosas, and delicate floral arrangements that mirror the warmth of the occasion. It’s about the clinking of glasses, the laughter shared over smoked salmon tartines, and the lingering scent of fresh-pressed coffee that makes the morning feel like a cherished, timeless tradition.
Essential Elements:
- Linen tablecloth and matching cloth napkins
- Fresh seasonal floral centerpieces (peonies, tulips, or ranunculus)
- Tiered serving stands for pastries and fruit
- Champagne flutes and a dedicated mimosa bar
- Personalized place cards and handwritten notes
- Soft acoustic playlist for background ambiance
How to make it
- Create a ‘wow’ factor by building a centerpiece using three different heights of vases filled with tonal flowers; keep them low enough so guests can see each other.
- Set the table the night before using your best china and glassware to reduce morning stress, ensuring every fork and knife is polished to a shine.
- Prepare a DIY mimosa station on a side table with chilled prosecco, three types of fruit juice, and bowls of fresh raspberries and mint for garnishes.
- Focus on ‘make-ahead’ dishes like overnight brioche French toast or a savory frittata, allowing you to spend more time talking and less time at the stove.
- Warm your plates in a low oven (150°F) before serving to ensure the food stays hot while everyone finds their seat and settles in.
- Place a small, wrapped gift or a handwritten letter at each guest’s setting to make every woman at the table feel uniquely celebrated and seen.
How to Decorate a Graduation Cap for Your Big Milestone
Why we love this
Decorating a graduation cap is a beautiful rite of passage, a way to wear your achievements and your future dreams on your head as you walk across the stage. We love this tradition because it is deeply personal and creative, turning a standard academic garment into a glittering storyboard of your hard work and personality. From sparkling rhinestones that catch the stadium lights to meaningful quotes that inspire, it’s a tiny billboard of triumph that makes for the most iconic photos of the day.
Essential Elements:
- Heavy-duty cardstock or a ‘grad cap kit’ base
- E6000 glue or a high-temp hot glue gun
- Assorted flatback rhinestones and pearls
- Vinyl lettering or permanent metallic markers
- 3D elements like silk flowers or miniature charms
- Double-sided adhesive velcro to attach the design to the cap
How to make it
- Trace your graduation cap onto a piece of cardstock and cut it out, including the hole for the button; this protects the actual cap from permanent glue damage.
- Sketch your design lightly in pencil on the cardstock before applying any permanent materials to ensure the layout is balanced and centered.
- Apply your background color first—whether that’s glitter paper, paint, or fabric—and let it dry completely before moving to the next layer.
- Use tweezers to place small rhinestones or lettering, applying glue to the cardstock rather than the decoration for a cleaner, smudge-free application.
- If using silk flowers, trim the plastic stems as flat as possible and glue them around the edges to create a lush, 3D frame for your central quote.
- Attach the finished cardstock to the cap using four small strips of adhesive velcro at the corners; this keeps the design secure while you walk.
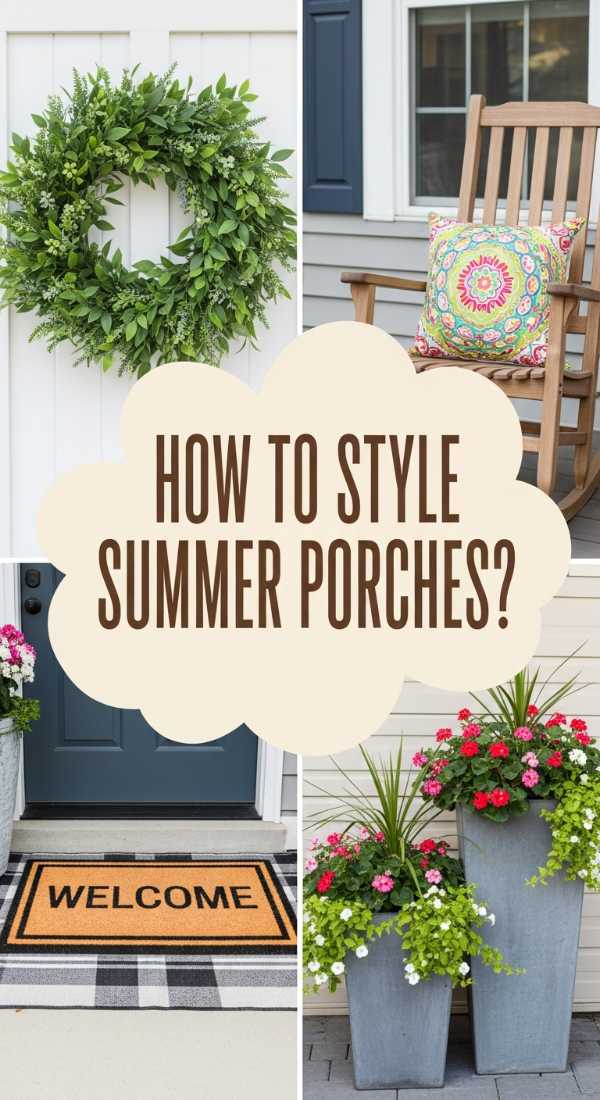
How to Refresh Your Front Porch for a Bright Summer Welcome
Why we love this
The front porch is the handshake of the home, and a summer refresh is the perfect way to signal a season of hospitality and sunshine. We love this because a few simple changes—like a pop of yellow on the door or the scent of blooming geraniums—can completely change the energy of your entryway. It creates a welcoming transition for guests and a cheerful ‘welcome home’ for you every time you pull into the driveway, making the entire house feel updated and full of life.
Essential Elements:
- A fresh, high-contrast welcome mat
- A large-scale summer wreath (citrus, eucalyptus, or hydrangea)
- Matching oversized planters for symmetry
- Coordinating outdoor pillows for a porch swing or chair
- New black or brass hardware/house numbers
- A decorative watering can or seasonal signage
How to make it
- Start by power-washing the porch floor, steps, and siding to remove winter grime and spiderwebs, giving you a bright, clean canvas to work with.
- Paint your front door in a bold, summery hue like sage green or butter yellow; use a high-gloss exterior paint for a durable and sophisticated finish.
- Place two tall, identical planters on either side of the door to create a sense of formal balance; fill them with ferns or tall grasses for height.
- Layer your welcome mat by placing a larger, patterned rug (like black and white stripes) underneath a standard coir mat for a trendy, designer look.
- Replace old, tarnished house numbers with modern, oversized digits to instantly elevate the curb appeal and make the home easier for guests to find.
- Add a ‘living’ element by hanging two baskets of trailing petunias from the porch ceiling, ensuring they are hung at eye level for maximum visual impact.
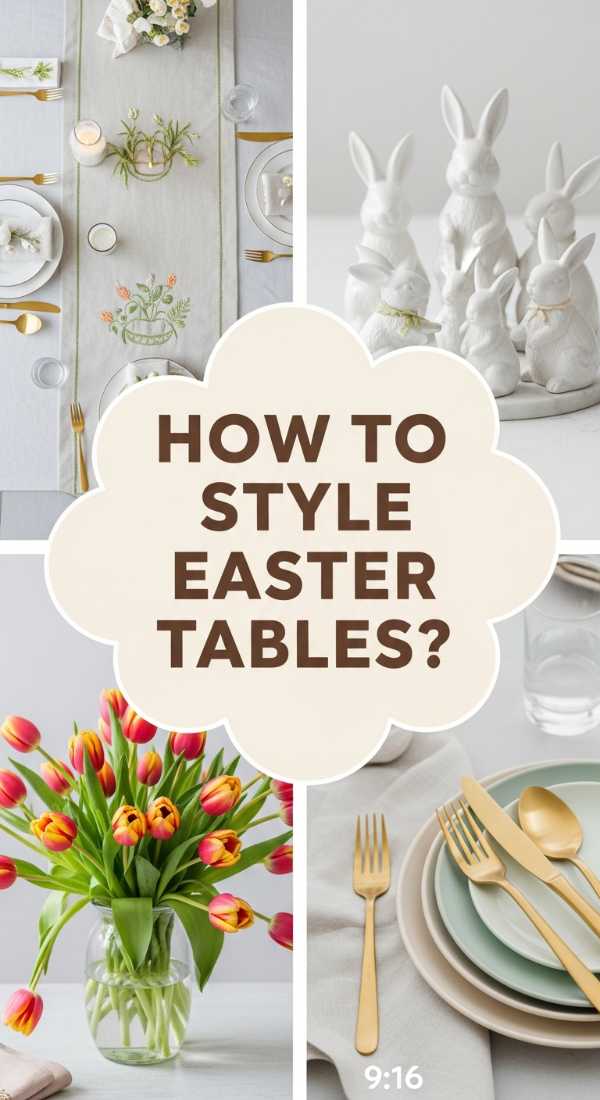
How to Set an Easter Table for a Joyful Family Feast

Why we love this
An Easter table is the heart of the spring season, where family heirlooms meet fresh-cut blooms in a celebration of new beginnings. We love this aesthetic because it balances the elegance of fine linens with the playful charm of ceramic bunnies and moss-covered accents. The soft light reflecting off polished silverware and the earthy textures of woven placemats create a grounded, festive environment where the meal feels like a true occasion, and every guest feels specially catered to.
Essential Elements:
- Neutral linen table runner or tablecloth
- Woven charger plates or placemats for texture
- Vintage-inspired floral china or pastel stoneware
- Taper candles in varying spring shades
- Nest-like bowls or egg cups for placeholders
- Fresh moss or micro-greens for a ‘garden’ feel
How to make it
- Lay down your base linen, ensuring it has a 6-10 inch overhang on all sides; iron it while on the table for a perfectly crisp, professional look.
- Create a ‘living’ center runner by scattering clumps of preserved moss down the center of the table and nesting ceramic eggs and small flower vases within it.
- Layer your place settings starting with a woven charger, followed by a large dinner plate, and topped with a smaller, decorative salad plate or bowl.
- Fold your napkins into ‘bunny ears’ using a simple rolling technique and securing them with a piece of twine or a wooden ring for a whimsical touch.
- Incorporate height by adding 3-5 slender taper candles in glass holders; choose unscented candles so they don’t interfere with the aroma of the food.
- Add a personalized element by writing each guest’s name on a hollowed-out eggshell or a small card tucked into a miniature bird’s nest at each setting.
How to Decorate Your Car for a Fun Road Trip Adventure
Why we love this
Road trips are about the journey as much as the destination, and decorating your car turns the vehicle into a mobile celebration. We love this because it brings a sense of adventure and personality to those long stretches of highway, making every gas station stop feel like a party. From window art that shares your excitement with the world to an interior that feels like a cozy, organized lounge, it transforms a utilitarian space into a fun-filled capsule of memories.
Essential Elements:
- Liquid chalk markers for window art
- Bunting or mini-garlands for the dashboard/windows
- Travel-themed stickers or magnetic decals
- Organized ‘snack station’ bins
- Cozy travel blankets and ergonomic pillows
- A portable Polaroid camera for capturing roadside stops
How to make it
- Clean the exterior windows thoroughly before using chalk markers; draw your route or ‘Just Graduated/Vacation Bound’ on the rear side windows only to ensure visibility.
- Secure a mini-garland or string of battery-operated fairy lights along the back dashboard, using small clear command hooks to keep them from sliding during turns.
- Create a ‘comfort zone’ in the back seat by layering plush blankets and pillows, ensuring they are secured so they don’t interfere with the driver’s view.
- Organize the center console or back-of-seat pockets with clear pouches for chargers, maps, and sunglasses to keep the aesthetic tidy and stress-free.
- Pack a dedicated ‘road trip tray’ for the passenger seat, featuring a aesthetic water bottle, a journal, and a selection of curated snacks in glass jars.
- Attach a small trash bin with a lid to the back of a seat; staying clean is the most important part of keeping a decorated car feeling ‘dreamy’ during a long trip.
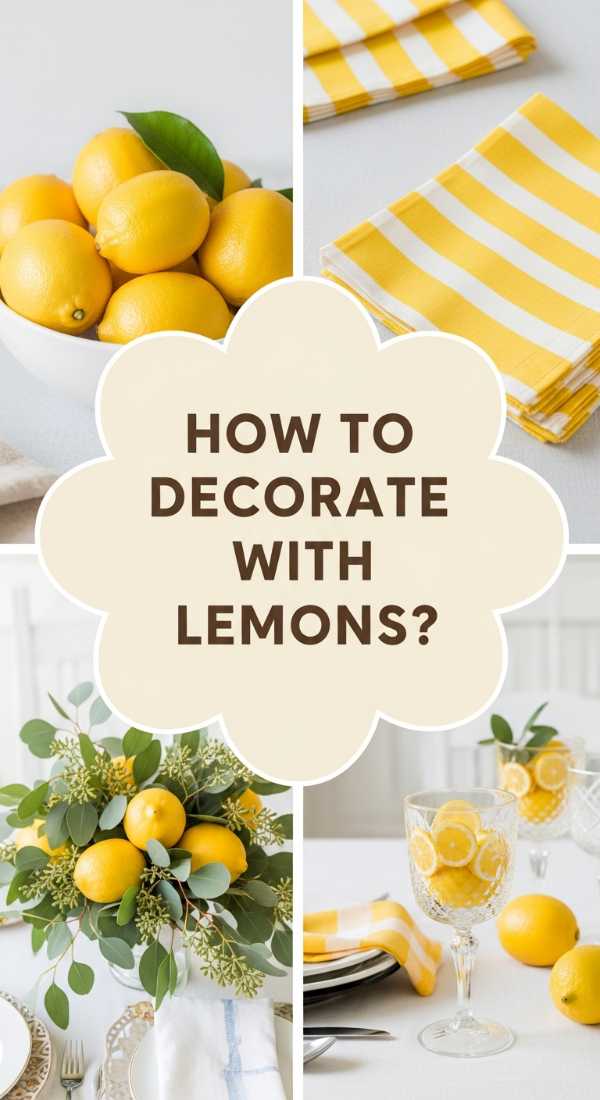
How to Style a Lemon Table for a Zesty Summer Soirée
[IMAGE_10]
Why we love this
Nothing says summer quite like the vibrant, zesty energy of fresh lemons. We love this styling because it is incredibly affordable yet looks high-end, utilizing the natural beauty of fruit to create a bright, citrus-scented atmosphere. The contrast between the vivid yellow lemons, crisp white linens, and deep green foliage creates a Mediterranean vibe that feels effortlessly chic. It’s a refreshing aesthetic that makes guests feel instantly energized and ready for a sun-soaked afternoon of laughter.
Essential Elements:
- Two dozen fresh, bright yellow lemons (various sizes)
- Fresh eucalyptus or bay leaf branches
- White or blue-and-white patterned linens (Majolica style)
- Yellow taper candles or citrus-scented votives
- Clear glass pitchers for lemon-infused water or sangria
- Yellow-ribboned napkins or citrus-slice place cards
How to make it
- Start with a clean white tablecloth or a blue-and-white tile-patterned runner to provide a high-contrast base for the yellow fruit.
- Create a ‘citrus garland’ down the center of the table by weaving eucalyptus branches together and nesting whole lemons and halved lemons throughout.
- Slice several lemons into thin rounds and press them against the inside of clear glass vases before filling with water and white flowers for a ‘submerged’ look.
- Use a small paring knife to make a slit in a whole lemon and slide a cardstock name tag into it for a charming, organic place card.
- Fill large glass dispensers with ice, water, and thick lemon slices; the visual of the floating fruit serves as both a beverage and decor.
- Scatter small yellow flower petals or yellow sea glass around the base of the centerpiece to fill in any gaps and add a final layer of color and texture.
Embracing the Beautiful Everyday
As we have explored today, the art of living isn’t about grand gestures, but about the thoughtful details that make our homes and celebrations feel uniquely ours. Whether you are baking treats for a spring morning or styling a citrus-themed table for friends, you are creating a legacy of beauty and warmth. Remember that your home is a reflection of your journey—make it dreamy, make it cozy, and above all, make it yours.