

I used to think that a life-changing morning routine involved waking up at 5:00 AM, hitting a grueling workout, and drinking green juice that tasted like grass. I was exhausted, burnt out, and honestly, quite miserable. It wasn’t until I leaned into the ‘aesthetic’ lifestyle—focusing on the beauty of my surroundings and the intentionality of my movements—that everything shifted. My morning isn’t just a to-do list anymore; it is a curated experience that fuels my soul before I ever touch a keyboard.
Now, my home is my sanctuary, and every corner of it serves a purpose. From the way the light hits my desk to the curated greenery in my yard, these small shifts have created a ripple effect of productivity and peace. If you’ve been feeling like your space is just a place where you sleep, it’s time to transform it into a living, breathing vision board. Let’s dive into the aesthetic upgrades that turned my house into a viral-worthy home.
How to Transform a Simple Landscaping Front Yard for Maximum Curb Appeal
Why we love this
There is nothing quite like the feeling of pulling into your driveway and being greeted by a lush, intentional garden that feels like a warm hug. We love this because it creates an immediate sense of serenity; the visual harmony of deep green boxwoods against crisp, dark mulch provides a high-contrast look that feels expensive. The aroma of damp earth and blooming hydrangeas wafts through the air, making every arrival feel like a special occasion. It is the ultimate way to set a welcoming tone for your entire home aesthetic.
Essential Elements:
- Dwarf English Boxwoods
- Premium dark brown or black mulch
- Natural flagstone or slate pavers
- Low-voltage warm LED path lights
- Hydrangea macrophylla for seasonal color
How to make it
- Start by defining your garden beds using a garden hose to mark out soft, organic curves rather than rigid straight lines; this creates a more natural, high-end flow.
- Clear all existing weeds and debris, ensuring the soil is tilled to a depth of at least 6 inches to allow for proper root aeration and nutrient absorption.
- Position your anchor plants—the boxwoods—first, spacing them about 24 inches apart to allow for growth while maintaining a dense, ‘pillowy’ appearance.
- Dig holes twice as wide as the root ball and just as deep, backfilling with a mix of native soil and organic compost to give the plants a nutrient-heavy start.
- Lay down a thick 3-inch layer of mulch, being careful not to pile it against the stems of the plants, which can cause rot; look for a consistent ‘matte’ finish across the surface for that professional look.
- Install your path lights at 45-degree angles toward the walkway to create a ‘moonlight’ effect, ensuring the wires are buried at least 3 inches deep for safety and aesthetic cleanliness.
How to Organize an Office Desk Setup for a Productive Work Cubicle Environment

Why we love this
A cluttered desk is a cluttered mind, and this aesthetic setup is the antidote to workday stress. We love the tactile sensation of a smooth vegan leather desk mat beneath our wrists and the soft, rhythmic click of a mechanical keyboard that makes every email feel like a masterpiece. The visual clarity of a monochrome color palette, accented by a single preserved eucalyptus sprig, creates a workspace that feels expensive and focused. It transforms a standard cubicle into a private boutique office where creativity can actually breathe.
Essential Elements:
- Large vegan leather desk mat in sand or charcoal
- Acrylic or gold-toned monitor stand
- Cable management sleeves and clips
- Small ceramic essential oil diffuser
- Minimalist daily planner
How to make it
- Begin by clearing every single item off your desk and wiping the surface with a microfiber cloth and a gentle citrus-scented cleaner to reset the energy of the space.
- Place your desk mat centrally; this acts as the ‘anchor’ for your setup and defines your primary work zone.
- Position your monitor stand at eye level—this is crucial for ergonomics—and tuck your keyboard and mouse underneath when not in use to maintain a clean visual line.
- Group like-items together in small acrylic trays: pens in one, tech cables in another; visual ‘clustering’ reduces the perceived clutter and makes items easier to find.
- Route all power cables through a management sleeve, securing it to the underside of the desk with adhesive clips; wait 24 hours for the adhesive to ‘cure’ before applying full tension.
- Add a single sensory element, like a diffuser, and set it to a ‘mist’ interval of 30 seconds to keep the scent subtle and non-distracting during deep work sessions.
How to Choose JBL Speakers Wallpapers for a High Tech Aesthetic Room

Why we love this
In a tech-forward room, the screen is as much a part of the decor as the furniture, and matching your wallpaper to your hardware is the ultimate aesthetic flex. We love how a high-resolution, vibrant wallpaper can mimic the powerful, bass-heavy energy of a JBL speaker, creating a cohesive digital ecosystem. The glow of the screen reflecting off the speaker’s mesh texture creates a futuristic, neon-lit ambiance that feels like a private lounge. It’s all about that seamless blend of sound and vision that makes your room feel like a sanctuary of modern tech.
Essential Elements:
- High-resolution 4K wallpaper images
- JBL speaker with customizable RGB lighting
- Desktop customization software (like Rainmeter)
- Backlit LED strips for the monitor
How to make it
- Identify the core color of your JBL speaker’s logo or RGB lighting; for most, this will be a vibrant orange or a customizable pulse.
- Search for ‘Abstract 4K Liquid Wallpapers’ that feature your primary accent color to create a visual bridge between the hardware and the software.
- Adjust your monitor’s color temperature to ‘Warm’ or ‘Vivid’ settings to ensure the wallpaper colors pop and match the saturation of the speaker’s physical build.
- If using a JBL Pulse or similar model, sync the light show to ‘Ambient’ mode so the speaker’s colors shift in time with the music, mimicking the movement of the wallpaper.
- Set the wallpaper to ‘Fill’ rather than ‘Stretch’ to avoid pixelation, which is a visual cue for a low-quality setup; the image should look sharp and intentional.
How to Implement Cheap Pool Deck Ideas for an Expensive Summer Look

Why we love this
You don’t need a million dollars to have a backyard that looks like a Mediterranean resort. We love this approach because it focuses on ‘high-end’ textures like weather-resistant outdoor rugs and the warm glow of oversized lanterns that mask an aging deck. The feeling of stepping onto a plush, patterned rug after a cool dip in the pool is pure luxury, and the sight of flickering candlelight reflecting off the water at dusk is breathtaking. It’s about creating a mood that feels curated, relaxed, and incredibly chic on a budget.
Essential Elements:
- Large-scale geometric outdoor rug
- White sheer outdoor curtains
- Wooden pallets or reclaimed timber for DIY seating
- String lights with Edison bulbs
- Oversized floor cushions
How to make it
- Deep clean your existing deck surface using a power washer on a medium setting; avoid high pressure which can splinter old wood, and wait 48 hours for it to be bone-dry.
- Apply a ‘translucent’ wood stain in a modern oak or weathered gray tone; use a long-handled roller for even coverage and a brush for the gaps between planks.
- Layer a large outdoor rug over the most worn area of the deck to instantly hide imperfections and define a ‘living room’ space outdoors.
- Hang sheer white curtains using simple tension rods or galvanized wire; the fabric should just graze the floor for that breezy, high-end resort feel.
- Arrange your string lights in a ‘zigzag’ pattern overhead, ensuring they are taut; use zip ties to secure them to existing structures for a clean finish.
- Add oversized cushions in a uniform color like cream or navy to create a cohesive, expensive-looking lounging area without the cost of a full furniture set.
How to Use Vinyl Lattice Panels for a Private Garden Sanctuary

Why we love this
There is something incredibly romantic about a hidden garden nook shielded from the world by a delicate, white lattice. We love vinyl lattice because it offers the classic look of a Victorian garden without the maintenance of wood, staying crisp and bright year-round. The way the sunlight filters through the diamond-shaped holes creates a beautiful dance of shadows on the grass, while the scent of climbing jasmine or roses entwined in the gaps fills the air. It’s a simple addition that provides instant architectural interest and a deep sense of seclusion.
Essential Elements:
- White or wood-grain vinyl lattice panels
- 4×4 pressure-treated posts
- Climbing vines (Clematis or Star Jasmine)
- Stainless steel screws
- Decorative post caps
How to make it
- Measure the area for your sanctuary and mark the post locations every 4 feet; use a post-hole digger to go down 24 inches to ensure the structure is wind-resistant.
- Set the posts in quick-set concrete, using a level to ensure they are perfectly vertical; wait at least 4 hours for the ‘visual cue’ of the concrete turning a light, dry gray before proceeding.
- Attach the lattice panels to the posts using stainless steel screws with decorative washers; leave a 1/2-inch gap at the bottom to prevent debris buildup and ensure airflow.
- Install decorative caps on the top of the posts to give the project a finished, professional ‘furniture-grade’ look.
- Plant your climbing vines at the base of each panel, gently weaving the first few tendrils into the lattice to ‘train’ them to grow upward.
How to Create Summer Table Centerpieces for a Fresh Seasonal Brunch

Why we love this
Brunch is the ultimate lifestyle ritual, and a stunning centerpiece is the heart of the experience. We love the freshness of sliced citrus floating in glass vases and the rustic charm of linen runners paired with wild, unstructured greenery. The bright, zingy aroma of lemons and limes mingles with the scent of freshly brewed coffee, creating a sensory experience that feels both invigorating and sophisticated. It’s a low-effort way to make a Sunday morning feel like a catered event in a sun-drenched villa.
Essential Elements:
- Clear glass cylinder vases in varying heights
- Fresh lemons, limes, and oranges
- Eucalyptus or olive branches
- Taper candles in soft pastel shades
- Linen table runner
How to make it
- Lay down your linen runner first, bunching it slightly to create a ‘relaxed’ texture rather than a flat, formal look.
- Slice your citrus fruits into 1/4-inch rounds; any thinner and they will lose their structural integrity in the water, any thicker and they won’t press against the glass beautifully.
- Line the inside of your vases with the citrus slices, pressing them firmly against the glass, then fill the center with cool water to ‘lock’ them in place.
- Insert your greenery stems into the center of the vases, allowing the leaves to spill over the sides for a lush, abundant appearance.
- Place taper candles in glass holders between the vases; light them 5 minutes before guests arrive to allow the wax to begin its first ‘drip,’ which looks more aesthetic in photos.
How to Decorate a Patriotic Front Porch for a Classic American Aesthetic

Why we love this
Classic Americana never goes out of style, and there’s a nostalgic warmth to a porch decked out in red, white, and blue. We love the crisp contrast of a heavy cotton flag against a white-painted porch and the traditional feel of wicker rockers adorned with star-patterned pillows. The sight of bunting draped perfectly over a railing evokes feelings of summer parades and homemade apple pie. It’s a timeless, high-quality look that feels grounded, proud, and incredibly welcoming to everyone who passes by.
Essential Elements:
- Embroidered cotton American flag
- Tea-stained pleated fan bunting
- White wicker rocking chairs
- Red geraniums in navy ceramic pots
- Galvanized metal lanterns
How to make it
- Mount your flag holder at a 45-degree angle on a main porch pillar; ensure the flag is a heavy-weight cotton to prevent it from tangling easily in the breeze.
- Secure the pleated bunting to the railing using hidden zip ties; start from the center and work your way out to ensure the ‘swags’ are perfectly symmetrical.
- Arrange your rocking chairs in a conversational grouping, placing navy and white striped outdoor pillows on each to soften the look.
- Pot your red geraniums in high-gloss navy pots; water them until the soil is saturated but not muddy, as vibrant ‘healthy’ green leaves are key to this aesthetic.
- Place galvanized lanterns of varying heights on the floor near the steps; use battery-operated flickering candles for a safe, consistent glow throughout the evening.
How to Achieve a Whimsical Apartment Aesthetic for a Dreamy Living Space

Why we love this
Living in a small apartment doesn’t mean you can’t live in a fairytale. We love the whimsical aesthetic because it’s all about soft textures, warm ‘fairy’ lighting, and a curated mix of vintage finds. The feeling of sinking into a velvet sofa surrounded by glowing lanterns and trailing ivy is like living inside a dream. It’s a cozy, maximalist approach that prioritizes comfort and magic over rigid minimalism, making every evening feel like a retreat into a secret, enchanted world.
Essential Elements:
- Warm-toned LED fairy lights or ‘curtain’ lights
- Velvet throw pillows in jewel tones
- Ornate gold-framed mirrors
- Hanging macramé plant holders
- Vintage-inspired floral rugs
How to make it
- Drape your fairy lights along the ceiling perimeter or behind sheer curtains; use clear command hooks to ensure the wires are invisible and the lights appear to ‘float.’
- Layer your rugs; place a larger jute rug down first and top it with a smaller, colorful floral rug at an angle to create a sense of depth and bohemian ‘whimsy.’
- Hang your gold-framed mirrors opposite windows; this doubles the natural light and makes the ‘magical’ elements of the room feel more expansive.
- Cluster your plants at varying heights using stools and hanging planters; the ‘jungle’ effect is a core pillar of the whimsical look.
- Switch out standard light bulbs for ‘Edison’ style bulbs with a low Kelvin rating (2000k-2700k) to ensure the room has a golden, honey-like glow at all times.
How to Explore Aquarium Setup Ideas for a Serene Underwater Oasis
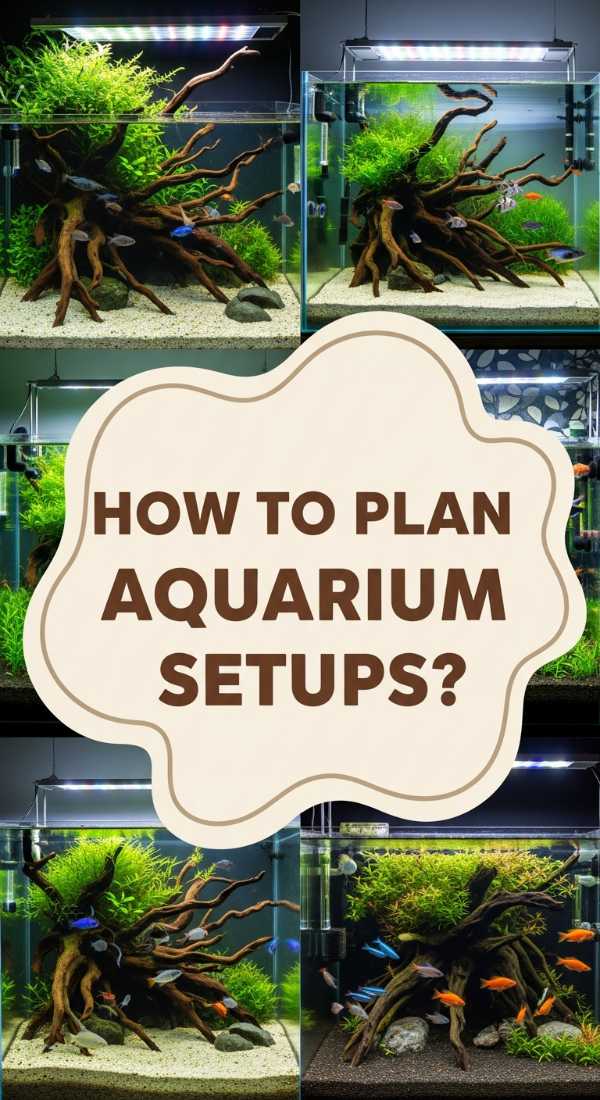
Why we love this
An aquarium is more than just a pet habitat; it is a piece of living art. We love a well-designed ‘aquascape’ because it brings a literal sense of flow and life into a room. The rhythmic sound of bubbling water and the sight of neon fish darting through vibrant green moss balls is incredibly meditative. It’s a slice of the ocean or a hidden forest stream brought indoors, providing a calming focal point that reduces stress and adds a sophisticated, high-tech nature element to your home.
Essential Elements:
- Rimless glass aquarium tank
- Dragon stone or driftwood anchors
- Live aquatic plants (Anubias or Java Fern)
- Substrate in a natural dark sand or gravel
- Full-spectrum LED aquarium light
How to make it
- Layer your substrate with a slight slope from back to front; this creates a ‘forced perspective’ that makes the tank look much deeper and more professional.
- Arrange your ‘hardscape’ (rocks and wood) using the ‘Rule of Thirds’; place your largest piece off-center to create a natural, asymmetrical balance.
- Attach your live plants to the rocks or wood using a small amount of cyanoacrylate gel (aquarium-safe super glue); this ensures they stay in place during the filling process.
- Fill the tank slowly by pouring water over a small plate to avoid disturbing the sand; wait for the ‘visual cue’ of the cloudiness settling (usually 24-48 hours) before adding fish.
- Program your LED light to a ‘siesta’ cycle—4 hours on, 2 hours off, 4 hours on—to maximize plant growth while preventing the overgrowth of aesthetic-ruining algae.
How to Style Vinyl Lattice Panels for a Modern Backyard Partition
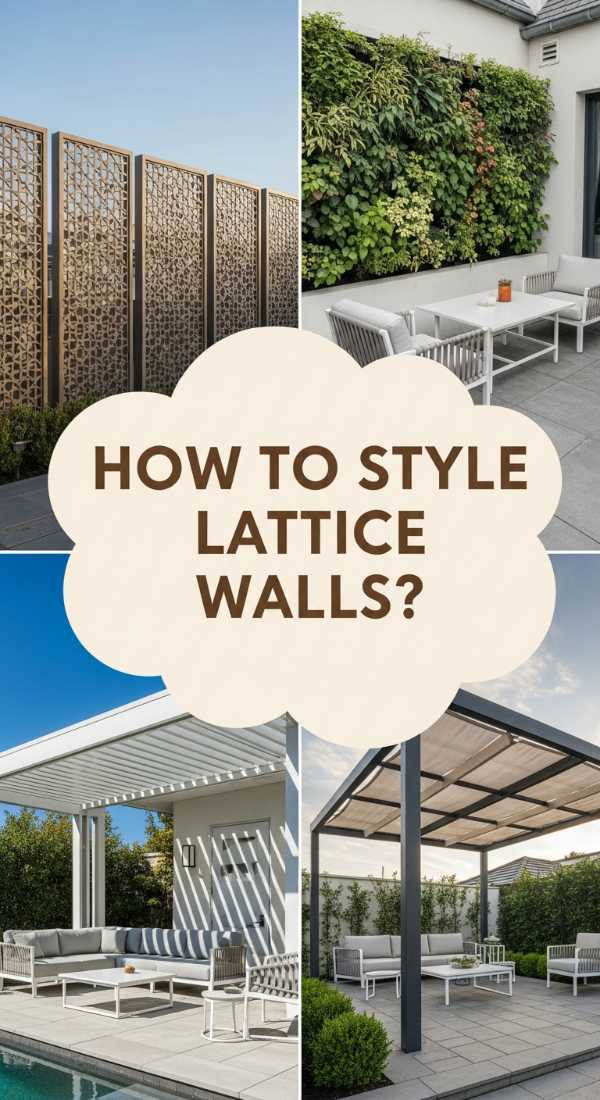
Why we love this
Modern design is all about clean lines and functional beauty, and styling black vinyl lattice as a partition is the height of backyard sophistication. We love the industrial-chic vibe of a dark, geometric screen contrasted against soft, ornamental grasses. It provides privacy without feeling heavy or closed-in, allowing the breeze to pass through while creating distinct ‘rooms’ in your outdoor space. It’s the perfect way to hide an unsightly AC unit or create a high-end backdrop for a modern fire pit area.
Essential Elements:
- Black vinyl lattice panels with square openings
- Sleek aluminum or black-painted wood frames
- Tall ornamental grasses (like Mexican Feather Grass)
- Black river rocks for the base
- Hidden spotlighting
How to make it
- Frame your black lattice panels in a 2×4 frame painted the exact same shade of matte black; this ‘thickens’ the profile and makes it look like custom architectural steel.
- Install the panels vertically as free-standing screens; ensure they are anchored deep in the ground with concrete to handle wind resistance.
- Place black river rocks at the base of the partition to create a ‘dry riverbed’ look that hides the transition between the ground and the screen.
- Plant tall, wispy grasses directly in front of the panels; the movement of the grass against the rigid black lines is a classic modern design trope.
- Position a small ground spotlight behind the grass, aimed up at the lattice; at night, this will project dramatic, oversized shadows that turn the partition into a piece of art.
The Final Touch to Your Aesthetic Journey
Transforming your life isn’t about making one massive change; it’s about the accumulation of small, beautiful choices. Whether it’s the way you organize your desk or the care you put into your front porch, these elements create an environment where you can truly thrive. Your home should be a reflection of the person you are becoming—intentional, peaceful, and full of light. Start with one section, perfect it, and watch how your entire perspective shifts.
Frequently Asked Questions
- Q: How do I maintain the aesthetic look without spending hours cleaning?
A: Focus on ‘closed storage’ for clutter and ‘open display’ for your aesthetic items. Use high-quality materials like vinyl or treated wood that require less maintenance over time. - Q: Can I achieve an expensive look on a tight budget?
A: Absolutely. Most ‘expensive’ looks come from a cohesive color palette and attention to detail, like hidden cables and healthy plants, rather than the price tag of the items themselves. - Q: What is the best way to start a morning routine?
A: Start with your environment. If you wake up to a space that feels curated and calm, your mind will follow suit. Choose one ‘aesthetic’ upgrade for your bedroom or kitchen to begin.