

The 5-Minute Food Board Hack That’s Going Viral Right Now
There is something magical about the way food brings us together, especially during those milestone seasons where the air feels electric with change. Whether you are celebrating a graduation or just the arrival of spring’s tartest treasures, the secret to a stress-free gathering isn’t a five-course meal; it’s the art of the board. I remember the first time I set out a massive, sprawling board of treats for my family—the room immediately filled with laughter as everyone reached for their favorite bites, and suddenly, the pressure of hosting just melted away into pure joy.
Today, I’m sharing the ultimate viral simple food board hack that combines celebratory sweets with seasonal rhubarb delights. This isn’t just about putting food on a platter; it’s about creating a visual and sensory experience that your guests will be talking about for weeks. From the zesty zing of lemon pesto to the sophisticated snap of tempered chocolate, we are diving deep into the components that make a board truly unforgettable. Grab your favorite large tray, and let’s get into the kitchen together to create something beautiful.
How to bake graduation cake?
Why we love this
There is nothing quite like the sight of a towering, golden-crumbed cake to signal that a massive achievement has been reached. When you slice into this cake, the aroma of Madagascar vanilla and sweet cream butter fills the room, instantly evoking a sense of nostalgic celebration. The texture is designed to be incredibly moist yet sturdy enough to hold its shape, providing a velvety mouthfeel that contrasts perfectly with a silky buttercream. It’s the kind of dessert that feels like a warm hug after years of hard work, making every bite a decadent reward for the graduate.
Ingredients
- 2 1/2 cups all-purpose flour
- 1 1/2 teaspoons baking powder
- 1/2 teaspoon baking soda
- 1 teaspoon salt
- 3/4 cup unsalted butter, softened
- 1 3/4 cups granulated sugar
- 2 large eggs plus 3 egg yolks
- 1 tablespoon vanilla extract
- 1 cup buttermilk
How to make it
- Preheat your oven to 350°F (175°C) and meticulously grease two 8-inch round cake pans with butter, then line the bottoms with parchment paper to ensure an effortless release later.
- In a medium bowl, whisk together the flour, baking powder, baking soda, and salt for at least 30 seconds to ensure the leavening agents are perfectly distributed throughout the dry mix.
- In a large stand mixer fitted with the paddle attachment, cream the softened butter and sugar on medium-high speed for about 5 minutes until the mixture looks pale, light, and exceptionally fluffy.
- Lower the speed and add the eggs and yolks one at a time, beating well after each addition and scraping down the sides of the bowl to ensure a completely homogenous batter.
- Alternate adding the dry ingredients and the buttermilk, starting and ending with the flour mixture; stir only until just combined to avoid overworking the gluten, which keeps the crumb tender.
- Divide the batter evenly between the prepared pans and bake for 30-35 minutes, or until a wooden skewer inserted into the center comes out with just a few moist crumbs clinging to it.
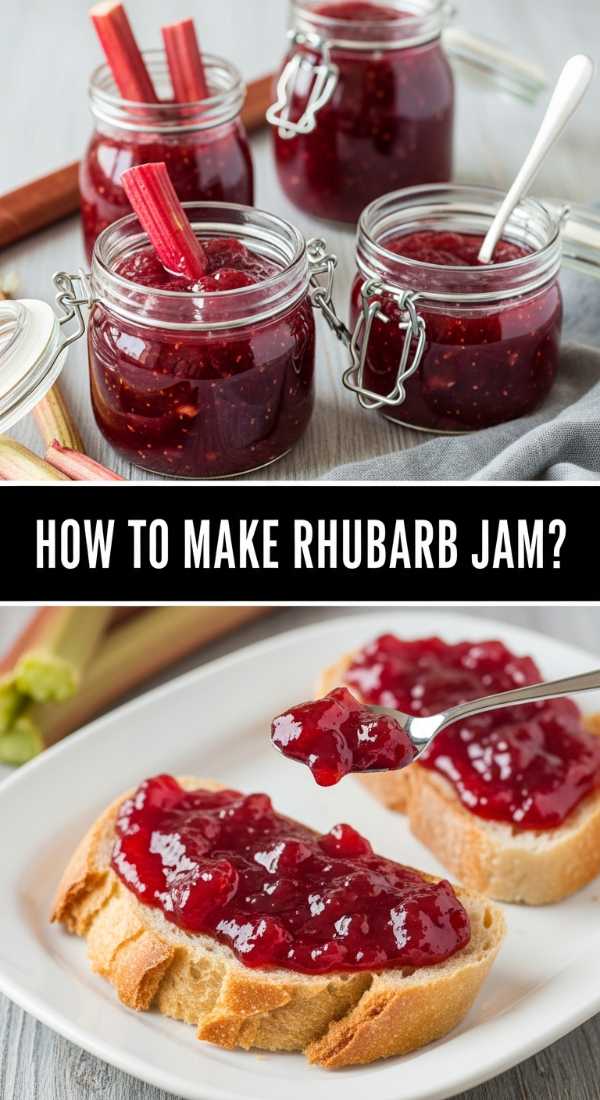
How to make rhubarb jam?

Why we love this
This rhubarb jam is a vibrant explosion of springtime, capturing that fleeting, electric pink hue that only fresh rhubarb can provide. As it simmers on the stove, the tart, herbaceous scent of the stalks transforms into a sophisticated sweetness that tingles on the tongue. The texture is thick and luscious, with small softened bits of fruit that spread like stained glass across a warm piece of toast or a savory cracker. It offers a bright, acidic punch that cuts through the richness of the cheeses on your food board, creating a perfect balance of flavors.
Ingredients
- 4 cups chopped rhubarb (1/2 inch pieces)
- 1 1/2 cups granulated sugar
- 2 tablespoons lemon juice
- 1 teaspoon lemon zest
- 1/2 teaspoon vanilla bean paste
How to make it
- Combine the chopped rhubarb and sugar in a heavy-bottomed saucepan and let it macerate for about 30 minutes until the sugar has drawn out the natural juices of the fruit.
- Place the saucepan over medium heat and stir in the lemon juice and zest, bringing the mixture to a gentle boil while stirring constantly to prevent the sugar from scorching.
- Reduce the heat to low-medium and let the mixture simmer for 15-20 minutes; use a wooden spoon to occasionally mash the larger chunks of rhubarb against the side of the pot as they soften.
- Watch for the jam to thicken and coat the back of a spoon; it should reach a temperature of 220°F (104°C) if you are using a candy thermometer for precision.
- Remove from heat and stir in the vanilla bean paste, which adds a floral depth that rounds out the tartness of the rhubarb beautifully.
- Pour the hot jam into sterilized glass jars, leaving a quarter-inch of headspace, and let it cool completely at room temperature before refrigerating to set the pectin.
How to frost graduation cupcakes?
Why we love this
Frosting cupcakes for a graduation is where the artistry truly happens, turning a simple handheld treat into a miniature work of celebratory art. The frosting itself is a cloud-like Swiss meringue buttercream that glides over the tongue, lacking the gritty sugar texture of traditional American versions. It provides a glossy, stable base that holds intricate shapes, allowing you to create sharp edges or soft rosettes that look professional and inviting. The subtle sweetness allows the flavor of the cupcake to shine while adding a luxurious, buttery finish that feels incredibly festive.
Ingredients
- 5 large egg whites
- 1 1/2 cups granulated sugar
- 2 cups unsalted butter, cubed and slightly cool
- 1 teaspoon vanilla extract
- Pinch of salt
- Gel food coloring (school colors)
How to make it
- Whisk the egg whites and sugar together in a heat-proof bowl over a pot of simmering water (double boiler), stirring constantly until the sugar has completely dissolved and the mixture reaches 160°F.
- Transfer the mixture to a stand mixer and whip with the whisk attachment on high speed for about 10-15 minutes until stiff, glossy peaks form and the bowl feels cool to the touch.
- Switch to the paddle attachment and add the cubed butter one piece at a time on medium-low speed, ensuring each piece is fully incorporated before adding the next.
- Once all the butter is in, continue beating until the frosting transforms from a curdled appearance into a smooth, silky consistency, then add vanilla and salt.
- Separate the frosting into bowls and tint with gel coloring using a toothpick to add color gradually until the desired school spirit shade is achieved.
- Fit a piping bag with a large star tip (like a 1M), fill with frosting, and pipe in a steady circular motion starting from the outside edge and moving inward to create a high, swirling peak.
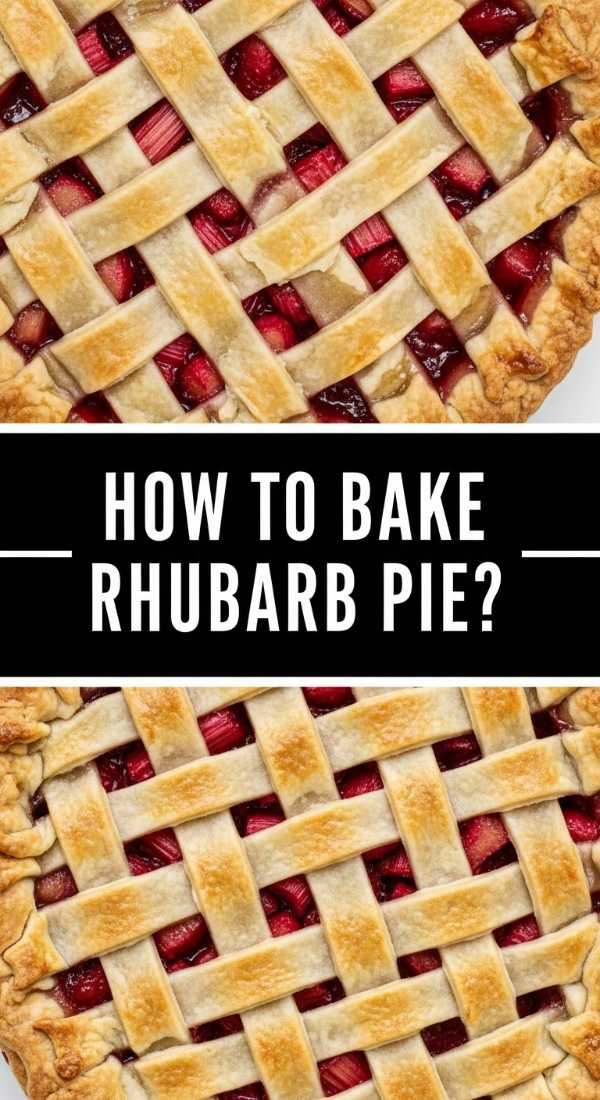
How to bake rhubarb pie?
Why we love this
A classic rhubarb pie is the ultimate centerpiece for a spring food board, offering a rustic charm that is both comforting and deeply flavored. When it emerges from the oven, the crust is a mosaic of golden-brown flakes that shatter delicately upon impact, revealing a bubbling, ruby-red center. The aroma is a heavenly mix of toasted flour, caramelized sugar, and the distinct, sharp tang of cooked rhubarb that makes your mouth water instantly. Each slice provides a delightful contrast between the buttery, savory pastry and the juicy, intensely tart fruit filling.
Ingredients
- Double pie crust (chilled)
- 5 cups sliced rhubarb
- 1 1/4 cups granulated sugar
- 1/4 cup cornstarch
- 1 tablespoon cold butter, cut into small pieces
- 1 egg (for wash) + 1 tablespoon sanding sugar
How to make it
- Roll out your bottom pie crust on a lightly floured surface until it is about 12 inches in diameter, then gently drape it into a 9-inch pie plate, trimming the overhang to one inch.
- In a large mixing bowl, toss the sliced rhubarb with the sugar and cornstarch until every piece is evenly coated; the cornstarch is vital for thickening the juices into a jam-like consistency during baking.
- Pour the rhubarb mixture into the prepared bottom crust and dot the top of the fruit with the small pieces of cold butter to add a rich, silky finish to the filling.
- Roll out the second crust and place it over the top, or cut it into strips to create a lattice pattern, which allows steam to escape and shows off the beautiful pink fruit.
- Crimp the edges tightly to seal, then brush the top crust with an egg wash (one egg beaten with a splash of water) and sprinkle generously with coarse sanding sugar for crunch.
- Bake at 425°F for the first 15 minutes to set the crust, then reduce the heat to 375°F and bake for another 40-50 minutes until the filling is bubbling thick and the crust is deep golden.
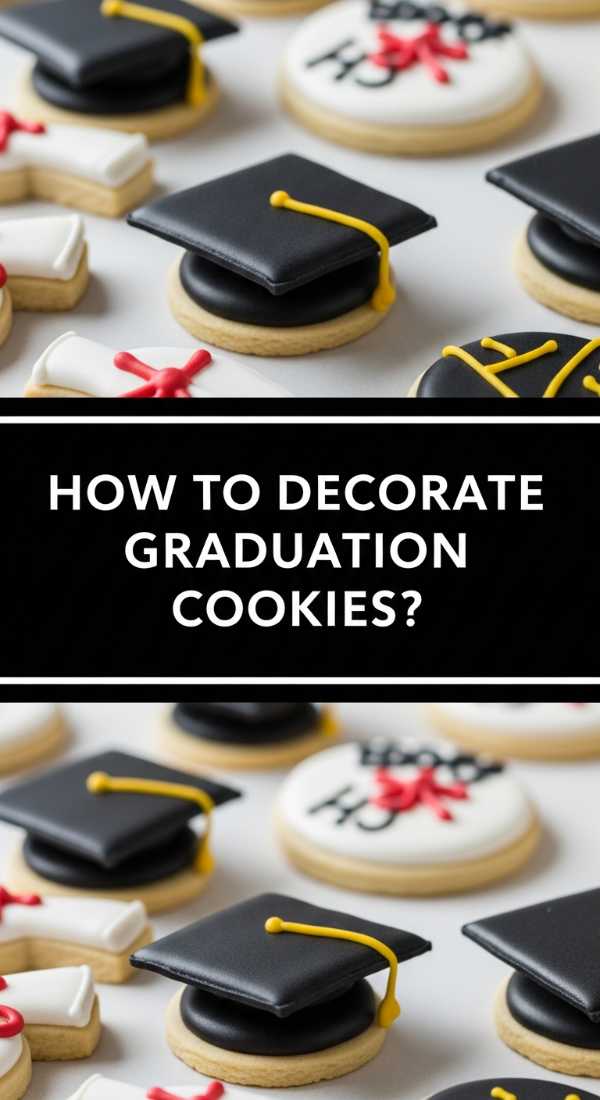
How to decorate graduation cookies?
Why we love this
Decorating graduation cookies is an exercise in detail that results in personalized treasures that guests almost feel guilty eating. The royal icing dries to a smooth, matte finish that provides a satisfying snap when bitten, yielding to a buttery, soft sugar cookie underneath. There is a tactile joy in the precision of the lines—outlining tiny diplomas or mortarboards with steady hands. The colors are vibrant and crisp, turning a simple tray of cookies into a themed narrative that celebrates the hard-earned journey of the graduate in every sweet, frosted bite.
Ingredients
- Batch of flat-surface sugar cookies
- 4 cups powdered sugar
- 3 tablespoons meringue powder
- 1/2 cup warm water
- Assorted gel food colors
- Black edible ink marker
How to make it
- Prepare the royal icing by beating powdered sugar, meringue powder, and water on medium speed for 7-10 minutes until it reaches a “stiff peak” consistency that holds its shape.
- Divide the icing into smaller bowls and thin it out with drops of water to reach “flood consistency” (it should disappear back into itself within 10-12 seconds when drizzled).
- Use a piping bag with a small round tip to outline the shape of a graduation cap on the cooled cookies, then immediately fill the center with the same color to create a seamless finish.
- Allow the base layer of icing to dry completely for at least 4-6 hours in a cool, dry place until the surface is hard to the touch.
- Once dry, use a thicker consistency icing to pipe a small “button” in the center of the cap and a dangling tassel falling off to one side for a 3D effect.
- For the final touch, use the black edible ink marker to write the graduation year or the student’s name across the diploma-shaped cookies for a personalized finish.
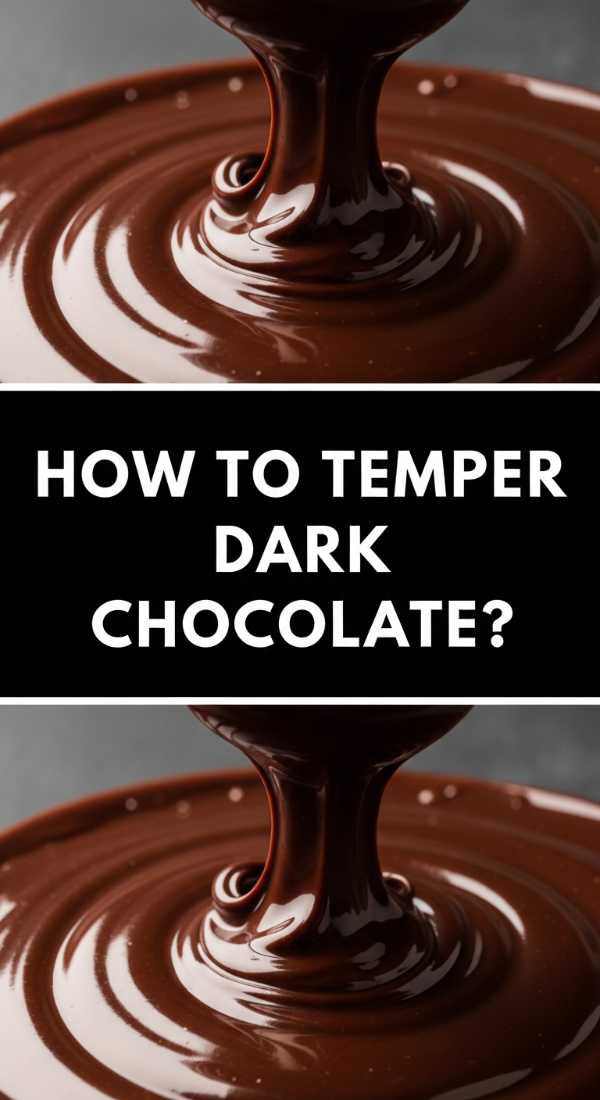
How to temper dark chocolate?
Why we love this
Tempered dark chocolate is the height of confectionery elegance, offering a professional, glossy sheen and a distinct, sharp snap that signifies quality. As it melts slowly on the tongue, it releases complex notes of roasted cocoa, red fruit, and a subtle earthiness that lingers beautifully. Unlike untempered chocolate, which can be dull or soft, tempered chocolate feels smooth and firm between the fingers, making it the perfect dipping companion for fresh fruit or cookies on your board. It adds a sophisticated, bitter-sweet edge that balances the more sugary elements of the display.
Ingredients
- 16 oz high-quality dark chocolate (60% cocoa or higher), finely chopped
- Thermometer (digital or candy)
How to make it
- Place two-thirds of the finely chopped chocolate in a glass or stainless steel bowl set over a pot of barely simmering water, ensuring the bottom of the bowl does not touch the water.
- Stir gently and constantly with a silicone spatula until the chocolate is completely smooth and reaches a temperature of 115°F (46°C) for dark chocolate, being careful not to let any steam enter the bowl.
- Remove the bowl from the heat and gradually stir in the remaining one-third of the “seed” chocolate; this introduces stable fat crystals back into the melted mass.
- Continue stirring until the temperature drops to 82°F (28°C), then briefly place the bowl back over the simmering water for a few seconds at a time until it reaches the working temperature of 88-90°F (31-32°C).
- Test the temper by dipping the tip of a knife into the chocolate; it should set at room temperature within 3-5 minutes with a shiny, streak-free finish.
- Keep the chocolate within that narrow 88-90°F window while using it by occasionally setting it over the warm water for 2-3 seconds to maintain the fluid state without breaking the temper.
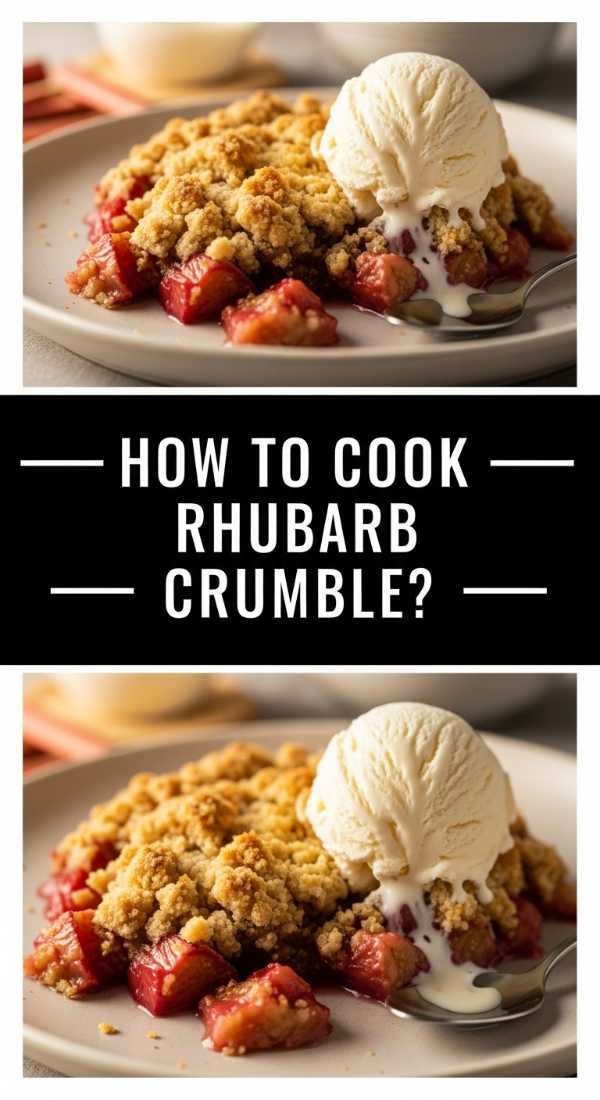
How to cook rhubarb crumble?
Why we love this
Rhubarb crumble is the epitome of cozy, home-style comfort, serving as the perfect warm addition to a sprawling food board. The topping is a rugged landscape of buttery, toasted oats and brown sugar that provides a satisfyingly crunchy crown for the soft fruit below. As it bakes, the rhubarb juices bubble up through the cracks, caramelizing the edges of the topping and creating a harmony of textures. The contrast between the scorching hot, tart filling and a cold scoop of vanilla bean ice cream is a sensory experience that feels both rustic and indulgent.
Ingredients
- 6 cups chopped rhubarb
- 3/4 cup granulated sugar
- 1 cup old-fashioned oats
- 1 cup all-purpose flour
- 1 cup packed brown sugar
- 1/2 cup cold salted butter, cubed
- 1 teaspoon cinnamon
How to make it
- Toss the chopped rhubarb with the granulated sugar in a 9×13 inch baking dish, spreading it out into an even layer that will roast consistently in the oven.
- In a separate bowl, combine the oats, flour, brown sugar, and cinnamon, whisking them together to ensure the spices are evenly distributed throughout the dry base.
- Add the cold, cubed butter to the dry mixture and use a pastry cutter or your fingertips to rub the butter into the flour until large, moist clumps begin to form.
- Sprinkle the crumble mixture generously over the rhubarb, making sure to leave some larger chunks of topping for variety in texture after the bake.
- Bake at 375°F (190°C) for 35-45 minutes; you are looking for the fruit to be tender when pierced with a fork and the topping to be a deep, golden brown.
- Let the crumble rest for 10 minutes before serving; this allows the juices to thicken slightly, making it easier to spoon onto plates or directly onto the board.
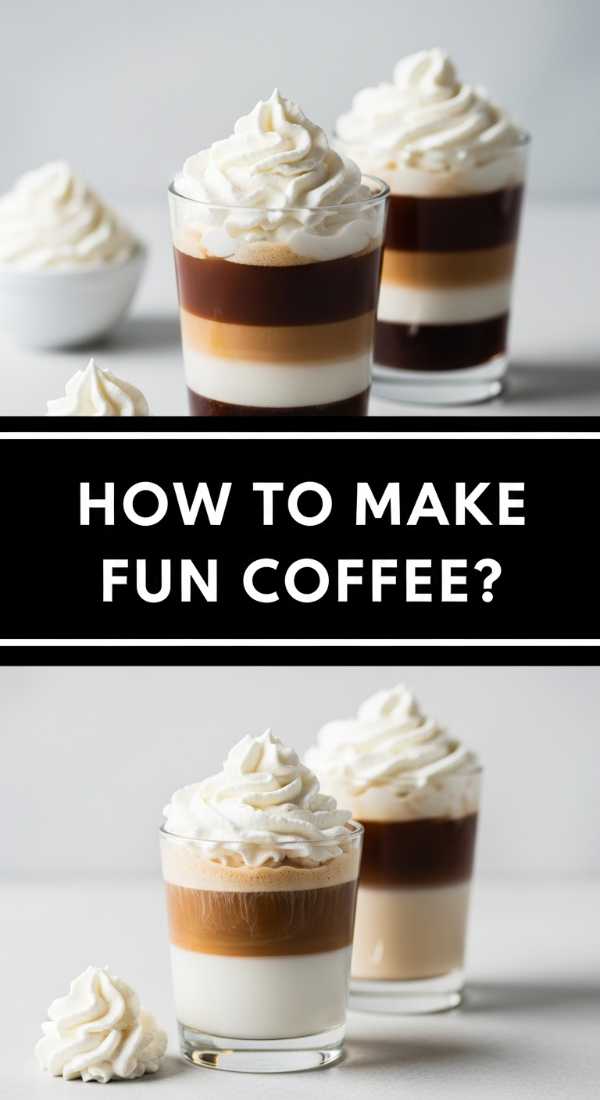
How to make fun coffee?

Why we love this
Adding a “fun coffee” element to your food board transforms a simple caffeine fix into an interactive, Instagram-worthy highlight of the party. Imagine layers of velvety cold foam sitting atop a rich, dark espresso base, drizzled with ribbons of golden caramel or infused with floral lavender syrup. The aroma is an intoxicating blend of freshly roasted beans and sweet aromatics that creates an inviting atmosphere for conversation. It’s a customizable experience where guests can choose their own adventure, making the beverage part of the entertainment rather than just an afterthought.
Ingredients
- 2 shots of strong espresso or 1/2 cup cold brew concentrate
- 1 tablespoon flavored syrup (vanilla, caramel, or lavender)
- 1/2 cup whole milk or oat milk
- Ice cubes
- Whipped cream or cold foam
How to make it
- Start by drizzling your chosen syrup down the inside walls of a tall glass, allowing it to pool slightly at the bottom for a beautiful marbled effect when the liquid is added.
- Fill the glass to the brim with large, clear ice cubes; using large cubes prevents the coffee from diluting too quickly as you sip and socialize.
- Pour your freshly brewed espresso or cold brew over the ice, watching as the dark liquid swirls and mingles with the syrup at the base of the glass.
- Froth your milk using a handheld frother or a steam wand until it is thick and micro-foamed, then gently pour it over the coffee to create a distinct layered look.
- For the “viral” touch, top the drink with a thick layer of cold foam made by whisking heavy cream and a splash of milk until it reaches a soft-peak consistency.
- Garnish the top with a dusting of cocoa powder, a cinnamon stick, or even a few dried edible flowers to match the spring theme of your food board.
How to whip lemon pesto?

Why we love this
Whipped lemon pesto is the bright, savory soul of a spring food board, offering a zesty punch that wakes up the palate. The texture is surprisingly airy and light, thanks to the whipping process, which incorporates tiny air bubbles into the herbaceous oil and cheese base. The scent of fresh basil bruised by the blade releases an earthy perfume that is instantly brightened by the high notes of fresh lemon zest and juice. It is incredibly versatile, acting as a vibrant dip for crusty bread or a flavorful smear for slices of fresh mozzarella and heirloom tomatoes.
Ingredients
- 2 cups fresh basil leaves, packed
- 1/2 cup grated Parmesan cheese
- 1/3 cup pine nuts, lightly toasted
- 2 cloves garlic, minced
- 1/2 cup extra virgin olive oil
- Zest and juice of 1 large lemon
- 1/4 cup heavy cream (for whipping)
How to make it
- In a food processor, pulse the basil, Parmesan, toasted pine nuts, and garlic until they are finely minced and form a thick, chunky paste.
- With the processor running on low, slowly drizzle in the olive oil in a thin, steady stream until the mixture becomes smooth and fully emulsified.
- Add the lemon zest and lemon juice, pulsing a few more times to incorporate; the acid will brighten the green color and balance the richness of the nuts and cheese.
- Transfer the pesto to a medium bowl and gently fold in the heavy cream using a silicone spatula until the mixture begins to lighten in color.
- Use a handheld mixer on medium speed to whip the pesto for about 1-2 minutes until it becomes slightly fluffy and holds a soft shape, adding a luxurious mouthfeel.
- Season with a pinch of sea salt and freshly cracked black pepper to taste, then transfer to a small serving bowl and garnish with a few extra pine nuts for the board.
How to design sheet cakes?
[IMAGE_10]
Why we love this
Design-focused sheet cakes are the unsung heroes of large gatherings, providing a vast, flat canvas for incredible creative expression and seasonal storytelling. The soft, even surface allows for intricate piping patterns, from delicate floral borders to bold, modern geometric shapes that draw the eye. There is a satisfying symmetry to a well-designed sheet cake, making it feel like a professional centerpiece despite its simple rectangular shape. The cake itself stays moist under its blanket of icing, ensuring that every guest gets a perfect ratio of sponge to frosting in every festive square.
Ingredients
- 1 baked 9×13 inch rectangular cake
- 4 cups vanilla buttercream frosting
- Piping bags and various tips (round, leaf, and petal)
- Fresh edible flowers or seasonal fruit for garnishing
How to make it
- Ensure your sheet cake is completely level by using a serrated knife to trim any domed top, creating a perfectly flat surface for your design work.
- Apply a thin “crumb coat” of frosting over the entire cake to trap any loose crumbs, then chill in the refrigerator for 20 minutes until the frosting is firm.
- Spread a second, thicker layer of frosting over the top and sides, using an offset spatula to create a glass-smooth finish or a textured, swirled look depending on your theme.
- Map out your design lightly on the frosting using a toothpick; for a spring board, a diagonal “meadow” of piped flowers in one corner looks modern and sophisticated.
- Use different piping tips to create variety; use a petal tip for ranunculus-style swirls and a small leaf tip to tuck greenery between the floral elements.
- Finish the design by placing fresh berries or edible gold leaf accents in strategic clusters, following the rule of thirds to ensure the composition is visually balanced and professional.
Conclusion
Creating a viral-worthy food board is all about the balance between the tartness of the rhubarb, the sweetness of the celebration cakes, and the savory notes of the lemon pesto. When you bring these elements together, you aren’t just serving food; you’re facilitating memories. So, don’t be afraid to get messy, experiment with the textures, and most importantly, enjoy the process. Your guests will feel the love in every bite!
Frequently Asked Questions
Find answers to common questions about assembling and maintaining your viral food board.