
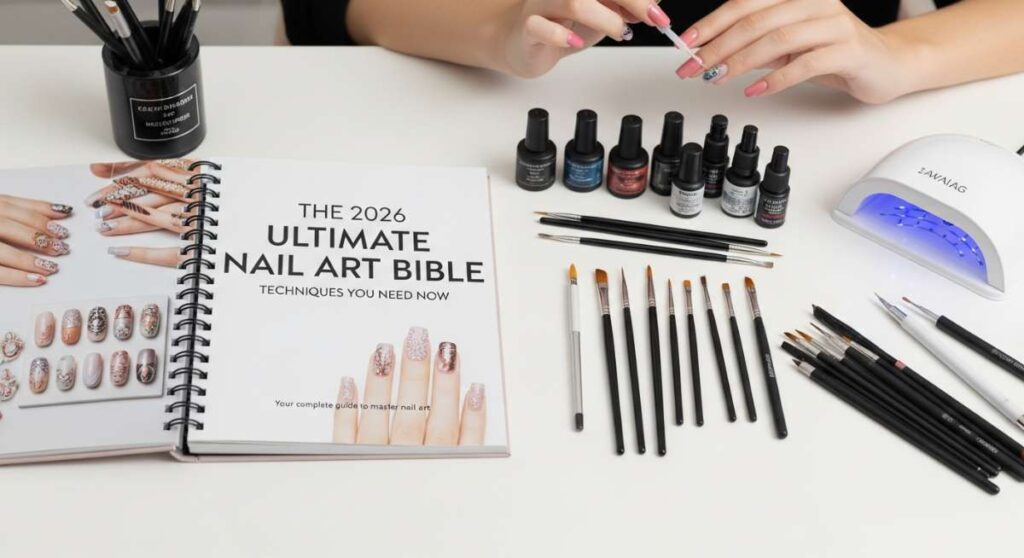
The 2026 Ultimate Nail Art Bible: Techniques You Need Now
Hello, my beautiful loves! Can you feel it? The air is changing, the light is getting a little softer, and there is that magical hum of creativity vibrating through our fingertips. I’ve spent the last few weeks tucked away in my sun-drenched studio, playing with colors that feel like a warm hug and textures that remind me of silk clouds. I wanted to create something truly special for you—a guide that isn’t just about polish, but about the joy of self-expression.
You know me, I believe that our nails are like tiny canvases for our souls. Whether you’re getting ready for a big dance, a quiet garden walk, or just want to feel a bit more ‘you’ while typing away at your desk, this 2026 bible is my gift to you. We are embracing the bold, the bright, and the beautifully nostalgic this year. So, grab a cup of lavender tea, settle into your favorite cozy chair, and let’s dive into these dreamy tutorials together.
4 Simple Steps to Paint Spring Fruit Nails
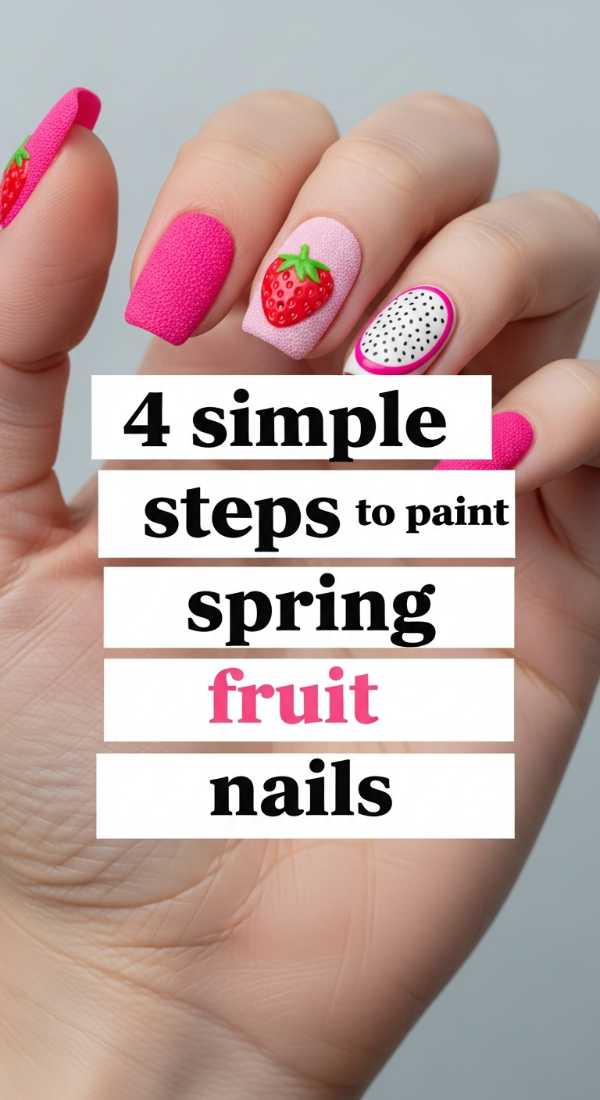
Why to love this Design:
There is nothing quite as sweet as little strawberries or tiny peaches dancing across your fingertips. This design is all about capturing that first bite of spring—fresh, juicy, and full of life. It’s a playful way to bring a bit of nature’s whimsy into your daily routine without feeling too over-the-top.
Essential Elements:
- Sheer pink base coat
- Red and green detail liners
- Dotting tool
- Glossy top coat
How to Prepare:
- Apply a sheer nude or pink base and let dry completely.
- Use a dotting tool to create two small red circles side-by-side for a strawberry shape.
- Take a fine liner brush with green polish to add tiny leaves at the top.
- Seal the sweetness with a high-shine top coat.
Budget Range
- Essie ‘Sugar Daddy’ ($10)
- Beetles Nail Art Liners ($12)
- Sally Hansen Insta-Dri Top Coat ($7)
5 Quick Tips for 3D Lemon Nails Designs
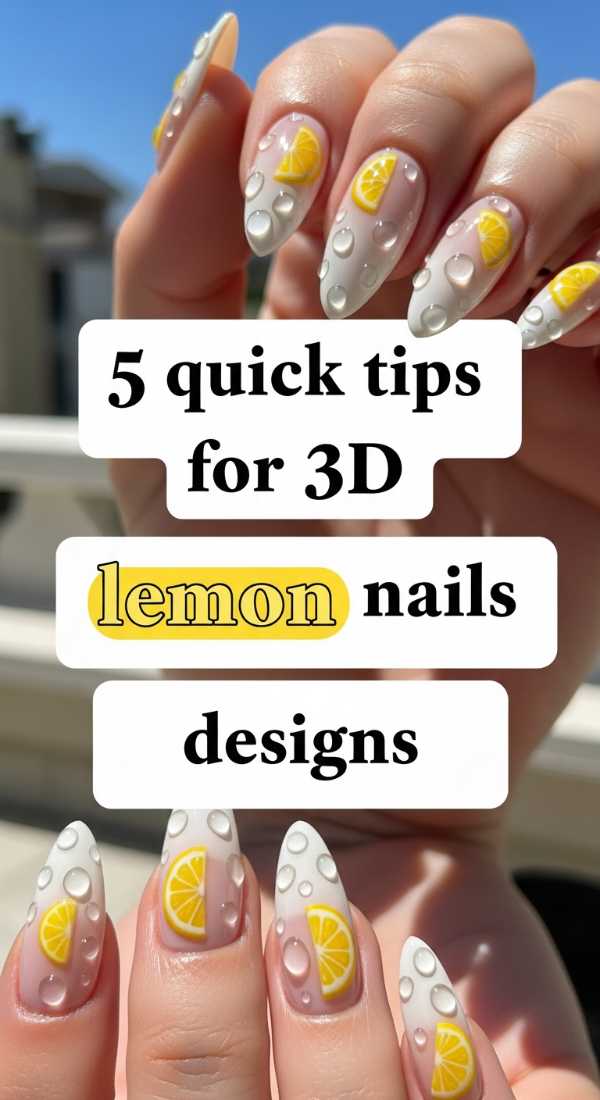
Why to love this Design:
Lemon nails are the ultimate mood booster! Adding a 3D element gives them a tactile, artisanal feel that looks like you spent hours at a high-end salon. It’s zesty, bright, and perfect for those of us who want our manicure to have a little ‘squeeze’ of personality.
Essential Elements:
- Neon yellow builder gel
- Clear 3D gem gel
- Matte base polish
- Fine detail brush
How to Prepare:
- Start with a matte yellow base to make the 3D texture pop.
- Use builder gel to create a raised oval shape.
- Apply a drop of clear gem gel over the yellow to mimic water droplets.
- Flash cure under a UV lamp for 30 seconds.
- Wipe with alcohol to reveal that delicious shine.
Budget Range
- Modelones 3D Molding Gel ($8)
- OPI ‘Exotic Birds Do Not Tweet’ ($11)
- UV LED Nail Lamp ($20)
Achieve Stunning Prom Nails Almond Style in 3 Steps
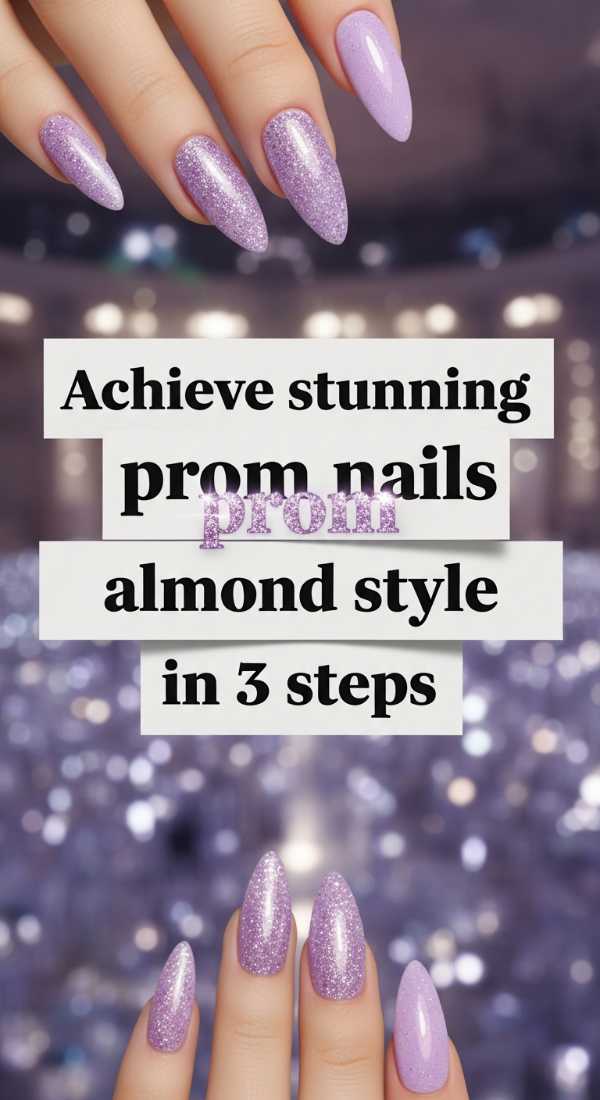
Why to love this Design:
Almond nails are the epitome of elegance—they elongate your fingers and provide the perfect sophisticated silhouette for prom night. This style is for the girl who wants to feel like a modern-day princess, blending classic grace with a contemporary edge.
Essential Elements:
- Almond-shaped nail tips or file
- Iridescent pearl powder
- Neutral gel polish
How to Prepare:
- File your nails into a soft almond point, ensuring all edges are smooth.
- Apply two coats of a neutral ‘your nails but better’ gel shade and cure.
- Rub pearl pigment powder onto the surface for a glass-like finish.
Budget Range
- Kiara Sky Gelly Tips ($15)
- Artdone Chrome Powder ($9)
- Gelish Soak-Off Polish ($13)
Apply Your Red Spring Nails in 10 Minutes
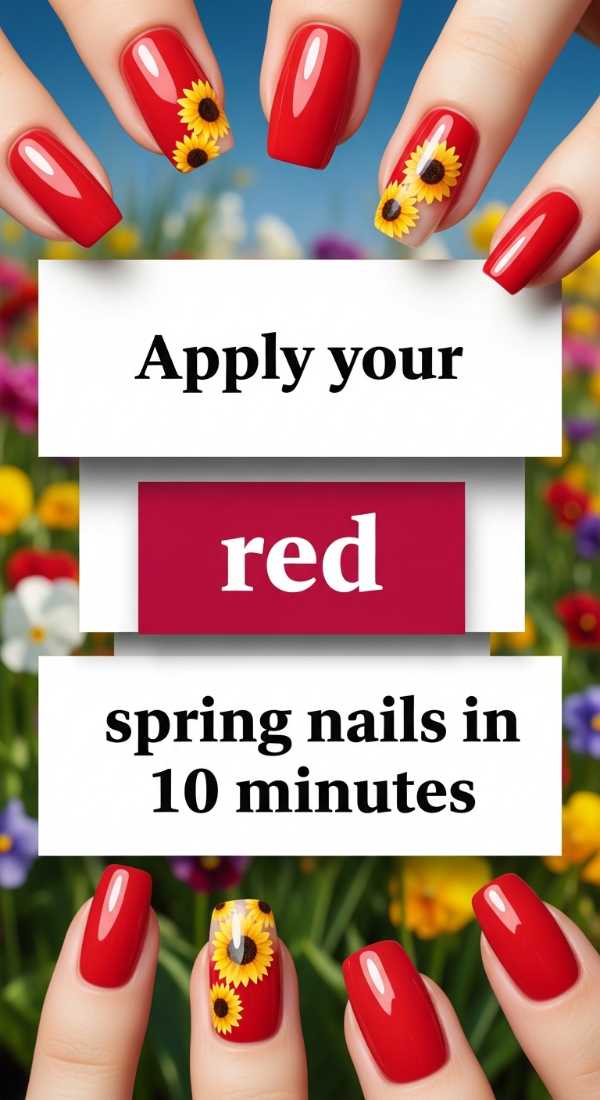
Why to love this Design:
Red isn’t just for winter, my darlings! A bright, poppy red is the heartbeat of spring. This look is for the busy bees who need to look polished and powerful in a flash. It’s classic, romantic, and takes almost no time to master.
Essential Elements:
- Vibrant poppy red lacquer
- Fast-drying base coat
- Conditioning cuticle oil
How to Prepare:
- Apply a quick-dry base to protect your natural nail.
- Swipe on one thick, even coat of high-pigment red.
- Finish with a drop of drying oil to set the color instantly.
Budget Range
- Revlon ‘Cherries in the Snow’ ($6)
- Seche Vite Fast Dry Top Coat ($9)
- Cuccio Cuticle Revitalizer ($7)
Design Your Blue Tropical Nail Set in 6 Phases
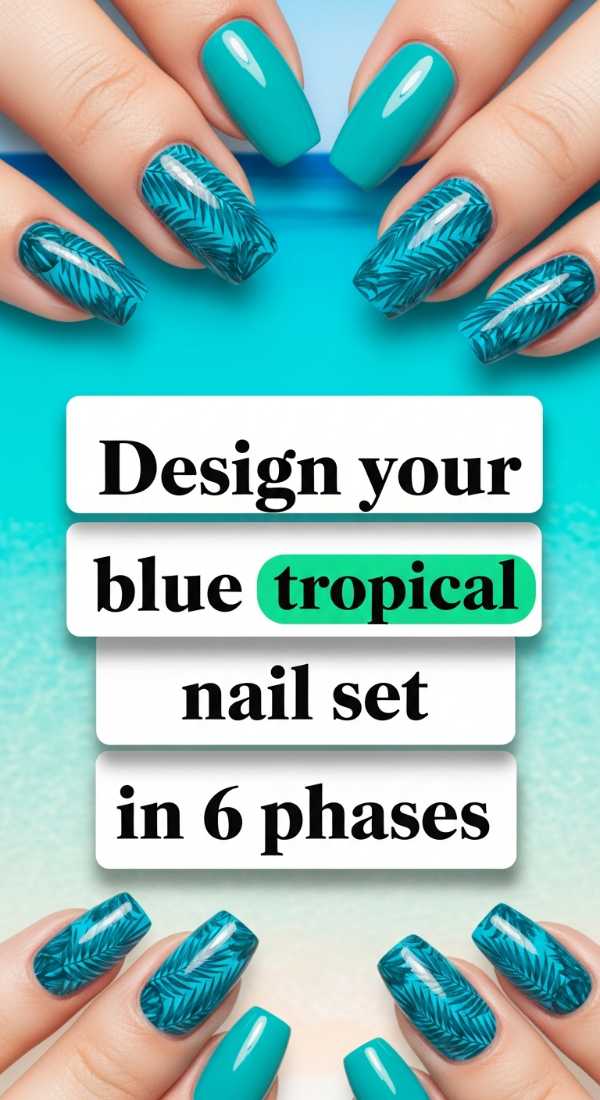
Why to love this Design:
Close your eyes and imagine the ocean waves. This tropical set is a vacation on your hands! Using different shades of blue creates a depth that feels like the Caribbean sea, making it the perfect companion for your next getaway or just a sunny Saturday.
Essential Elements:
- Cobalt, turquoise, and white polishes
- Sponge for gradient
- Palm leaf stickers or stamps
How to Prepare:
- Base: Paint all nails a soft sky blue.
- Gradient: Sponge turquoise on the tips for an ombre effect.
- Detail: Add white ‘sea foam’ lines with a thin brush.
- Art: Place a palm leaf decal on the ring finger.
- Refine: Clean up the edges with acetone.
- Seal: Use a UV-protectant top coat.
Budget Range
- Zoya Professional Lacquer Blues ($12 each)
- What Up Nails Tropical Stencils ($5)
- Maniology Stamping Kit ($25)
Create Butter Yellow Nails Chrome with 2 Tools
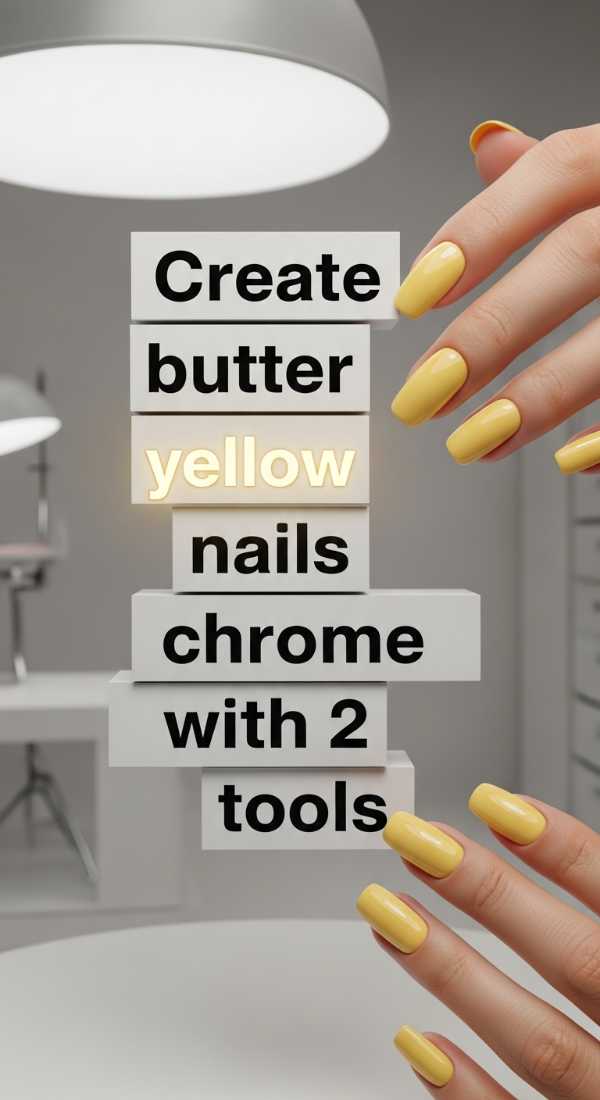
Why to love this Design:
Butter yellow is the ‘it’ color of 2026. It’s soft, creamy, and looks absolutely divine with a chrome finish. It feels like sunshine reflecting off a lake—serene, expensive, and incredibly chic.
Essential Elements:
- Butter yellow gel polish
- Gold-toned chrome powder
- Silicone applicator tool
How to Prepare:
- Paint two coats of yellow gel and cure until ‘tacky’.
- Use the silicone tool to buff the gold chrome powder into the surface until it glows.
Budget Range
- DND ‘Buttercup’ Gel ($9)
- Born Pretty Mirror Powder ($7)
- Dual-ended Silicone Brush ($6)
3 Ways to Style Funky Spring Nails Today
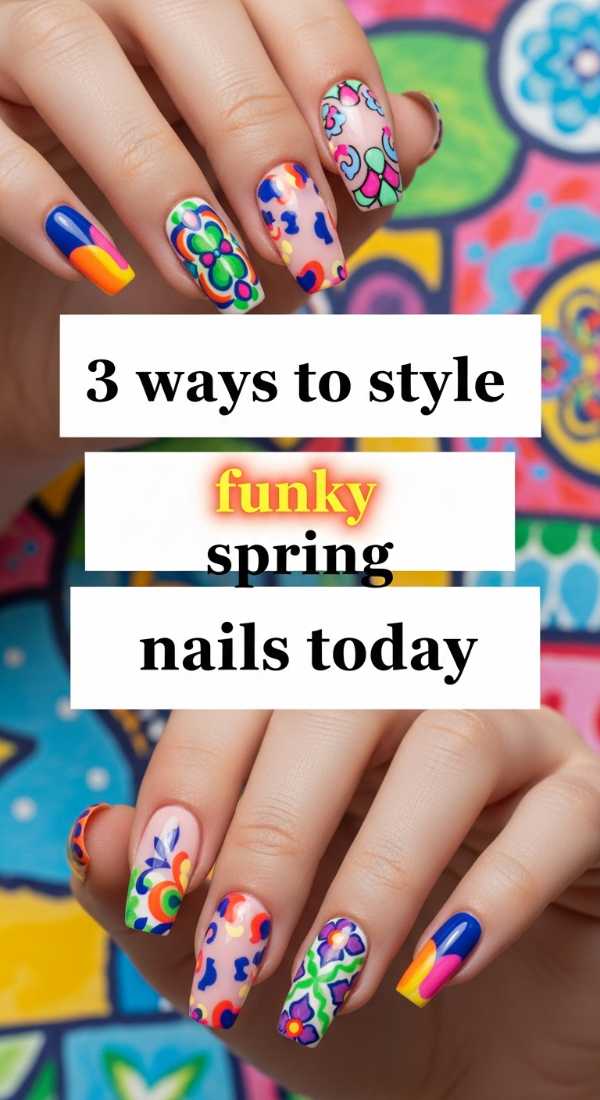
Why to love this Design:
Sometimes we just need to break the rules! Funky spring nails are all about mismatched patterns—think checkers, swirls, and smiley faces. It’s a dopamine hit every time you look down at your hands.
Essential Elements:
- Contrast colors (purple & orange)
- Dotting tool
- Striper brush
How to Prepare:
- The Swirl: Use a striper brush to draw wavy lines across the nail.
- The Checker: Use a square brush to create a grid on the middle finger.
- The Dot: Add random oversized dots in clashing colors for a retro vibe.
Budget Range
- Holo Taco Rainbow Bundle ($60)
- Amazon Nail Art Brush Set ($8)
- Nailtopia Plant-Based Polish ($10)
Master Black and Gold Prom Nails in 5 Steps
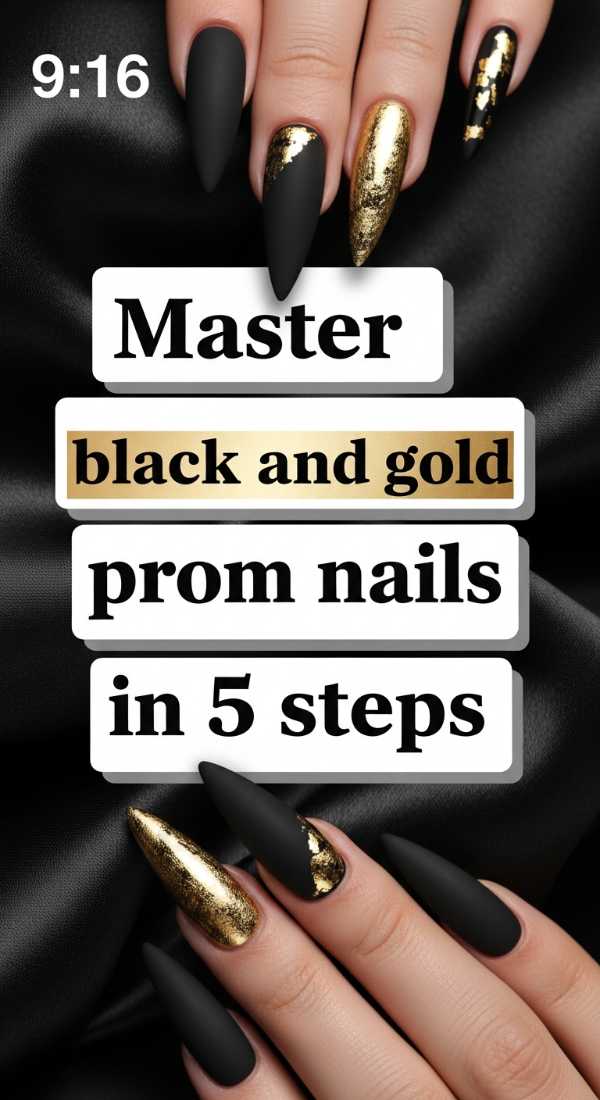
Why to love this Design:
For my loves who want a bit of drama, black and gold is the ultimate power duo. It’s sophisticated, slightly mysterious, and perfectly matches a glamorous evening gown. It’s pure luxury at your fingertips.
Essential Elements:
- Matte black polish
- Gold metallic leaf
- Tweezers
How to Prepare:
- Apply two coats of deep matte black.
- While slightly wet, use tweezers to place small flakes of gold leaf.
- Press the gold leaf down gently with a dry finger.
- Apply a matte top coat over the black and a glossy one over the gold for contrast.
- Clean cuticles for a crisp look.
Budget Range
- OPI ‘Black Onyx’ ($11)
- Kinetic Gold Leaf Sheets ($6)
- Tweezerman Precision Tweezers ($15)
Match Your Summer Toe Nails in 4 Simple Steps
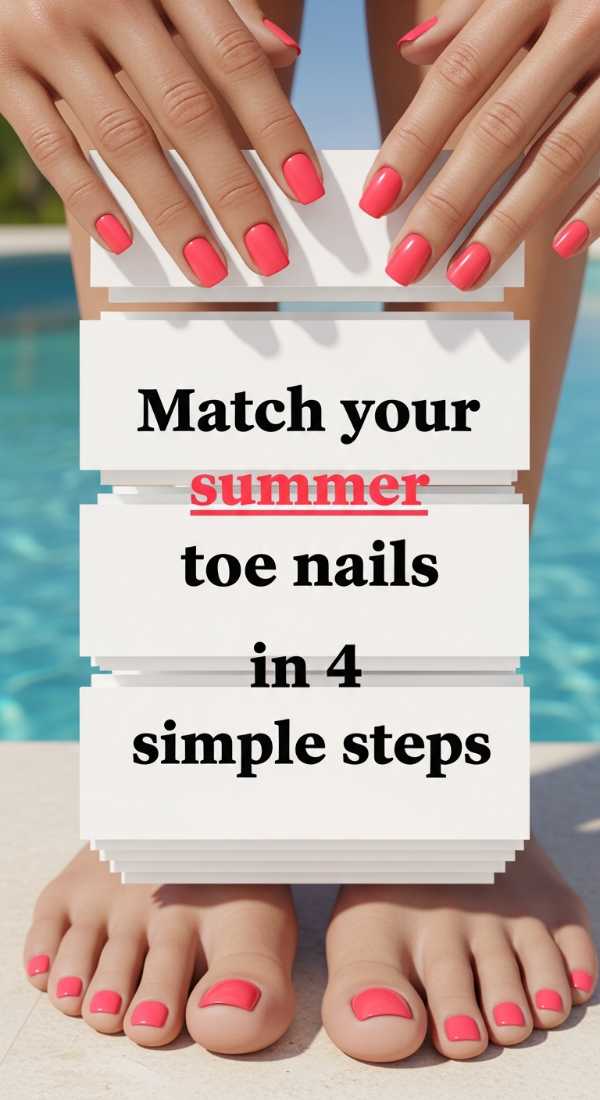
Why to love this Design:
There is something so satisfying about a coordinated mani-pedi! Matching your toes to your summer nails completes your look and makes you feel put-together, whether you’re in sandals or barefoot on the sand.
Essential Elements:
- Matching neon coral polish
- Toe separators
- Buffing block
How to Prepare:
- Soak and buff your toes to create a smooth surface.
- Use toe separators to keep the polish from smudging.
- Apply two thin coats of your favorite summer shade.
- Finish with a high-gloss, sand-resistant top coat.
Budget Range
- Orly Neon Heat Collection ($12)
- Walgreens Toe Separators ($3)
- Flowery Blue Buffer ($2)
Recreate Tuscan Nails 2000s in 5 Minutes
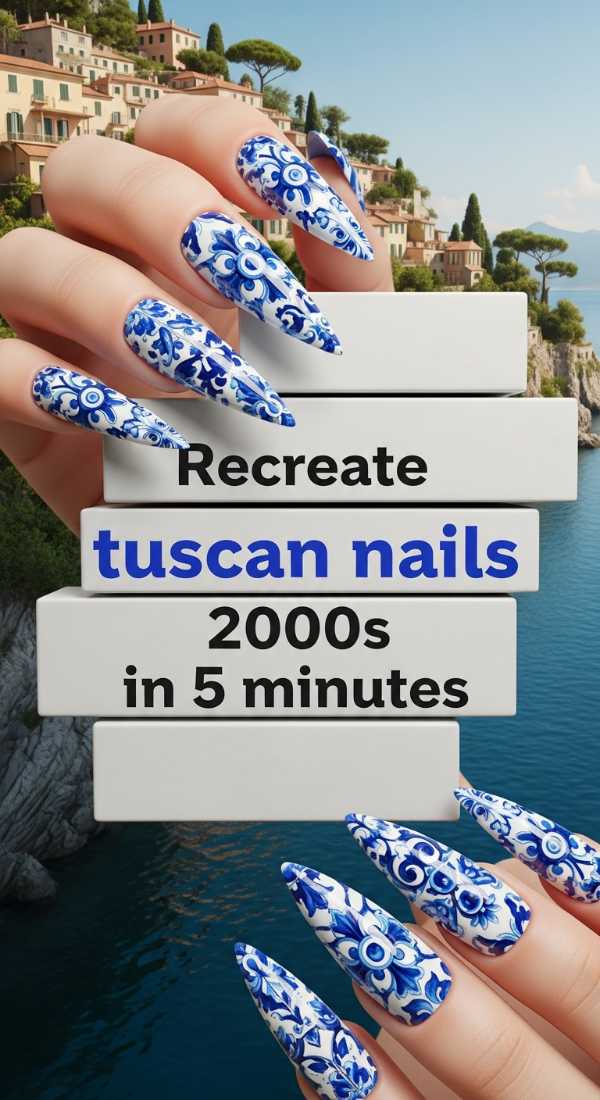
Why to love this Design:
We are going back to the Y2K era with a Tuscan twist! Think terracotta tones, swirls, and that sun-drenched Italian villa aesthetic. It’s nostalgic, warm, and surprisingly fast to achieve for a last-minute brunch.
Essential Elements:
- Terracotta orange polish
- White ‘marble’ ink
- Buffer
How to Prepare:
- Paint a solid base of terracotta.
- Drop two dots of white marble ink while the base is wet.
- Swirl with a toothpick for 5 seconds.
- Wait for the ink to spread and settle.
- Finish with a matte top coat for that ‘stone’ feel.
Budget Range
- Lights Lacquer ‘Terra’ ($13)
- Alcohol Inks for Nails ($10)
- Toothpicks ($1)
Embrace Your Inner Artist
My darlings, I hope this guide sparks a little fire in your heart to try something new. Remember, nail art isn’t about perfection; it’s about the feeling you get when you see a splash of your favorite color on your hand. Whether you go for the bold black and gold or the sweet spring fruits, wear them with confidence and a smile. You are your own best masterpiece! I can’t wait to see what you create. Don’t forget to tag me in your photos—I’ll be over here, cheering you on with every brushstroke.