
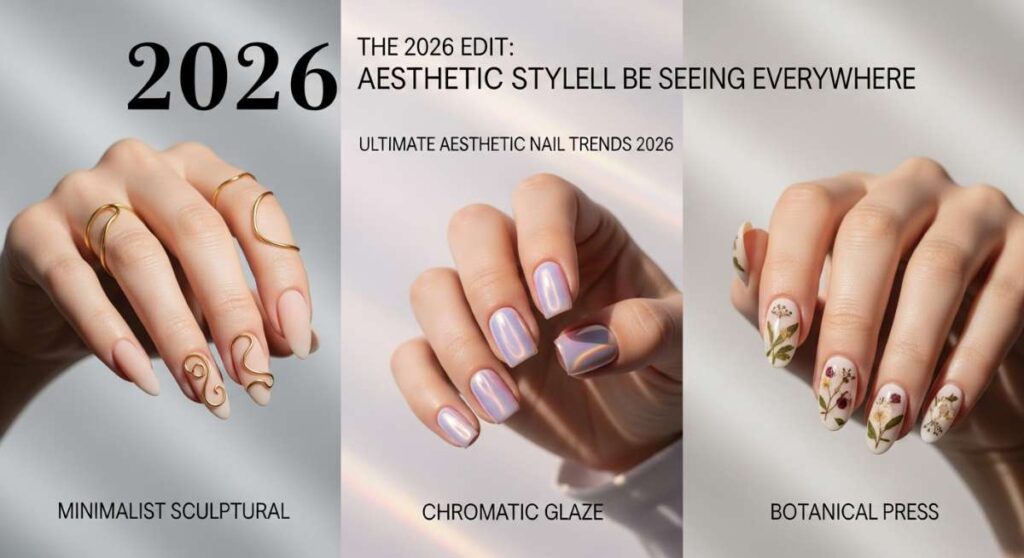
The 2026 Nail Edit: Aesthetic Styles You’ll Be Seeing Everywhere
Hello, my beautiful loves. As we drift further into 2026, I’ve found myself leaning into the small rituals that make life feel like a soft, warm embrace. There is something so healing about sitting down, taking a deep breath, and letting our hands become the canvas for our current mood. It’s more than just a manicure; it’s a way to carry our intentions with us throughout the day.
This year, the energy is all about a ‘cloud-soft’ aesthetic—think ethereal finishes, sun-drenched pigments, and a return to playful storytelling on our fingertips. Whether you’re looking for something that whispers elegance or a design that shouts your joy from the rooftops, I’ve curated the ultimate edit of the trends that are truly capturing our hearts right now. Let’s dive into these dreamy designs together, shall we?
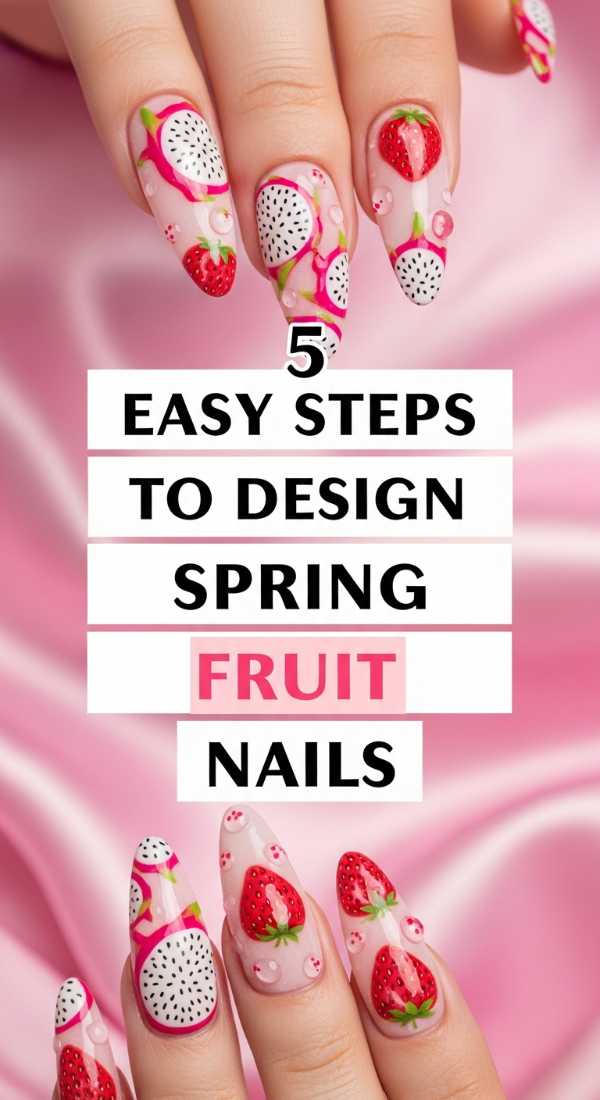
5 Easy Steps to Design Spring Fruit Nails
Why to love this Design:
There is something so incredibly nostalgic and sweet about fruit-inspired nails, isn’t there? It’s like carrying a little piece of a sun-drenched orchard right on your fingertips. In 2026, we’re seeing a shift toward micro-art—tiny cherries, strawberries, and peaches that feel delicate rather than overwhelming. It’s the perfect way to welcome the warmth back into our lives.
Essential Elements:
- Sheer ‘milk’ base polish
- Precision detailing brush
- Vibrant red and leaf-green gel liners
- Matte and glossy top coat for texture
How to Prepare:
- Start with a clean, buffed nail and apply a sheer nude or milky white base.
- Use a dotting tool to place two small red dots side-by-side for the fruit body.
- With a fine liner, drag a tiny green line upward to create the stem.
- Add a tiny white ‘highlight’ dot on the fruit to give it a 3D, juicy effect.
- Seal with a high-shine top coat to make the colors pop.
Budget Range
- Essie Marshmallow Polish ($10)
- Beetles Nail Art Liner Set ($12)
- Sally Hansen Insta-Dri Top Coat ($7)
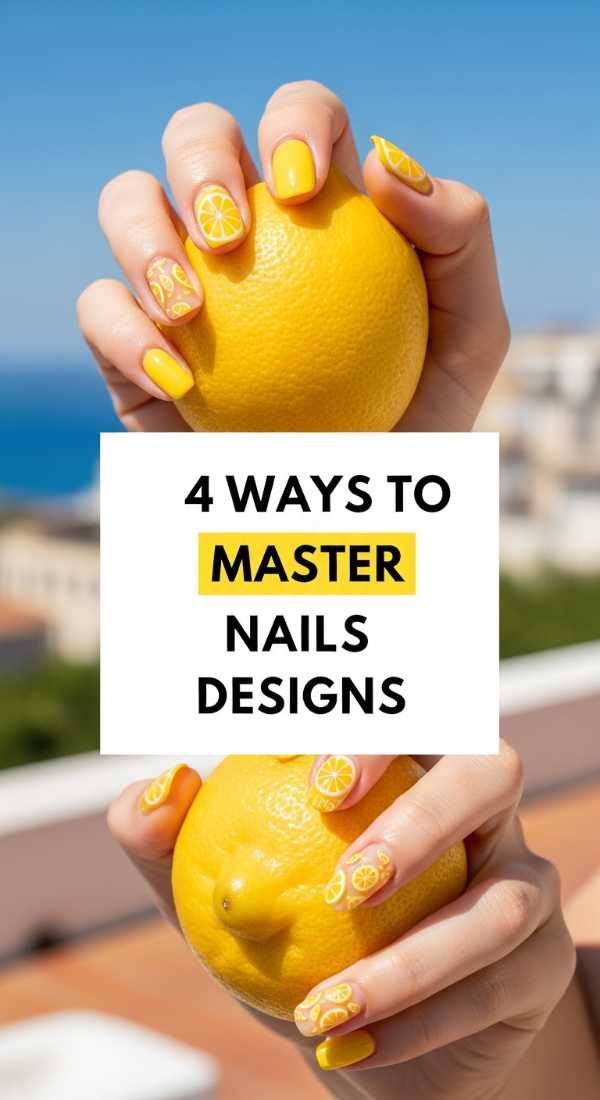
4 Ways to Master Lemon Nails Designs
Why to love this Design:
Lemon nails are the ultimate ‘clean girl’ update for 2026. They bring a zest for life and a bright, citrusy energy that instantly lifts your mood. It’s a design that feels crisp, refreshing, and surprisingly sophisticated when paired with the right neutral tones. It’s like a glass of ice-cold lemonade for your aesthetic.
Essential Elements:
- Zesty pastel yellow polish
- White ‘pith’ accent color
- Crystal clear top coat
- Citrus-scented cuticle oil
How to Prepare:
- The Negative Space Look: Paint only the tips with a lemon-yellow French curve.
- The Half-Lemon Accent: Use a stencil to create a sliced lemon shape on your ring finger.
- The Matte Finish: Apply a yellow shade and finish with a matte top coat for a soft, velvety ‘lemon peel’ texture.
- The Mediterranean Mix: Pair yellow accents with cobalt blue tiles for a Capri-inspired vibe.
Budget Range
- OPI ‘Exotic Birds Do Not Tweet’ ($11)
- Nail Stencils by What’s Up Nails ($5)
- Holler and Glow Cuticle Oil ($8)
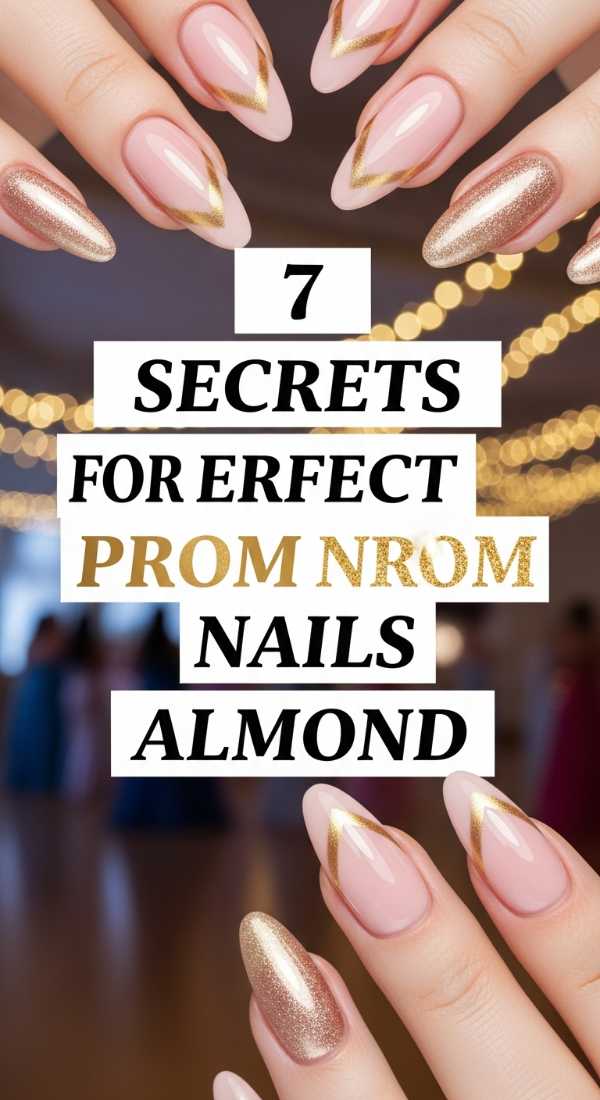
7 Secrets for Perfect Prom Nails Almond
Why to love this Design:
Prom is such a magical milestone, and almond-shaped nails are the gold standard for elegance. They elongate your fingers and provide the perfect canvas for those ‘once-in-a-lifetime’ photos. This year, we’re moving away from heavy glitter and toward a soft, ‘lit-from-within’ glow that feels timeless and sophisticated.
Essential Elements:
- Almond-shaped nail tips or natural shaping
- Iridescent pearl powder
- Nude-pink base color
- Nail glue for embellishments
How to Prepare:
- Gently push back cuticles to maximize the nail bed length.
- File edges inward to create a soft, tapered point.
- Apply a strengthening base coat to prevent breakage during the dance.
- Use thin, even layers of your chosen nude polish.
- Apply a pearl chrome powder over a no-wipe top coat for a ‘glazed’ look.
- Seal the free edge meticulously to prevent chipping.
- Apply a drop of rosehip oil to the cuticles for a healthy, photo-ready glow.
Budget Range
- Modelones Almond Tip Kit ($15)
- Arora Pearl Chrome Powder ($9)
- Olive & June Pink Sand Polish ($9)
6 Easy Steps for Tuscan Nails 2000s
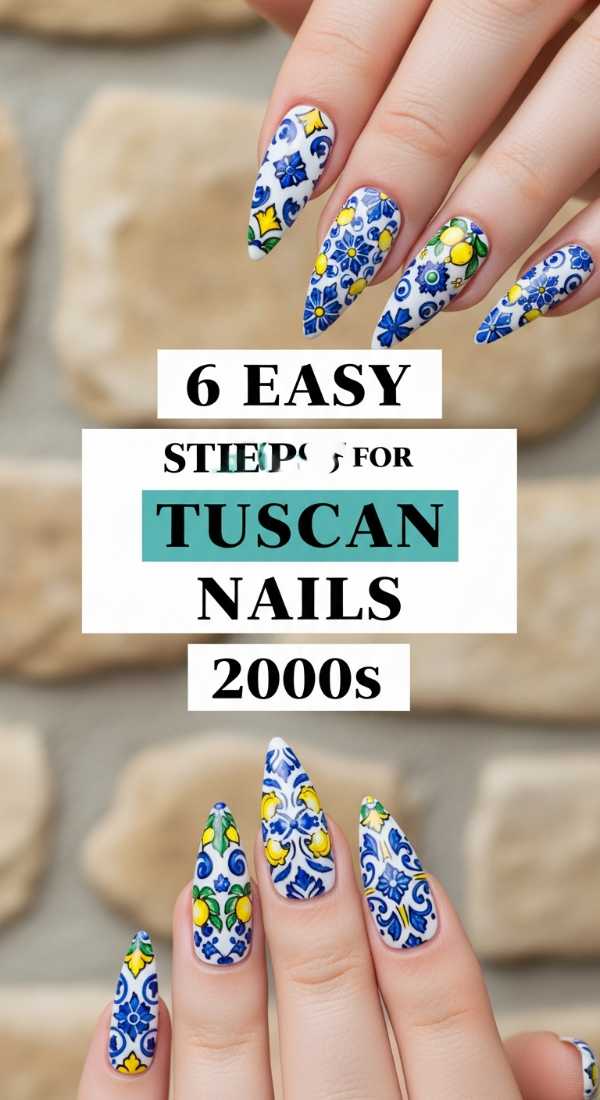
Why to love this Design:
The Y2K revival meets Italian summer vibes with Tuscan 2000s nails. It’s all about that warm, terra-cotta energy mixed with early aughts playfulness—think swirls, butterflies, and sun motifs. This style feels like a vintage postcard from a holiday you never want to end. It’s soulful, earthy, and so incredibly chic.
Essential Elements:
- Terra-cotta and burnt orange polish
- Gold leaf flakes
- Retro swirl stencils
- Deep bronze liner
How to Prepare:
- Apply a warm beige base to all nails.
- Use a sponge to create a soft terra-cotta gradient on the tips.
- Add 2000s-style ‘butterfly’ or ‘star’ stickers in gold.
- Paint thin, organic ‘swirl’ lines using a bronze metallic polish.
- Carefully place a few gold leaf flakes near the base of the nail.
- Finish with a thick, plush top coat for a gel-like finish.
Budget Range
- Orly ‘Can You Dig It’ ($12)
- Winstonia Gold Leaf Flakes ($6)
- Seche Vite Dry Fast Top Coat ($10)
3 Tips to Style Red Spring Nails
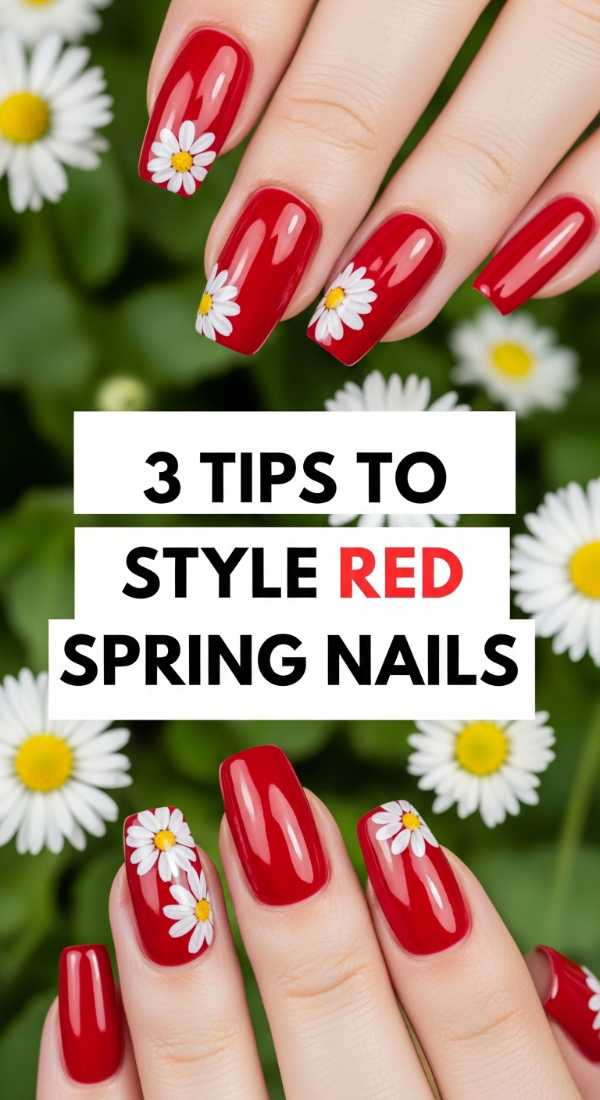
Why to love this Design:
Red isn’t just for winter, my loves. A spring red is vibrant, poppy, and reminds us of fresh tulips and new beginnings. It’s a power move that feels fresh when styled with lighter fabrics and floral prints. In 2026, we’re opting for tomato reds and sheer cherry tints that feel breathable and light.
Essential Elements:
- Cranberry or tomato red cream polish
- High-gloss finish
- Oval nail shape
How to Prepare:
- Keep the length short and rounded for a modern, ‘quiet luxury’ feel.
- Use a ‘jelly’ red polish for a translucent effect that mimics spring blooms.
- Pair with a matching red lip but keep the rest of your makeup dewy and minimal.
Budget Range
- Zoya ‘Sizzling Red’ ($12)
- Cirque Colors Lucky Jelly ($14)
- Revlon ColorStay Gel Envy ($8)
5 Ways to Apply Butter Yellow Nails Chrome
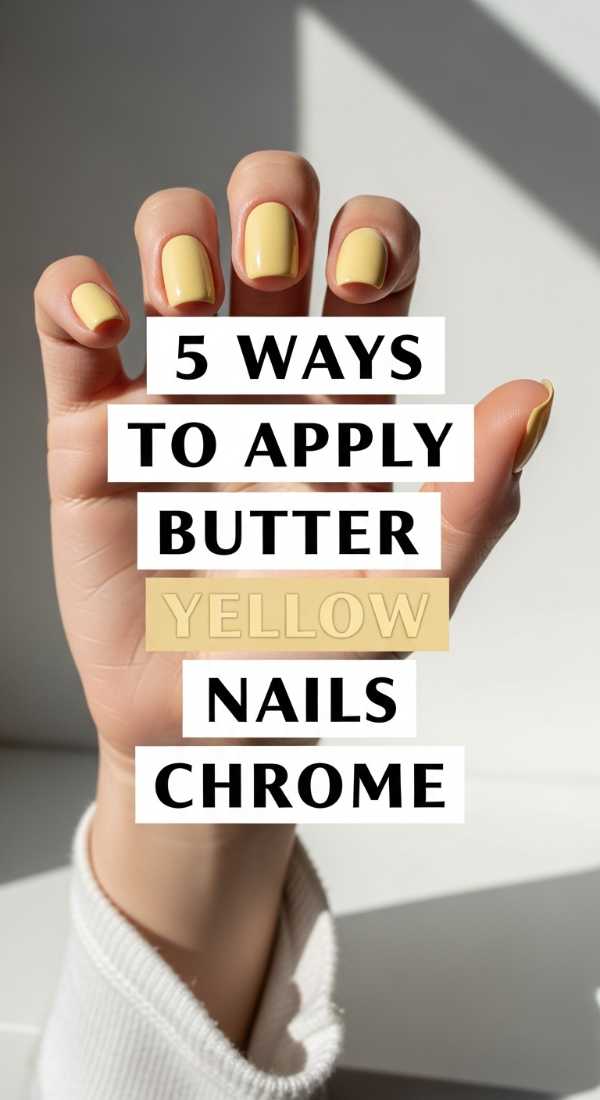
Why to love this Design:
Butter yellow is the breakout star of 2026, and adding a chrome finish makes it look like literal liquid sunshine. It’s soft, creamy, and universally flattering. This look captures that ‘clean girl’ aesthetic while adding a futuristic, high-fashion twist that is absolutely mesmerizing in the light.
Essential Elements:
- Butter yellow cream polish
- Clear chrome powder (Unicorn or Aurora)
- Silicon applicator tool
How to Prepare:
- The Full Glaze: Apply yellow, top coat, then rub chrome over the entire nail.
- The Chrome Tip: Apply chrome only to the tips for a metallic French look.
- The Ombre Shift: Focus the chrome at the base and fade it out toward the tip.
- The Velvet Effect: Mix a bit of yellow with a magnetic polish for a 3D shimmer.
- The Accent Feature: Chrome only the ring finger for a subtle pop of light.
Budget Range
- DND ‘Butter’ Gel Polish ($8)
- Born Pretty Aurora Powder ($7)
- Makartt No Wipe Top Coat ($9)
8 Steps to Create a Tropical Nail Set

Why to love this Design:
When the heat hits, we go tropical. This isn’t just a manicure; it’s a tiny vacation you get to look at every single day. We’re talking lush greens, vibrant hibiscus pinks, and the kind of designs that make you want to book a one-way ticket to paradise. It’s bold, brave, and beautiful.
Essential Elements:
- Teal, fuchsia, and lime green polishes
- Fine-tipped art brushes
- Small gold studs
How to Prepare:
- Apply a clean white base to make colors pop.
- Sponge on a teal-to-blue ombre for a ‘sea’ effect.
- Use lime green to paint simple ‘palm leaf’ strokes.
- Add a pop of fuchsia in the center for a floral accent.
- Use a dotting tool to add yellow centers to your flowers.
- Place a gold stud at the base of the thumb nail for some ‘resort’ glam.
- Clean up edges with a brush dipped in acetone.
- Apply a UV-protective top coat to prevent fading in the sun.
Budget Range
- China Glaze ‘Tropical Collection’ Set ($20)
- Pure Acetone Clean-up Brush ($5)
- Nail Art Studs Variety Pack ($8)
4 Techniques for Gothic Spring Nails
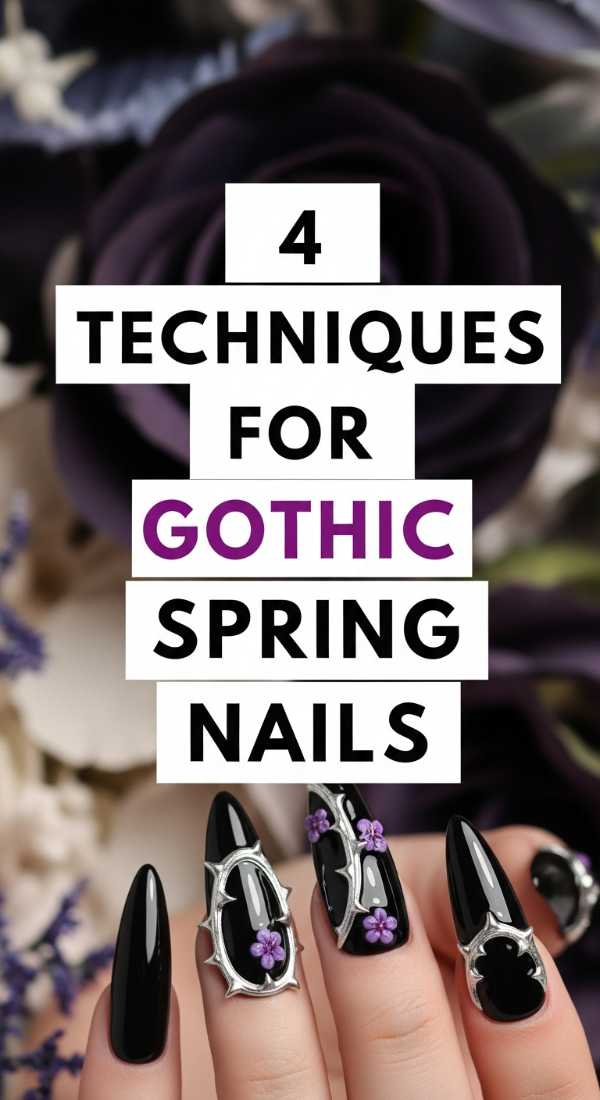
Why to love this Design:
Who says spring has to be all pastels? Gothic spring nails combine delicate florals with edgy, dark undertones for a look that’s beautifully moody. It’s for my loves who find beauty in the shadows and want to pair their lace dresses with something a bit more mysterious. Think ‘Whimsigoth’ at its finest.
Essential Elements:
- Sheer black or ‘smoke’ polish
- Dried pressed flowers
- Matte top coat
- Silver micro-beads
How to Prepare:
- The Smoky Base: Apply one thin layer of sheer black for a ‘veil’ effect.
- The Encapsulated Flower: Place a tiny dried flower onto tacky polish and seal it.
- The Dark French: Swap white tips for a deep charcoal or navy.
- The Matte Floral: Paint black roses on a nude base and finish with a matte coat.
Budget Range
- Ejiubas Jelly Black Polish ($9)
- Pressed Dried Flowers for Nails ($7)
- OPI Matte Top Coat ($11)
6 Tips for Matching Summer Toe Nails
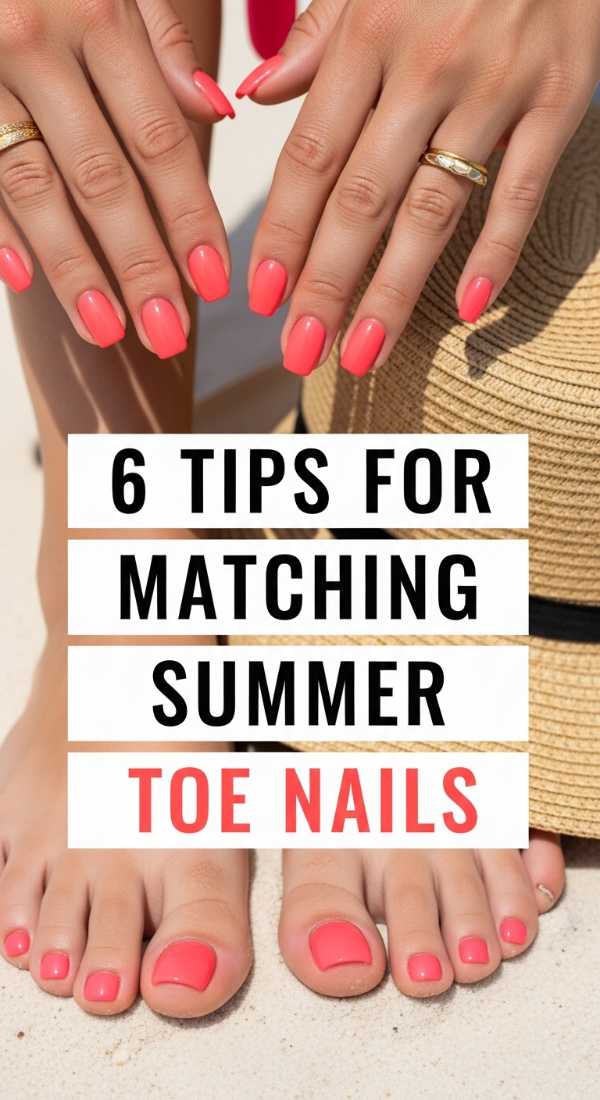
Why to love this Design:
Matching your mani-pedi is the ultimate form of self-care. It’s that polished, put-together feeling that makes every sandal look better. For 2026, we aren’t doing exact clones; we’re doing ‘sisters, not twins’—colors that complement each other perfectly while maintaining their own personality.
Essential Elements:
- Coordinating color palette (e.g., Peach and Coral)
- Hydrating foot mask
- Toe separators
How to Prepare:
- Pick a ‘hero’ color for your hands and a ‘support’ color for your toes.
- Use a consistent finish (both glossy or both matte) to tie them together.
- If you have nail art on your hands, keep toes a solid color from that art.
- Exfoliate your feet before painting to ensure a smooth application.
- Use a ridge-filling base coat on toes for an even surface.
- Apply a cooling peppermint oil after the polish dries for a spa feel.
Budget Range
- Burt’s Bees Peppermint Foot Cream ($9)
- Deborah Lippmann Gel Lab Pro Duo ($36)
- Separator Sponges ($3)
5 Steps for Lavender Sparkle Nails
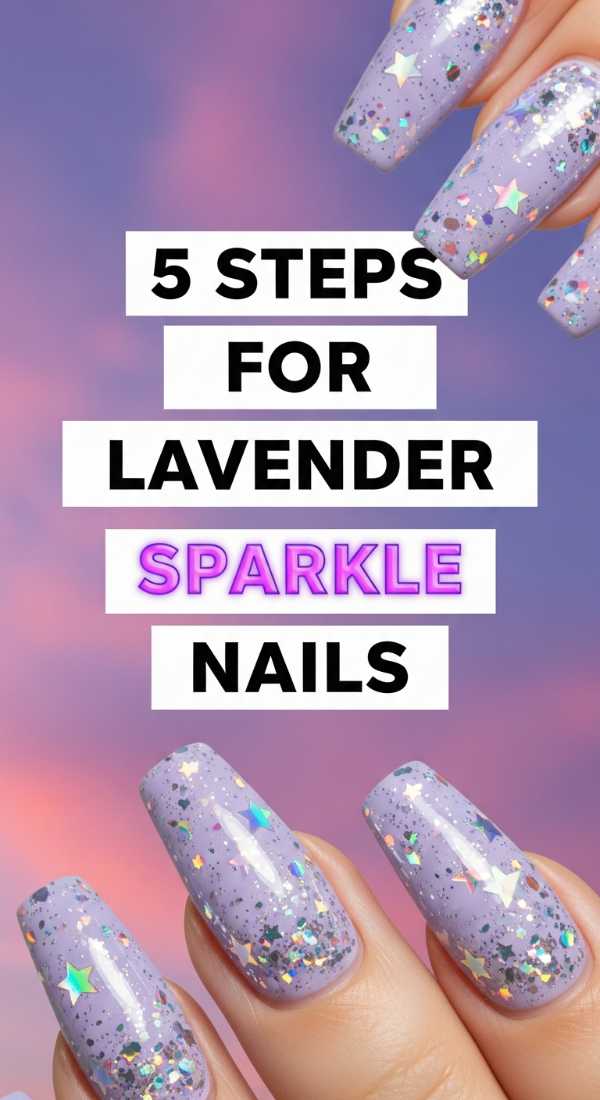
Why to love this Design:
Lavender is the color of calm, and when you add a bit of sparkle, it’s pure magic. It’s soft, ethereal, and perfectly dreamy. This design is like a quiet morning in a field of flowers, reflecting the light as you move. It’s the trend that everyone is asking for because it just feels so peaceful.
Essential Elements:
- Soft lavender cream polish
- Reflective holographic glitter
- Dense glitter sponge
How to Prepare:
- Apply two coats of a soft lavender base.
- Dab a silver holographic glitter onto the tips of the nails using a sponge.
- Gently blend the glitter downward to create a ‘falling’ effect.
- Add a few larger hexagonal glitters for extra dimension.
- Seal with two layers of top coat to ensure a smooth, glass-like finish.
Budget Range
- ILNP Lavender Cream ($10)
- Holo Taco Scattered Holo Top Coat ($13)
- Cosmetic Sponges ($4)
A Season of Beautiful Intentions
As we wrap up this look into the future of our fingertips, I hope you feel inspired to try something that makes your heart flutter. Whether you choose the zesty energy of lemons or the calm embrace of lavender, remember that these small acts of beauty are a gift to yourself. You deserve to look down at your hands and feel a sense of joy and peace. Until next time, stay beautiful, stay soft, and keep shining, my loves.