
The 10-Minute Viral Food Board That Will Save Your Next Party
We’ve all been there: the guest list is growing, the clock is ticking, and you’re standing in your kitchen wondering how on earth you’re going to pull off a Pinterest-worthy spread without losing your mind. Hosting should be about the laughter and the shared memories, not the stress of a complicated menu. That is exactly why I fell in love with the concept of the viral food board—it’s approachable, stunning, and feels like a warm hug for your guests.
This particular spread is inspired by the transition of the seasons, blending the tart, early-summer goodness of rhubarb with the celebratory spirit of graduation season. Whether you are honoring a graduate or just gathered for a Sunday brunch, these components come together to create a sensory experience that your friends will be talking about for weeks. Let’s dive into the elements that make this board truly unforgettable.
How to design graduation cakes
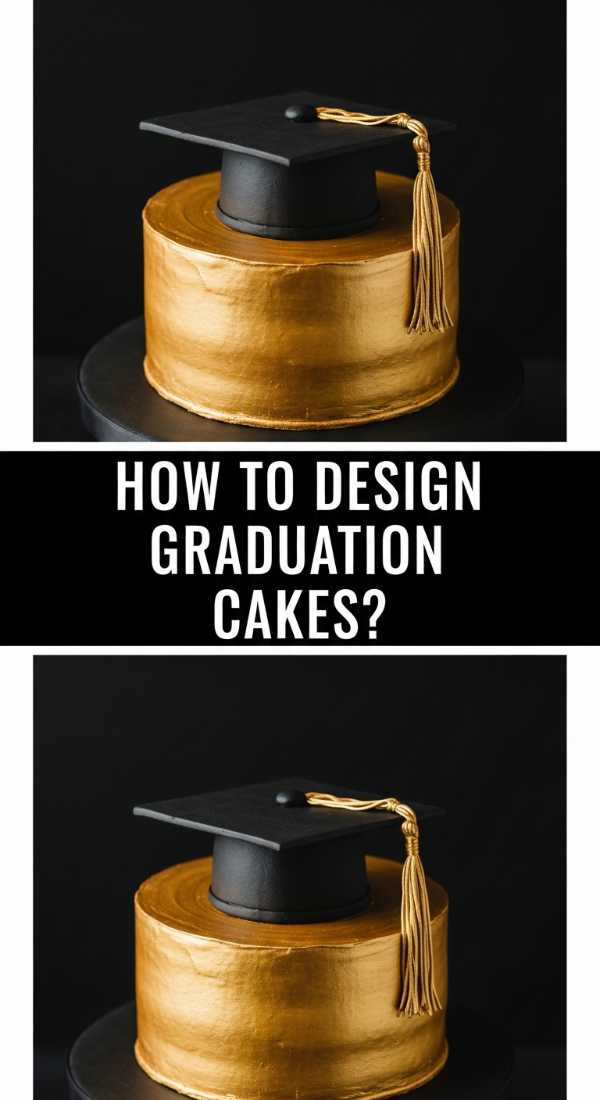
Why we love this
There is something incredibly sophisticated about a minimalist graduation cake that focuses on clean lines and a hint of academic flair. The aroma of Madagascar vanilla bean wafting through the kitchen as the sponge cools is enough to make anyone feel festive. We love the way a silky, stark white buttercream provides the perfect canvas for a tiny, handmade fondant tassel or a delicate gold leaf accent, offering a texture that is both airy and decadent against the palate.
Ingredients
- 2 1/2 cups all-purpose flour
- 1 1/2 cups granulated sugar
- 1 cup unsalted butter, softened
- 4 large eggs, room temperature
- 1 cup whole milk
- 1 tbsp vanilla bean paste
- 2 tsp baking powder
- White Swiss meringue buttercream
- Gold leaf or black fondant for accents
How to make it
- Preheat your oven to 350°F (175°C) and grease two 8-inch round cake pans, lining the bottoms with parchment paper for a flawless release.
- In a stand mixer fitted with the paddle attachment, cream the butter and sugar on medium-high for 5 full minutes until the mixture looks pale and fluffy, which creates the essential aeration for a light crumb.
- Add eggs one at a time, beating well after each addition to emulsify the fats and liquids properly.
- Whisk your dry ingredients in a separate bowl and then alternate adding them with the milk into the butter mixture, starting and ending with the flour to prevent the batter from curdling.
- Divide the batter evenly and bake for 30-35 minutes; check for doneness when a wooden skewer comes out with just a few moist crumbs.
- Once cooled completely, level the tops with a serrated knife, stack with buttercream, and apply a thin ‘crumb coat’ before the final smooth layer. Use a bench scraper for those sharp, professional edges that scream ‘viral style.’
How to bake rhubarb pie
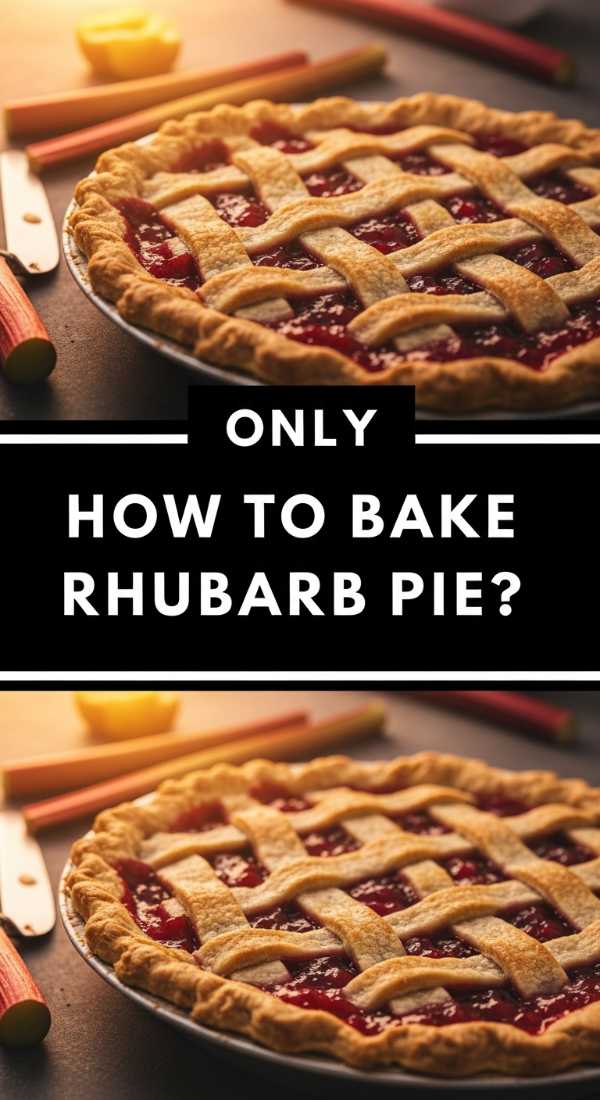
Why we love this
The first bite of a classic rhubarb pie is a revelation of contrasting sensations—the shatteringly crisp, buttery flakes of the crust give way to a jammy, ruby-red center that hits that perfect note of lip-puckering tartness. It smells like early summer mornings and old-fashioned country kitchens, where the heat of the oven transforms tough stalks into a tender, translucent filling. It’s a rustic masterpiece that demands a scoop of melting vanilla bean ice cream to balance its bold, acidic profile.
Ingredients
- 5 cups fresh rhubarb, chopped into 1/2 inch pieces
- 1 1/4 cups granulated sugar
- 1/4 cup cornstarch
- 1/2 tsp orange zest
- Pinch of nutmeg
- Double crust pie pastry
- 1 egg (for wash)
- Turbinado sugar for topping
How to make it
- Toss the chopped rhubarb with sugar, cornstarch, zest, and nutmeg in a large glass bowl; let it macerate for 15 minutes to allow the juices to start drawing out, which helps the cornstarch hydrate.
- Roll out your bottom pastry crust on a floured surface until it is 1/8 inch thick and drape it into a 9-inch deep-dish pie plate, leaving an inch of overhang.
- Pour the rhubarb mixture into the shell, ensuring the cornstarch slurry at the bottom of the bowl is included as this is your thickening agent.
- Top with the second crust—either solid with steam vents or a beautiful lattice—and crimp the edges tightly to seal in the bubbling juices.
- Brush the top generously with a beaten egg and a splash of water, then sprinkle with turbinado sugar for that signature bakery-style crunch.
- Bake at 425°F for 20 minutes to set the crust, then lower the heat to 375°F for another 35-40 minutes until the filling is thick and bubbling visibly through the vents.
How to decorate graduation cupcakes
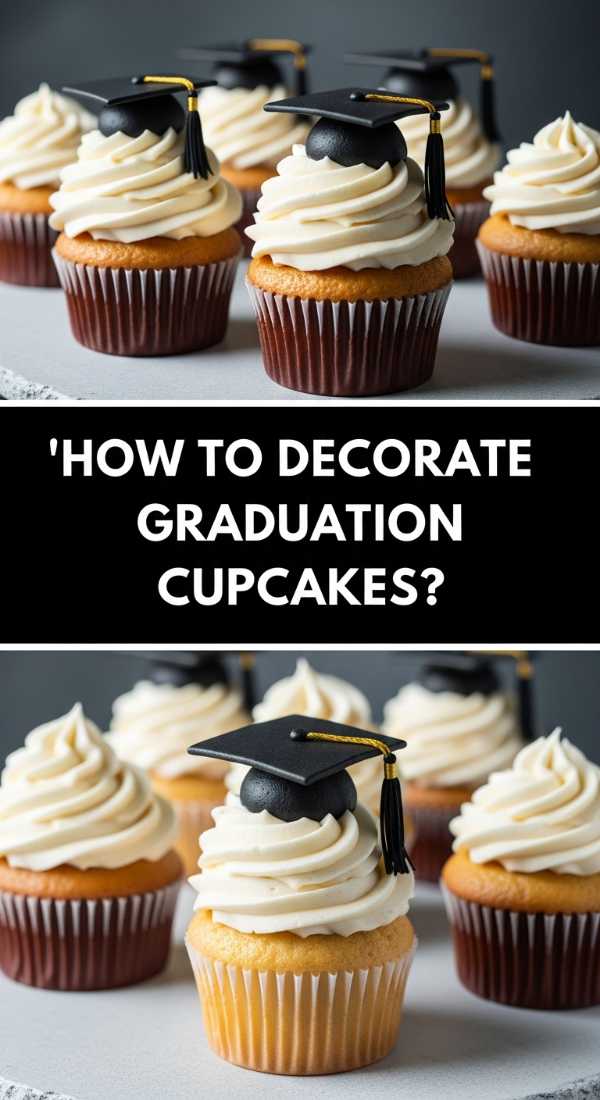
Why we love this
Cupcakes are the ultimate party vessel, and when decorated for graduation, they become tiny, edible trophies of achievement. We love the playfulness of using chocolate squares to mimic mortarboards and the way a swirl of rich frosting can be customized to match any school color. The visual impact of a dozen perfectly piped cupcakes arranged on a board provides an instant focal point that is as delicious as it is celebratory.
Ingredients
- Pre-baked chocolate or vanilla cupcakes
- Stiff vanilla buttercream
- Ghirardelli chocolate squares
- Mini peanut butter cups
- Sour belt candy or fruit leather (for tassels)
- M&Ms or edible pearls
How to make it
- Fit a piping bag with a large open star tip and pipe a flat, sturdy swirl of frosting onto each cooled cupcake to act as the base for your ‘hat.’
- Unwrap the mini peanut butter cups and place them upside down in the center of the frosting swirl; press down slightly so they are anchored.
- Apply a small dot of frosting to the bottom of a chocolate square and press it onto the peanut butter cup to create the flat top of the graduation cap.
- Slice thin strips of the sour belt candy or fruit leather, about 1 inch long, and fray the ends with scissors to create a tassel effect.
- Use a tiny dab of frosting to secure the tassel to the center of the chocolate square and top it with an M&M or an edible pearl to hide the attachment point.
- Chill the cupcakes for 15 minutes before serving to ensure the chocolate components don’t slip as the frosting softens in the room.
How to simmer rhubarb jam
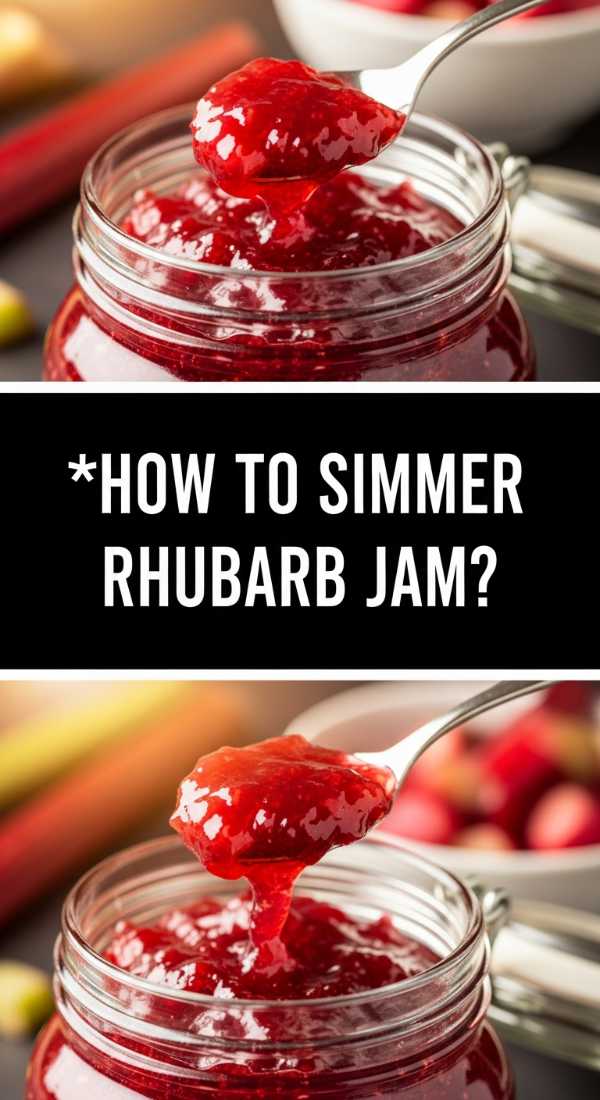
Why we love this
Watching rhubarb transform from fibrous stalks into a glossy, jewel-toned jam is a culinary magic trick that never gets old. The aroma is bright and tangy, filling the house with a scent that is both floral and fruity. Spread across a warm scone or dolloped onto a cheese board, this jam offers a velvety texture and a complex flavor profile that balances sweetness with a sophisticated, sharp finish that cuts through rich fats perfectly.
Ingredients
- 2 lbs fresh rhubarb, sliced
- 3 cups granulated sugar
- 1/4 cup fresh lemon juice
- 1 vanilla bean, split and scraped
- 1/2 tsp ginger powder
How to make it
- Combine the rhubarb, sugar, lemon juice, ginger, and the vanilla bean seeds/pod in a heavy-bottomed Dutch oven or jam pot.
- Let the mixture sit at room temperature for about 2 hours until the sugar has completely dissolved and the rhubarb is swimming in its own syrup.
- Bring the pot to a boil over medium-high heat, stirring constantly with a wooden spoon to prevent the sugar from scorching on the bottom.
- Reduce the heat to a simmer and cook for 20-30 minutes; you’ll see the bubbles change from thin and watery to thick, slow-popping ‘lava’ bubbles.
- Test the set by placing a small spoonful on a plate that has been in the freezer; if it wrinkles when pushed with your finger, it’s done.
- Remove the vanilla pod and ladle the hot jam into sterilized jars, leaving 1/4 inch of headspace before sealing.
How to style graduation cookies
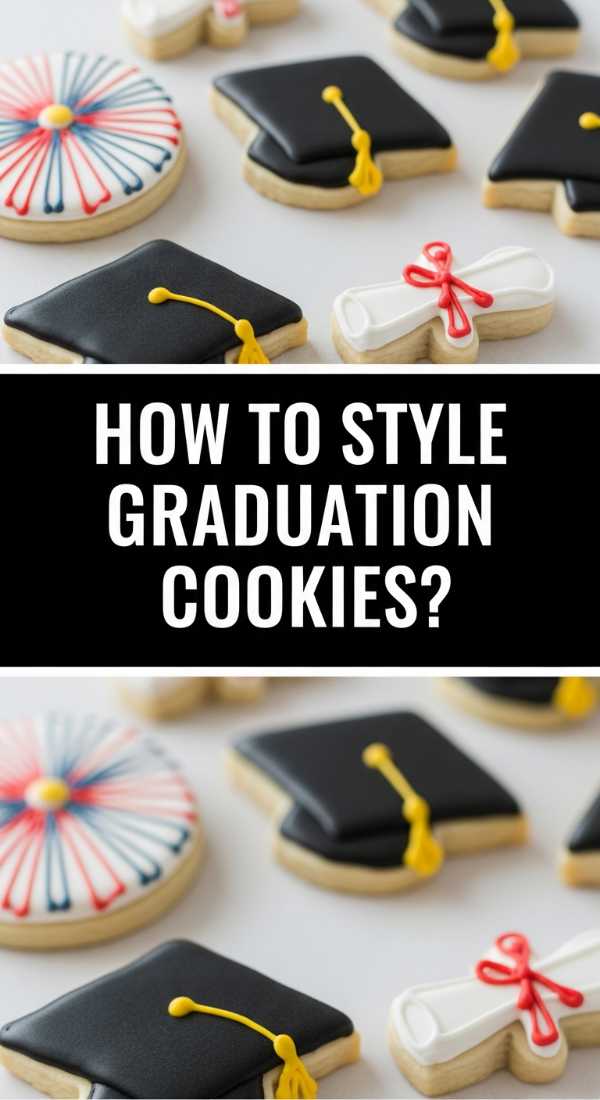
Why we love this
Graduation cookies are all about the details—the sharp snap of a sugar cookie paired with the smooth, matte finish of royal icing. We love the artistic process of flooding a cookie and then adding ‘wet-on-wet’ techniques to create patterns like diplomas or graduation caps. They are the perfect take-home favor, offering a sweet, buttery crunch that feels both personal and professionally polished, adding a touch of elegance to any dessert platter.
Ingredients
- Batch of cut-out sugar cookies (stars and circles)
- Royal icing (stiff and flooding consistencies)
- Gel food coloring (school colors)
- Fine-tip piping bags
- Scribe tool or toothpick
- Edible gold luster dust
How to make it
- Outline your cooled cookies with the stiff-consistency royal icing, creating a ‘dam’ that will hold the thinner icing in place.
- Fill the center with the flooding-consistency icing, using a scribe tool to pop any air bubbles and to gently nudge the icing into the corners for a perfectly smooth surface.
- Allow the base layer to dry completely—usually 6 to 8 hours or overnight—to ensure your top decorations don’t bleed into the background.
- Once dry, pipe graduation years or ‘Congrats’ using the stiff icing and a very fine round tip for precision.
- Mix a tiny drop of vodka or lemon extract with gold luster dust to create a paint; use a food-safe brush to highlight the edges or the ‘tassel’ on your cookie designs.
- Store in an airtight container with parchment paper between layers to prevent the icing from scuffing or absorbing moisture.
How to whip lemon pesto
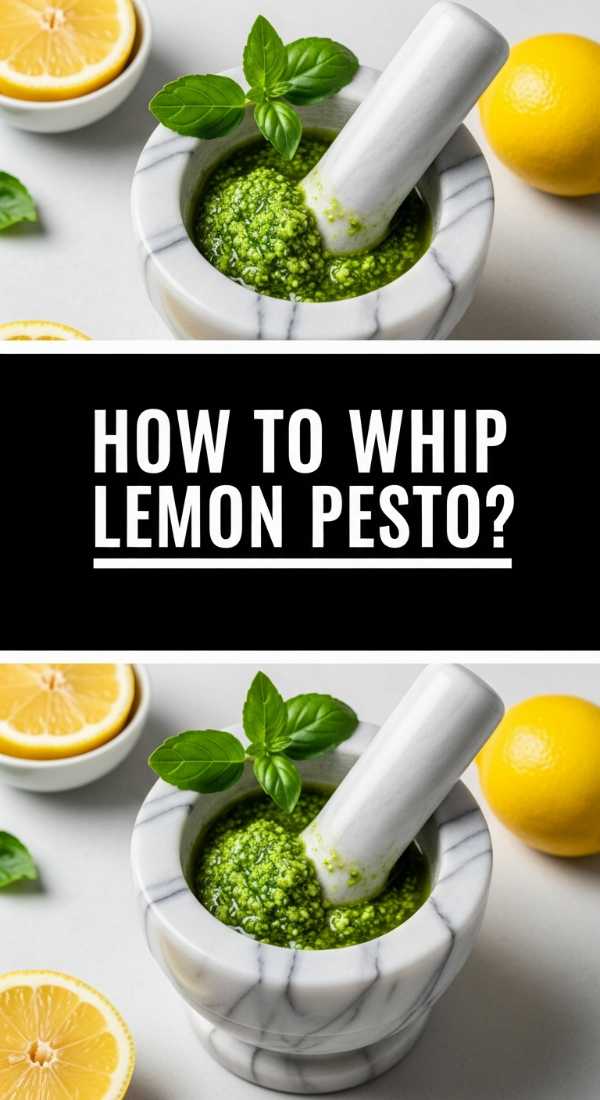
Why we love this
Traditional pesto gets a bright, citrusy makeover that is absolutely essential for a summer board. The fragrance of freshly slapped basil leaves combined with the zingy, oils from lemon zest creates a sauce that is vibrant green and electrically flavorful. We love the creamy texture that comes from high-quality olive oil and pine nuts, providing a savory, nutty counterpoint to the sharp citrus that wakes up every taste bud it touches.
Ingredients
- 2 cups fresh basil leaves, packed
- 1/2 cup extra virgin olive oil
- 1/3 cup pine nuts, lightly toasted
- 2 cloves garlic, minced
- 1/2 cup grated Pecorino Romano
- Zest and juice of 1 large lemon
- 1/2 tsp sea salt
How to make it
- Start by toasting your pine nuts in a dry pan over medium heat for 2-3 minutes until golden and fragrant; this step is crucial as it releases the essential oils and deepens the flavor.
- Place the basil, toasted nuts, and garlic in a food processor; pulse several times to create a coarse paste, ensuring you don’t over-process and turn the basil brown from the heat of the blades.
- With the motor running on low, slowly drizzle in the olive oil in a steady stream to create a beautiful, stable emulsion.
- Transfer the mixture to a bowl and fold in the grated cheese, lemon zest, and lemon juice by hand; folding the cheese instead of processing it preserves the texture.
- Taste and adjust the salt—the Pecorino is salty, so add the sea salt sparingly until the balance is perfect.
- Serve immediately or cover with a thin layer of olive oil to prevent oxidation before placing it on your board.
How to make fancy coffee

Why we love this
Nothing elevates a party board like a ‘fancy’ coffee that looks like it came from a high-end boutique cafe. The deep, earthy aroma of freshly pulled espresso meeting the sweet, caramelized notes of a homemade syrup is intoxicating. We love the visual appeal of the distinct layers—dark coffee at the bottom, creamy milk in the middle, and a cloud-like foam on top, finished with a sprinkle of spice that makes every guest feel like a VIP.
Ingredients
- 2 shots of dark roast espresso or 1/2 cup strong cold brew
- 1 cup whole milk or oat milk
- 1 tbsp vanilla or lavender syrup
- Cinnamon or cocoa powder for dusting
- Ice cubes (if serving cold)
How to make it
- Brew your espresso or strong coffee; if you want the ‘fancy’ look, ensure the coffee is hot so it interacts correctly with the sweeteners.
- Add your flavored syrup to the bottom of a tall glass and pour the coffee directly over it, stirring gently to combine.
- For the milk, use a handheld milk frother: heat the milk to about 150°F (just before it simmers) and froth at a 45-degree angle until the volume doubles and the bubbles are microscopic (micro-foam).
- Slowly pour the frothed milk over the coffee; the liquid milk will sink while the foam stays on top, creating those beautiful, viral-ready layers.
- If serving iced, fill the glass with ice first, add syrup and milk, and then ‘float’ the espresso over the top for a stunning ombre effect.
- Finish with a light dusting of cinnamon through a stencil for a professional, decorative touch.
How to bake rhubarb crumble

Why we love this
Rhubarb crumble is the cozy, approachable cousin of the pie, offering a textural playground of soft, bubbling fruit and a crunchy, buttery oat topping. The scent of cinnamon and brown sugar baking together is the ultimate comfort. We love how the topping acts as a golden, craggy blanket that soaks up just enough of the tart rhubarb juice while remaining satisfyingly crisp, creating a dessert that feels effortless yet deeply indulgent.
Ingredients
- 4 cups rhubarb, chopped
- 1/2 cup granulated sugar
- 1 cup old-fashioned rolled oats
- 1 cup all-purpose flour
- 1 cup brown sugar, packed
- 1/2 cup cold unsalted butter, cubed
- 1 tsp cinnamon
How to make it
- Preheat your oven to 375°F and toss the rhubarb with the granulated sugar directly in an 8×8 inch baking dish; there’s no need to pre-cook the fruit.
- In a medium bowl, combine the oats, flour, brown sugar, and cinnamon, stirring to ensure the spices are evenly distributed.
- Add the cold, cubed butter to the dry mixture; use your fingertips or a pastry cutter to work the butter in until the mixture resembles coarse crumbs with some pea-sized chunks of butter remaining.
- Squeeze handfuls of the crumble mixture to create larger ‘clumps,’ then scatter them evenly over the rhubarb.
- Bake for 35-40 minutes; you are looking for the fruit juices to be bubbling vigorously around the edges and the topping to be a deep, golden brown.
- Let it rest for at least 10 minutes before serving; this allows the juices to thicken slightly so it isn’t too runny when scooped.
How to pack toddler lunches
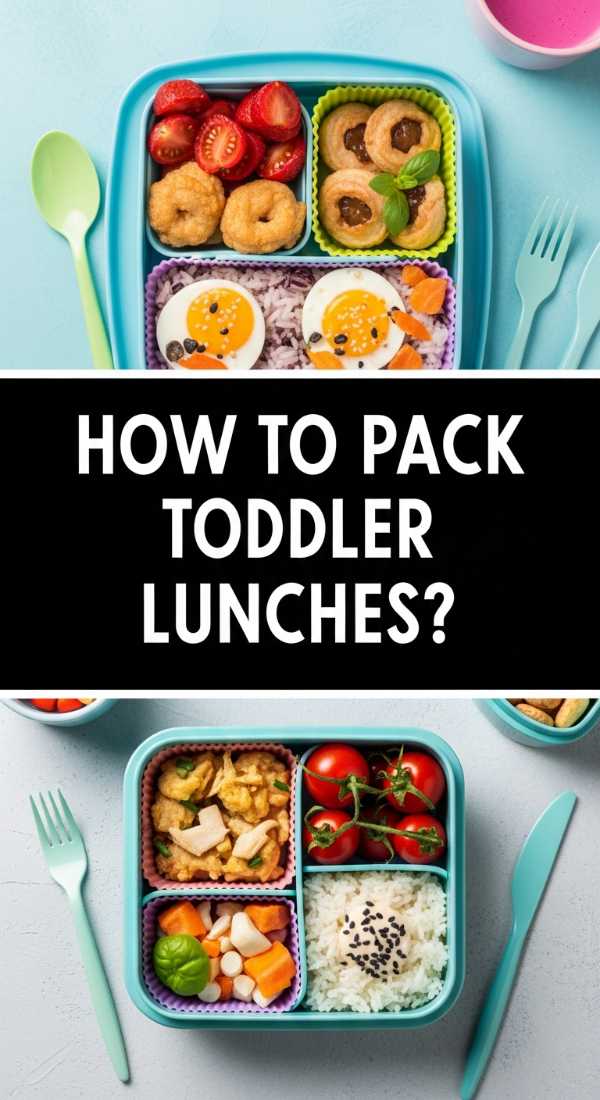
Why we love this
When the party involves little ones, the ‘toddler lunch’ section of the board is a lifesaver. It’s all about bright colors, bite-sized shapes, and a variety of textures that keep curious hands busy. We love the way simple ingredients like cheese cubes and fruit stars can look like a gourmet feast when presented with care, making the children feel just as included in the celebration as the adults.
Ingredients
- Whole wheat bread (cut into fun shapes)
- Mild cheddar cheese cubes
- Cucumber slices and baby carrots
- Turkey or ham roll-ups
- Apple slices (tossed in lemon juice to prevent browning)
- Small handful of blueberries
How to make it
- Use metal cookie cutters to punch out stars or hearts from the bread and deli meats; this small step makes the food instantly more appealing to a toddler.
- Slice the cucumbers into ‘coins’ and peel the carrots into ribbons using a vegetable peeler for a fun, easy-to-chew texture.
- Assemble the roll-ups by laying the meat flat, adding a thin layer of cream cheese if desired, rolling tightly, and slicing into 1-inch ‘sushi’ rounds.
- Arrange the items in a dedicated corner of the board or in small bento-style dividers to keep the flavors from mixing too much.
- Ensure all items are cut into safe, bite-sized pieces to prevent choking hazards while they play.
- Add a small dip, like hummus or yogurt, in a colorful silicone cup to encourage them to interact with the vegetables.
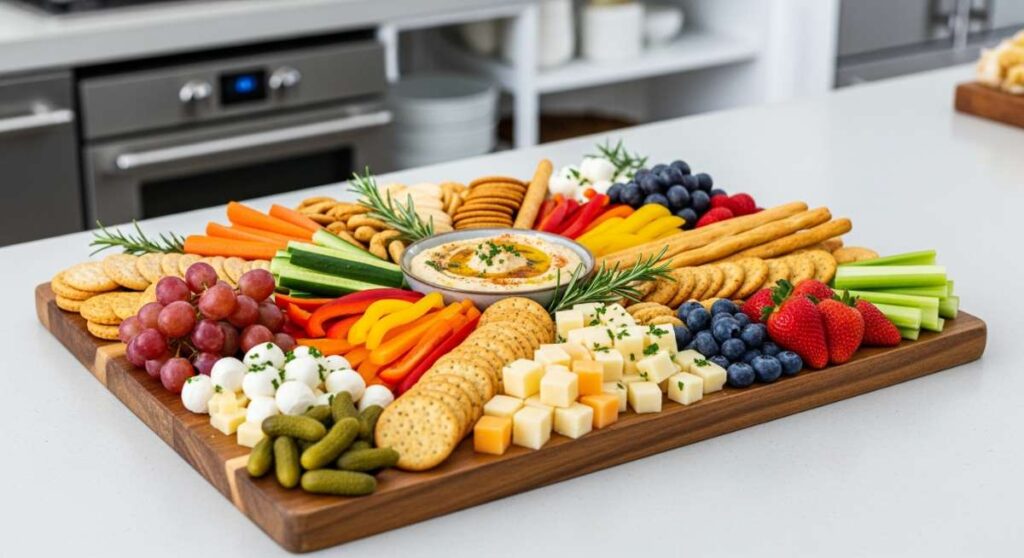
How to build graduation boards
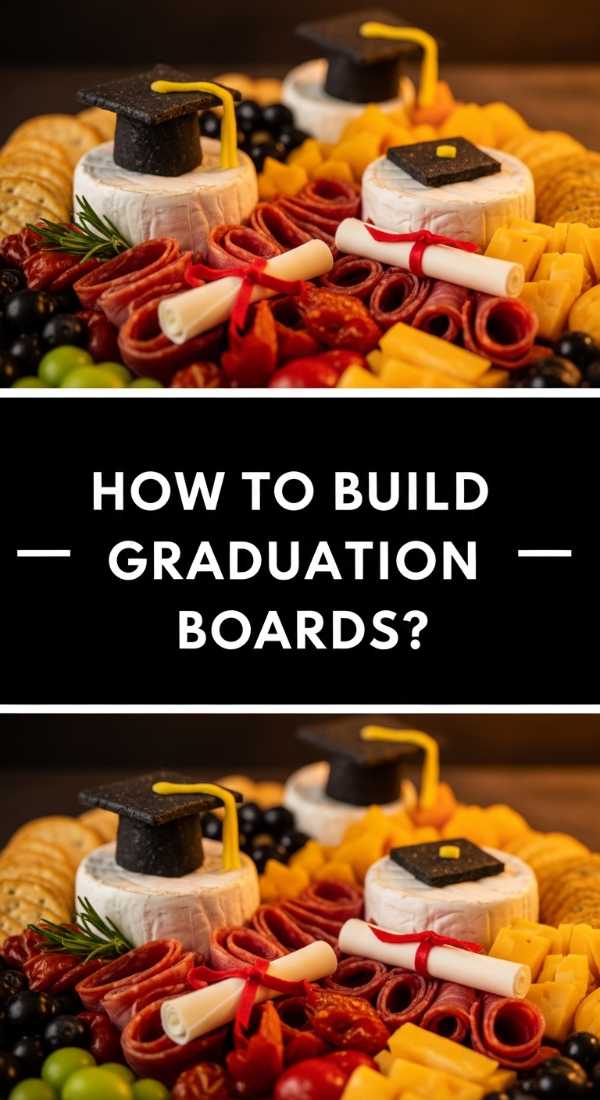
Why we love this
The graduation board is the grand finale—a curated assembly of all the hard work you’ve put into the individual components. It’s a visual celebration of a milestone, combining the sweetness of the cookies and cupcakes with the savory zest of the lemon pesto and the rustic charm of rhubarb. We love how a board tells a story, offering a little something for everyone and creating a communal space where guests naturally gather to graze and chat.
Ingredients
- All prepared items (cupcakes, cookies, jam, pesto)
- Variety of crackers and toasted baguette slices
- Selection of soft and hard cheeses (Brie, Manchego)
- Fresh grapes and sliced strawberries
- Handful of Marcona almonds
- Fresh herbs for garnish (rosemary or mint)
How to make it
- Start with your largest items first—place the cake or the bowl of rhubarb crumble on the board to act as anchors.
- Position the smaller bowls of lemon pesto and rhubarb jam in opposite corners to balance the colors and provide ‘dipping stations.’
- Create ‘rivers’ of crackers and baguette slices that lead the eye from one side of the board to the other.
- Group your graduation-themed sweets (cookies and cupcakes) together in a dedicated section to highlight the theme of the party.
- Fill in any remaining gaps with ‘fillers’ like grapes, almonds, and strawberries; high density is the secret to a professional-looking viral board.
- Finish with a flourish of fresh herbs or edible flowers tucked into the crevices to add a pop of life and a wonderful fragrance to the display.
The Secret to a Stress-Free Celebration
At the end of the day, the most important ingredient in any party is the host’s ability to actually enjoy it. This viral food board isn’t just about the aesthetic; it’s about a philosophy of hosting that prioritizes preparation and assembly over last-minute kitchen chaos. By combining homemade touches like the rhubarb jam with easy-to-style elements like the graduation cookies, you create a balanced spread that looks like it took days but only took a fraction of the time. So, pour yourself a fancy coffee, take a deep breath, and get ready to impress your guests with ease!
Frequently Asked Questions
Can I make the rhubarb components in advance? Yes! The rhubarb jam can be made up to two weeks ahead, and the crumble can be prepped (but not baked) a day in advance and kept in the fridge.
How do I keep the board looking fresh if the party is outside? If hosting outdoors, keep the cheese and pesto on ice packs hidden under the board or bring them out in small batches. Avoid placing the board in direct sunlight to prevent the frosting on the cupcakes from melting.
What is the best way to transport a graduation board? If you’re bringing the board to a venue, wrap it tightly in plastic wrap and transport the heavier items (like the cake) separately, assembling the final ‘filler’ pieces once you arrive.