

Hello, my loves! Welcome back to my cozy corner of the internet where we celebrate the sweeter things in life. Lately, my feed has been absolutely overflowing with the most decadent, jaw-dropping dessert creations that seem to defy the laws of physics and flavor, and I just couldn’t resist diving into this delicious trend with you all today. There is something so magical about a dessert that doesn’t just satisfy a craving but tells a story of indulgence and pure, unadulterated joy.
We live in a world that can sometimes feel a bit heavy, which is why these ‘over-the-top’ treats are going viral—they offer us a momentary escape into a cloud of sugar and creativity. Whether you are looking for a protein-packed snack that feels like a cheat meal or a no-bake wonder that saves you from the heat of the oven, I have gathered the absolute best of the best for you. Let’s wrap ourselves in a sweet embrace and explore these viral obsessions together, making our kitchens feel like a boutique bakery one recipe at a time.
The Secret To Perfectly Moist Chocolate Cake Every Single Time

Why we love this
There is nothing quite like the first bite of a chocolate cake that practically melts against your tongue with a velvety richness. This recipe is my absolute favorite because it solves the age-old problem of dry, crumbly crumbs that leave you reaching for a glass of milk. It feels like a warm hug in dessert form, wrapping you in deep cocoa flavors and a texture so tender it defies logic. Whenever I share this with my loves, the room goes silent as everyone savors that perfect, decadent moisture that lingers long after the plate is cleared.
Ingredients
- 2 cups all-purpose flour
- 2 cups granulated sugar
- 3/4 cup unsweetened cocoa powder
- 2 teaspoons baking soda
- 1 teaspoon baking powder
- 1 teaspoon salt
- 1 cup buttermilk, room temperature
- 1/2 cup vegetable oil
- 2 large eggs, room temperature
- 2 teaspoons vanilla extract
- 1 cup boiling water or hot coffee
How to make it
- Preheat your oven to 350°F (175°C) and grease two 9-inch round cake pans, lining the bottoms with parchment paper for easy removal.
- In a large mixing bowl, sift together the flour, sugar, cocoa powder, baking soda, baking powder, and salt until perfectly combined and free of lumps.
- Add the buttermilk, oil, eggs, and vanilla extract to the dry ingredients and mix on medium speed for about two minutes until the batter is smooth and glossy.
- Reduce the mixer speed to low and carefully pour in the boiling water or hot coffee; the batter will be very thin, but this is the secret to that incredible moisture.
- Divide the batter evenly between the prepared pans and bake for 30 to 35 minutes, or until a toothpick inserted in the center comes out clean or with just a few moist crumbs.
The Best No Bake Peanut Butter Bars Ever Made Without An Oven

Why we love this
These bars are a nostalgic dream come true, reminding me of those elementary school lunchroom treats but elevated to a gourmet level. They are the perfect solution for when those peanut butter cravings hit hard but you simply cannot bear the thought of turning on the stove. The contrast between the salty, slightly crunchy base and the silky smooth chocolate topping is an absolute symphony of textures. I love how they hold their shape perfectly while still being soft enough to bite through without any effort at all.
Ingredients
- 1 cup unsalted butter, melted
- 2 cups graham cracker crumbs
- 2 cups powdered sugar
- 1 cup creamy peanut butter (plus 2 tablespoons for topping)
- 1 1/2 cups semi-sweet chocolate chips
How to make it
- Line an 8×8 inch square baking pan with parchment paper, leaving a little overhang on the sides to make it easy to lift the bars out later.
- In a medium bowl, combine the melted butter, graham cracker crumbs, and powdered sugar, stirring until the mixture is well-incorporated and crumbly.
- Stir in the 1 cup of peanut butter until the mixture forms a thick, uniform dough, then press it firmly and evenly into the bottom of your prepared pan.
- In a microwave-safe bowl, melt the chocolate chips with the remaining 2 tablespoons of peanut butter in 30-second intervals, stirring until completely smooth.
- Spread the chocolate mixture over the peanut butter base and refrigerate for at least two hours until set before slicing into squares with a warm knife.
High Protein Brownies That Actually Taste Like Real Gourmet Dessert
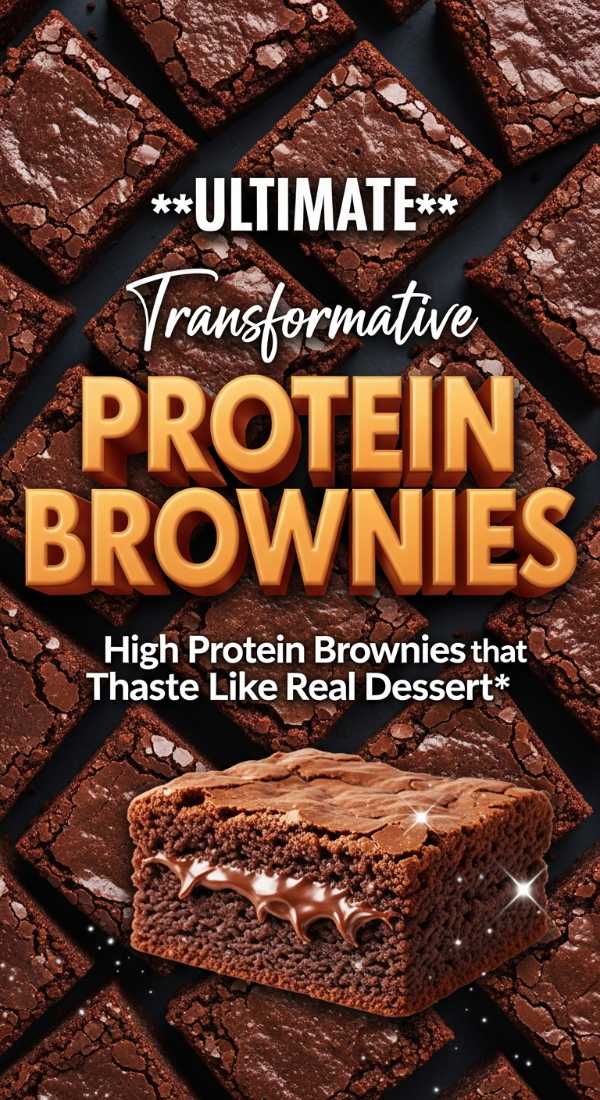
Why we love this
Finding a healthy alternative that actually satisfies a deep chocolate craving can feel like searching for a needle in a haystack, but these brownies change everything. They have that signature fudgy crinkle-top and a dense, rich interior that makes it hard to believe they are packed with muscle-building protein. I love serving these to my friends who are health-conscious because their eyes always light up when they realize they can indulge without the sugar crash. It is the ultimate guilt-free pleasure that feels like a decadent reward after a long, productive day.
Ingredients
- 1 cup non-fat Greek yogurt
- 1/2 cup unsweetened cocoa powder
- 1/2 cup rolled oats (blended into flour)
- 1/2 cup chocolate protein powder
- 1/4 cup maple syrup or honey
- 1 large egg
- 1/2 teaspoon baking soda
- 1/2 cup dark chocolate chips
How to make it
- Preheat your oven to 350°F (175°C) and lightly grease a small rectangular baking dish or line it with parchment paper for a mess-free experience.
- In a large bowl, whisk together the Greek yogurt, egg, and maple syrup until the mixture is completely smooth and no lumps remain.
- Fold in the oat flour, cocoa powder, protein powder, and baking soda, stirring gently until just combined—be careful not to overmix the batter.
- Stir in half of the dark chocolate chips, then pour the batter into the pan and sprinkle the remaining chips over the top for a beautiful finish.
- Bake for 18 to 22 minutes; the center should be slightly soft to the touch as they will firm up significantly as they cool to room temperature.
Creamy No Bake Cheesecake Bites With A Luscious Berry Swirl

Why we love this
These little bites are like tiny clouds of summer caught in a delicious graham cracker crust, offering a refreshing burst of flavor in every mouthful. The tartness of the berry swirl cuts through the richness of the cream cheese perfectly, creating a balance that is both sophisticated and incredibly addictive. I find these are the stars of every garden party because they look like they came from a high-end patisserie but are actually so simple to assemble. They are light, airy, and carry the scent of fresh fruit and vanilla that just makes my heart feel so full.
Ingredients
- 1 1/2 cups graham cracker crumbs
- 1/4 cup melted butter
- 16 oz cream cheese, softened
- 1/2 cup powdered sugar
- 1 teaspoon vanilla extract
- 1 cup heavy cream, whipped
- 1/2 cup raspberry or strawberry jam
How to make it
- Mix the graham cracker crumbs and melted butter in a bowl, then press a tablespoon of the mixture into the bottom of each cavity of a lined muffin tin.
- In a large mixing bowl, beat the softened cream cheese, powdered sugar, and vanilla until the mixture is light, fluffy, and free of any lumps.
- Gently fold in the whipped heavy cream using a spatula, ensuring you keep the mixture airy, then spoon the filling over the crusts in the muffin tin.
- Drop small dots of the berry jam onto the top of each cheesecake bite and use a toothpick to gently swirl the jam into beautiful patterns.
- Freeze the bites for at least 3 hours or refrigerate overnight, then let them sit at room temperature for five minutes before serving to guests.
Edible Cookie Dough Made With Simple Pantry Ingredients Only

Why we love this
We have all been told not to eat the raw dough, but this recipe finally gives us permission to indulge in that forbidden pleasure safely and deliciously. It has that perfect grainy-sweet texture that we all crave, packed with chocolate chips and the warm scent of vanilla that brings back childhood memories. I love how I can whip this up in five minutes using items I already have in my cupboard, making it the ultimate late-night snack. It is the definition of comfort food—simple, sweet, and exactly what your inner child is asking for after a long week.
Ingredients
- 1 cup all-purpose flour (heat-treated)
- 1/2 cup unsalted butter, softened
- 3/4 cup brown sugar, packed
- 2 tablespoons milk or cream
- 1/2 teaspoon vanilla extract
- 1/4 teaspoon salt
- 1/2 cup mini chocolate chips
How to make it
- First, heat-treat your flour by spreading it on a baking sheet and baking at 350°F for 5-7 minutes until it reaches 160°F to ensure it is safe to eat.
- In a medium bowl, cream together the softened butter and brown sugar until the mixture is light, fluffy, and the sugar has mostly dissolved into the butter.
- Mix in the milk, vanilla extract, and salt, stirring until everything is well combined and the aroma of vanilla is prominent in the dough.
- Slowly add the cooled, heat-treated flour to the wet mixture, stirring until a thick, cohesive cookie dough forms that looks just like the traditional version.
- Fold in the mini chocolate chips by hand, then enjoy immediately with a spoon or store in an airtight container in the fridge for later snacking.
Rich Chocolate Truffles That Melt In Your Mouth Instantly

Why we love this
There is a certain elegance to a handmade truffle that just cannot be matched by anything store-bought, especially when they have this level of silky smoothness. These little gems are surprisingly simple to make, yet they carry an intensity of chocolate flavor that feels like a pure luxury on the palate. I love the way the cocoa-dusted exterior gives way to a ganache center that is so soft it practically disappears the moment it touches your tongue. They are my favorite gift to give because they show so much love and care in every perfectly rolled sphere.
Ingredients
- 8 oz high-quality dark chocolate (60% cocoa or higher)
- 1/2 cup heavy whipping cream
- 1/2 teaspoon vanilla extract
- Pinch of sea salt
- 1/4 cup unsweetened cocoa powder for coating
How to make it
- Finely chop the dark chocolate and place it in a medium heat-proof glass bowl, ensuring the pieces are small so they melt evenly and quickly.
- In a small saucepan, heat the heavy cream over medium heat until it just begins to simmer, but do not let it reach a rolling boil.
- Pour the hot cream over the chopped chocolate and let it sit undisturbed for five minutes to allow the heat to gently melt the cocoa solids.
- Whisk the mixture gently starting from the center until it becomes a glossy, smooth ganache, then stir in the vanilla and salt before chilling for two hours.
- Once firm, scoop small amounts of ganache, roll them quickly between your palms to form balls, and toss them in cocoa powder until fully coated.
The Ultimate High Protein Chocolate Chip Cookies For Guilt Free Snacking

Why we love this
Imagine a cookie that is soft, chewy, and loaded with chocolate chips, but also happens to fuel your body with the nutrients it needs to conquer the day. These cookies are a revelation for anyone who wants to maintain a balanced lifestyle without sacrificing the simple joy of a fresh-baked treat. I love the slightly nutty flavor the almond flour provides, which pairs beautifully with the richness of the protein and the sweetness of the chips. They are the perfect ‘pick-me-up’ for those busy afternoons when you need a little burst of energy and a lot of flavor.
Ingredients
- 1 1/2 cups almond flour
- 1/2 cup vanilla or chocolate protein powder
- 1/4 cup coconut oil, melted
- 1/4 cup maple syrup
- 1 large egg
- 1/2 teaspoon baking soda
- 1/2 cup dark chocolate chips
How to make it
- Preheat your oven to 325°F (165°C) and line a large baking sheet with a silicone mat or parchment paper to prevent any sticking.
- In a large bowl, combine the almond flour, protein powder, and baking soda, whisking them together to break up any large clumps from the flour.
- In a separate smaller bowl, whisk the melted coconut oil, maple syrup, and egg until the mixture is uniform and slightly frothy on top.
- Pour the wet ingredients into the dry ingredients and mix with a spatula until a thick dough forms, then fold in the chocolate chips evenly.
- Scoop rounded tablespoons of dough onto the sheet, flatten them slightly with your palm, and bake for 10-12 minutes until the edges are golden brown.
Creamy Chocolate Fudge Made Without An Oven Or Stove
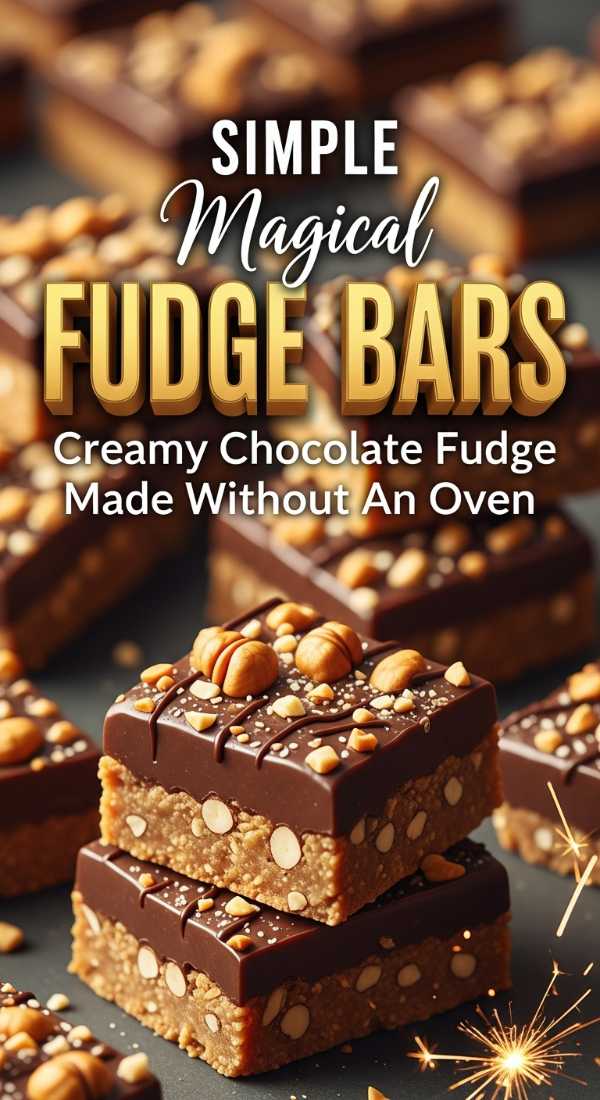
Why we love this
This fudge is the ultimate ‘lazy day’ dessert that tastes like you spent hours over a hot stove tempering chocolate to perfection. It has a dense, creamy consistency that is incredibly satisfying, with a deep cocoa flavor that lingers on the tongue in the most delightful way. I love how foolproof this recipe is, making it a wonderful activity to do with little ones or a quick fix when unexpected guests are on their way. It’s a classic treat that never goes out of style, providing a thick, decadent bite that feels like pure, sugary bliss.
Ingredients
- 3 cups semi-sweet chocolate chips
- 1 can (14 oz) sweetened condensed milk
- 1/4 cup unsalted butter, cubed
- 1 teaspoon vanilla extract
- Pinch of salt
How to make it
- Line an 8-inch square pan with parchment paper or aluminum foil, making sure to grease the foil slightly for a smooth release of the fudge.
- In a large microwave-safe bowl, combine the chocolate chips, sweetened condensed milk, and the cubed butter, stirring once to mix the ingredients slightly.
- Microwave the mixture in 30-second bursts, stirring vigorously after each interval until the chocolate is completely melted and the mixture is glossy and thick.
- Stir in the vanilla extract and a pinch of salt, then immediately pour the fudge into the prepared pan, smoothing the top with an offset spatula.
- Let the fudge set in the refrigerator for at least 4 hours, then lift it out of the pan and cut into small, rich squares for serving.
Fluffy Chocolate Mousse Using Only Minimal Fresh Ingredients

Why we love this
There is an ethereal quality to a well-made mousse that makes it feel like you are eating a chocolate-flavored cloud that has been kissed by the heavens. This version is so light and airy, yet it carries a deep, sophisticated chocolate punch that satisfies even the most intense cravings without feeling heavy. I love how the simple ingredients transform through the power of whisking into something that looks like it belongs on a five-star dessert menu. It is my go-to choice for a romantic dinner at home because it is elegant, effortless, and so incredibly romantic to share.
Ingredients
- 1 1/2 cups heavy whipping cream, chilled
- 1/2 cup powdered sugar
- 1/4 cup unsweetened cocoa powder
- 1 teaspoon vanilla extract
- Fresh berries for garnish
How to make it
- Place a large metal mixing bowl and your beaters in the freezer for about 10 minutes before starting; cold tools help the cream whip much faster.
- Pour the chilled heavy cream into the cold bowl and beat on medium-high speed until it begins to thicken and soft peaks start to form.
- Sift the powdered sugar and cocoa powder into the cream to ensure there are no lumps, then add the vanilla extract for that classic sweet aroma.
- Continue beating the mixture on high speed until stiff peaks form, meaning the mousse holds its shape perfectly when you lift the beaters out of the bowl.
- Pipe or spoon the mousse into individual serving glasses and chill for at least an hour before topping with fresh berries and serving to your loves.
Salty Caramel Bars With A Thick Decadent Chocolate Crust

Why we love this
The combination of salty and sweet is a love language all its own, and these bars speak it fluently with every single decadent layer they provide. The base is a deep, dark chocolate crust that provides a sturdy and bitter contrast to the gooey, amber-colored caramel that sits beautifully in the center. I love how the flakes of sea salt on top sparkle like little diamonds, promising a flavor explosion that wakes up every single one of your taste buds. These are the bars that people beg for at bake sales and family gatherings because they are simply unforgettable.
Ingredients
- 2 cups chocolate wafer crumbs
- 1/2 cup melted butter
- 1 cup unsalted butter (for caramel)
- 1 cup brown sugar
- 1/2 cup heavy cream
- 1/2 teaspoon sea salt (plus extra for sprinkling)
- 1 cup dark chocolate chips (for topping)
How to make it
- Preheat your oven to 350°F (175°C) and press a mixture of chocolate wafer crumbs and 1/2 cup melted butter into the bottom of a lined 9×9 inch pan.
- Bake the crust for 10 minutes to set it, then remove from the oven and let it cool completely while you prepare the luscious caramel filling.
- In a heavy-bottomed saucepan, melt 1 cup of butter and brown sugar together over medium heat, stirring constantly until the mixture begins to bubble.
- Carefully whisk in the heavy cream and sea salt, boiling for exactly 2 minutes while stirring, then pour the hot caramel over the cooled chocolate crust.
- Melt the dark chocolate chips and spread them over the set caramel layer, sprinkle with extra sea salt, and chill until the bars are firm enough to slice.
A Sweet Conclusion to Our Journey
Oh, my loves, my heart is so full just thinking about you all creating these beautiful, viral masterpieces in your own kitchens. Baking and creating treats isn’t just about the sugar; it’s about the warmth we share and the memories we build when we take a moment to indulge in something truly special. I hope these recipes bring a little extra sparkle to your week and that you feel the love I’ve poured into every single suggestion. Remember, life is short, so always eat the dessert first and share it with someone who makes your soul smile!