

Sun-Kissed & Sophisticated: The May 2026 Nail Trends You’ll See Everywhere This Summer
Hello, my loves. Can you feel it? The air is shifting, growing sweeter and more humid as May stretches her golden limbs. It’s that magical time of year when we shed our winter layers and start looking toward the horizon of a long, lazy summer. My heart is so full just thinking about the garden parties, the beach sunrises, and the way the late afternoon light dances on a fresh manicure. To me, our nails are like little jewels we carry with us—a gentle reflection of our inner glow and the season’s softest promises.
This year, I’ve been feeling a pull toward both the vibrant and the serene. May 2026 is all about that delicate balance—capturing the excitement of a new season while staying grounded in elegance. Whether you’re walking across a graduation stage or sipping an iced tea on a porch swing, these trends are here to make you feel like the absolute goddess you are. Let’s dive into these sun-drenched inspirations together, shall we?
7 Easy Steps to Achieve Perfect Graduation Nails

Why to love this Design:
There is something so incredibly poignant about graduation. It’s a moment of pure transition, and your nails should reflect that clean, bright future. These nails are a cloud-soft embrace of minimalism, using pearlescent whites and delicate gold leaf to celebrate your hard-earned success with a touch of quiet luxury.
Essential Elements:
- Sheer milky white polish
- Ultra-fine gold foil flakes
- High-gloss glass top coat
- Soft almond nail shape
How to Prepare:
- Gently push back cuticles and buff the nail plate for a smooth canvas.
- Apply a nourishing base coat to protect your natural nails.
- Layer two thin coats of sheer milky white polish, letting each dry.
- Using tweezers, delicately place small gold foil flakes at the base of the nail.
- Apply a second layer of sheer white over the foil for a ‘milky’ encased look.
- Seal everything with a thick, high-shine top coat to prevent chipping.
- Massage a drop of rose-scented cuticle oil into each finger for a photo-ready finish.
Budget Range
- Essie Marshmallow Polish ($10)
- Nail Art Gold Leaf Set ($6)
- Seche Vite Dry Fast Top Coat ($9)
5 Simple Ways to Style Sunset Chrome Nails

Why to love this Design:
Oh, my darlings, if you could capture the exact moment the sun hits the ocean, it would look just like this. Sunset chrome is all about warmth and movement. It’s a fiery, iridescent glow that makes your hands look like they’re perpetually bathed in the golden hour light, no matter what time of day it is.
Essential Elements:
- Peach or apricot base color
- Yellow-to-pink holographic chrome powder
- Sponge applicators
- UV/LED lamp
How to Prepare:
To style these beautifully, try these 5 approaches: 1. Pair them with stacked gold rings to enhance the metallic shimmer. 2. Use a ‘velvet’ top coat for a soft-focus matte chrome effect. 3. Apply the chrome only as a French tip for a sophisticated twist. 4. Match your pedicure to the darkest orange hue in the gradient. 5. Wear them with an all-white linen outfit to let the colors truly pop.
Budget Range
- Artdone Chrome Nail Powder ($8)
- OPI ‘Data Peach’ Gel Polish ($18)
- Born Pretty No-Wipe Top Coat ($7)
4 Quick Steps to Create Lemon Nails Designs
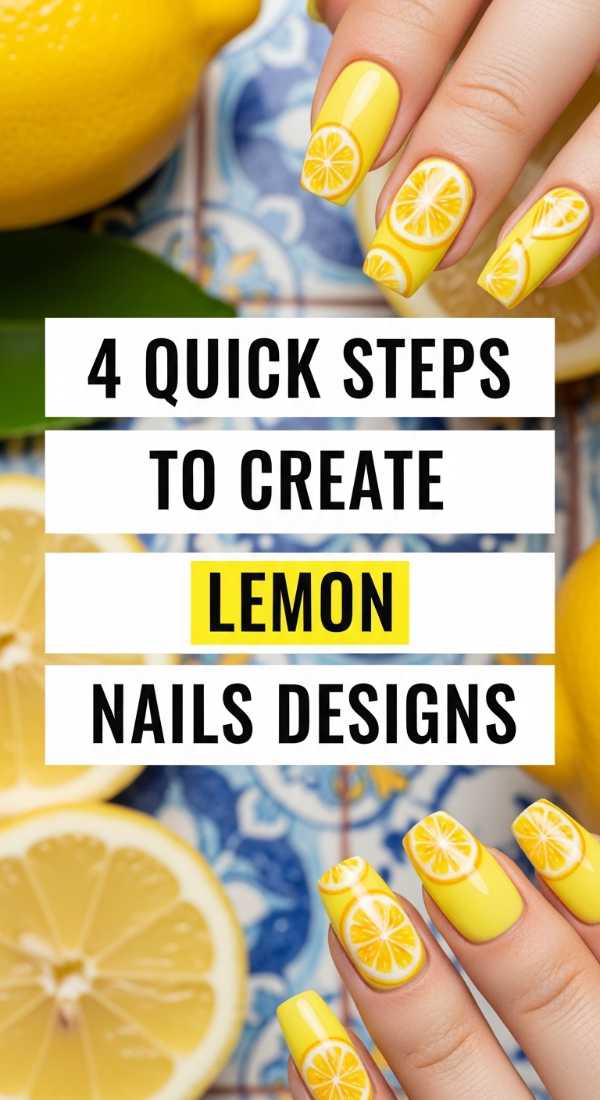
Why to love this Design:
Is there anything more refreshing than a cold glass of lemonade on a May afternoon? Lemon nails are the ultimate ‘clean girl’ summer aesthetic. They are bright, cheerful, and bring a little squeeze of joy to your day. It’s a playful nod to Mediterranean summers and citrus groves.
Essential Elements:
- Pastel yellow and leaf green polish
- A very fine detailing brush
- Nude or clear base
- Matte top coat (optional)
How to Prepare:
- Paint a clean nude base and let it dry completely.
- Use a dotting tool to create two small yellow circles side-by-side.
- With a fine brush, add a tiny green leaf and a brown stem at the top of the circles.
- Seal with a matte top coat for a modern, ‘porcelain’ fruit look.
Budget Range
- Sally Hansen ‘Lemon Heaven’ ($6)
- Nail Art Detailing Brush Set ($5)
- Zoya ‘Tilda’ Green Polish ($12)
9 Easy Ways to Master May Birthday Nails

Why to love this Design:
For my May-born loves, this design is a tribute to the lushness of spring. Since the emerald is your birthstone, we focus on deep, revitalizing greens and floral textures. It feels like walking through a secret garden at midnight—mysterious, elegant, and deeply personal.
Essential Elements:
- Emerald green jelly polish
- Dried pressed flowers
- Silver micro-glitter
- Clear builder gel
How to Prepare:
Master this birthday look with these 9 ideas: 1. Create a green marble effect using rubbing alcohol. 2. Embed real dried flowers into a clear accent nail. 3. Add a silver glitter ‘halo’ around the cuticle. 4. Use a matte green base with glossy tips. 5. Apply emerald rhinestones for a 3D jewel effect. 6. Try a vertical ombre from dark green to mint. 7. Paint delicate white daisies over a solid emerald base. 8. Use ‘cat-eye’ magnetic polish for a gemstone depth. 9. Stamp gold astrological symbols for a Taurus/Gemini touch.
Budget Range
- Cirque Colors ‘Emerald’ Jelly ($14)
- Mini Dried Flowers for Nails ($7)
- Magnetic Wand & Polish Set ($15)
6 Simple Steps for Summer Goth Nails
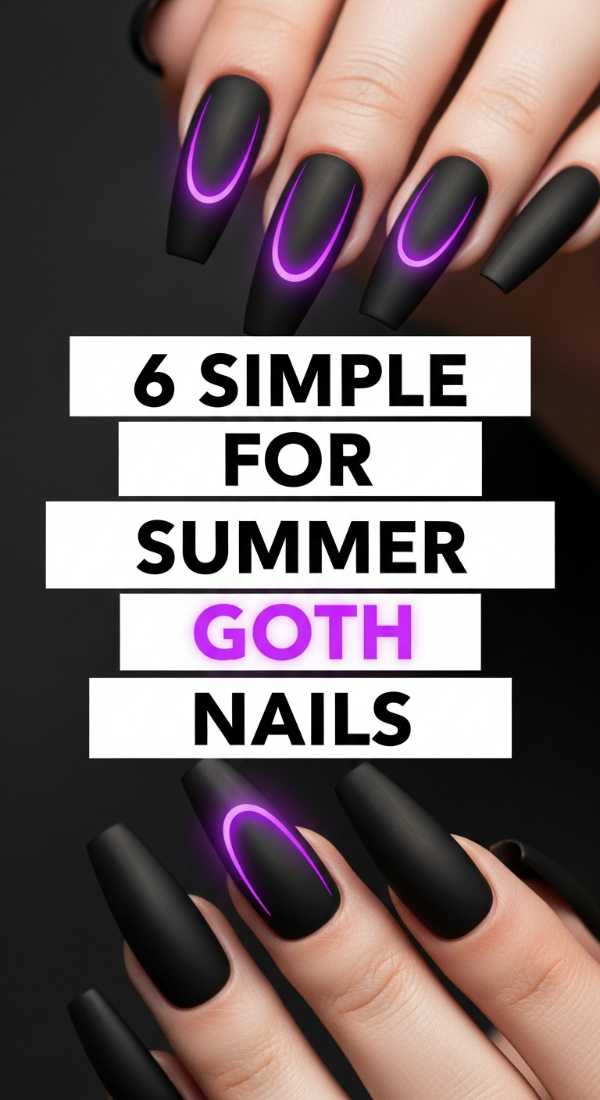
Why to love this Design:
Who says dark colors are only for winter? Summer Goth is such a mood, my sweethearts. It’s about sheer blacks, lace textures, and dark florals that feel light enough for the heat. It’s for the mysterious soul who finds beauty in the shadows even when the sun is at its peak.
Essential Elements:
- Sheer ‘stocking’ black polish
- Opaque black stamping ink
- Lace pattern nail stamps
- Velvet matte top coat
How to Prepare:
- Apply one coat of sheer black polish to create a translucent ‘smoke’ base.
- Choose a floral or lace stamping plate and apply opaque black ink.
- Carefully transfer the lace design onto the center of each nail.
- Clean up the edges with a brush dipped in acetone.
- Apply a matte top coat to give the lace a fabric-like texture.
- Add a single silver stud at the base of the ring finger for a ‘pierced’ look.
Budget Range
- Holt Taco ‘Smoke Show’ Sheer ($13)
- What Up Nails Stamping Plate ($8)
- Maniology Black Stamping Polish ($7)
8 Easy Techniques for Retro Pucci Nails
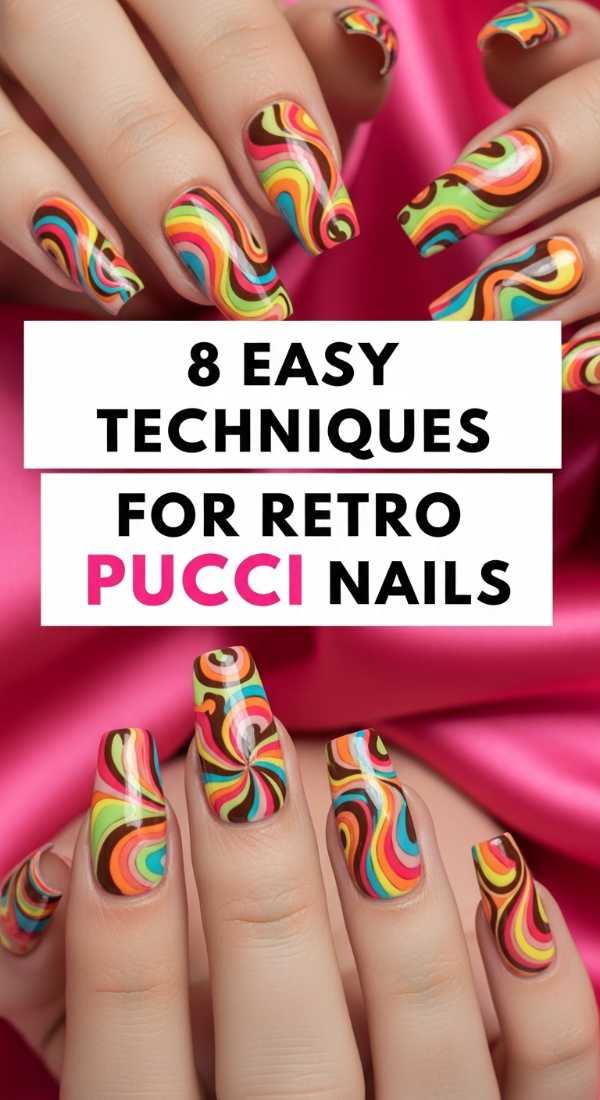
Why to love this Design:
Let’s take a trip back to the 60s! Retro Pucci nails are all about those iconic, swirling geometric patterns in vibrant colors. They are sophisticated, high-fashion, and wonderfully energetic. It’s like wearing a vintage silk scarf on your fingertips.
Essential Elements:
- Turquoise, lilac, and coral polishes
- Black and white striping tape or paint
- Long-liner nail brush
- High-gloss top coat
How to Prepare:
Try these 8 techniques for the perfect swirl: 1. Drag a toothpick through wet polish drops to create ‘marbled’ swirls. 2. Use a liner brush to outline organic ‘blob’ shapes in black. 3. Fill in different sections with contrasting pastels. 4. Use negative space (clear nail) between color blocks. 5. Add tiny white dots along the border of the swirls. 6. Gradient your colors within the shapes for a 3D effect. 7. Focus the pattern on just the thumb and ring finger. 8. Finish with two coats of top coat for a perfectly smooth surface.
Budget Range
- Nail Art Liner Brush ($4)
- Lights Lacquer ‘Retro’ Collection ($50 set)
- Orly ‘Bonder’ Base Coat ($10)
7 Quick Steps to Rock Neon Cheetah Print Nails
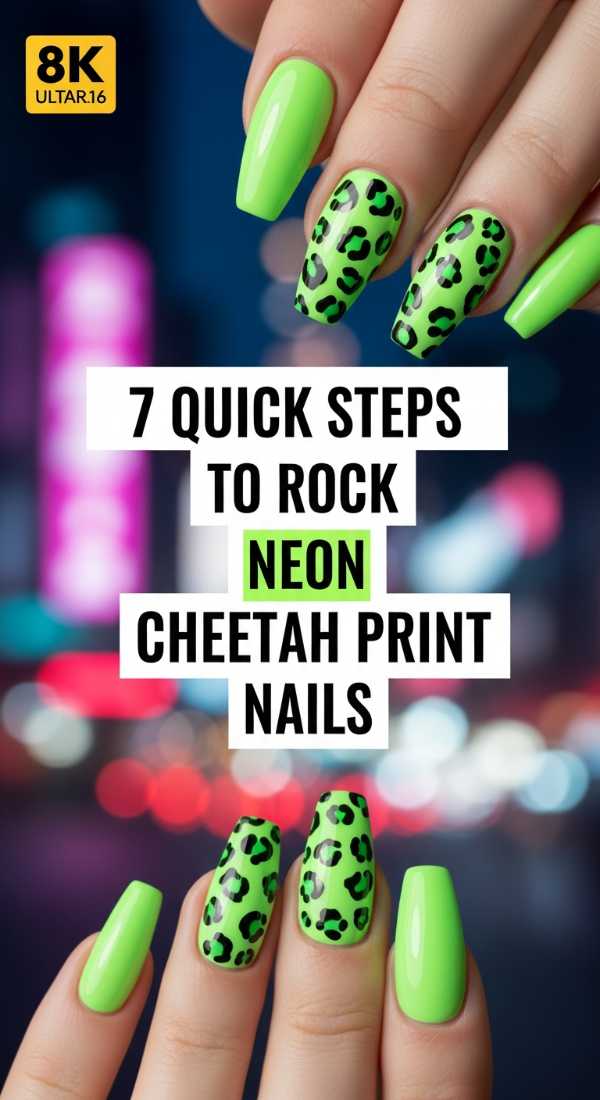
Why to love this Design:
Sometimes, we just want to be a little wild! Neon cheetah print is the ultimate party look for Summer 2026. It takes a classic animal print and turns the volume up with electric pinks and greens. It’s bold, it’s fierce, and it’s undeniably fun.
Essential Elements:
- Neon pink base polish
- Dark purple or black detailing ink
- Neon orange ‘spots’
- UV-reactive top coat
How to Prepare:
- Apply two coats of neon pink and let dry.
- Using a dotting tool, place irregular blobs of neon orange across the nail.
- Take your dark purple ink and draw ‘C’ shapes or brackets around the orange blobs.
- Add a few small dark dots in the empty spaces to fill the pattern.
- Allow the design to dry for at least 10 minutes to avoid smearing.
- Seal with a thick top coat.
- Charge under a UV light to see them glow in the dark!
Budget Range
- China Glaze ‘Electric Nights’ Neon ($8)
- Dotting Tool Set ($4)
- Glow in the Dark Top Coat ($9)
5 Easy Ways to Match Hands and Toes Nails

Why to love this Design:
There is a quiet harmony in having a perfectly coordinated mani-pedi. In 2026, we aren’t just doing ‘exact matches’—we are doing ‘sister’ looks. It’s a sophisticated way to look put-together without being too ‘matchy-matchy.’ It feels intentional and polished.
Essential Elements:
- A primary color palette (e.g., blues)
- Complementary textures (shimmer vs. matte)
- Shared accent details
How to Prepare:
Achieve the perfect match with these 5 ways: 1. Use the same color but different finishes (glossy fingers, matte toes). 2. Choose a ‘gradient’ where the fingers are light blue and the toes are navy. 3. Keep solid colors on the toes and use the same color for art on the fingers. 4. Reverse the French tip (white base/pink tip on hands, pink base/white tip on toes). 5. Use the same glitter topper over two different neutral shades.
Budget Range
- Zoya ‘Naked Manicure’ Set ($25)
- OPI ‘Big Apple Red’ ($11)
- Holo Taco ‘Flakie’ Topper ($13)
4 Simple Steps for Taurus Birthday Nails

Why to love this Design:
Taurus season is all about luxury, comfort, and the earth. For my Taurus beauties, we use sage greens, rich creams, and copper accents. These nails feel grounded and expensive, reflecting your love for the finer things in life and your deep connection to nature.
Essential Elements:
- Sage green cream polish
- Copper metallic polish or flakes
- Creamy off-white base
- Nourishing cuticle butter
How to Prepare:
- Apply a cream base to most nails, leaving the ring finger for sage green.
- On the cream nails, use a sponge to dab a bit of copper polish for a ‘stone’ effect.
- Use a thin brush to paint a delicate copper ‘bull’ symbol or a simple constellation.
- Finish with a velvety top coat for an earthy, soft feel.
Budget Range
- Essie ‘Sage You Love Me’ ($9)
- ILNP Copper Metallic Polish ($10)
- Burt’s Bees Lemon Butter Cuticle Cream ($6)
3 Easy Ways to Style Teal and Coral Nails
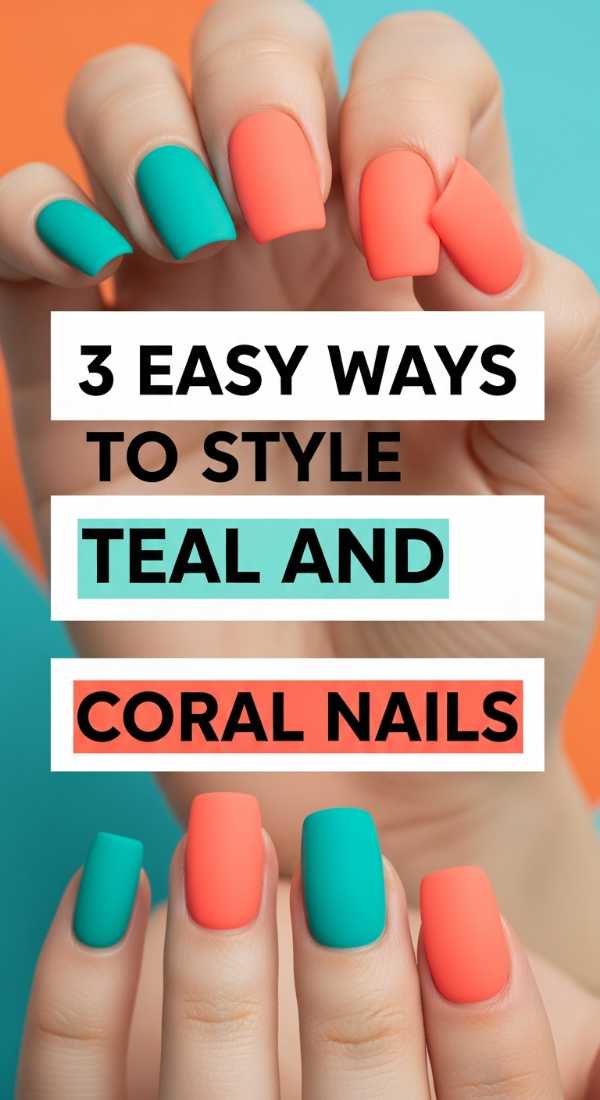
Why to love this Design:
Teal and coral are the ultimate summer power couple. The cool depth of the teal balances the vibrant energy of the coral perfectly. It reminds me of tropical reefs and sunset swims. It’s a color combination that flatters every skin tone and feels instantly like a vacation.
Essential Elements:
- Bright coral cream polish
- Deep teal or turquoise polish
- Gold striping tape
How to Prepare:
Style this duo in 3 easy ways: 1. The ‘Half-and-Half’: Paint the left half of the nail teal and the right half coral, separated by gold tape. 2. The ‘Coral Pop’: Use teal as a solid base on all nails except the ring finger, which gets a bright coral coat. 3. The ‘Water Ripple’: Use a wet-on-wet technique to swirl the two colors together for an abstract ocean look.
Budget Range
- Revlon ‘Cantaloupe’ ($5)
- Maybelline ‘Teal We Meet Again’ ($4)
- Gold Nail Art Tape ($3)
A Summer of Beauty and Softness
As we move into these warmer months, I hope these designs bring a little extra sparkle to your days. Remember, my loves, that taking twenty minutes to paint your nails isn’t just about the aesthetics—it’s about the ritual. It’s a moment to breathe, to be present, and to treat yourself with the kindness you so deserve. May your summer be filled with sun-kissed moments and nails that make you feel absolutely unstoppable. I can’t wait to see which look you choose!