
Stunning DIY Grad Party Decor Ideas Your Guests Will Love
Oh, my sweet loves, can you feel the magic in the air? Graduation season is finally whispering its arrival, and I am just overflowing with all the feels. It feels like just yesterday we were marking the first day of school with tiny backpacks, and now, here we are, preparing to send our favorites off into the great wide world. My heart is a little bit tender, but oh-so-proud, and I know yours is too.
I wanted to create something special for you—a little cloud-soft embrace to help you navigate the beautiful chaos of planning that perfect graduation party. I’ve gathered my favorite, most soul-soothing DIY decor and food ideas that don’t just look pretty, but actually make your guests feel the warmth of home and the joy of this milestone. Let’s create a space where memories can bloom and laughter can echo all night long.
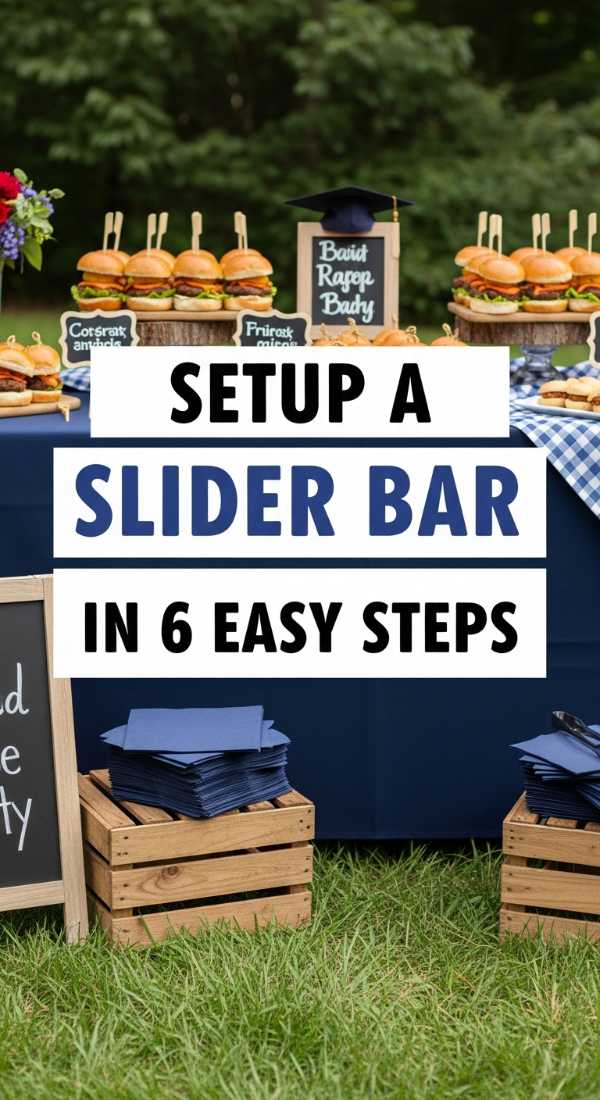
Setup a slider bar in 6 easy steps
Why to love this recipe:
There is something so incredibly comforting about a mini burger, isn’t there? A slider bar is the ultimate way to cater to every heart (and tummy) in the room. It’s interactive, cozy, and allows your guests to customize their little bites exactly how they like them, making everyone feel seen and cared for.
Essential Ingredients:
- Mini brioche buns
- Pre-cooked beef or veggie sliders
- Assorted cheeses (Cheddar, Swiss, Pepper Jack)
- Toppings: caramelized onions, pickles, arugula, tomatoes
- Sauces: Garlic aioli, spicy mustard, classic ketchup
- Decorative picks or mini flags
How to Prepare:
- Warm your mini brioche buns in the oven until they are soft and fragrant.
- Prepare your slider patties and keep them warm in a slow cooker or a chafing dish.
- Arrange your toppings in beautiful ceramic bowls or wooden trays.
- Line up your sauces with pretty little spoons for easy drizzling.
- Create clear labels for each ingredient so guests know their options.
- Place a stack of napkins and mini plates at the start of the line for a seamless flow.
Budget Range
- Brioche buns: $5 – $10
- Slider patties: $15 – $25
- Assortment of toppings: $10 – $20
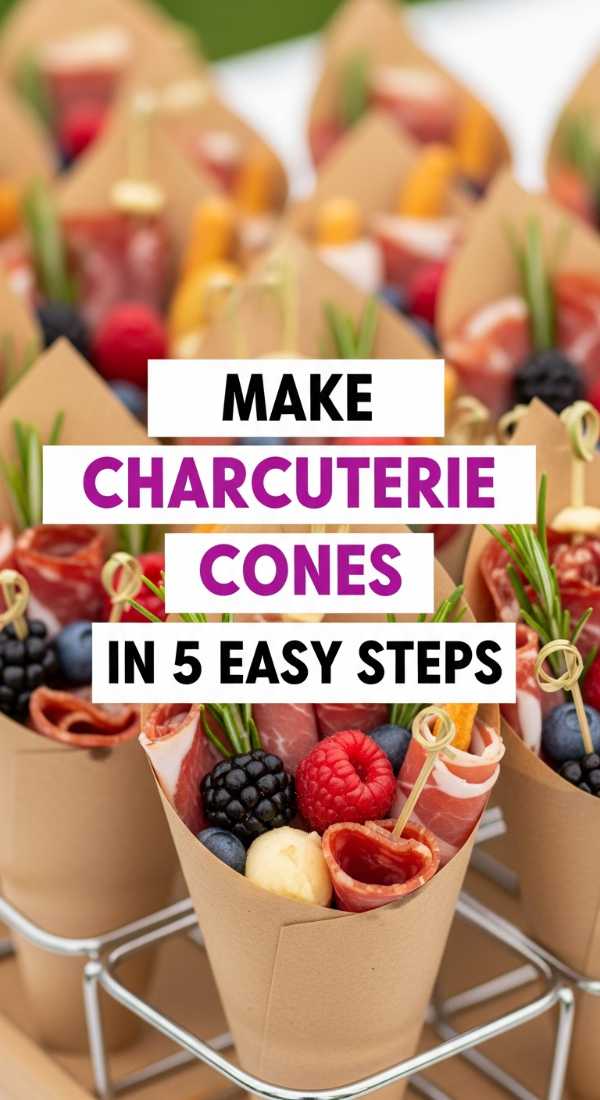
Make charcuterie cones in 5 easy steps
Why to love this recipe:
These little cones are like a hug you can hold in your hand! They are the perfect solution for social butterflies who want to nibble while they mingle. Plus, they look absolutely darling tucked into a wooden stand, adding a touch of rustic elegance to your spread.
Essential Ingredients:
- Bamboo or heavy-paper cones
- Cured meats (prosciutto, salami)
- Cubed cheeses (Manchego, Sharp Cheddar)
- Grapes and fresh berries
- Breadsticks or rosemary crackers
- Fresh herbs for garnish
How to Prepare:
- Place a sturdy cracker or breadstick at the back of the cone for height.
- Fold your meats into delicate fans or ribbons and tuck them in.
- Add a variety of cheese cubes to create different textures.
- Fill the remaining space with bright, juicy berries and grapes.
- Finish with a sprig of rosemary or mint for that fresh, artisanal look.
Budget Range
- Bamboo cones (50 ct): $12 – $18
- Assorted meats and cheeses: $30 – $50
- Fresh fruit and garnish: $10 – $15
Design a lemonade station in 4 simple steps

Why to love this recipe:
Nothing says “celebration” quite like a bright, sun-drenched lemonade station. It’s a refreshing oasis for your guests, and the sight of floating lemon slices and fresh berries in a glass dispenser is enough to make any heart smile. It’s simple, sweet, and oh-so-inviting.
Essential Ingredients:
- Large glass drink dispensers
- Classic lemonade and a strawberry or lavender variation
- Fresh fruit slices (lemons, strawberries, blueberries)
- Fresh mint leaves
How to Prepare:
- Fill your dispensers with chilled lemonade and plenty of ice.
- Toss in generous amounts of sliced fruit and mint for a pop of color.
- Set out glass mason jars or pretty paper cups with striped straws.
- Place a small wooden sign inviting guests to “Squeeze the Day!”
Budget Range
- Glass drink dispenser: $20 – $40
- Lemonade mix or fresh lemons: $10 – $20
- Garnish and straws: $5 – $10
Assemble a balloon arch in 5 quick minutes
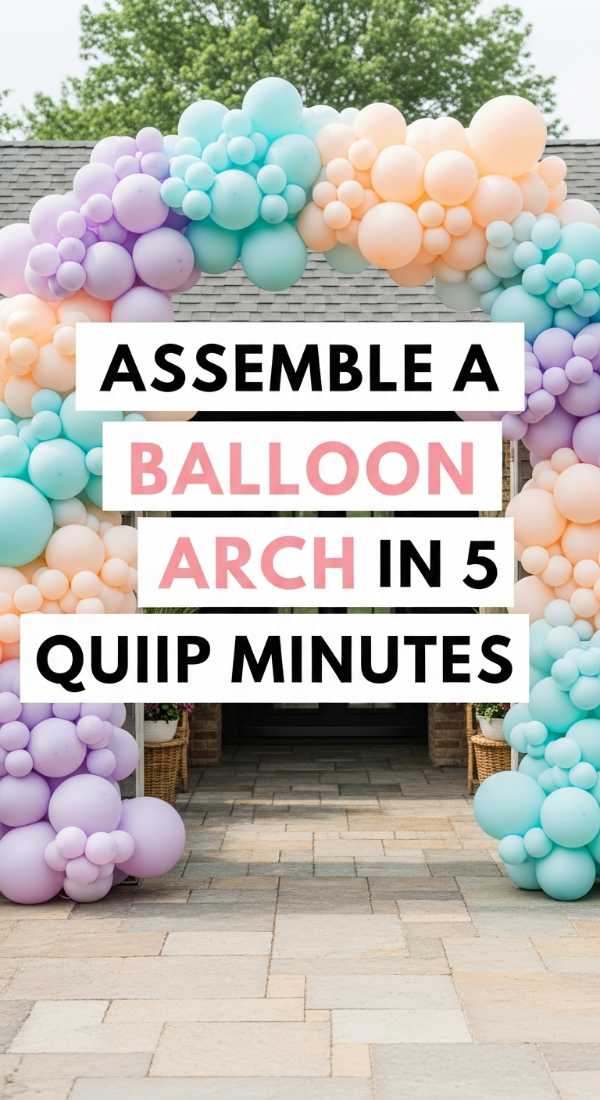
Why to love this recipe:
A balloon arch is like a giant, colorful smile at your party entrance. It creates such a grand, festive atmosphere without needing a huge budget. It’s the perfect backdrop for those “I did it!” photos and makes the whole venue feel like a dream.
Essential Ingredients:
- Balloon arch kit (strip and glue dots)
- Balloons in school colors and metallics
- Hand or electric balloon pump
- Command hooks or string for hanging
How to Prepare:
- Blow up all your balloons in varying sizes to create visual interest.
- Insert the knots of the balloons into the holes of the plastic arch strip.
- Use glue dots to fill in any gaps with smaller balloons.
- Attach the strip to your doorway or wall using Command hooks.
- Step back and adjust the curve until it looks perfectly whimsical.
Budget Range
- Balloon arch kit: $8 – $15
- Bulk balloon pack: $15 – $25
- Electric pump: $15 – $20
Host an ice cream social in 6 simple steps
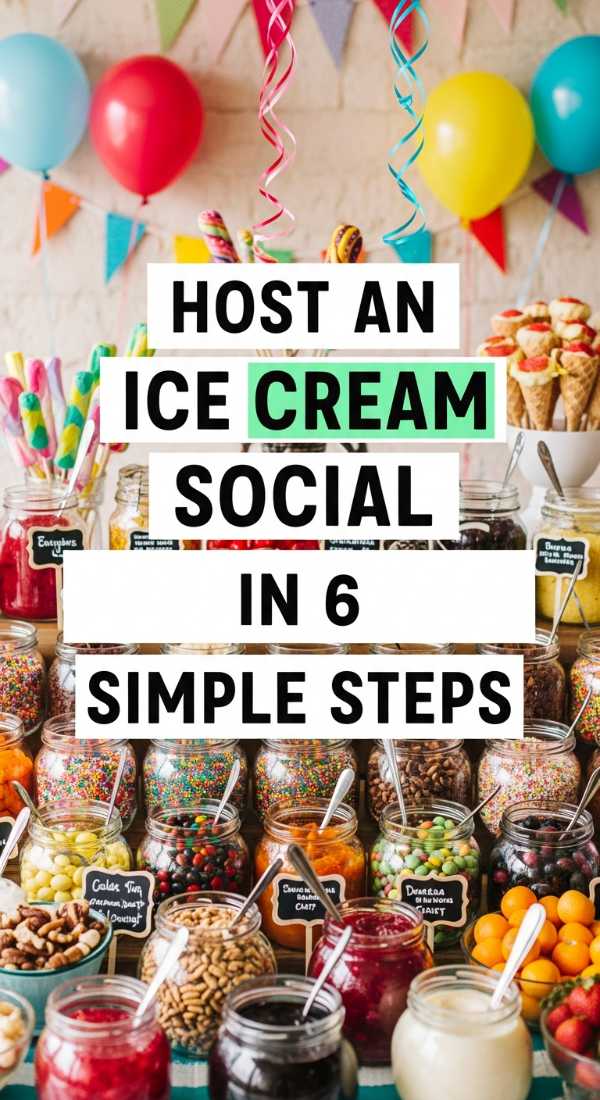
Why to love this recipe:
Is there anything more nostalgic than an ice cream sundae? This station brings out the inner child in everyone. It’s a moment of pure, sweet joy that encourages guests to linger over their bowls and share stories of the graduate’s journey.
Essential Ingredients:
- 3-4 flavors of ice cream
- Toppings: sprinkles, crushed cookies, nuts, maraschino cherries
- Sauces: Hot fudge, caramel, strawberry
- Waffle cones and colorful bowls
- Ice cream scoops
How to Prepare:
- Keep ice cream cartons in a decorative tub filled with ice.
- Place toppings in clear jars with small scoops or spoons.
- Warm your fudge and caramel sauces in small crocks or pitchers.
- Set out a variety of cones and bowls at one end.
- Provide plenty of napkins—ice cream is deliciously messy!
- Add a sprinkle of confetti to the table for extra sparkle.
Budget Range
- Ice cream tubs: $20 – $35
- Assorted toppings: $15 – $25
- Bowls and spoons: $10 – $15
Plan your party buffet in 10 easy steps

Why to love this recipe:
A well-organized buffet is the heart of the party. It’s where everyone gathers to nourish themselves and connect. By planning it thoughtfully, you ensure a smooth, stress-free flow that allows you, the host, to actually enjoy the celebration too!
Essential Ingredients:
- Coordinated tablecloths and runners
- Tiered serving stands
- Food warmers or chafing dishes
- Clear labels and menu cards
- Utensil holders
How to Prepare:
- Sketch a layout of your table before the big day.
- Start with plates at the beginning of the line.
- Place cold items first, followed by hot main dishes.
- Use tiered stands to create height and save space.
- Label every dish, noting any dietary restrictions (GF, Vegan).
- Place silverware and napkins at the very end of the line.
- Set out a separate area for drinks to avoid congestion.
- Keep a small kit nearby for quick spills or refills.
- Decorate with small floral arrangements or grad photos.
- Ensure there is plenty of lighting so the food looks appetizing.
Budget Range
- Table linens: $15 – $30
- Serving platters/stands: $25 – $60
- Labels and stationery: $5 – $10
Build a photo booth in 4 simple steps

Why to love this recipe:
The memories we make are the only things we take with us, and a photo booth captures them perfectly! It gives your guests a fun activity and ensures you have plenty of candid, happy snapshots of everyone who came to support your grad.
Essential Ingredients:
- A backdrop (fringe curtain, fabric, or balloon wall)
- Graduation-themed props (hats, glasses, signs)
- A tripod for phones
- Good lighting or a ring light
How to Prepare:
- Secure your backdrop against a flat wall with good natural light.
- Set up a basket or table nearby filled with fun props.
- Position the tripod at the perfect height for group shots.
- Add a sign with your custom party hashtag so you can find all the photos later!
Budget Range
- Backdrop curtain: $10 – $20
- Photo props pack: $10 – $15
- Phone tripod: $15 – $25
Create a memory jar in 3 fun steps

Why to love this recipe:
This is my favorite sentimental touch. A memory jar allows guests to leave pieces of advice, favorite stories, or well-wishes for the graduate. It becomes a priceless treasure that your grad can look back on whenever they need a little boost of love.
Essential Ingredients:
- A large, beautiful glass jar
- Small cards or slips of paper
- A few nice pens
- A decorative ribbon
How to Prepare:
- Tie a ribbon around the neck of the jar and label it “Memories & Wishes.”
- Fan out the cards and pens on a small side table.
- Write the first note yourself to show guests how it’s done!
Budget Range
- Large glass jar: $8 – $15
- Stationery/Cards: $5 – $10
- Ribbon and pens: $5 – $8
Hang outdoor string lights in 4 fast steps

Why to love this recipe:
As the sun begins to set, string lights transform a simple backyard into a magical, twinkling wonderland. They add a soft, warm glow that makes the evening feel intimate and enchanted, keeping the celebration going long into the night.
Essential Ingredients:
- Outdoor Edison or globe string lights
- Outdoor extension cords
- Zip ties or gutter hooks
- Ladder
How to Prepare:
- Plan your pattern—a “zigzag” or “X” shape works beautifully.
- Secure the first end near a power source using a hook.
- Carefully string the lights across the space, securing them as you go.
- Plug them in just as twilight hits for that “wow” moment.
Budget Range
- 48ft String lights: $25 – $45
- Extension cords: $10 – $20
- Hanging hooks: $5 – $10
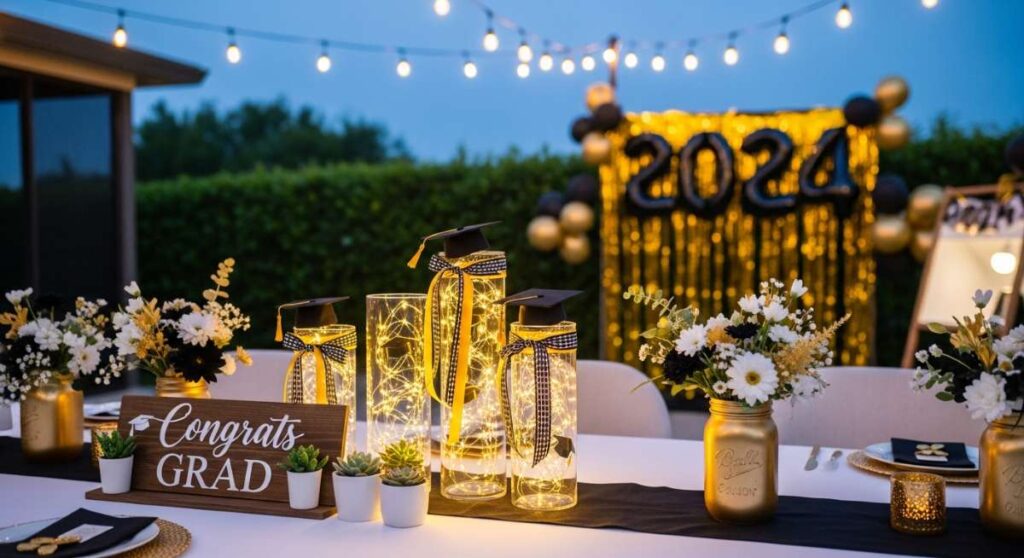
Make graduation centerpieces in 5 easy steps

Why to love this recipe:
Centerpieces are the little details that tie the whole room together. They bring the theme to life right at the table where your loved ones are sitting. These DIY versions are personal, sweet, and oh-so-easy to put together.
Essential Ingredients:
- Mason jars or glass vases
- Fresh flowers in school colors
- Mini graduation caps or tassels
- Photos of the graduate through the years
- Double-sided tape
How to Prepare:
- Fill your jars with water and arrange your fresh flowers.
- Attach a small photo of the graduate to the front of the jar.
- Place a mini grad cap on top of one of the flowers or the rim.
- Wrap a tassel around the neck of the jar for a classic look.
- Cluster three jars of different heights in the center of each table.
Budget Range
- Mason jars (bulk): $15 – $25
- Fresh flowers: $20 – $40
- Mini caps/tassels: $10 – $15
A Celebration of New Beginnings
My loves, planning a graduation party is about so much more than just the decor or the food. It’s about celebrating the hard work, the late nights, and the incredible person your graduate has become. It’s a bridge between the beautiful past and the exciting future. I hope these ideas help you create a day that feels just as special as they are. Remember to take a deep breath, soak in the smiles, and maybe keep a tissue or two handy for those happy tears. You’ve got this, and it’s going to be absolutely stunning!