

Stress-Free Entertaining: The Viral Simple Food Board Recipe
We’ve all been there: the guest list is growing, the clock is ticking, and the pressure to be the ‘perfect host’ starts to feel more like a chore than a celebration. There is something truly magical about gathering friends around a table, but the stress of timing five different dishes to come out hot at once can ruin the magic for the person behind the stove. That’s exactly why the ‘Simple Food Board’ has taken the internet by storm—it’s not just a meal; it’s a lifestyle shift toward effortless, beautiful, and interactive dining.
The beauty of this viral concept is that it leans into the art of grazing. By focusing on a few star elements and arranging them beautifully on a massive wooden board, you create an environment where guests feel comfortable helping themselves and lingering over conversation. It’s about ditching the formal plated dinner for something tactile, colorful, and undeniably delicious. Let’s dive into the recipes that make this board a viral sensation.
How to make crispy potatoes

Why we love this
There is nothing quite like the audible ‘crunch’ of a perfectly roasted potato that gives way to a fluffy, cloud-like center. These potatoes become the golden gems of your food board, filling the kitchen with the earthy, comforting aroma of roasted rosemary and garlic. The contrast between the jagged, salt-crusted exterior and the buttery interior makes them impossible to stop eating, especially when they are served warm and shimmering under the kitchen lights.
Ingredients
- 2 lbs Yukon Gold potatoes, chopped into 1-inch pieces
- 1/4 cup extra-virgin olive oil
- 1 tsp sea salt
- 1/2 tsp black pepper
- 2 sprigs fresh rosemary, minced
- 3 cloves garlic, smashed
- 1/2 tsp baking soda
How to make it
- Start by parboiling your potatoes: Place the chopped potatoes in a large pot of cold water salted heavily like the sea, and add 1/2 teaspoon of baking soda. Bring to a boil and cook for about 8-10 minutes until the edges are soft but the centers are still firm. The baking soda breaks down the starch on the surface, creating more surface area for maximum crispiness.
- Drain the potatoes and let them steam dry in the colander for 2 minutes. Give them a vigorous shake to roughen up the edges; you want a starchy ‘mash’ coating the outside.
- Preheat your oven to 425°F (220°C). Pour your olive oil onto a large rimmed baking sheet and place it in the oven for 5 minutes to get the oil shimmering hot.
- Carefully spread the potatoes onto the hot tray, ensuring they are in a single layer with space between them. Roast for 20 minutes without touching them.
- Flip the potatoes, add the garlic and rosemary, and roast for another 15-20 minutes until they are a deep, mahogany gold. Listen for the sizzle; that’s when you know they are ready.
How to make breakfast sliders

Why we love this
These sliders are the ultimate crowd-pleaser, combining the sweetness of Hawaiian rolls with the savory punch of fluffy eggs and melted sharp cheddar. As they bake, the butter glaze seeps into the nooks and crannies of the bread, creating a toasted, slightly caramelized crust that smells like a high-end brunch spot. Holding one of these warm, soft rolls in your hand while the cheese pulls away in gooey ribbons is the definition of morning comfort.
Ingredients
- 1 pack (12 count) Hawaiian sweet rolls
- 8 large eggs, scrambled
- 6 slices cooked bacon or ham
- 1 1/2 cups shredded sharp cheddar cheese
- 1/4 cup melted butter
- 1 tsp garlic powder
- 1 tsp dried parsley
How to make it
- Preheat your oven to 350°F (175°C). Use a long serrated knife to slice the entire block of rolls in half horizontally, keeping the individual rolls connected.
- Place the bottom half of the rolls into a parchment-lined 9×13 baking dish. Layer the scrambled eggs evenly across the bread, followed by the bacon or ham slices.
- Generously sprinkle the shredded cheddar over the meat. The cheese acts as the ‘glue’ that holds the slider together, so ensure it reaches all the way to the edges.
- Place the top half of the rolls back on. In a small bowl, whisk together the melted butter, garlic powder, and parsley. Use a pastry brush to coat every inch of the top of the rolls, letting the butter drip down the sides.
- Cover with foil and bake for 10 minutes to melt the cheese, then remove the foil and bake for another 5 minutes to achieve a golden-brown, toasted top. Look for the cheese to be bubbling at the edges before removing.
How to season potato wedges

Why we love this
A well-seasoned potato wedge is a masterpiece of balance, offering a smoky heat that is immediately cooled by the creamy potato interior. The aroma of smoked paprika and onion powder wafts through the house, creating an irresistible invitation to the table. These wedges have a rustic, hand-cut charm that adds a beautiful texture to your food board, especially when dusted with a final hit of fresh herbs that pop against the deep orange spice blend.
Ingredients
- 4 large Russet potatoes, cut into thick wedges
- 3 tbsp olive oil
- 1 tbsp smoked paprika
- 1 tsp garlic powder
- 1 tsp onion powder
- 1/2 tsp cayenne pepper (optional)
- 1 tsp kosher salt
- Freshly chopped parsley for garnish
How to make it
- Soak your cut potato wedges in a bowl of ice-cold water for at least 30 minutes. This removes excess starch, ensuring they don’t get soggy in the oven. Pat them completely dry with a lint-free towel afterward—moisture is the enemy of a good crust.
- In a large mixing bowl, whisk together the olive oil and all the dry spices until it forms a thick, fragrant paste.
- Toss the dry wedges in the spice paste, using your hands to ensure every single surface is coated. The oil should look dark red from the paprika.
- Arrange the wedges on a baking sheet lined with parchment paper, standing them up on their skin side if possible. This allows hot air to circulate around both fleshy sides.
- Bake at 400°F (200°C) for 30-35 minutes. Halfway through, use tongs to flip them onto their other side. They are done when a fork slides into the center with zero resistance and the outside is blistered and dark.
How to bake smores cookies
Why we love this
Smores cookies take all the nostalgia of a summer campfire and pack it into a chewy, decadent bite that feels sophisticated yet playful. The scent of toasted marshmallows and melting chocolate chips is intoxicating, instantly transporting you to evenings spent outdoors. When you pull these apart, the marshmallow creates a long, stretchy thread of sweetness that contrasts perfectly with the salty crunch of graham cracker crumbs embedded in the dough.
Ingredients
- 1 cup softened butter
- 3/4 cup brown sugar
- 3/4 cup white sugar
- 2 eggs
- 2 tsp vanilla extract
- 2 1/4 cups all-purpose flour
- 1 cup crushed graham crackers
- 1 tsp baking soda
- 1 cup semi-sweet chocolate chips
- 1 cup mini marshmallows
How to make it
- Cream the butter and both sugars in a stand mixer on medium-high speed for about 3-4 minutes until the mixture looks pale and fluffy. This aeration is key to a light cookie texture.
- Add the eggs one at a time, followed by the vanilla, mixing well after each addition.
- In a separate bowl, whisk the flour, baking soda, and crushed graham crackers. Gradually add this to the wet ingredients on low speed until just combined. Fold in the chocolate chips by hand.
- Chill the dough for at least 30 minutes in the refrigerator. This prevents the cookies from spreading too thin and keeps them thick and chewy.
- Scoop rounded tablespoons of dough onto a tray. Press 3-4 mini marshmallows into the top of each dough ball. Bake at 350°F (175°C) for 10-12 minutes. Watch for the marshmallows to puff up and turn a light golden brown—don’t overbake, as they will firm up as they cool on the tray.
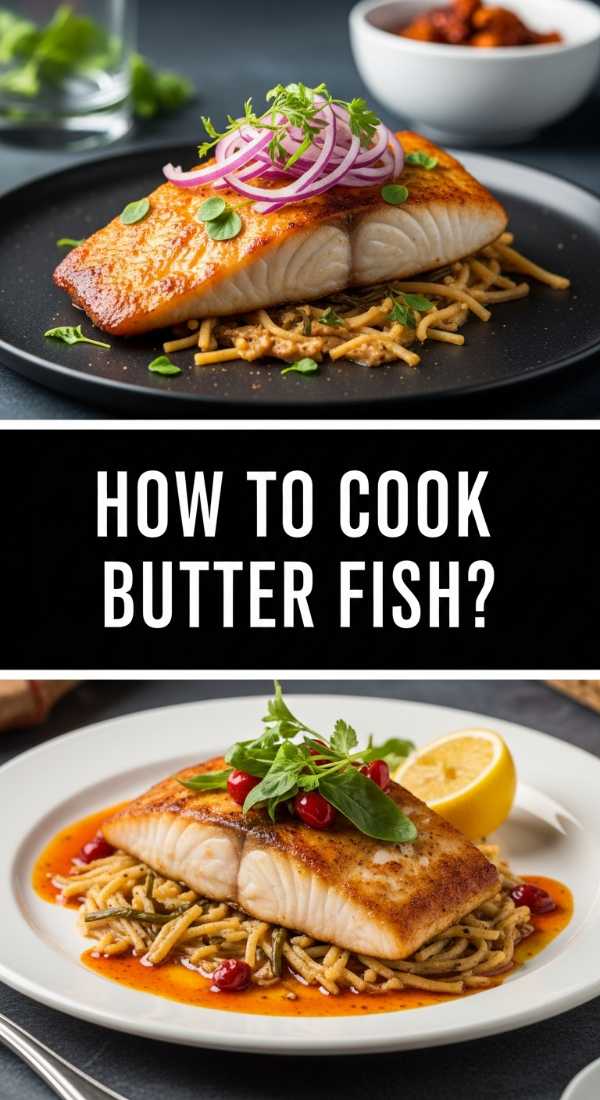
How to cook butter fish

Why we love this
Butter fish, often known as Black Cod or Sablefish, is the height of luxury on a food board. Its high fat content gives it a silky, melt-in-your-mouth texture that earns its name. When seared correctly, the skin becomes a salty, potato-chip-crisp layer that protects the delicate, pearlescent flakes of fish underneath. The aroma of browning butter mixed with a squeeze of fresh lemon creates a bright, elegant profile that balances out the heavier items on your spread.
Ingredients
- 2 butter fish fillets (6 oz each)
- 2 tbsp unsalted butter
- 1 tbsp avocado oil (high smoke point)
- 2 cloves garlic, thinly sliced
- 1 sprig fresh thyme
- Lemon wedges
- Salt and white pepper
How to make it
- Pat the fish fillets extremely dry with paper towels. Season both sides generously with salt and white pepper.
- Heat a stainless steel or cast-iron skillet over medium-high heat. Add the avocado oil and wait until you see the first wisps of smoke.
- Place the fish skin-side down in the pan. Use a spatula to press down firmly for the first 30 seconds to prevent the skin from curling. Cook for 4-5 minutes undisturbed until the skin is golden and releases easily from the pan.
- Flip the fish carefully. Immediately drop the butter, garlic, and thyme into the pan. As the butter melts and begins to foam, tilt the pan and use a large spoon to continuously baste the fish with the hot, fragrant butter for about 2 minutes.
- Remove the fish when the internal temperature reaches 135°F (57°C). It will carry over to 140°F while resting, ensuring it remains moist and buttery.
How to bake strawberry cake

Why we love this
A fresh strawberry cake is like a slice of sunshine on your board. Its vibrant pink hue and the fragrance of sun-ripened berries make it a visual and olfactory centerpiece. The crumb is incredibly moist, infused with the natural juices of the fruit, providing a sweet and slightly tangy finish to a meal. It’s the kind of cake that feels homemade and heartfelt, with every bite offering a burst of summery freshness regardless of the season.
Ingredients
- 1 1/2 cups all-purpose flour
- 1 1/2 tsp baking powder
- 1/2 cup softened butter
- 1 cup sugar
- 1 large egg
- 1/2 cup whole milk
- 1 tsp vanilla extract
- 1 lb fresh strawberries, hulled and halved
How to make it
- Preheat your oven to 350°F (175°C) and grease a 9-inch springform pan. Whisk the flour and baking powder together in a medium bowl.
- In a large bowl, cream the butter and sugar until the mixture is light and airy. Add the egg, milk, and vanilla, and beat until smooth.
- Gradually fold in the dry ingredients using a spatula. Be careful not to overmix, as this can lead to a tough cake; stop as soon as no streaks of flour remain.
- Pour the batter into the prepared pan. Arrange the strawberry halves on top, cut-side down, covering as much surface area as possible. As the cake bakes, the batter will rise up around the berries.
- Bake for 10 minutes at 350°F, then reduce the heat to 325°F and bake for another 45-50 minutes. The cake is ready when a tester comes out clean and the strawberries look slightly jammy and concentrated.
How to make creamy pasta

Why we love this
Creamy pasta is the ultimate ‘comfort’ anchor for any food board. There’s something deeply satisfying about the way a velvety, garlic-infused sauce clings to every ridge of the pasta. The steam rising from the bowl carries the scent of aged Parmesan and fresh herbs, promising a rich, savory experience. It’s a dish that invites people to scoop up just one more spoonful, filling the air with the clinking of silverware and sighs of contentment.
Ingredients
- 12 oz pasta (fettuccine or penne)
- 2 cups heavy cream
- 1/2 cup unsalted butter
- 1 1/2 cups freshly grated Parmesan cheese
- 3 cloves garlic, minced
- 1/4 tsp nutmeg
- Salt and cracked black pepper
How to make it
- Boil a large pot of water and add enough salt so it tastes like the ocean. Cook your pasta until it is ‘al dente’ (firm to the bite). Reserve 1 cup of starchy pasta water before draining.
- In a wide skillet, melt the butter over medium heat. Add the minced garlic and sauté for only 1 minute—do not let it brown, as burnt garlic turns bitter.
- Pour in the heavy cream and bring to a gentle simmer. Let it reduce for about 3-5 minutes until it slightly thickens and can coat the back of a spoon.
- Whisk in the Parmesan cheese one handful at a time, allowing it to melt completely into the cream before adding more. Add the nutmeg and pepper.
- Toss the cooked pasta into the sauce. If it looks too thick, add the reserved pasta water a tablespoon at a time while tossing vigorously. The starch in the water helps the sauce emulsify and stick to the noodles like a dream.
How to grill juicy steak

Why we love this
A perfectly grilled steak is a masterclass in texture—a dark, salty crust on the outside with a tender, ruby-red center that practically dissolves on the tongue. The smoky aroma of the grill combined with the rich scent of melting beef tallow is primal and deeply appetizing. Serving sliced steak on a board allows guests to grab a piece or two, making it a luxurious but accessible protein that feels like a celebration of high-quality ingredients.
Ingredients
- 2 Ribeye or New York Strip steaks (1.5 inches thick)
- 2 tbsp avocado oil
- 2 tbsp kosher salt
- 1 tbsp coarse black pepper
- 3 tbsp butter
- 2 sprigs rosemary
How to make it
- Take your steaks out of the fridge at least 45 minutes before cooking. They must be at room temperature to ensure even cooking through to the center. Pat them bone-dry with paper towels.
- Season aggressively with salt and pepper. Much of the seasoning will fall off during the sear, so don’t be shy.
- Preheat your grill to high heat (about 450°F-500°F). Place the steaks on the grates at a 45-degree angle to get those professional-looking diamond sear marks.
- Grill for 4-5 minutes per side for medium-rare. Use a meat thermometer to pull the steaks at exactly 130°F (54°C).
- Crucial Step: Let the steaks rest on a cutting board for at least 10 minutes before slicing. Top them with a pat of butter and rosemary while they rest. This allows the juices to redistribute so they don’t run out when you cut into the meat.
How to prep healthy meals

Why we love this
Healthy meal prep is the backbone of a stress-free week, but it can also be a beautiful addition to a food board. Imagine vibrant blanched broccoli, roasted sweet potatoes, and perfectly portioned quinoa arranged with an eye for color and balance. The freshness of the ingredients, the crisp snap of the vegetables, and the clean, bright flavors offer a refreshing counterpoint to the more indulgent items. It’s the visual representation of ‘eating the rainbow’ and feeling energized by your food.
Ingredients
- 2 cups dry quinoa or brown rice
- 3 large chicken breasts
- 1 lb broccoli florets
- 3 bell peppers, sliced
- Lemon-tahini dressing
- Olive oil, salt, and pepper
How to make it
- Batch cook your grains: Rinse 2 cups of quinoa and simmer in 4 cups of vegetable broth for 15 minutes. Fluff with a fork and let cool completely before storing; this keeps the grains individual and not mushy.
- Sheet pan roasting: Toss the broccoli and sliced peppers in olive oil and salt. Roast at 400°F for 15-20 minutes until the edges are slightly charred but the colors are still vibrant.
- Poach or grill your protein: Season chicken breasts and cook until they reach 165°F. For the best meal prep texture, slice the chicken against the grain only when you are ready to serve to keep the moisture locked in.
- Divide and conquer: Use clear glass containers to store each component separately. This allows you to mix and match flavors throughout the week or arrange them artistically on a platter for guests.
- Finish with a ‘power sauce’: Always keep a jar of homemade dressing (like lemon-tahini) ready. Adding acidity and fat at the last moment elevates prepped food from ‘leftovers’ to a ‘gourmet meal’.
How to make street tacos
[IMAGE_10]
Why we love this
Street tacos bring a sense of fiesta and fun to the table with their small size and explosion of bold, bright flavors. The scent of charred corn tortillas and sizzling marinated meat is enough to make anyone’s mouth water. Each taco is a tiny canvas of textures—the crunch of white onion, the creaminess of avocado, and the sharp bite of lime and cilantro. They are the perfect ‘hand-held’ food for a board, encouraging guests to build their own and customize every bite.
Ingredients
- 1 lb flank steak or chicken thighs, finely diced
- 24 small corn tortillas
- 1 white onion, finely diced
- 1 bunch fresh cilantro, chopped
- 3 limes, cut into wedges
- 1 tbsp cumin and chili powder blend
- Hot sauce of choice
How to make it
- Marinate the meat for at least 1 hour in a mixture of lime juice, oil, cumin, and chili powder. This breaks down the fibers and infuses every bite with spice.
- Heat a heavy skillet or griddle over high heat until it’s nearly smoking. Add the meat in a single layer and let it sear without moving it for 2 minutes to get those crispy, charred ‘carnitas’ style edges. Cook until fully browned and tender.
- Warm the tortillas: Never skip this! Place tortillas directly over a low gas flame for 10 seconds per side or in a dry pan until they puff slightly and develop charred spots. Keep them warm in a clean kitchen towel.
- Assemble the ‘street’ way: Place two small tortillas together (double bagging prevents tearing). Add a generous spoonful of meat.
- Top with a sprinkle of raw onion and a heavy hand of cilantro. Serve immediately with a lime wedge on the side—the acidity of the lime is what wakes up all the other flavors.
Conclusion: The Art of the Shared Table
Hosting doesn’t have to be a performance; it should be an invitation into your home and your heart. By using the Simple Food Board method, you take the pressure off yourself and put the focus back where it belongs: on the people you love. Whether you’re serving crispy potatoes or mini street tacos, the goal is to create a space where everyone feels welcome to grab a plate, sit down, and stay a while. So, clear off your biggest wooden board, pick two or three of these recipes, and get ready to host the most relaxed and viral-worthy dinner party of your life.