
Stop Being Subtle: Creative Maximalist Nail Designs for Color Lovers
Hello my sweet loves! I am sitting here in my favorite cozy nook, wrapped in the softest knit blanket, looking down at my hands and feeling a literal surge of joy. There is something so incredibly soul-soothing about a vibrant, loud, and unapologetically colorful manicure. For too long, we’ve been told to keep things ‘neutral’ or ‘professional,’ but darling, your spirit is a rainbow, and your nails should be the canvas that reflects that inner light back to the world.
Today, I want to wrap you in a cloud-soft embrace and give you the permission you might be seeking to finally go big. Maximalism isn’t just about ‘more’; it’s about the abundance of happiness. Whether you are a seasoned pro or just starting to dabble in the magic of nail art, I’ve put together these little tutorials to help you find your sparkle. Let’s dive into a world where color knows no bounds and every finger tells a story of creative freedom.
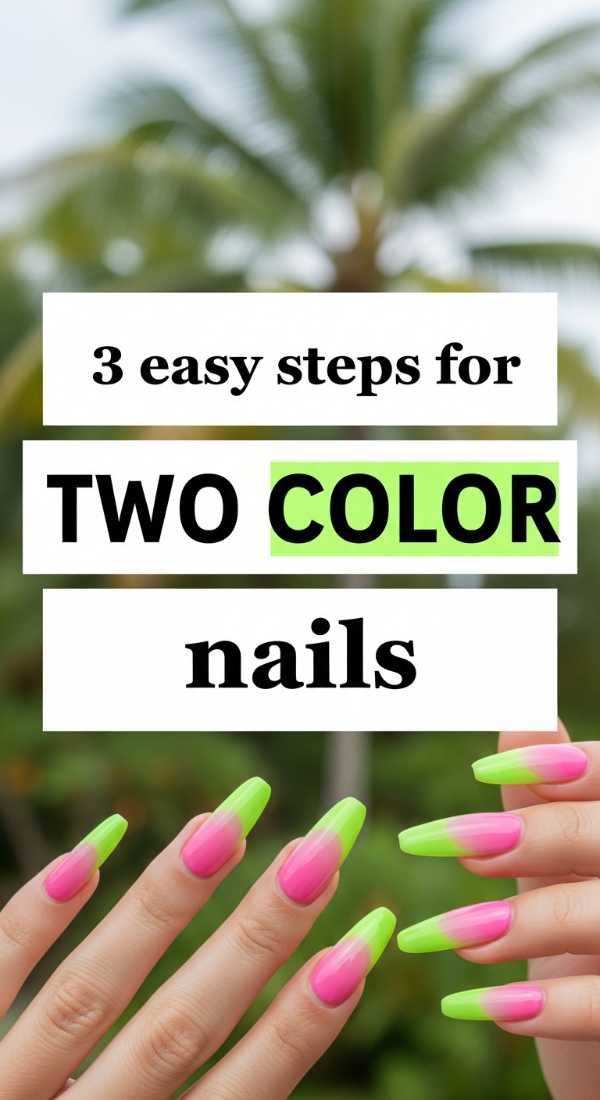
3 Easy Steps for Two Color Nails
Why to love this recipe:
This is the perfect ‘soft-entry’ into the world of maximalism. It’s like a gentle hug for your nails—simple, clean, but twice the fun of a standard mani. It allows you to play with color theory without feeling overwhelmed.
Essential Ingredients:
- Two contrasting gel polishes (e.g., Lavender and Sunshine Yellow)
- Clean-up brush
- High-gloss top coat
How to Prepare:
- Apply two thin coats of your base color to the left half of the nail.
- Carefully apply the second color to the right half, meeting in the center.
- Seal the seam with a thick, glassy top coat to blend the transition.
Budget Range
- Essie Enamel ($9.00)
- Sally Hansen Insta-Dri ($6.00)
- Beetles Gel Polish Set ($15.00 for 6)
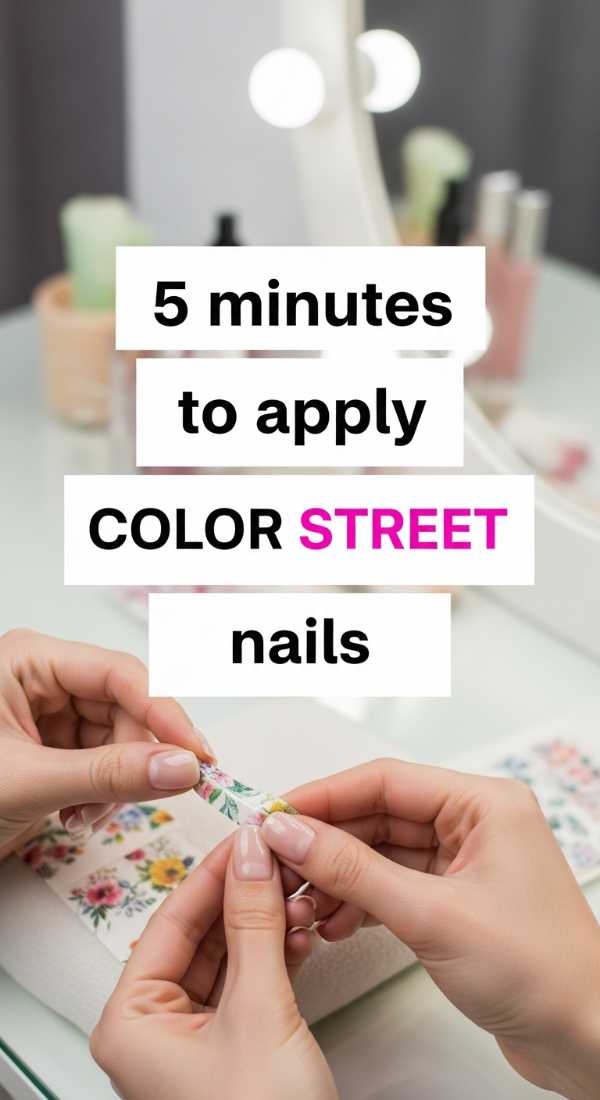
5 Minutes to Apply Color Street Nails
Why to love this recipe:
For my busy loves who want high-impact art without the hours in a salon chair, this is your magic wand. It’s instant gratification that looks like you spent a fortune on hand-painted details.
Essential Ingredients:
- Color Street nail strips
- Alcohol prep pads
- Glass nail file
How to Prepare:
- Cleanse your natural nails thoroughly with the prep pad.
- Peel the strip and align the rounded edge with your cuticle.
- Press firmly and fold the excess over the tip, filing downward to remove.
Budget Range
- Color Street Specialty Sets ($13.00 – $16.00)
- Glass Nail File ($5.00)
7 Ways to Style Nails Colorful Today

Why to love this recipe:
Sometimes the art isn’t just on the nail, but how you wear it! This ‘recipe’ is about the holistic vibe, making your colorful nails the centerpiece of your entire aesthetic.
Essential Ingredients:
- Chunky gold rings
- Colorful midi rings
- Moisturizing cuticle oil
How to Prepare:
- Mix metals and textures with your rings to frame the nails.
- Coordinate one nail color with your eyeshadow.
- Use cuticle oil for that healthy, ‘expensive’ glow.
Budget Range
- Target Wild Fable Rings ($8.00)
- Cuccio Revitalize Oil ($12.00)
- ASOS Ring Multipacks ($15.00)
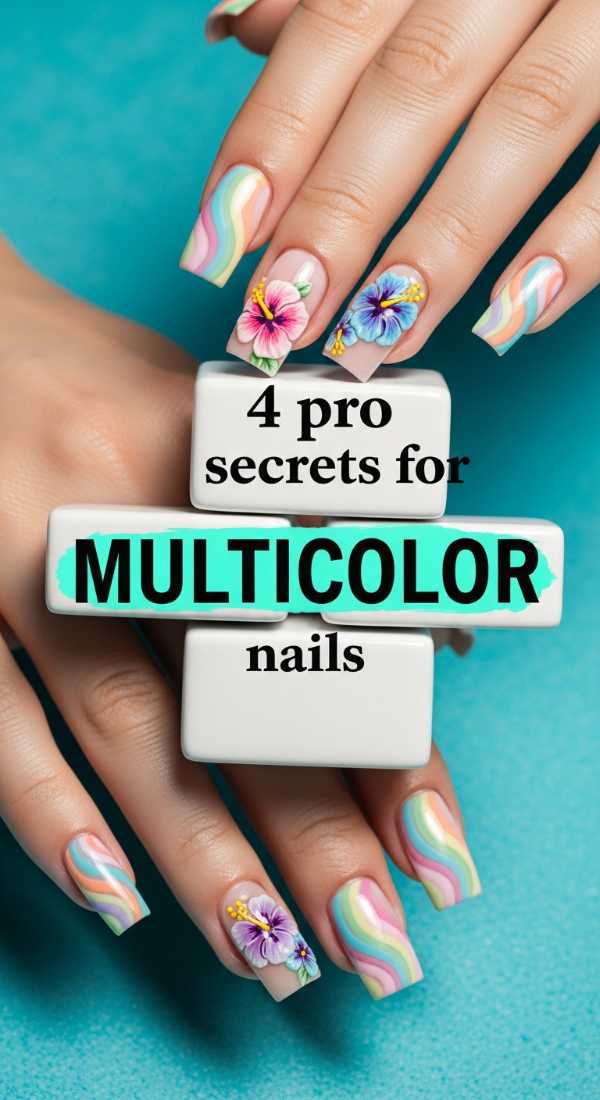
4 Pro Secrets for Multicolor Nails
Why to love this recipe:
These are the little whispers of wisdom that take a manicure from ‘home-made’ to ‘high-end.’ It’s all about the finesse and the longevity of your beautiful art.
Essential Ingredients:
- Dehydrator/Primer
- Liner brushes
- LED Lamp
How to Prepare:
- Always use a primer to prevent lifting.
- Apply thin, ‘whisper’ layers of polish to avoid bulk.
- Clean your brushes in isopropyl alcohol between every color change.
- Flash cure for 10 seconds between different color placements to prevent bleeding.
Budget Range
- Modelones Nail Primer ($7.00)
- SunUV LED Lamp ($25.00)
- Winstonia Liner Brushes ($10.00)
10 Fresh Ideas for Colorful Nail Inspo
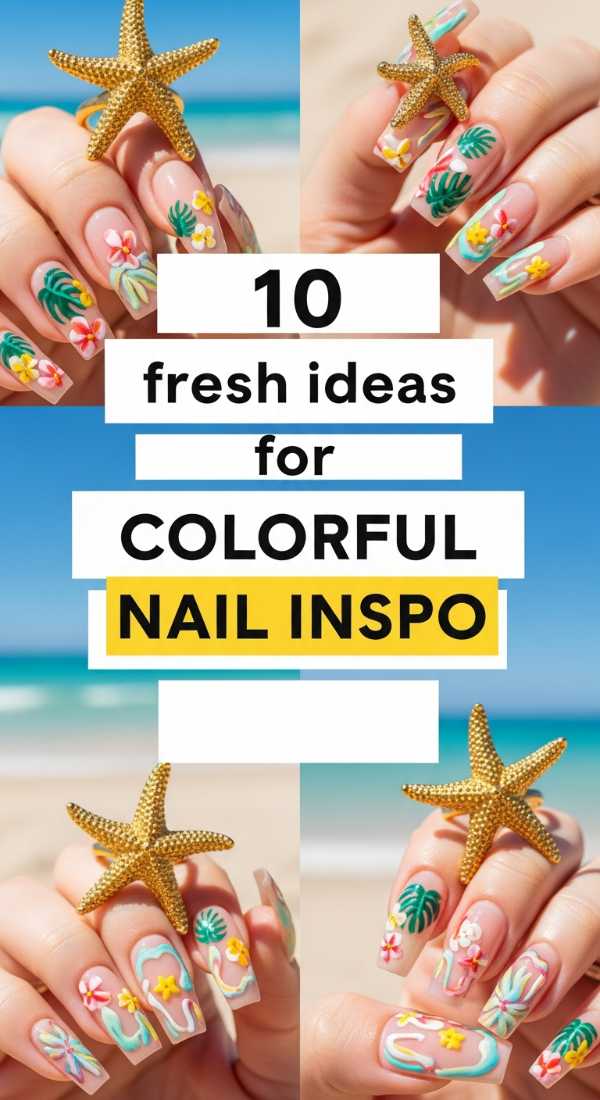
Why to love this recipe:
When you feel a bit stuck, these ideas are like a fresh breeze. They are designed to spark that ‘aha!’ moment in your creative soul, giving you a roadmap for your next ten manicures.
Essential Ingredients:
- Neon pigments
- Matte top coat
- Iridescent flakes
How to Prepare:
- Try ‘Mismatched Hands’ where each hand has a different palette.
- Experiment with ‘Aura Nails’ using a makeup sponge.
- Layer matte and gloss for a tactile experience.
Budget Range
- Born Pretty Neon Pigment ($10.00)
- OPI Matte Top Coat ($11.00)
- Holo Taco Flake Taco ($13.00)
6 Steps to Craft Colourful Acrylic Nails

Why to love this recipe:
Acrylics offer a sturdy, long canvas for our most ambitious dreams. This recipe is for my loves who want that satisfying ‘clack’ and endless space for rainbows.
Essential Ingredients:
- Colored acrylic powder
- Monomer
- Size 8 Kolinsky brush
How to Prepare:
- Prep the natural nail and apply tips.
- Pick up a small bead of colored powder.
- Place at the free edge and blend upward.
- Add a second color at the cuticle and blend downward (the ombré).
- File to a crisp shape.
- Buff and shine.
Budget Range
- Mia Secret Acrylic Kit ($20.00)
- Saviland Colored Powder Set ($25.00)
- Pana Acrylic Brush ($18.00)
5 Tricks for Bold Colorful Stiletto Nails
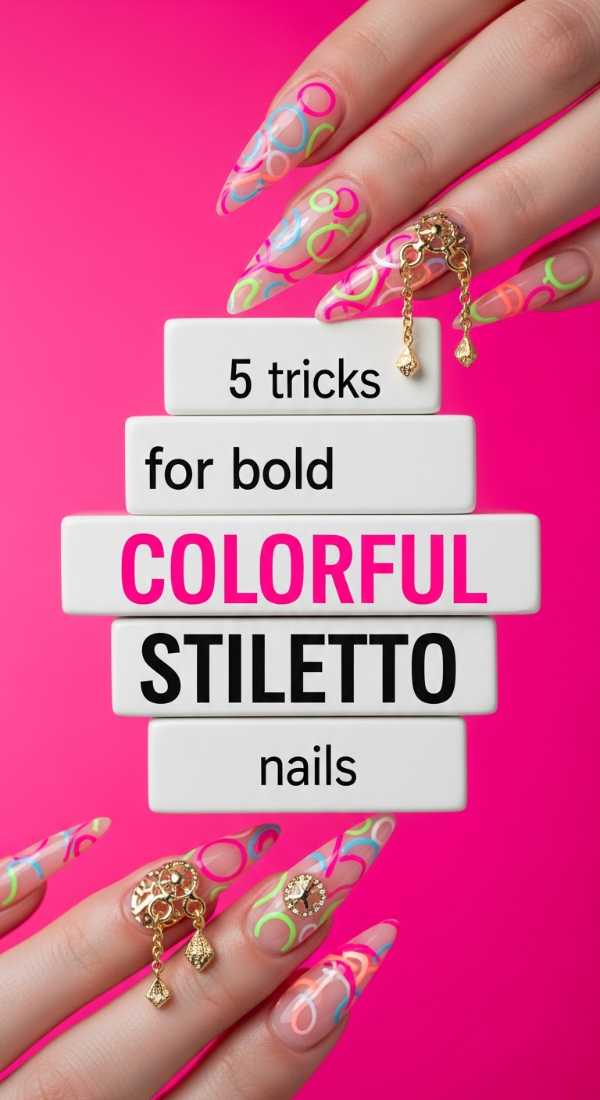
Why to love this recipe:
Stiletto nails are the ultimate ‘don’t touch me, I’m art’ statement. They are sharp, fierce, and provide the perfect silhouette for bold, geometric patterns.
Essential Ingredients:
- Stiletto nail forms
- Reinforced builder gel
- Electric nail file
How to Prepare:
- Sculpt the point using a form for maximum precision.
- Keep the ‘sidewalls’ straight to emphasize the sharpness.
- Use bold vertical stripes to elongate the look even further.
Budget Range
- Makartt Nail Forms ($9.00)
- MelodySusie E-File ($30.00)
- Ibd Builder Gel ($14.00)
4 Steps for 3D Tropical Floral Nails
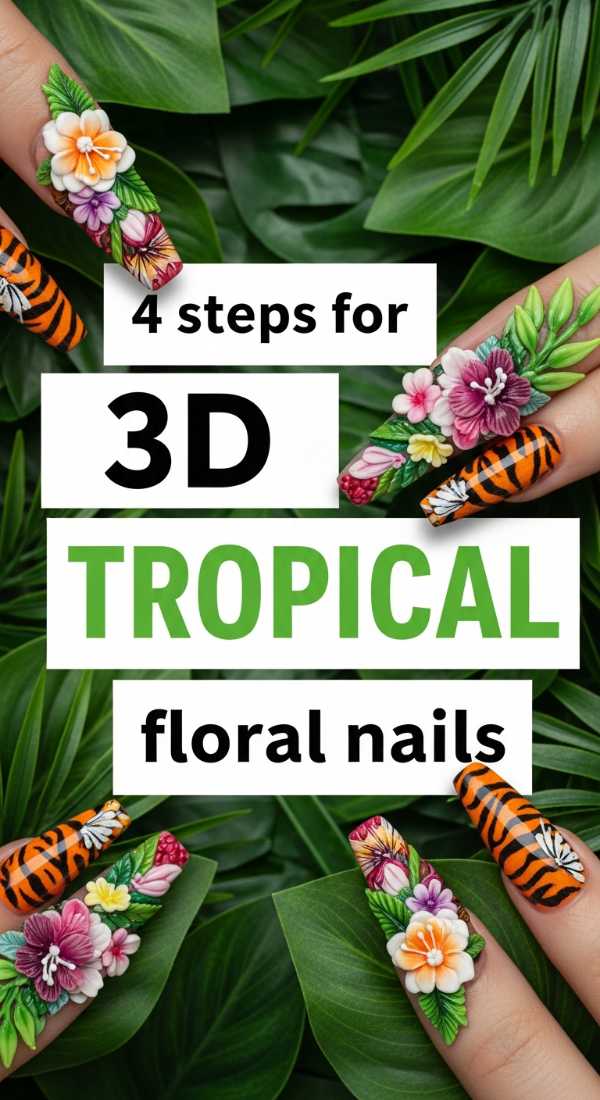
Why to love this recipe:
This is like wearing a tiny, blooming garden on your fingertips. It’s tactile, whimsical, and brings a touch of paradise to even the rainiest afternoon.
Essential Ingredients:
- 3D Sculpture gel
- Dotting tools
- Vibrant green and hibiscus pink polish
How to Prepare:
- Paint a tropical base (teal or sunset orange).
- Roll tiny beads of sculpture gel and press into petal shapes.
- Use a dotting tool to add yellow ‘pollen’ centers.
- Cure for a full 60 seconds to ensure the 3D elements are set.
Budget Range
- Morovan 3D Gel Kit ($18.00)
- Dotting Tool Set ($5.00)
- Gelish Tropical Collection ($12.00 per bottle)
3 Simple Ways to Paint Tiger Nails
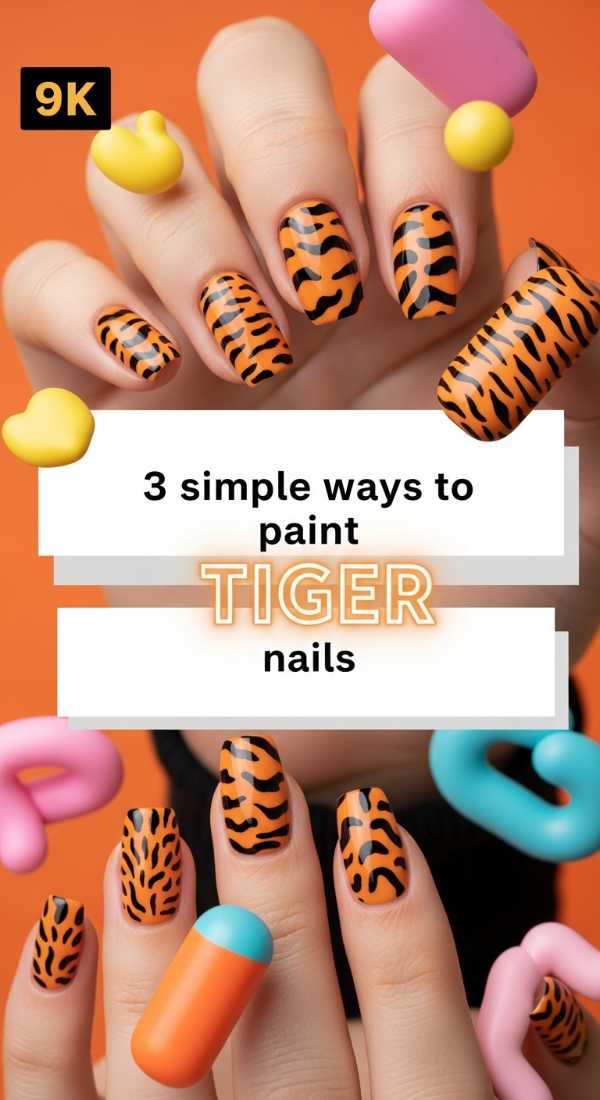
Why to love this recipe:
Unleash your inner wild side! Tiger stripes are surprisingly soothing to paint—it’s all about the flow and the natural ‘imperfection’ of the lines.
Essential Ingredients:
- Bright orange base polish
- Black striper paint
- Gold leaf accents
How to Prepare:
- Apply two coats of orange and let dry completely.
- Wiggle a striper brush from the edge of the nail toward the center, varying pressure.
- Add tiny flecks of gold leaf between stripes for a luxury finish.
Budget Range
- Orly It’s Not A Step ($10.00)
- Art Deco Striper ($4.00)
- Nail Art Gold Flakes ($6.00)
8 Ways to Secure Luxury Nail Charms

Why to love this recipe:
Nothing says maximalism like a ‘junk nail’ encrusted with jewels! But the secret is making sure those beauties stay put while you go about your magical life.
Essential Ingredients:
- Rhinestone glue (UV cure)
- Wax picker tool
- Luxury charms (bears, hearts, gems)
How to Prepare:
- Apply a thick dollop of rhinestone glue.
- Place your largest charm first.
- Surround it with smaller ‘caviar’ beads to anchor it.
- Seal the edges with a thin liner brush and top coat.
Budget Range
- Makartt Rhinestone Glue ($10.00)
- Dual-ended Wax Picker ($7.00)
- Amazon Bulk Nail Charms ($12.00)
Embrace Your Vibrant Self
My loves, I hope these ideas have filled your heart with as much excitement as they have mine. Remember, there are no rules in art, and there are certainly no rules when it comes to expressing your joy. If a design makes you smile when you type on your keyboard or hold your morning coffee, then it is perfect. Go forth, be bold, and let your nails be the colorful exclamation point to everything you do! I can’t wait to see the masterpieces you create.