
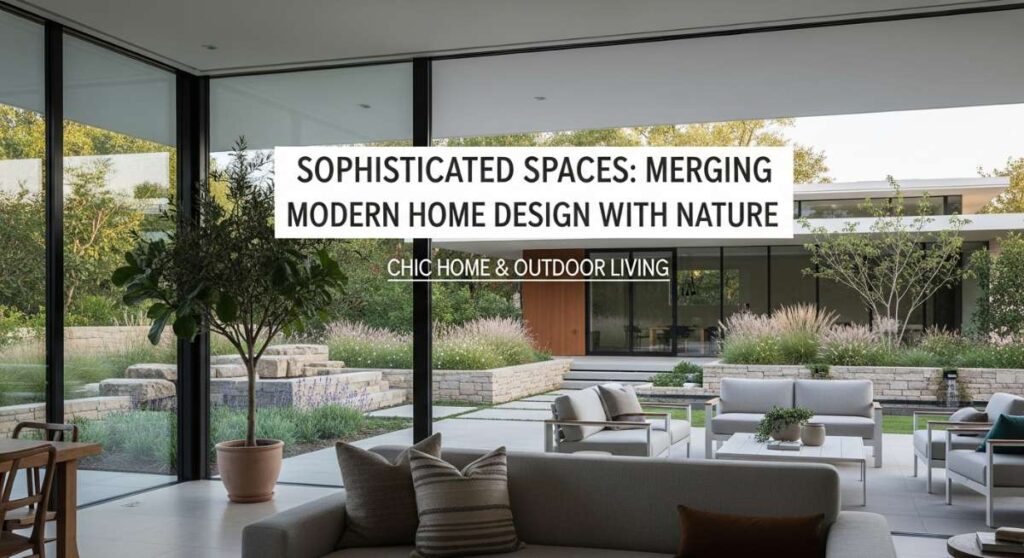
There is a specific kind of magic that happens when the crisp, clean lines of modern design meet the wild, unapologetic beauty of nature. We often spend so much time curating our indoor sanctuaries that we forget the transition to the outdoors is where our homes truly begin to breathe. Creating a sophisticated space isn’t just about high-end furniture; it’s about the harmony between the cedar scent of a new fence, the tactile coolness of a ceramic planter, and the visual peace of a perfectly organized backyard.
For many of us, our homes are more than just four walls—they are an extension of our creative souls. Whether you are looking to fix a pesky drainage issue or want to transform a basic rectangular yard into a lush retreat, the goal is always the same: serenity. In this guide, we are diving deep into those chic home and outdoor living projects that elevate the everyday into something extraordinary, proving that luxury is often found in the most thoughtful details.
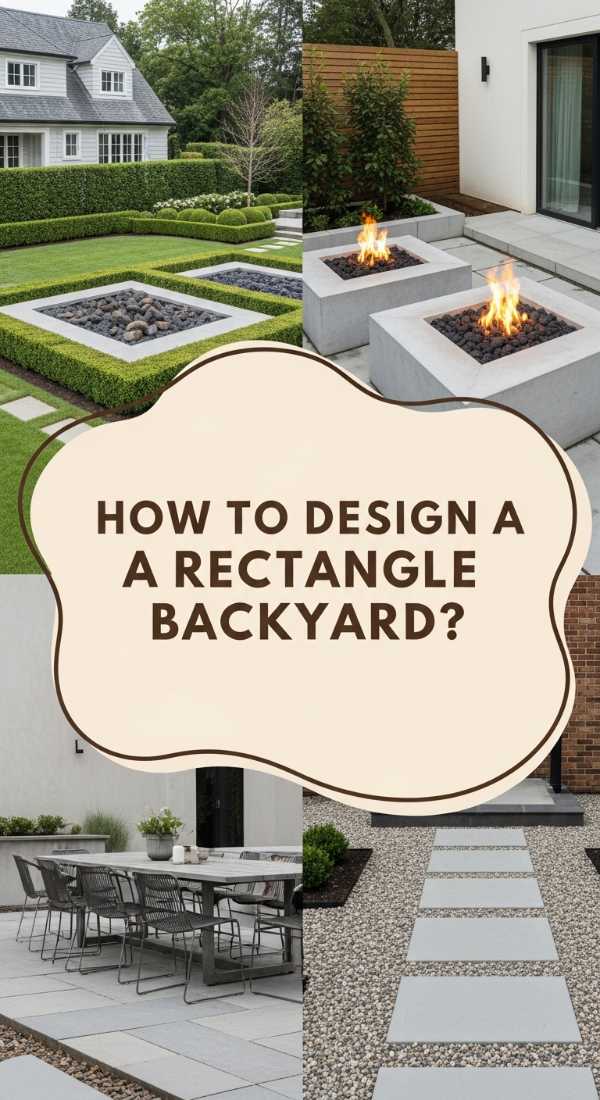
How to Design a Rectangle Backyard for Maximum Serenity
Why we love this
A rectangular backyard often feels like a blank, daunting canvas, but its symmetry is actually its greatest strength for creating a meditative retreat. We adore how a structured layout allows for distinct ‘rooms’ outdoors—imagine the crisp crunch of pea gravel underfoot in a seating area, transitioning into the soft, cool touch of manicured grass. The scent of lavender planted along the perimeter catches the breeze, while the visual alignment of paths creates a sense of order that immediately lowers your heart rate after a long day of work.
Essential Elements:
- Defined zones (dining, lounging, recreation)
- Symmetrical border plantings
- Hardscaping materials like slate or light-colored gravel
- Strategic focal point (a water feature or fire pit)
- Ambient string lighting or path lanterns
How to make it
- Begin by sketching your yard on graph paper to scale, dividing the rectangle into three distinct functional zones to avoid a ‘tunnel’ look.
- Define the boundaries of your first zone, usually a dining area near the house, using a level base of crushed stone followed by your choice of pavers or decking.
- Install a central walkway using large-format rectangular slate tiles, leaving a two-inch gap between them to be filled with moss or decorative pebbles for a modern, organic texture.
- Plant a ‘living wall’ using tall, slender evergreens or a cedar trellis along the long sides of the rectangle to create vertical interest and a sense of cozy enclosure.
- Place a singular focal point at the far end of the yard, such as a sculptural bench or a bubbling stone urn, to draw the eye forward and create a visual destination.
- Layer in soft elements like outdoor rugs and weather-resistant cushions in neutral tones to soften the hard lines of the rectangular space.
How to Style a DIY Air Return Vent Cover for a Polished Look

Why we love this
Nothing disrupts the flow of a beautifully curated room quite like a dusty, industrial metal vent cover glaring from the wall. We love this DIY because it turns a functional eyesore into a piece of architectural art that feels intentional and warm. Replacing that clunky metal grate with a custom wooden or laser-cut screen adds a tactile richness to the room, catching the light on its beveled edges and blending seamlessly into your wall molding for a high-end, custom-built appearance.
Essential Elements:
- Decorative laser-cut metal or wood screen
- Wooden molding for the frame (pine or oak)
- Magnetic strips or invisible hinges
- Fine-grit sandpaper and wood stain/paint
- High-airflow mesh backing (optional)
How to make it
- Measure your existing air return opening precisely, adding two inches to the width and height for the outer frame dimensions.
- Cut four pieces of decorative molding at 45-degree angles using a miter box to create a clean, professional-looking frame that sits flush against the wall.
- Sand the wood pieces thoroughly until they feel as smooth as silk, then apply a stain that matches your flooring or a paint that matches your trim perfectly.
- Attach your chosen decorative screen to the back of the frame using a heavy-duty construction adhesive, ensuring the pattern is perfectly centered.
- Install magnetic strips to the wall and the back of the frame, allowing you to easily ‘pop’ the cover off for filter changes without the need for unsightly screws.
- If the interior of the vent is visible, paint the inside of the ductwork matte black to make the hardware disappear and highlight the decorative pattern of your new cover.
How to Build a Budget Fence for Instant Curb Appeal

Why we love this
A fence is the frame for your home’s portrait, and you don’t need a massive budget to create something that looks like it belongs in a design magazine. We love the smell of fresh cedar and the way a horizontal slat fence can make a property feel wider and more expansive. It provides a crisp, rhythmic backdrop for your greenery, making the vibrant greens of your shrubs and the bright pops of your flowers stand out with incredible contrast against the warm, earthy tones of the wood.
Essential Elements:
- Pressure-treated 4×4 posts
- Horizontal cedar or pine slats (1×4 or 1×6)
- Galvanized deck screws
- Post-hole digger and quick-set concrete
- Outdoor-rated wood sealer or semi-transparent stain
How to make it
- Mark your fence line with stakes and string, ensuring you are at least two inches inside your property line to avoid any neighborly disputes.
- Dig post holes every 6 to 8 feet, reaching a depth of at least 24 inches (or below the frost line) to ensure the structure remains perfectly plumb over time.
- Set your posts in concrete, using a level on two sides of each post to guarantee they are perfectly vertical, then allow the concrete to cure for a full 24 hours.
- Begin attaching your horizontal slats from the bottom up, using a 1/2 inch spacer between each board to allow for airflow and wood expansion while maintaining a modern aesthetic.
- Check the level of every third board to ensure your lines stay perfectly horizontal across the entire length of the fence.
- Finish by applying a high-quality UV-resistant sealer with a wide brush, working in the direction of the grain to protect the wood from graying and water damage.
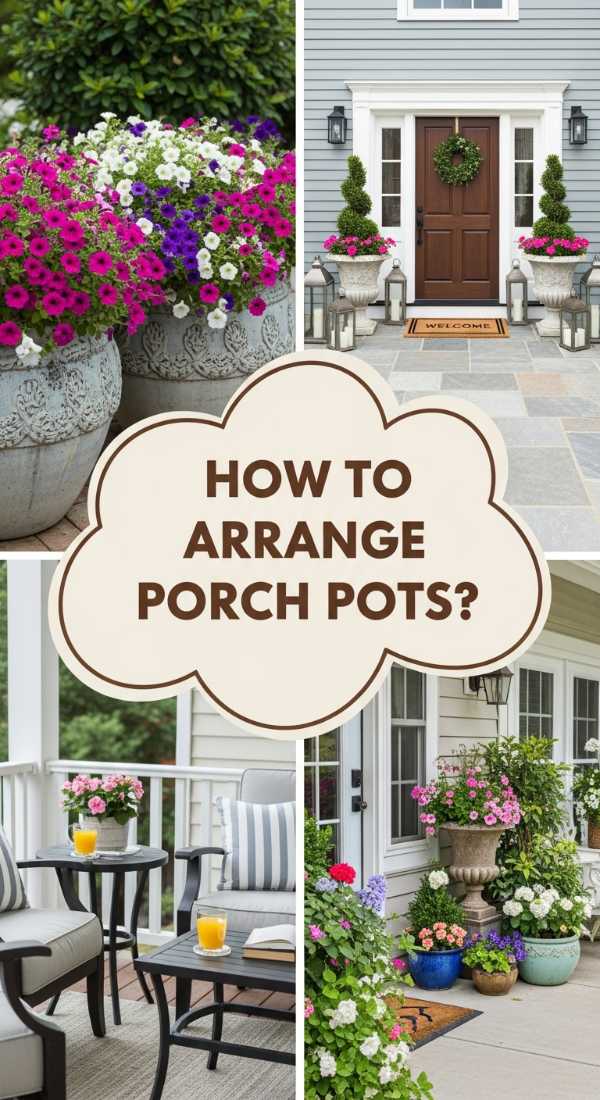
How to Arrange Front Porch Flower Pots for a Grand Entrance
Why we love this
There is nothing more welcoming than an entryway that feels alive and curated. We love the ‘thriller, filler, spiller’ method because it creates a mini-ecosystem of texture and height right at your doorstep. Imagine the velvety softness of silver mound artemisia paired with the vibrant, waxy leaves of begonias, all cascading over the side of a heavy stone pot. It’s a sensory greeting that combines the earthy smell of fresh soil with the visual theater of varying heights and colors.
Essential Elements:
- Various sized pots (small, medium, large) in a cohesive color palette
- High-quality potting mix with perlite
- ‘Thriller’ plants (tall, structural plants like Dracaena or Grasses)
- ‘Filler’ plants (mounded flowers like Petunias or Geraniums)
- ‘Spiller’ plants (trailing vines like Creeping Jenny or Ivy)
How to make it
- Select an odd number of pots (3 or 5) in varying heights but matching materials to create an effortlessly balanced and professional-looking cluster.
- Fill each pot with potting soil, leaving about two inches of space at the top to prevent overflow during watering.
- Place your ‘thriller’ plant in the center or back of the pot—this should be your tallest element and serve as the focal point of the arrangement.
- Surround the thriller with ‘fillers,’ tucking them in closely to create a lush, full appearance that hides the soil completely.
- Plant your ‘spillers’ near the edges of the pot, angling them slightly outward so they naturally drape over the sides as they grow.
- Water the arrangement immediately until water runs out of the drainage holes, ensuring the roots settle into their new home without air pockets.
How to Use Outdoor Fake Flower Pot Ideas for Low Maintenance Beauty

Why we love this
For those of us with busy schedules or shaded porches where nothing seems to thrive, high-quality faux florals are a complete game-changer. We love the peace of mind that comes with ‘ever-blooming’ beauty—no wilting, no watering, and no petals scattered on the floor. Modern silk and UV-protected florals have a stunning realism, with variegated leaf tones and delicate textures that mimic the soft, papery feel of real blooms, allowing you to enjoy a vibrant pop of color even in the harshest sun.
Essential Elements:
- UV-resistant artificial flowers and greenery
- Weighted outdoor planters
- Floral foam or dry sand for stability
- Real dried moss or river rocks for top-dressing
- UV-protector spray for extra longevity
How to make it
- Choose artificial stems that have a ‘real touch’ coating, as these resist fading and have a more natural sheen than standard plastic versions.
- Fill the bottom of your planter with heavy rocks to prevent it from tipping over in high winds, then wedge floral foam tightly into the top half.
- Bend the wire stems of your faux flowers slightly to give them a natural, organic ‘droop’ rather than having them stand perfectly straight and rigid.
- Insert the stems into the foam, starting with the largest blooms in the center and layering in smaller sprigs of greenery to fill any gaps.
- Cover the top of the floral foam with a thick layer of real dried Spanish moss or dark river stones; this simple trick is the secret to making the arrangement look completely authentic.
- Mist the entire arrangement with a specialized UV-protection spray once every season to ensure the colors remain vivid and don’t turn blue or silver in the sun.
How to Manage Drainage Around House for a Dry Foundation

Why we love this
While drainage isn’t the most ‘glamorous’ topic, the satisfaction of a dry, protected home is the ultimate luxury. We love the transformation of a soggy, muddy yard into a functional, beautifully landscaped drainage solution like a French drain or a dry creek bed. There is a primal sense of relief in watching heavy rain flow exactly where it’s supposed to—away from your foundation—moving through smooth river stones that glisten in the wet weather like a natural mountain stream.
Essential Elements:
- Perforated drainage pipe (4-inch)
- Filter fabric (sock) to prevent clogging
- Crushed drainage gravel (3/4 inch)
- Decorative river rock for the surface
- Trenching shovel or power trencher
How to make it
- Identify the lowest point of your yard and plan a path that slopes at least 1 inch for every 10 feet away from your home’s foundation.
- Dig a trench roughly 12 inches deep and 10 inches wide, ensuring the bottom is smooth and maintains a consistent downward pitch.
- Line the trench with heavy-duty landscape fabric, leaving enough excess on the sides to wrap over the top later.
- Pour a 2-inch base layer of gravel into the trench, then lay your perforated pipe on top with the holes facing downward to allow water to rise into the pipe.
- Fill the rest of the trench with gravel, then wrap the excess fabric over the top like a burrito to keep dirt and roots out of your drainage system.
- Top the area with decorative river stones or a layer of sod, creating a beautiful landscape feature that doubles as a hardworking drainage solution.
How to Create a Rectangular Backyard Oasis for Endless Summer Vibes

Why we love this
Transforming a standard rectangular plot into a vacation-worthy oasis is all about layering comfort and light. We love the feeling of ‘resort living’ at home—the warmth of a fire pit reflecting off a glass of wine, the soft glow of Edison bulbs strung overhead, and the plushness of outdoor sofas. It turns an underutilized patch of grass into the heartbeat of the home, where summer evenings stretch out indefinitely and the air smells like charcoal, cedar, and blooming night-jasmine.
Essential Elements:
- Overhead string lighting (Bistro style)
- A centralized fire feature (gas or wood-burning)
- L-shaped outdoor sectional sofa
- Potted palms or tropical-looking foliage
- Outdoor speakers or a portable sound system
How to make it
- Anchor the ‘oasis’ by installing a large outdoor rug that defines the primary lounging area and provides a soft surface for bare feet.
- Position your sectional sofa to face inward toward a central fire pit, creating a cozy ‘conversation circle’ that naturally invites guests to relax.
- Install four wooden 4×4 posts at the corners of your patio or deck to serve as anchors for heavy-duty, commercial-grade string lights.
- Hang the lights in a ‘zigzag’ or ‘criss-cross’ pattern, ensuring enough slack for a romantic ‘swag’ effect that mimics a European bistro.
- Surround the seating area with large planters filled with tall grasses or palms to create a visual ‘green wall’ that provides privacy from neighbors.
- Incorporate small side tables and plenty of weather-resistant throw pillows to give the space a finished, indoor-inspired level of comfort.
How to Plan Cheap Fence Ideas for Secure Backyard Living

Why we love this
Security and privacy shouldn’t cost a fortune, and we love the creative ingenuity of budget-friendly fencing. Using materials like welded wire mesh paired with wood frames creates a ‘farmhouse modern’ look that is both airy and incredibly secure for pets and children. It doesn’t block the view of your garden, but it provides a clear, sturdy boundary that feels solid and protective. The combination of dark metal and warm wood is a classic design choice that elevates the look of any property.
Essential Elements:
- Welded wire fencing rolls (black or silver)
- 2×4 pressure-treated lumber for the frame
- Heavy-duty staples or U-nails
- Circular saw and drill
- Black exterior spray paint for a high-end look
How to make it
- Build a simple ‘picture frame’ structure using 2×4 lumber, creating panels that are roughly 6 to 8 feet wide depending on your post spacing.
- If you want a modern look, paint your wood frames matte black or a dark charcoal before attaching the wire—this makes the fence ‘disappear’ into the landscape.
- Roll out the welded wire mesh and cut it to size using wire snips, ensuring it fits perfectly within the inner dimensions of your wooden frame.
- Tension the wire tightly across the frame and secure it every 4 inches using heavy-duty galvanized staples to ensure no sagging occurs over time.
- Mount the completed panels to your 4×4 fence posts, using a spacer block at the bottom to keep the wood off the ground and prevent rot.
- Add a decorative 1×6 ‘cap’ rail across the top of all the posts and panels to tie the entire look together and provide a finished, polished appearance.
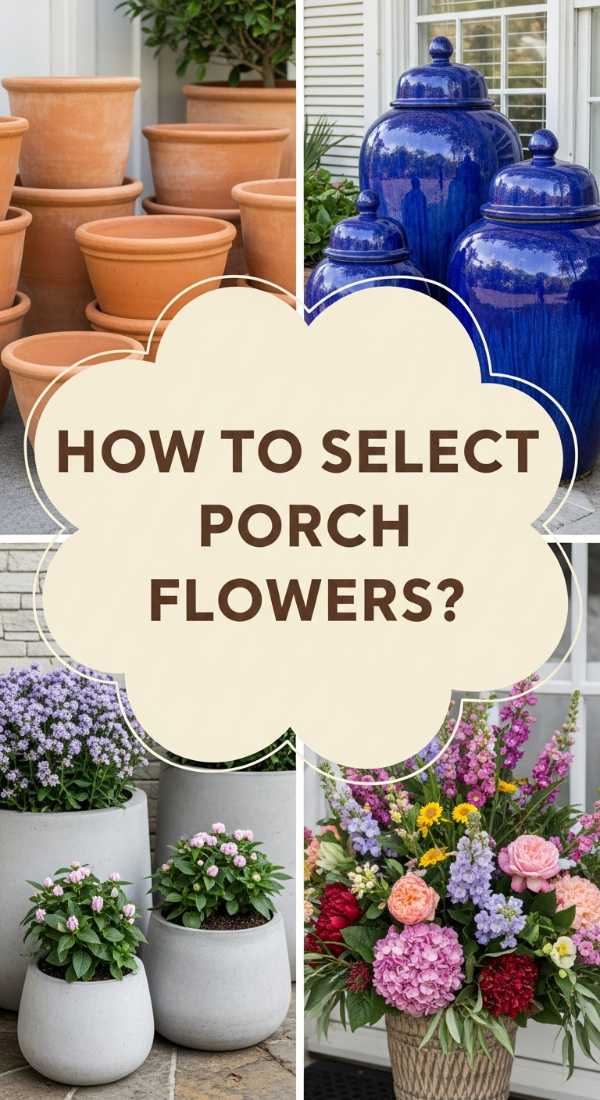
How to Select Front Porch Flower Pots for a Welcoming Home
Why we love this
Selecting the right pots is like choosing the perfect jewelry for an outfit—it completes the look. We love the weight and permanence of high-quality planters; they provide a sense of stability and grandeur to an entrance. Whether it’s the rugged, porous texture of aged terracotta or the sleek, glossy finish of glazed ceramic, the right pot acts as a pedestal for your plants, reflecting your personal style and catching the golden hour light in a way that makes your whole porch glow.
Essential Elements:
- Weather-resistant materials (fiberglass, stone, or thick ceramic)
- Built-in drainage holes
- Cohesive color story (monochromatic or complementary)
- Varying scales (at least one ‘oversized’ statement piece)
- Pot feet or risers (to protect the porch surface)
How to make it
- Evaluate the architecture of your home; choose angular, dark-toned pots for modern builds, or rounded, earthy stone pots for traditional or cottage-style homes.
- Measure your porch width and select pots that are proportional; a tiny pot on a large porch will look cluttered, whereas one or two large ‘statement’ pots will look intentional.
- Opt for fiberglass or composite materials if you live in a climate with freeze-thaw cycles, as these won’t crack like traditional ceramic might.
- Check for drainage; if your dream pot doesn’t have a hole, use a masonry bit to carefully drill one in the bottom to ensure your plants’ roots don’t rot.
- Group your pots in ‘clusters’ rather than lining them up in a row; grouping three pots of different heights creates a much more sophisticated and dynamic visual.
- Use pot feet or small bricks to lift the planters slightly off the ground, which prevents moisture from being trapped against your porch and damaging the wood or stone.
How to Master Outdoor Fake Flower Pot Ideas for Year Round Color

Why we love this
Mastering the art of ‘faux’ means you never have to deal with the heartbreak of frost-bitten blooms. We love the ability to have a burst of summer color even in the depths of November. By mixing high-quality silk florals with real, hardy evergreen branches or dried elements, you create an arrangement that defies the seasons. It’s about that ‘always-ready’ look—where your home looks impeccable and full of life, regardless of how much time you’ve actually had to spend in the garden.
Essential Elements:
- High-quality silk flowers (Ranunculus, Peonies, or Hydrangeas)
- Artificial ‘boxwood’ or ‘eucalyptus’ for base greenery
- Real soil or mulch for the top layer
- Heavy-duty wire cutters
- Sturdy floral wire
How to make it
- Start with a base of high-quality artificial boxwood or cedar sprigs; these provide a dense, green structure that hides the internal mechanics of the pot.
- Select faux flowers that are in season for the current time of year; using ‘fake’ tulips in October is a dead giveaway, so stick to pansies or mums in the fall.
- Integrate a few real dried elements, like curly willow branches or lotus pods, to add varied textures and scents that trick the senses into believing the whole pot is real.
- Fill the pot with real potting soil around the base of the stems; the visual of ‘real dirt’ is the number one way to make faux plants look authentic.
- Change out just the ‘blooms’ every few months while keeping your green base, allowing you to transition from spring pinks to autumn oranges with minimal effort.
- Clean your faux leaves once a month with a damp cloth to remove dust, as nothing gives away an artificial plant faster than a layer of indoor-looking grime.
Elevating Your Home One Detail at a Time
Sophisticated living isn’t about perfection; it’s about the intentional choices we make to blend our modern lives with the beauty of the natural world. By focusing on these high-impact projects—from the foundation-saving drainage to the soul-soothing backyard oasis—you are crafting a home that doesn’t just look good on camera, but feels good to live in. We hope these tips inspire you to pick up a shovel, a paintbrush, or a planter and start creating your own personal sanctuary today.