
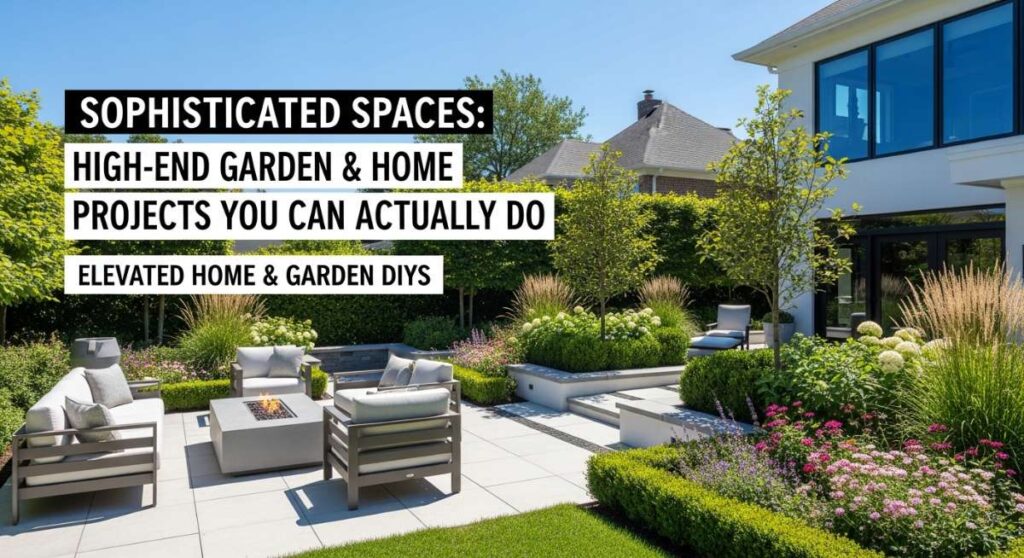
Sophisticated Spaces: High-End Garden & Home Projects You Can Actually Do
There is a specific kind of magic that happens when you stop looking at your home as a list of chores and start seeing it as a canvas for your lifestyle. We’ve all scrolled through those glossy magazines and Pinterest boards, feeling a pang of envy for those perfectly manicured gardens and architecturally sound interiors. But here is a little secret: those high-end looks aren’t always the result of a six-figure renovation budget. Most of the time, they are the result of intentional, well-executed DIY projects that focus on texture, flow, and the little details that whisper luxury.
In this guide, we are diving deep into the world of elevated DIY. We’re moving past the ‘hot glue and glitter’ stage and into the realm of ‘timeless and sophisticated.’ Whether you are looking to reclaim a rectangular backyard or transform a chaotic pantry into a sanctuary of organization, these projects are designed to be approachable yet impressive. Let’s roll up our sleeves and start building a home that feels as good as it looks.
How to Design a Rectangular Backyard for a Peaceful Garden Escape
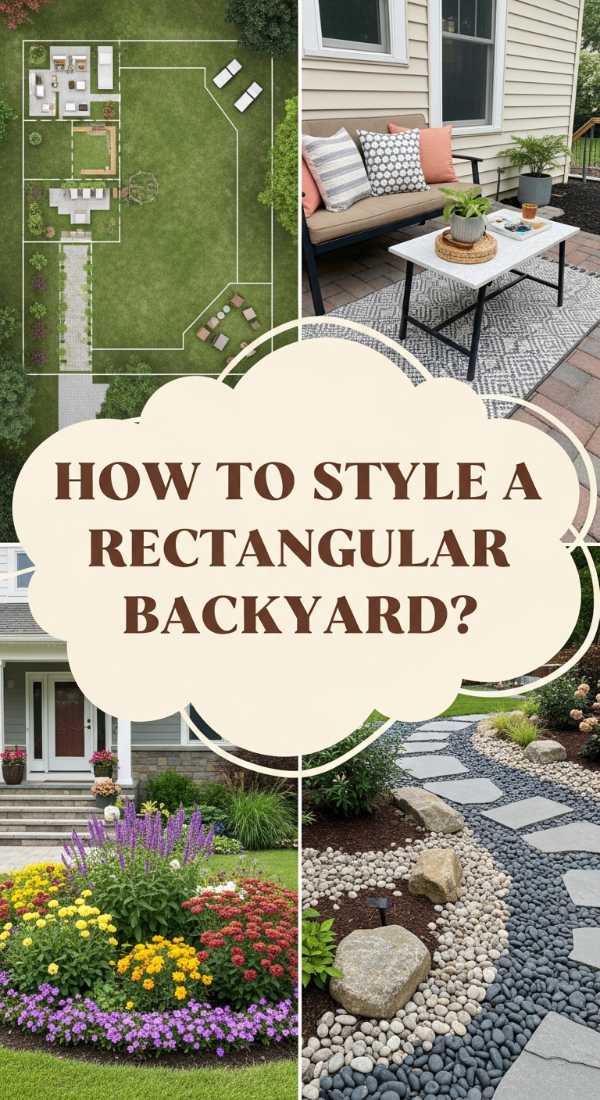
Why we love this
A rectangular backyard can often feel like a boring ‘green box,’ but with the right design, it becomes a multi-layered sanctuary that invites deep breathing and quiet contemplation. We love how this layout uses geometric precision to create a sense of order, balanced by the soft, rustling textures of ornamental grasses and the sweet, heady scent of climbing jasmine. Imagine stepping out into a space where every corner has a purpose, from the dappled shade of a focal tree to the crisp lines of a gravel path that crunches satisfyingly underfoot. It’s about creating a visual journey that makes a standard lot feel like a private estate.
Essential Elements:
- Long-format pavers or stepping stones
- Ornamental grasses (like Fountain Grass or Maiden Grass)
- A focal point tree (like a Japanese Maple or Dogwood)
- Steel or cedar garden edging
- Low-voltage path lighting
How to make it
- Measure your entire perimeter and sketch a ‘three-zone’ layout: a dining area near the house, a central lawn or meadow transition, and a quiet seating nook at the far end to draw the eye.
- Define your pathways using steel edging to create crisp, modern lines that run parallel to your fence, emphasizing the length of the yard while creating ‘rooms.’
- Excavate 2-3 inches of soil along your planned paths and lay down landscape fabric followed by a layer of compacted pea gravel or slate chips for a high-end tactile experience.
- Plant tiered garden beds along the fence lines, placing taller evergreens in the back for privacy, medium shrubs in the middle, and flowering perennials in the front to create depth.
- Install a focal point—like a modern bench or a large stone planter—at the very end of your central path to create a ‘destination’ that makes the garden feel larger and more intentional.
How to Build a Pallet Mud Kitchen for Creative Outdoor Fun
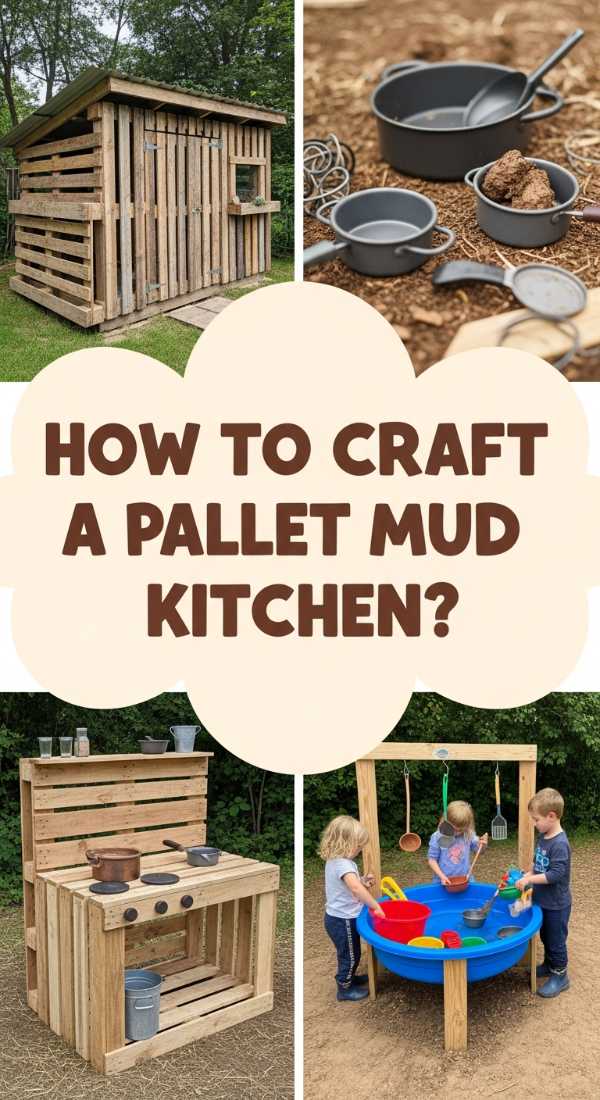
Why we love this
There is something profoundly nostalgic about the sound of a wooden spoon hitting a metal bowl and the cool, squelching sensation of garden mud. A pallet mud kitchen brings a sophisticated, rustic aesthetic to a child’s play area, blending seamlessly into a high-end garden rather than standing out like plastic toys. We love the earthy aroma of damp cedar combined with the scent of crushed herbs and ‘flower soup’ that kids love to brew. It’s a sensory-rich station that encourages tactile exploration and messy, uninhibited creativity while maintaining a beautiful, organic look in your backyard.
Essential Elements:
- Two heat-treated (HT) wooden pallets
- Stainless steel mixing bowls (for sinks)
- Outdoor-rated wood screws and hooks
- Old kitchen faucets or knobs
- Non-toxic outdoor wood sealer
How to make it
- Source two ‘HT’ stamped pallets to ensure they haven’t been chemically treated, and sand every surface thoroughly with 80-grit then 120-grit sandpaper to prevent splinters.
- Disassemble the second pallet to use its slats for a solid countertop surface, screwing them into the frame of the first upright pallet.
- Using a jigsaw, cut circular holes into the countertop that are slightly smaller than the lip of your stainless steel bowls, allowing them to drop in securely as ‘sinks.’
- Attach a vertical backboard using more pallet slats and install hooks for hanging utensils and a small shelf for ‘spice jars’ filled with pebbles and dried leaves.
- Apply two coats of a clear, water-based outdoor sealer to protect the wood from the inevitable water and mud play, ensuring the kitchen lasts for years of imaginative use.
How to Style Front Porch Flower Pots for Professional Curb Appeal
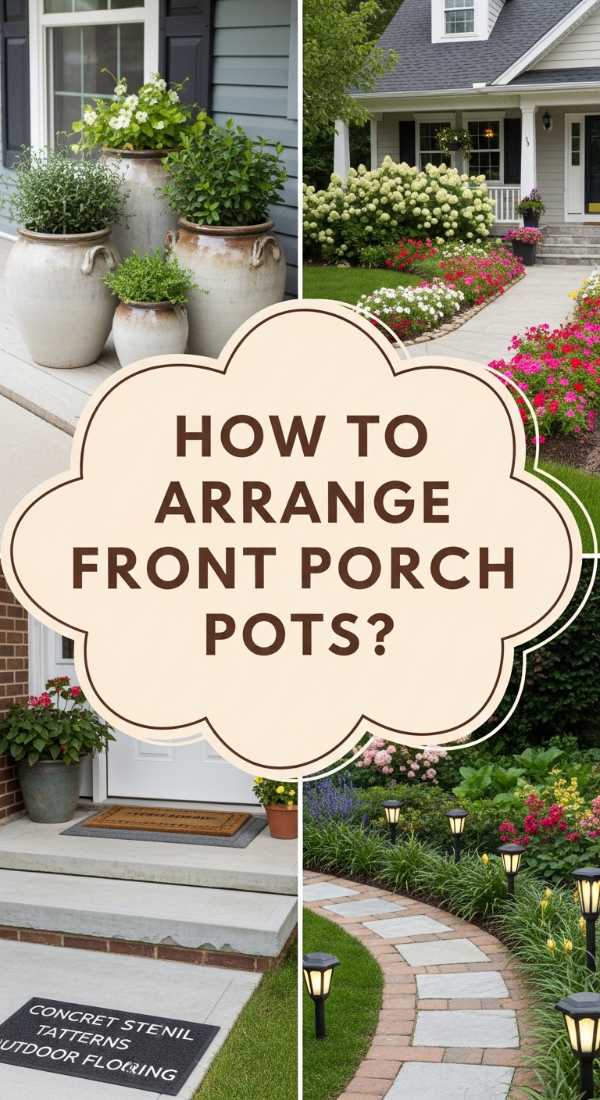
Why we love this
First impressions are everything, and a professionally styled front porch feels like a warm, sophisticated hug for your guests. We love the ‘thriller, filler, spiller’ method because it creates a lush, three-dimensional arrangement that looks like it was curated by a high-end florist. The vibrant contrast of deep green foliage against limestone-colored pots, the delicate scent of trailing lobelia, and the architectural height of a centerpiece palm or grass create a sensory experience that elevates your entire home’s exterior. It’s an instant hit of color and life that makes even a simple entryway look like a luxury residence.
Essential Elements:
- Large, matching heavy-duty planters (stone, ceramic, or high-quality resin)
- High-quality potting mix with perlite
- A ‘Thriller’ (Dracaena, Canna Lily, or Grass)
- A ‘Filler’ (Petunias, Geraniums, or Lantana)
- A ‘Spiller’ (Sweet Potato Vine, Creeping Jenny, or Ivy)
- Select pots that are at least 16-20 inches in diameter to allow for adequate root growth and to provide a substantial visual ‘weight’ to your porch.
- Fill the bottom third of the pot with empty plastic water bottles or packing peanuts to reduce weight and improve drainage before topping with high-quality potting soil.
- Plant your ‘Thriller’ (the tallest plant) in the center or slightly toward the back of the pot, ensuring it is positioned at the same depth it was in its nursery container.
- Surround the thriller with ‘Fillers’—mounding plants that add volume and color—packing them closely enough that no soil is visible between the plants.
- Place your ‘Spillers’ along the very edge of the pot, angling them slightly outward so they begin to drape over the sides immediately, creating that high-end ‘overflowing’ look.
- River rocks in varying sizes (1 inch to 6 inches)
- A few large ‘accent’ boulders
- Heavy-duty landscape fabric
- Crushed stone for the base
- Shovel and trenching tool
- Identify the natural path of water runoff in your yard and mark a winding, ‘S’ shaped path with spray paint to mimic the natural flow of a stream.
- Dig a trench along this path approximately 12-18 inches wide and 6-8 inches deep, ensuring a slight downward slope away from your home’s foundation.
- Line the entire trench with heavy-duty landscape fabric, securing it with landscape staples to prevent weeds from poking through your ‘river.’
- Layer the bottom with 2 inches of crushed stone, then place your largest accent boulders at the ‘bends’ of the river to make it look like the water was forced to move around them.
- Fill in the remaining space with a mix of medium and small river rocks, varying the sizes to create a naturalistic look, and tuck some ornamental grasses along the edges to soften the stone.
- Concrete cleaner and degreaser
- Concrete stain or etching tint
- High-gloss or matte concrete sealer
- Long-handled paint roller
- Pressure washer
- Thoroughly pressure wash the concrete and use a heavy-duty degreaser to remove any oil or dirt, as any residue will prevent the stain from adhering properly.
- If using an acid-based stain, apply it in circular motions using a plastic sprayer, working in small sections to ensure even coverage and a marbled, natural look.
- Allow the stain to react for the manufacturer-recommended time (usually 4-8 hours) before neutralizing the acid with a mixture of baking soda and water.
- Once the slab is completely dry—usually 24 hours later—apply the first coat of high-quality sealer using a 3/8-inch nap roller, ensuring no puddles are left behind.
- Apply a second coat of sealer in a direction perpendicular to the first coat to ensure total coverage, resulting in a professional-grade, weather-resistant finish.
- Untreated Cedar or Pine boards (1×6 is standard)
- 1-1/2 inch galvanized finish nails
- Wood glue (exterior grade)
- Drill with a 1-1/4 inch spade bit
- A small piece of copper or slate for the roof (optional)
- Cut your wood into six pieces: a front, back, two sides, a base, and a roof, ensuring the roof has a generous overhang to keep rain out of the entry hole.
- Use your spade bit to drill an entrance hole exactly 1-1/4 inches wide (the perfect size for wrens and chickadees while keeping larger predators out) about 6 inches above the floor.
- Assemble the sides to the back using exterior wood glue and galvanized nails, then attach the floor, leaving small gaps at the corners for drainage.
- Attach the front panel but use screws instead of nails for the bottom two corners, allowing you to easily remove the front for cleaning out the nest after the season.
- Mount the birdhouse to a post or tree at least 5-10 feet off the ground, preferably facing East to catch the morning sun while staying cool in the afternoon.
- Pressure-treated 2×6 boards for the frame
- Composite or Cedar decking boards
- Deck blocks (concrete)
- Joist hangers and deck screws
- Level and landscape fabric
- Clear the area and lay down heavy-duty landscape fabric topped with a thin layer of gravel to prevent weeds and moisture buildup under your deck.
- Position concrete deck blocks at the four corners and every 4 feet along the perimeter, using a long level to ensure every block is perfectly even with the others.
- Build the outer frame using pressure-treated 2x6s, setting them into the notches of the deck blocks and squaring the corners using the 3-4-5 triangle method.
- Install interior joists every 16 inches on center using joist hangers, which provides the structural integrity needed for a ‘solid’ feel when walking.
- Lay your top decking boards, using spacers to maintain a consistent 1/8-inch gap for drainage, and secure them with hidden fasteners for a clean, high-end look without visible screw heads.
- 4×4 pressure-treated posts
- Cedar 2x4s for the bar framing
- Live-edge wood or exterior-grade plywood for the countertop
- Outdoor bar stools
- Marine-grade spar urethane
- Measure the height of your pool wall and build a free-standing frame of 4×4 posts that sits just outside the pool, ensuring it doesn’t actually touch or put pressure on the pool structure.
- Construct a ‘bar top’ frame at a comfortable height (usually 42 inches) that extends slightly over the top rail of the pool, allowing swimmers to reach it easily.
- Clad the exterior of the frame in cedar pickets or ‘shiplap’ style boards to create a high-end, finished look that hides the pool’s metal or resin siding.
- Sand your countertop smooth and apply at least three coats of marine-grade spar urethane to protect the wood from constant splashes of chlorinated or salt water.
- Install a footrest rail near the bottom and add a few solar-powered LED strip lights under the bar lip to create a stunning nighttime ambiance for evening swims.
- Airtight glass or BPA-free plastic canisters
- Uniform baskets (wicker or wire)
- Tiered ‘stadium’ shelving for cans
- A label maker or custom vinyl decals
- Lazy Susans for corner access
- Empty your entire pantry and group items by category: baking, snacks, dinner staples, and ‘backstock.’ Throw away anything expired and donate items you won’t use.
- Decant dry goods like flour, sugar, and pasta into uniform airtight canisters, which not only looks professional but keeps food fresh significantly longer.
- Place frequently used items at eye level and use wicker baskets on lower shelves for ‘grab-and-go’ items like kids’ snacks or potatoes/onions.
- Utilize Lazy Susans in the corners or on deep shelves for oils, vinegars, and jars, ensuring that nothing ever gets ‘lost’ in the dark recesses of the pantry.
- Finish by applying clean, minimalist labels to every container, ensuring everyone in the household knows exactly where things belong, maintaining the order long-term.
- Sturdy, washable work table
- Wall-mounted paper roll dispenser
- Pegboard for tool organization
- Clear acrylic bins for supplies
- Drying rack for wet masterpieces
- Position a large, sturdy table in the center of the room to allow for 360-degree access, opting for a surface that can handle paint spills and glue drips.
- Install a large pegboard on one wall, painting it a bright white or a soft pastel to serve as a backdrop for hanging scissors, tape, and cups of brushes.
- Set up a ‘color station’ using clear acrylic bins organized in rainbow order, making it easy for young creators to find—and more importantly, put away—their supplies.
- Mount a butcher paper roll to the wall that can be pulled across the table and taped down, providing a giant, renewable canvas for messy projects.
- Create a dedicated ‘Gallery Wall’ using clip-frames or a simple wire-and-clip system to display finished works, giving the children a sense of accomplishment and ownership.
How to make it
How to Design a Rock River Bed for Elegant Backyard Drainage
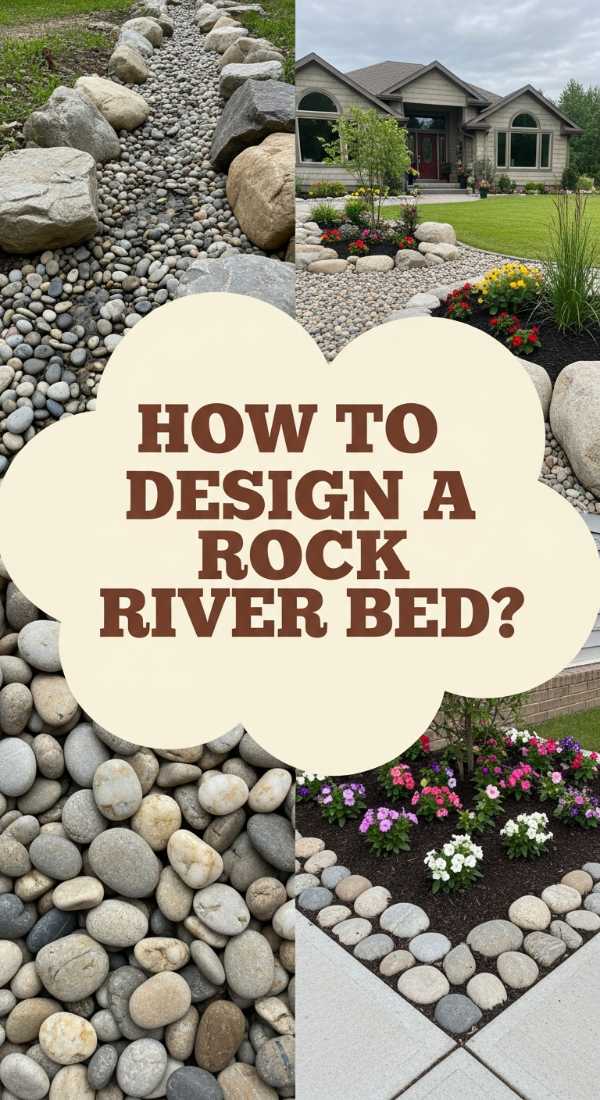
Why we love this
Function meets high-end form in the rock river bed, a solution for drainage that looks like a natural geological feature. We love the way sunlight glints off smooth river stones and the rhythmic, calming sound of water trickling through the rocks during a summer rainstorm. This project replaces muddy patches and plastic pipes with a beautiful, winding path of varied textures—from large, rugged boulders to tiny, smooth pebbles. It’s a grounding element that brings an alpine or zen-garden vibe to your space while doing the heavy lifting of keeping your foundation dry.
Essential Elements:
How to make it
How to Finish a Concrete Slab Patio for a High End Feel
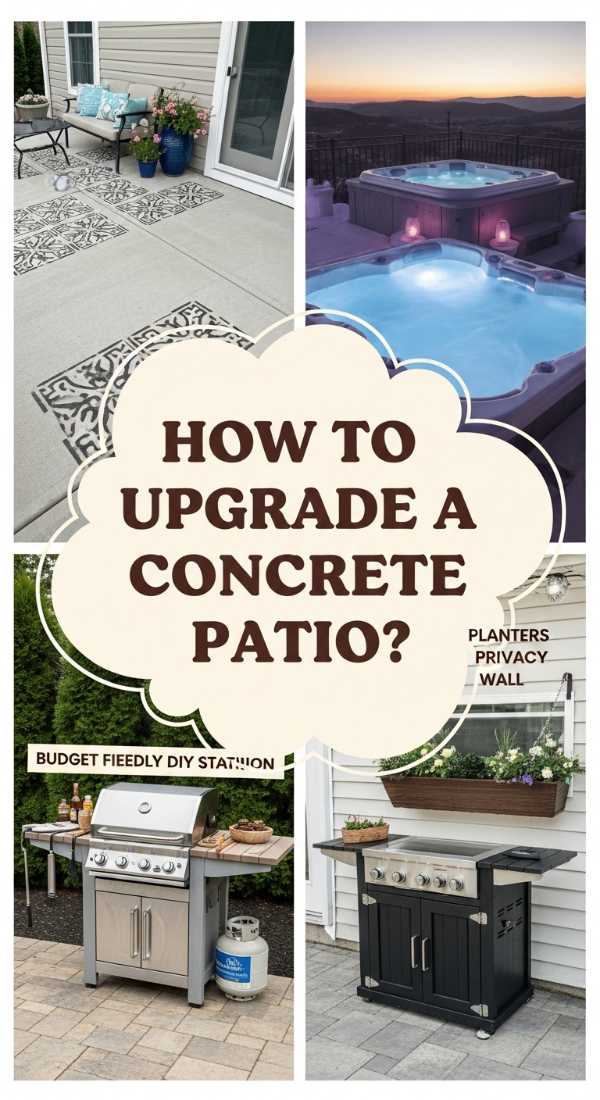
Why we love this
A plain gray concrete slab can feel cold and industrial, but a finished patio feels like an extension of your indoor living room. We love the transformation from ‘utility surface’ to a sophisticated entertaining hub with a sleek, polished finish or a rich, earthy stain. The cool touch of the sealed concrete under your feet on a hot day, combined with the way it reflects the glow of string lights at night, creates an atmosphere of modern elegance. It’s a durable, low-maintenance way to achieve a custom look that rivals expensive stone pavers or hardwood decking.
Essential Elements:
How to make it
How to Craft Rustic Birdhouses for a Whimsical Garden Vibe
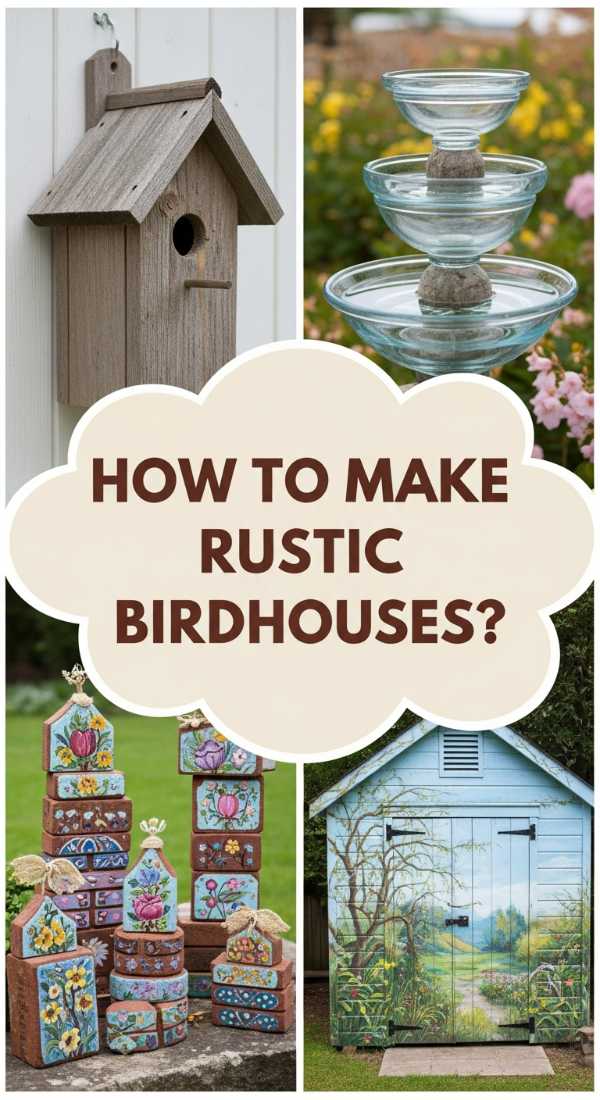
Why we love this
There is a whimsical charm in providing a home for your garden’s smallest inhabitants. We love these rustic birdhouses because they add a layer of ‘soul’ to the garden, blending the scent of cedar with the lively morning chorus of chickadees and wrens. Unlike mass-produced plastic houses, a handmade wooden birdhouse ages beautifully, developing a silvery patina over time that feels integrated into the landscape. It’s a project that rewards you twice: once during the satisfying process of assembly, and every single morning when you watch a new family take up residence.
Essential Elements:
How to make it
How to Build a Floating Deck for a Luxury Backyard Platform
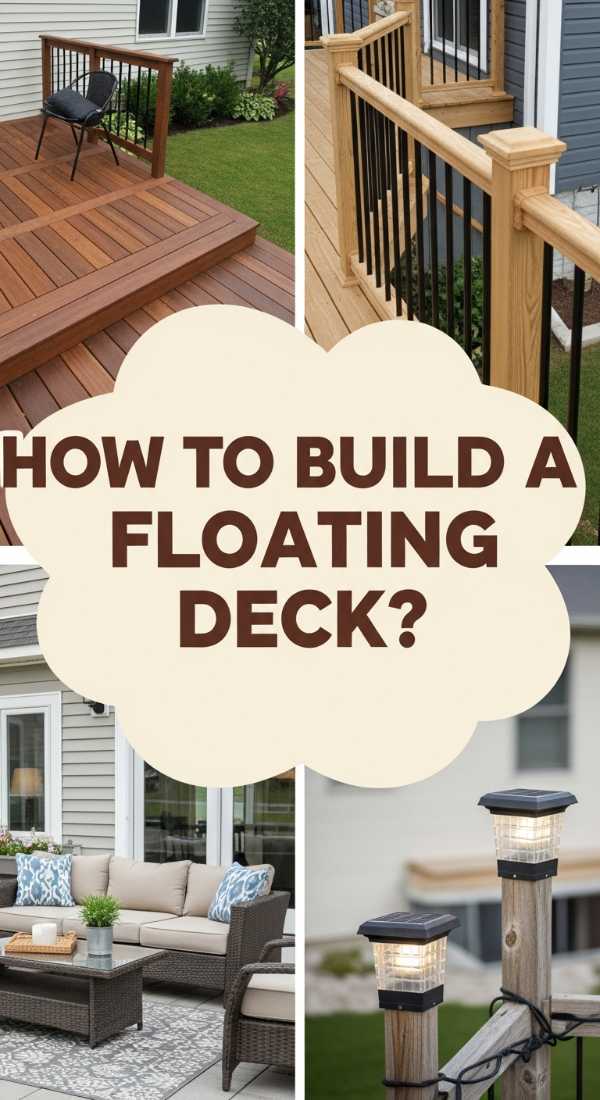
Why we love this
A floating deck is the ultimate ‘level up’ for any backyard, creating a dedicated island for relaxation that feels architectural and expensive. We love the sensation of being slightly elevated off the ground, the smoothness of stained wood against bare skin, and the way it defines an outdoor lounge area without the need for complex footings or permits in many areas. It provides a clean, level surface for high-end furniture and fire pits, turning an unused corner of the yard into the most popular ‘room’ in the house. It’s a weekend project that yields a decade of luxury.
Essential Elements:
How to make it
How to Create an Above Ground Pool Bar for Ultimate Summer Parties
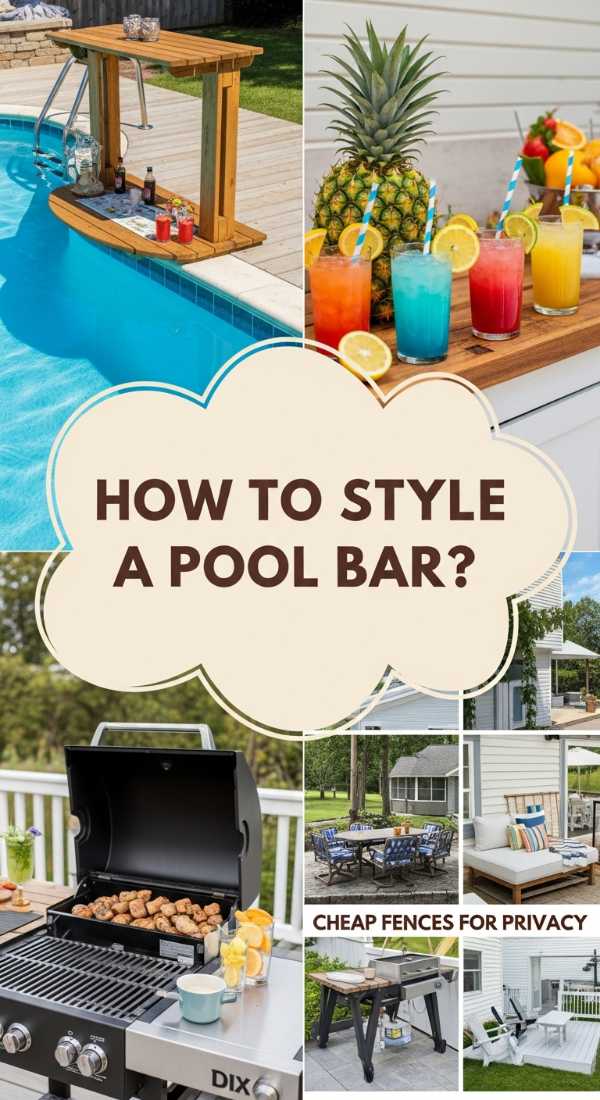
Why we love this
Who says above-ground pools can’t be glamorous? This pool bar project turns a standard swimming spot into a tropical resort-style destination. We love the feeling of resting a cold, sweating glass on a smooth wooden ledge while still chest-deep in cool water, the sun warming your shoulders while you chat with friends. It’s the ultimate social hub—a place where the scent of coconut sunscreen meets the crisp aroma of lime garnishes. It masks the industrial look of the pool wall and replaces it with a sophisticated, functional wood-wrapped feature that screams ‘vacation at home.’
Essential Elements:
How to make it
How to Organize a Realistic Pantry for a Calm Cooking Experience
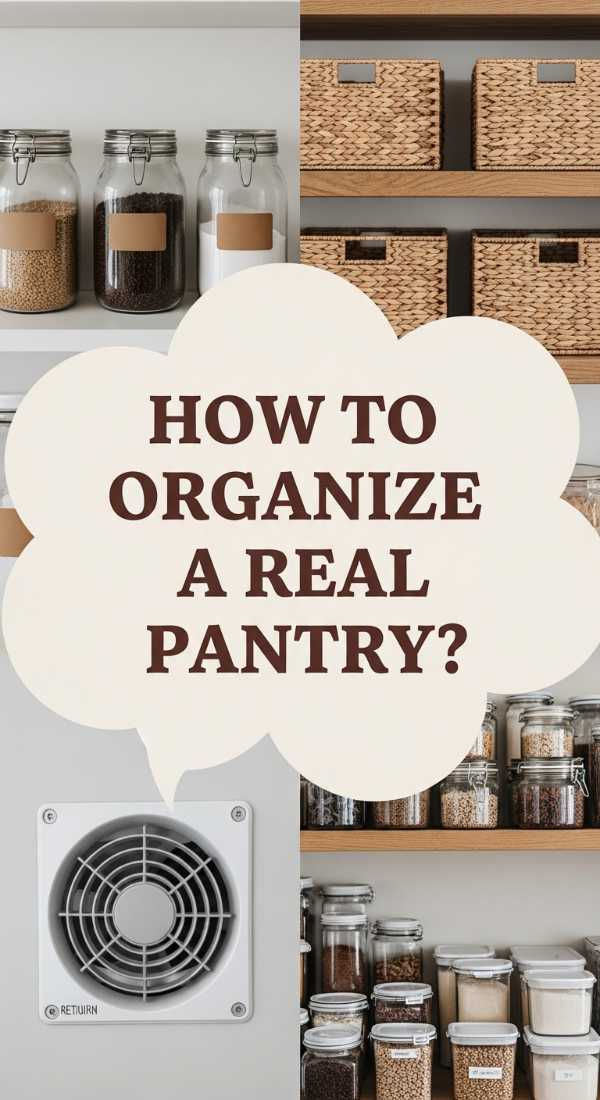
Why we love this
A high-end pantry isn’t just about matching jars; it’s about the mental clarity that comes from a perfectly ordered space. We love the visual rhythm of glass canisters filled with textures of grains, pastas, and flours, and the clean, herbal scent of an organized spice rack. There is a deep satisfaction in being able to see exactly what you have at a glance, reducing the ‘mental load’ of meal planning and grocery shopping. It turns a daily chore into a boutique shopping experience within your own home, making the kitchen feel like the heart of a well-managed estate.
Essential Elements:
How to make it
How to Design an Elementary Art Room for Inspired Young Creators
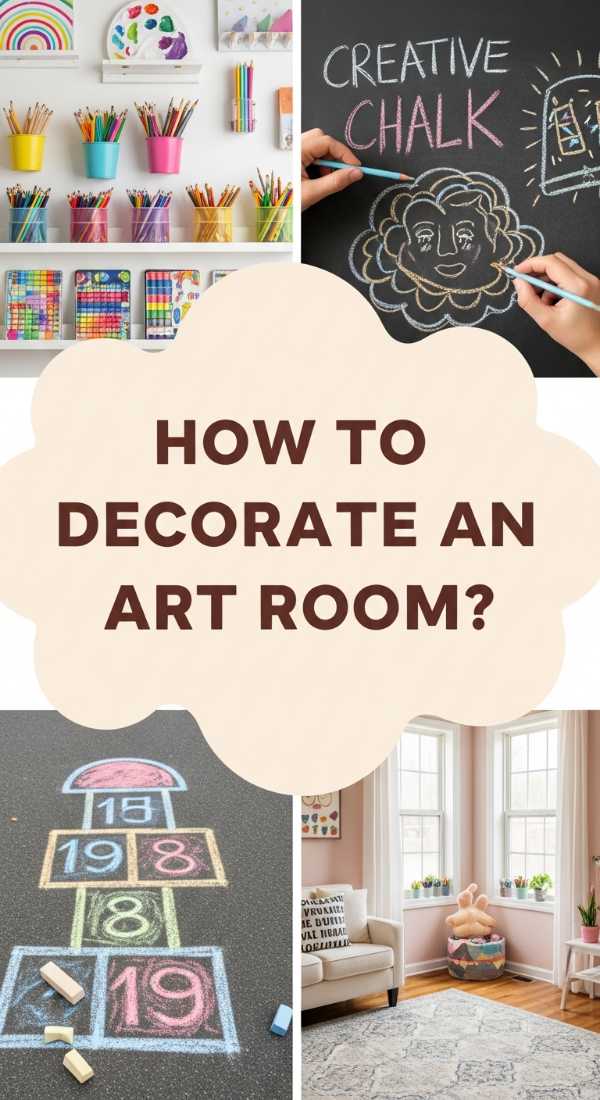
Why we love this
An art room should be a vibrant, organized explosion of possibility that respects a child’s creative process. We love the way a well-designed art space balances the ‘mess’ of creativity with the ‘order’ of a professional studio. The sight of rainbow-ordered markers in clear bins, the tactile pull of a fresh roll of butcher paper, and the pride of an ‘art gallery’ wall create an environment where children feel like real artists. It’s a room that smells like cedar pencils and fresh tempera paint—a dedicated zone where imagination is the only limit, and every supply has a home.
Essential Elements:
How to make it
Conclusion
Elevating your home and garden is a journey of intentionality. It’s about choosing projects that don’t just fill a space, but enhance the way you interact with it every single day. From the quiet structure of a rectangular garden to the organized peace of a boutique pantry, these DIYs prove that luxury isn’t something you buy—it’s something you create. We hope these projects inspire you to pick up a tool, plant a seed, and start building the sophisticated space you’ve always dreamed of. Happy making!