

Sizzle Into Summer 2026: The Ultimate Nail Trend Guide & DIY Tutorials
Hi my loves! Can you feel it? That soft, golden warmth of the 2026 sun is finally starting to peek through our windows, and I couldn’t be more excited to welcome this season with you. There is something so magical about the way a fresh manicure makes you feel—like you’re ready to hold a chilled iced latte and take on the world. This summer, we’re moving away from the quiet and stepping into a world of vibrant self-expression that feels like a warm, cloud-soft embrace for your soul.
I’ve spent the last few weeks playing with colors, textures, and designs that make my heart skip a beat, just so I could bring the very best of Summer 2026 to your fingertips. Whether you’re lounging by the pool or dancing at a garden party, these nails are designed to be your favorite accessory. Let’s dive into these trends together, hand in hand, and find the look that speaks to your beautiful spirit.
5 Simple Steps for Sunset Chrome May Nails
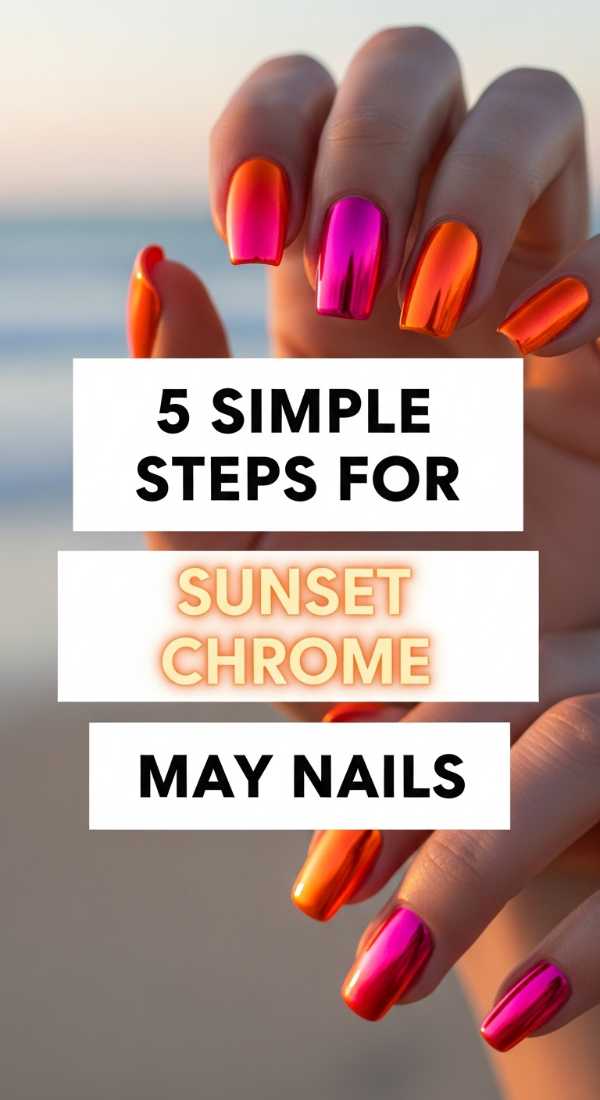
Why to love this Design:
There is nothing quite like the glow of a May sunset reflecting off the water. This design captures that ephemeral magic, giving your nails a liquid-metal finish that shifts with every move you make. It’s sophisticated yet playful, making it the perfect transition from spring into the heat of summer.
Essential Elements:
- Iridescent peach chrome powder
- Warm apricot gel base
- High-gloss no-wipe top coat
- Soft eyeshadow applicator
How to Prepare:
- Apply your warm apricot base color and cure fully.
- Apply a no-wipe top coat and cure for only 30 seconds (it needs to be slightly tacky).
- Dip your applicator into the chrome powder and rub it firmly onto the nail surface.
- Dust off the excess powder with a soft brush.
- Seal with a final layer of high-gloss top coat and cure completely.
Budget Range
- Peach Chrome Powder ($8 – $12)
- Apricot Gel Polish ($10 – $15)
- LED Nail Lamp ($25 – $40)
7 Quick Tips to Style Your Graduation Nails

Why to love this Design:
Graduation is such a monumental milestone, my loves! You deserve a look that feels polished, celebratory, and timeless in those cap-and-gown photos. These tips help you blend your school pride with a high-fashion aesthetic that looks stunning at the ceremony and the after-party.
Essential Elements:
- Sheer nude or ‘milk’ base
- Micro-glitter in school colors
- Fine-line detailing brush
- Nail strengthener
How to Prepare:
- Start with a clean, shaped nail to ensure a professional look.
- Apply two coats of a sheer milky base.
- Add a thin line of glitter along the tips for a ‘sparkle’ french look.
- Use a detail brush to paint your graduation year in a tiny font on the ring finger.
- Ensure cuticles are hydrated with oil.
- Apply a long-wear top coat for durability.
- Finish with a hand massage to calm those ceremony jitters!
Budget Range
- Milky Nude Polish ($9 – $13)
- Detailing Brush Set ($5 – $8)
- Cuticle Oil Pen ($6 – $10)
4 Ways to Master Pucci Summer 2026 Nails
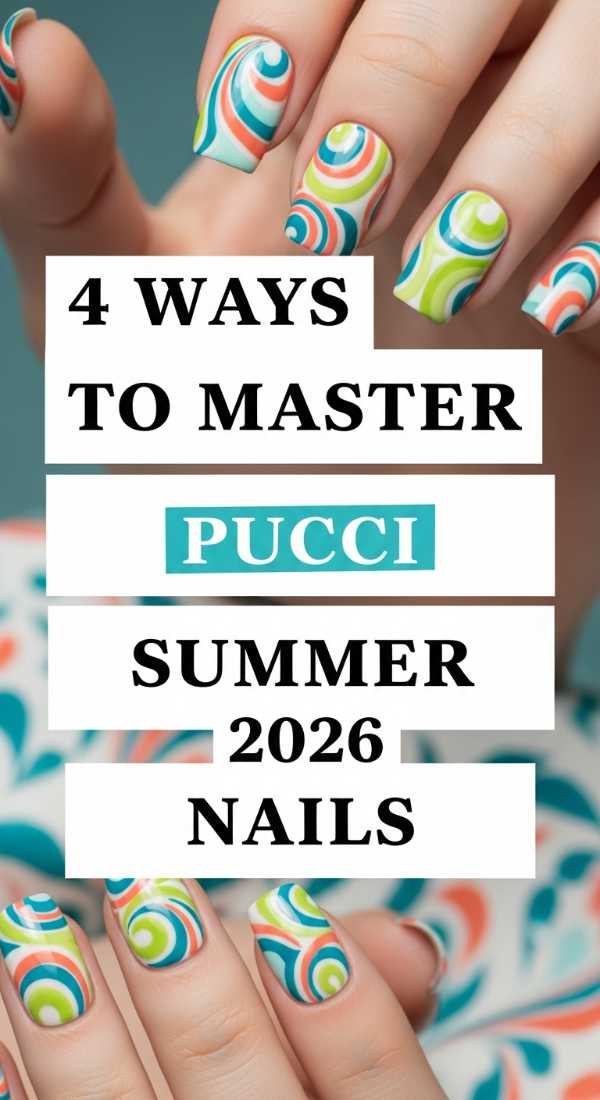
Why to love this Design:
Retro 1960s glamour is making a massive comeback this year! The Pucci-inspired look is all about those iconic, swirling geometric patterns in bold, unexpected color palettes. It’s an artistic statement that feels like wearing a piece of vintage luxury right on your hands.
Essential Elements:
- Palette of 4-5 contrasting pastel and neon shades
- Long striper brush
- Matte and Glossy top coats (for texture play)
- Steady hand or a guide stencil
How to Prepare:
- Map out your organic swirl shapes using a light pencil or dots.
- Fill in each section with a different vibrant color using a striper brush.
- Outline the shapes with a thin white or black line to make them ‘pop’.
- Choose a matte finish for a modern, velvety 2026 twist.
Budget Range
- Multi-color Polish Set ($20 – $35)
- Professional Striper Brush ($7 – $11)
- Matte Top Coat ($8 – $12)
6 Easy Stages to Create Lemon Nails Designs
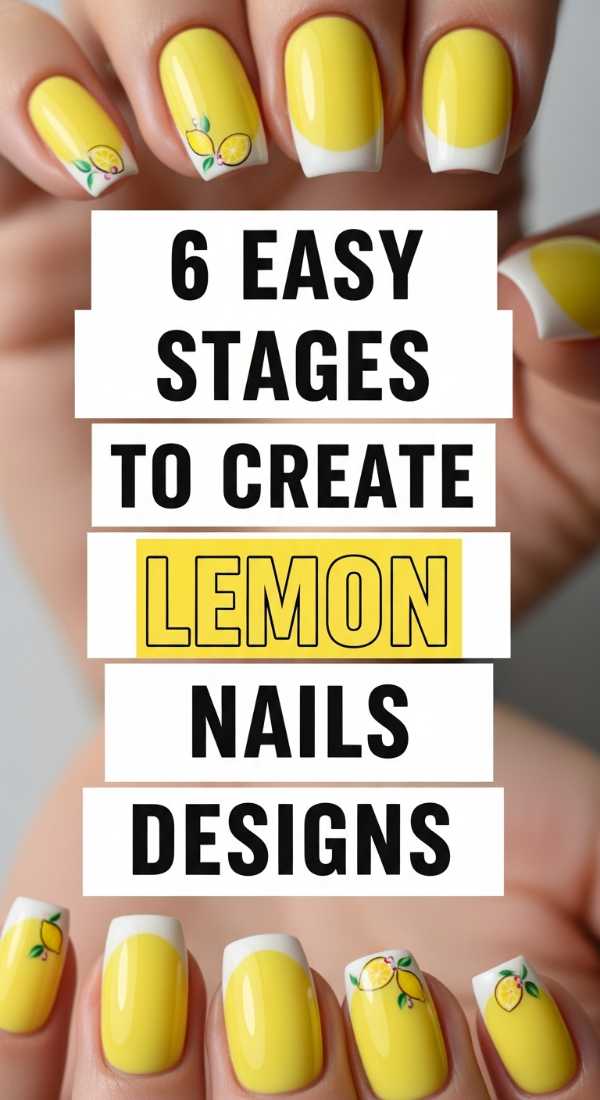
Why to love this Design:
When life gives you lemons, put them on your nails! This design is the epitome of freshness. It’s zesty, cheerful, and brings an instant smile to everyone who sees it. It’s like a cold glass of lemonade for your eyes on a scorching July afternoon.
Essential Elements:
- Vibrant lemon yellow polish
- Leaf green lacquer
- White detailing polish
- Small dotting tool
How to Prepare:
- Paint a clear or pale blue base to represent the summer sky.
- Place two yellow dots side-by-side to create the lemon base.
- Shape the dots into ovals with a fine brush.
- Add a tiny white ‘highlight’ to give the fruit dimension.
- Draw two small green leaves at the top of each lemon.
- Seal with a thick, juicy gloss coat.
Budget Range
- Lemon Yellow Polish ($7 – $10)
- Dotting Tool Kit ($4 – $7)
- Glossy Top Coat ($6 – $9)
3 Fast Techniques for Sunset Aura Nails
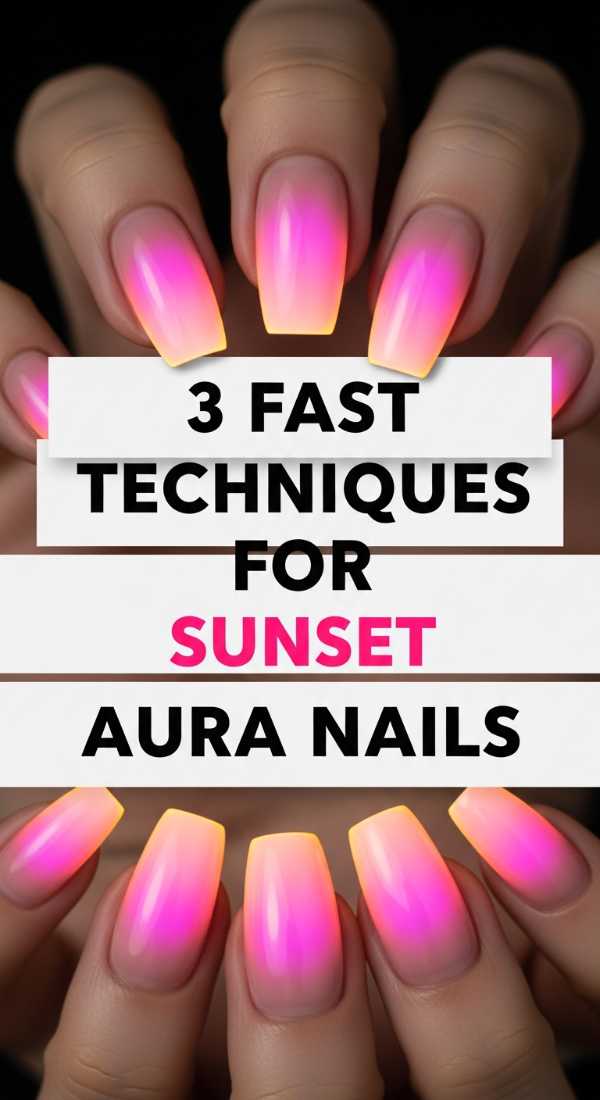
Why to love this Design:
Aura nails are all about your inner energy, and the sunset version is so incredibly soothing. It features a soft, blurred gradient that looks like light radiating from the center of your nail. It’s ethereal, dreamy, and feels very ‘main character’ energy.
Essential Elements:
- Makeup sponge wedges
- Neon orange and deep violet polishes
- Base color (white or light pink)
- Liquid latex (for easy cleanup)
How to Prepare:
- Apply liquid latex around your skin to protect it from the sponge dabbing.
- Apply the darker purple to the edges of a makeup sponge and the orange to the center.
- Gently press the sponge onto the nail in a pulsing motion to blend the ‘glow’.
Budget Range
- Makeup Sponges ($3 – $5)
- Neon Polish Bundle ($15 – $25)
- Liquid Latex ($7 – $10)
5 Dark Ways to Rock Summer Goth Nails
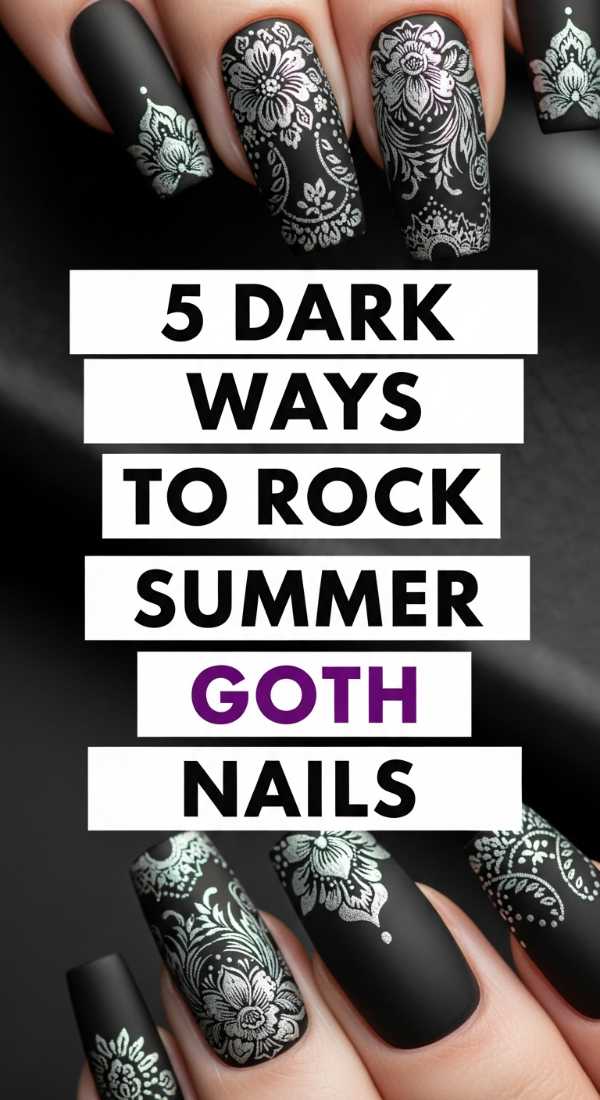
Why to love this Design:
Who says summer is only for brights? Summer Goth is for my babes who love the shadows but still want to feel the heat. It’s about taking those moody, dark elements and making them airy and light enough for a beach day. Think ‘Wednesday Addams on vacation’.
Essential Elements:
- Sheer ‘smoke’ black polish
- Silver chrome studs
- Pointed stiletto nail shape
- Spider-web decals
How to Prepare:
- Use a ‘jelly’ black polish for a translucent, veil-like effect.
- Apply a matte top coat to give it a stone-like texture.
- Add a single silver stud at the base of each nail.
- Incorporate negative space (clear areas) to keep the look light.
- Pair with silver rings for the full aesthetic.
Budget Range
- Jelly Black Polish ($10 – $14)
- Nail Studs Pack ($5 – $9)
- Nail Glue ($4 – $6)
4 Steps to Match Your Hands and Toes Nails
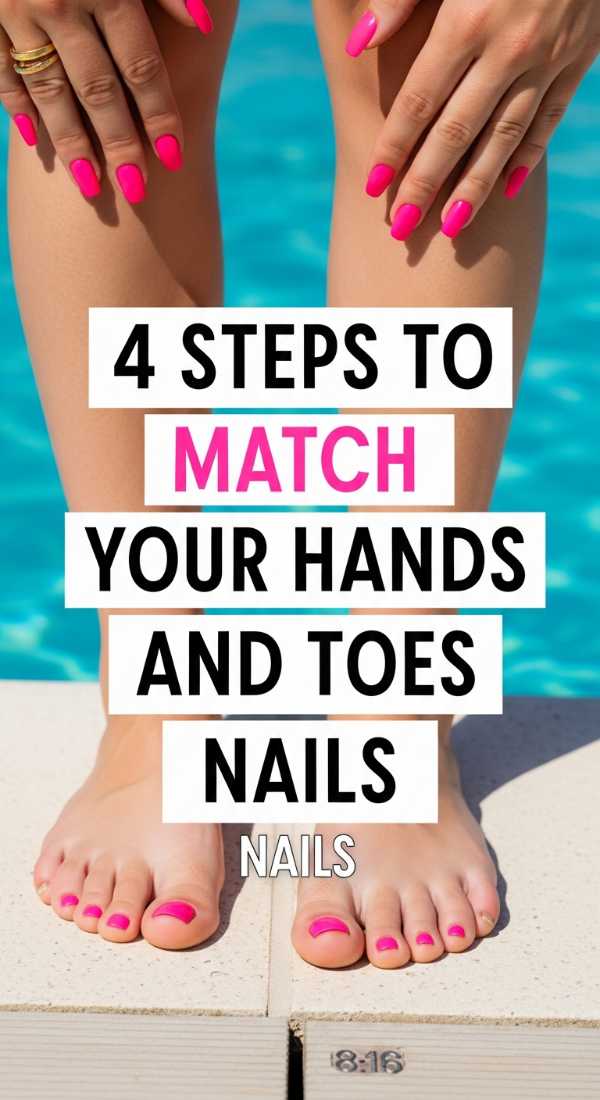
Why to love this Design:
There is an unmatched sense of ‘togetherness’ when your mani and pedi are in perfect harmony. In 2026, we aren’t just doing identical colors; we’re doing sister designs—matching themes that make your whole look feel curated and intentional from head to toe.
Essential Elements:
- Coordinating color palette
- Matching glitter accents
- Separators for toes
- Comfortable seating area
How to Prepare:
- Select a primary color for your fingers and a secondary ‘accent’ color for your toes.
- Apply the primary color to all fingers except the ring finger.
- Apply the secondary color to all toes and that single ‘accent’ finger.
- Apply a matching glitter topper to the big toe and the accent finger to tie the look together.
Budget Range
- Coordinating Polish Duo ($14 – $20)
- Toe Separators ($2 – $4)
- Glitter Topper ($8 – $11)
8 Unique Ways to Wear Teal and Coral Nails
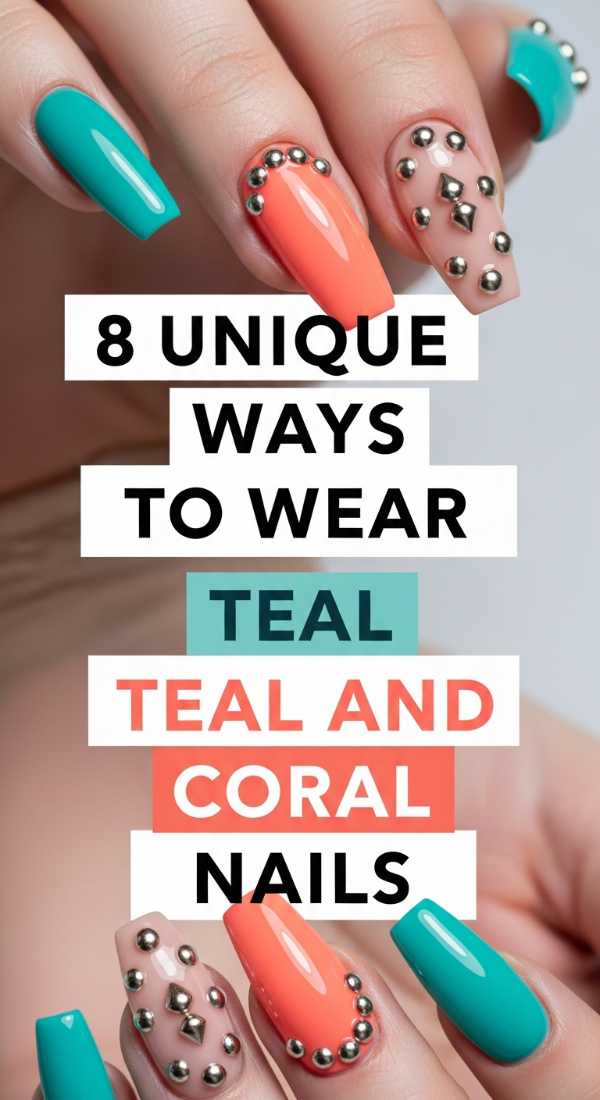
Why to love this Design:
Teal and Coral are the ultimate power couple of the color wheel. One is cool and refreshing like the ocean, the other is warm and vibrant like a reef. Together, they create a high-contrast look that is impossible to ignore and looks stunning on every skin tone.
Essential Elements:
- Tropical teal cream polish
- Electric coral neon
- Gold foil flakes
- Striping tape
How to Prepare:
- Try an alternating ‘skittle’ mani with teal on one hand and coral on the other.
- Use striping tape to create half-and-half vertical splits.
- Create a teal base with coral ‘leopard’ spots.
- Apply coral tips on a teal base for a reverse French.
- Dot teal over a coral base for a bubble effect.
- Use gold foil at the transition point of the two colors.
- Try a marble swirl by dropping both colors into water.
- Gradient sponge the two colors for a ‘tropical punch’ vibe.
Budget Range
- Teal/Coral Polish Set ($12 – $18)
- Gold Foil Flakes ($6 – $10)
- Striping Tape ($3 – $5)
5 Simple Methods for Neon Cheetah Print Nails
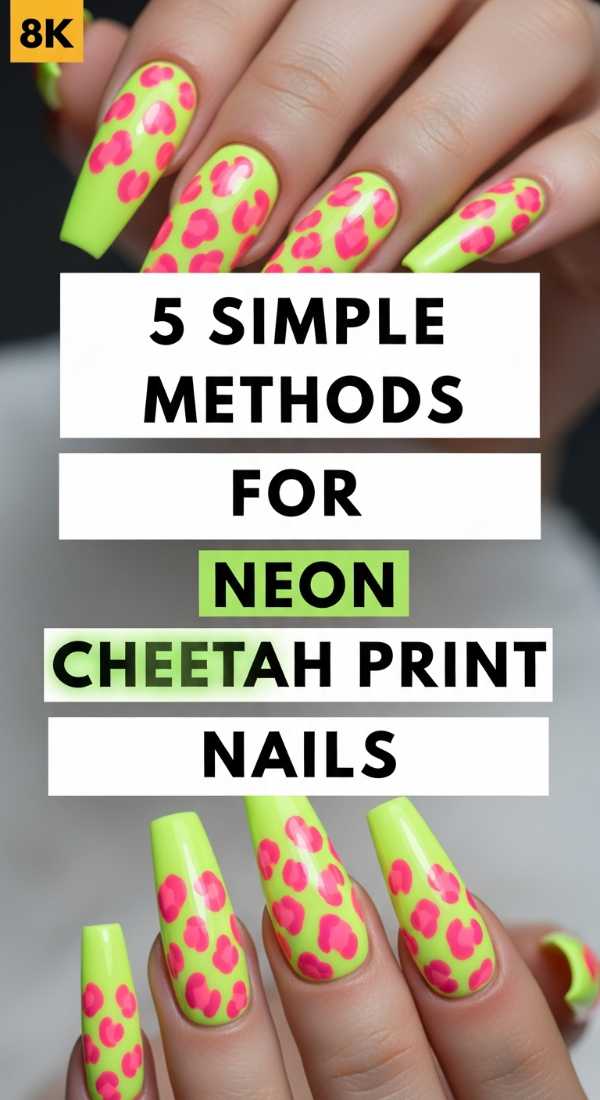
Why to love this Design:
We are embracing our wild side this summer! Neon cheetah print is loud, proud, and incredibly fun. It takes a classic pattern and electrifies it with the energy of 2026. It’s for the girl who isn’t afraid to be the center of attention at the summer festival.
Essential Elements:
- Neon lime or pink base
- Black nail art pen
- Contrasting neon center color
- Sturdy top coat
How to Prepare:
- Apply two coats of neon lime and let dry completely.
- Using a black pen, draw small, irregular ‘C’ and ‘U’ shapes.
- Fill the center of some ‘C’ shapes with a tiny drop of neon pink.
- Keep the placement random for a natural animal-print feel.
- Seal with a thick top coat to prevent the neon from fading in the sun.
Budget Range
- Neon Polish Collection ($22 – $30)
- Black Nail Art Pen ($8 – $12)
- High-UV Top Coat ($10 – $14)
7 Lovely Ways to Design Hot Pink Nails with Flowers
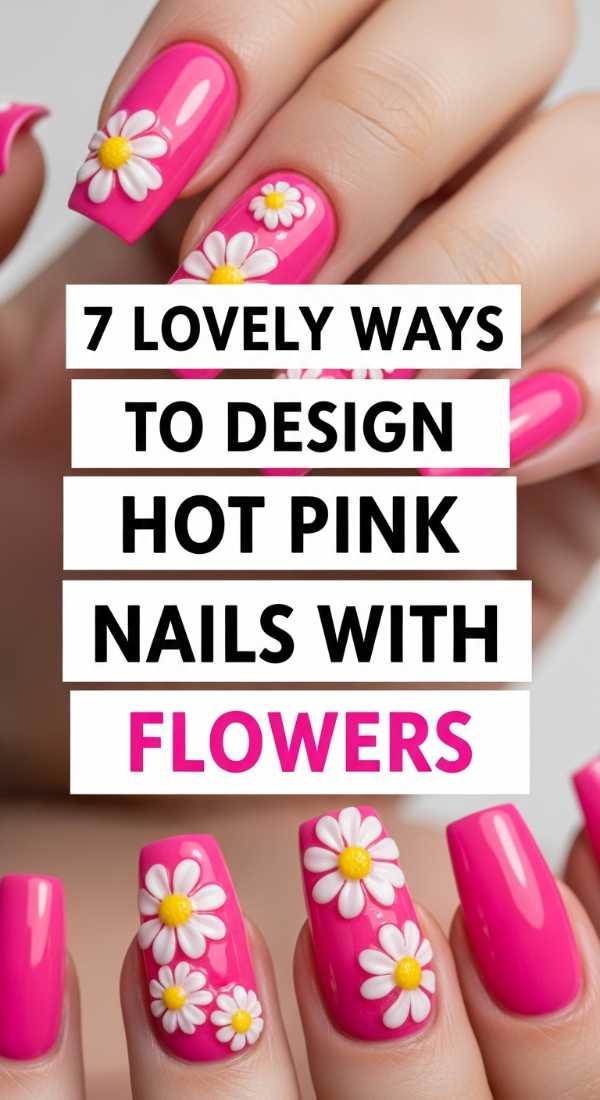
Why to love this Design:
Hot pink is a mood, a lifestyle, and a summer staple. Adding delicate floral elements softens the intensity and adds a touch of cottagecore romance to a bold Barbiecore base. It’s feminine, fierce, and absolutely timeless.
Essential Elements:
- Hot fuchsia pink polish
- White and yellow acrylic paint (for flowers)
- Ultra-fine detail brush
- Matte or gloss finish
How to Prepare:
- Paint your base hot pink.
- Use a dotting tool to create 5 white petals in a circle.
- Place a yellow dot in the center for the pollen.
- Add tiny green vines connecting the flowers for a ‘garden’ look.
- Try a ‘negative space’ flower where the petal is the natural nail.
- Experiment with 3D flower stickers for added texture.
- Finish with a scented cuticle oil for a full floral experience.
Budget Range
- Fuchsia Polish ($9 – $12)
- 3D Floral Stickers ($5 – $8)
- Detail Brush ($6 – $9)
Embrace Your Summer Glow
My loves, as we wrap up this guide, I want you to remember that your nails are just an extension of the beautiful light you already carry. Whether you choose the moody Summer Goth or the zesty Lemon designs, the most important thing is that they make you feel confident and happy. Summer 2026 is all about joy, connection, and expressing every facet of who you are. I can’t wait to see which of these looks you recreate! Tag me in your photos, and let’s keep this cloud-soft conversation going. Stay sun-kissed and beautiful!