

Simple, Stunning, and Viral: Your Next Party Must-Have
There is something truly magical about the way food brings us together. I remember the last time I hosted a small gathering; the air was thick with the scent of roasted garlic and the sound of laughter echoing against the kitchen tiles. It wasn’t the expensive wine or the fancy decor that made the night—it was the ease of a beautifully spread food board that allowed everyone to graze, chat, and feel right at home. In our fast-paced lives, finding that balance between ‘impressive’ and ‘effortless’ is the ultimate goal for any host.
Today, we’re diving into the viral trend that is taking over every social feed: the ultimate customizable food board. Think of this as your master blueprint for stress-free hosting. Whether you’re meal prepping for a busy week or setting the stage for a weekend soirée, these ten components will transform your kitchen into a sanctuary of flavor and style. Let’s reclaim the joy of cooking and the beauty of a shared meal.
How to prep healthy chicken bowls

Why we love this
There is nothing quite like the savory, comforting aroma of herb-marinated chicken searing in a hot pan. These bowls are a symphony of textures, combining the tender, juicy bite of perfectly cooked poultry with the crisp snap of fresh cucumbers and the fluffy, cloud-like base of jasmine rice. It’s a meal that feels like a warm hug, providing a balanced explosion of zest and earthiness that lingers on the palate and leaves you feeling energized and truly nourished.
Ingredients
- 2 lbs boneless, skinless chicken breasts, cubed
- 3 tbsp olive oil
- 2 lemons, juiced
- 4 cloves garlic, minced
- 1 tbsp dried oregano
- Salt and cracked black pepper to taste
- Cooked jasmine rice or quinoa
- Toppings: Sliced cucumbers, cherry tomatoes, pickled red onions, and tzatziki
How to make it
- Begin by patting your chicken cubes dry with a paper towel; removing excess moisture is the secret to getting a beautiful golden-brown crust. In a large glass bowl, whisk together the olive oil, lemon juice, minced garlic, oregano, salt, and pepper until well emulsified.
- Toss the chicken in the marinade, ensuring every piece is coated. Let it marinate in the refrigerator for at least 30 minutes, or up to 4 hours for maximum flavor penetration.
- Heat a large heavy-bottomed skillet or cast iron pan over medium-high heat. Add a splash of oil and, once it begins to shimmer, add the chicken in a single layer. Avoid crowding the pan; cook in batches if necessary to ensure the meat sears rather than steams.
- Sear the chicken for 5-6 minutes, turning occasionally. You are looking for a deep golden-brown exterior and an internal temperature of 165°F (74°C). The meat should feel firm but spring back slightly when pressed.
- Once cooked, let the chicken rest for 3 minutes to allow the juices to redistribute. Assemble your bowls by layering the base grain, the warm chicken, and your fresh toppings for a vibrant, viral-worthy presentation.
How to make easy salad jars
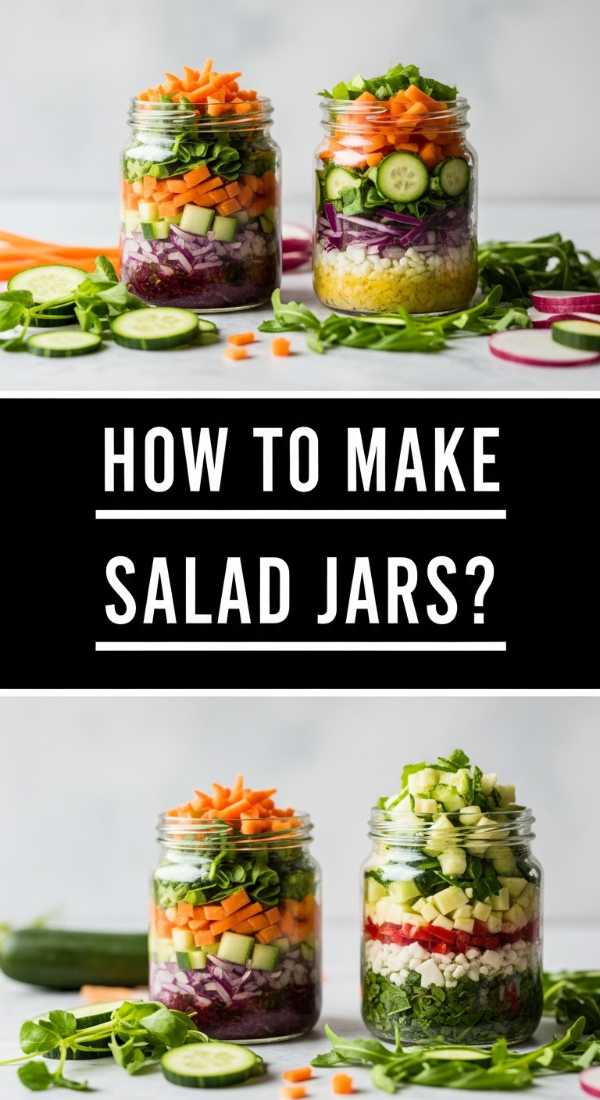
Why we love this
The visual appeal of a salad jar is unmatched, with its vibrant layers of greens, grains, and colorful vegetables stacked like a work of art. Beyond the aesthetic, there is a deep satisfaction in the ‘clink’ of the glass and the knowledge that your lunch is preserved in peak freshness. The crunch of the chickpeas against the velvetiness of a creamy dressing creates a sensory experience that makes healthy eating feel like a decadent treat rather than a chore.
Ingredients
- 1/2 cup balsamic vinaigrette or lemon-tahini dressing
- 1 cup canned chickpeas, rinsed and dried
- 1 cup halved cherry tomatoes
- 1 cup chopped cucumbers
- 1/2 cup cooked quinoa or farro
- 2 cups chopped kale or romaine lettuce
- 1/4 cup crumbled feta cheese
How to make it
- The most critical rule of the salad jar is the ‘wet-to-dry’ layering technique. Start by pouring 2 to 3 tablespoons of your favorite dressing into the very bottom of a clean, dry 32-ounce wide-mouth mason jar.
- Add your hardier vegetables next—these are the ones that won’t get soggy. Drop in the chickpeas followed by the cucumbers and cherry tomatoes. These will act as a barrier between the dressing and the delicate greens.
- Layer in your cooked grains, like quinoa. Ensure the grains are completely cooled before adding them to the jar to prevent steam from wilting the vegetables.
- Pack the leafy greens (kale or romaine) tightly at the top. The goal is to leave as little air as possible at the top of the jar to keep the leaves crisp. Finish with a sprinkle of feta cheese.
- Seal the lid tightly and refrigerate. When you’re ready to eat, simply shake the jar vigorously to distribute the dressing or dump it all into a large bowl for a perfectly dressed, fresh salad that looks as good as it tastes.
How to prep breakfast burritos

Why we love this
Imagine waking up to the smell of spiced sausage and sautéed peppers, all wrapped in a soft, warm flour tortilla. Breakfast burritos are the ultimate handheld comfort, offering a rich, savory mouthfeel with every bite of fluffy scrambled eggs and melted cheddar cheese. The combination of the hearty protein and the subtle heat of green chilies creates a morning ritual that is both grounding and exhilarating, making even the busiest Monday feel like a slow Sunday morning.
Ingredients
- 8 large eggs, beaten
- 1 lb breakfast sausage or soy crumbles
- 1 bell pepper, diced
- 1/2 onion, finely chopped
- 1 cup shredded cheddar cheese
- 8 large flour tortillas
- Salt, pepper, and a dash of hot sauce
How to make it
- In a large non-stick skillet over medium heat, brown the breakfast sausage, breaking it into small crumbles with a wooden spoon. Once fully cooked and browned, remove the sausage with a slotted spoon and set aside, leaving about a tablespoon of fat in the pan.
- Add the diced peppers and onions to the same pan. Sauté for 5-7 minutes until the onions are translucent and the peppers have softened and developed slightly charred edges.
- Lower the heat to medium-low. Pour in the beaten eggs, seasoned with salt and pepper. Use a silicone spatula to gently fold the eggs, moving them from the edges toward the center. The key to creamy eggs is low heat and constant movement; remove them from the heat when they are still slightly ‘wet’ as they will continue to cook from residual heat.
- To assemble, lay out a tortilla and place a generous spoonful of eggs, sausage, sautéed veggies, and a sprinkle of cheese in the center. Fold the sides in and roll tightly from the bottom up.
- For a pro tip, wrap each burrito in foil and then briefly sear the outside in a hot, dry pan for 30 seconds per side to seal the seam and create a satisfyingly crisp exterior. Store in the freezer and reheat in the oven or microwave for an instant gourmet breakfast.
How to roast crispy potatoes

Why we love this
There is a primal joy in the perfect roasted potato—the audible crunch of a salt-encrusted, golden-brown skin giving way to a center that is as light and fluffy as a cloud. These little nuggets of joy carry the earthy aroma of rosemary and garlic, filling your kitchen with a scent that promises warmth and satisfaction. They are the ultimate crowd-pleaser, providing a rustic elegance to any food board or dinner plate.
Ingredients
- 3 lbs Yukon Gold potatoes, cut into 1-inch chunks
- 1/4 cup extra virgin olive oil
- 1 tsp sea salt
- 1/2 tsp black pepper
- 1 tsp garlic powder
- 2 sprigs fresh rosemary, finely chopped
How to make it
- For the absolute crispiest results, start by parboiling your potato chunks. Place them in a pot of cold salted water, bring to a boil, and simmer for exactly 8 minutes. You want them tender on the outside but still firm in the middle.
- Drain the potatoes and let them sit in the colander for 2 minutes to allow steam to escape. Give the colander a vigorous shake; this ‘fuffs’ up the edges of the potatoes, creating more surface area for the oil to crisp up.
- Preheat your oven to 425°F (220°C). Place a large baking sheet inside the oven while it heats. A hot pan is crucial for that immediate sear.
- In a large bowl, toss the parboiled potatoes with olive oil, salt, pepper, garlic powder, and rosemary until every piece is glistening. Carefully spread the potatoes onto the hot baking sheet in a single layer—if they are touching, they will steam instead of roast.
- Roast for 35-45 minutes, flipping them halfway through. They are done when they are a deep, mahogany gold and make a ‘clink’ sound when they hit the pan. Sprinkle with a little extra sea salt immediately after removing from the oven.
How to prep garlic shrimp
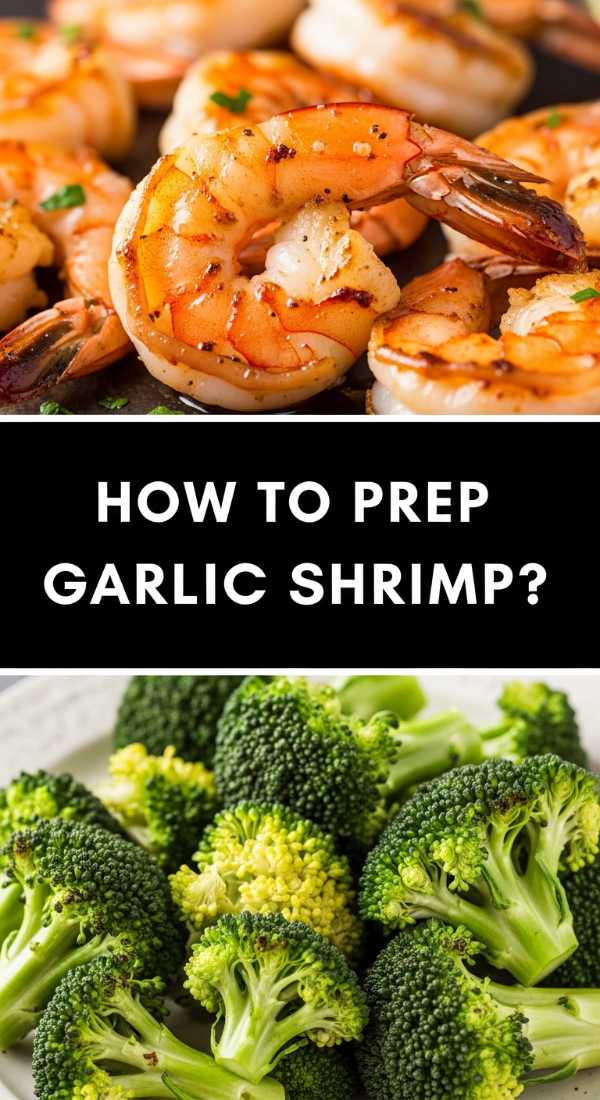
Why we love this
Garlic shrimp is the epitome of fast, elegant cooking that feels like a luxury. The moment the pink, plump shrimp hit a pan filled with sizzling butter and smashed garlic, the aroma is intoxicating—sweet, savory, and bright with a hint of citrus. The texture is a delicate balance of a firm, snappy bite and a buttery, melt-in-your-mouth finish. It’s a sophisticated addition to any meal that takes mere minutes but leaves a lasting impression.
Ingredients
- 1 lb large shrimp, peeled and deveined
- 4 tbsp unsalted butter
- 5 cloves garlic, thinly sliced
- 1/2 tsp red pepper flakes
- 1/4 cup dry white wine or chicken broth
- Fresh parsley and lemon wedges for garnish
How to make it
- Ensure your shrimp are completely dry by patting them with paper towels. Season them lightly with salt and pepper. A dry shrimp sears beautifully, whereas a wet one will simply boil in its own juices.
- In a large skillet, melt the butter over medium heat. Once it starts to foam, add the thinly sliced garlic and red pepper flakes. Sauté for about 1-2 minutes until the garlic is golden and fragrant, being careful not to let it burn, which would turn the sauce bitter.
- Increase the heat to medium-high and add the shrimp to the pan. Spread them out so they aren’t overlapping. Cook for 2 minutes without moving them to develop a nice color.
- Flip the shrimp and immediately pour in the white wine or broth. This ‘deglazes’ the pan, picking up all the flavorful browned bits. Let the liquid simmer and reduce by half while the shrimp finish cooking (another 1-2 minutes).
- The shrimp are done when they turn opaque and form a ‘C’ shape—if they curl into an ‘O’, they are overcooked. Toss with fresh parsley and a squeeze of lemon juice, then serve immediately while the sauce is glossy and warm.
How to cook steak bites
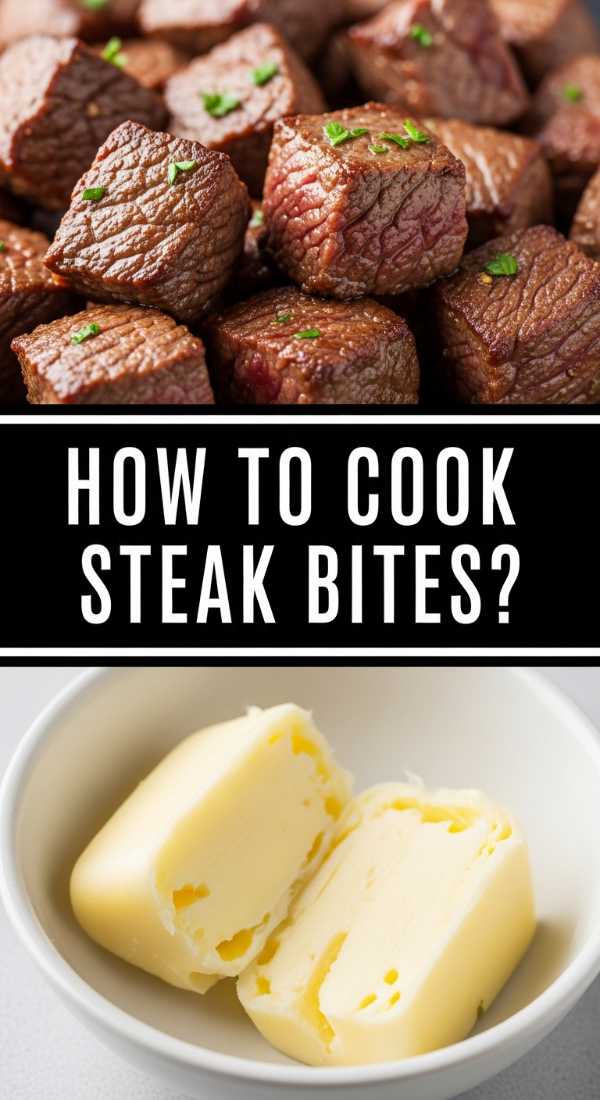
Why we love this
Steak bites are pure indulgence in bite-sized form. There is something deeply satisfying about the rich, umami flavor of high-quality beef paired with the velvety smoothness of garlic butter. The contrast between the dark, caramelized crust and the tender, pink center provides a steakhouse experience right in your own kitchen. It’s the kind of dish that makes everyone reach for ‘just one more,’ making it the undisputed star of any viral food board.
Ingredients
- 1.5 lbs Sirloin or Ribeye steak, cut into 1-inch cubes
- 2 tbsp avocado oil (high smoke point is key)
- 3 tbsp butter
- 4 cloves garlic, smashed
- 1 tsp dried thyme
- Salt and heavy black pepper
How to make it
- Remove the steak from the refrigerator 30 minutes before cooking to bring it to room temperature. This ensures even cooking. Pat the cubes extremely dry and season generously with salt and pepper on all sides.
- Heat a large cast-iron skillet over high heat until it is literally smoking. Add the avocado oil and swirl to coat the pan.
- Carefully add the steak bites to the pan, ensuring they aren’t crowded. You want to hear a loud, aggressive sizzle. Let them sear undisturbed for 2 minutes to develop a thick, dark brown crust.
- Turn the steak bites and add the butter, smashed garlic, and thyme to the pan. As the butter melts and foams, use a spoon to ‘baste’ the steak bites with the flavored butter for another 1-2 minutes.
- For medium-rare, aim for an internal temperature of 130-135°F. Remove the bites from the pan immediately and let them rest on a plate for 5 minutes. This resting period allows the muscle fibers to relax, ensuring every bite is incredibly tender and juicy.
How to make overnight oats
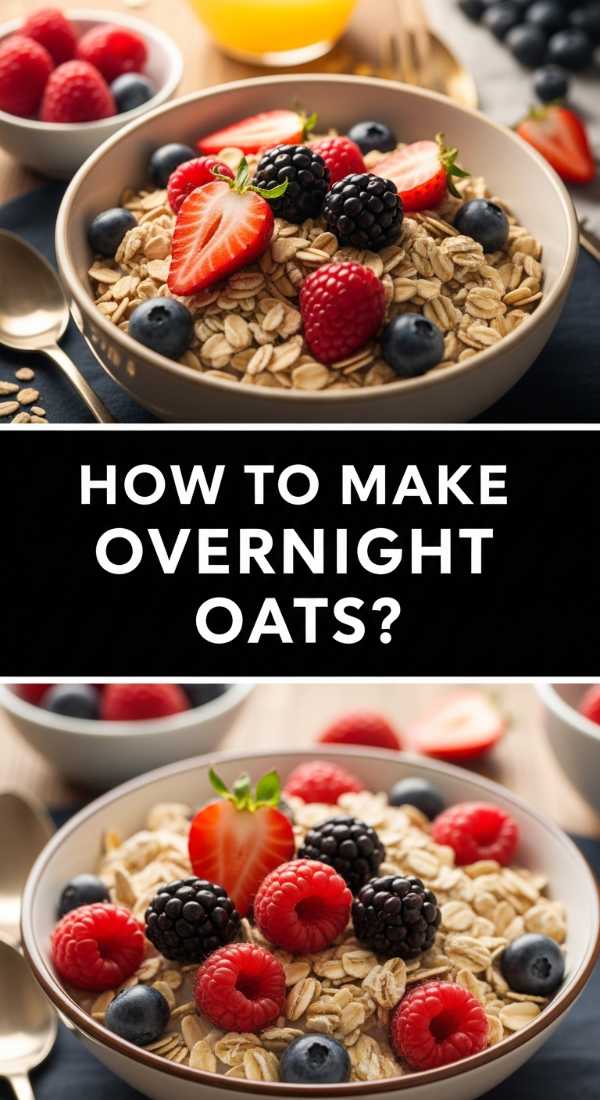
Why we love this
Overnight oats are the ultimate morning gift to your future self. There is a quiet, creamy elegance to this dish, with its thick, pudding-like consistency and the subtle sweetness of maple syrup and vanilla. As the oats soak, they transform into a lush, cool base that perfectly complements the burst of fresh berries or the crunch of toasted nuts. It is a refreshing, nutrient-dense start to the day that feels like eating dessert for breakfast while providing lasting, steady energy.
Ingredients
- 1/2 cup rolled oats (old-fashioned)
- 1/2 cup almond milk or milk of choice
- 1/4 cup Greek yogurt
- 1 tbsp chia seeds
- 1 tbsp maple syrup
- 1/2 tsp vanilla extract
- Toppings: Fresh berries, nut butter, or granola
How to make it
- In a clean glass jar or container, combine the rolled oats and chia seeds. Chia seeds are essential as they absorb liquid and create that signature thick, creamy texture.
- Add the milk, Greek yogurt, maple syrup, and vanilla extract. The yogurt adds a delightful tang and extra creaminess, while the maple syrup provides a gentle, natural sweetness.
- Stir the mixture thoroughly with a spoon, ensuring there are no clumps of chia seeds or dry oats hiding at the bottom of the jar.
- Seal the jar with a tight-fitting lid and place it in the refrigerator for at least 6 hours, though overnight is ideal for the best texture. This long soak allows the starches in the oats to soften and the flavors to meld beautifully.
- In the morning, give the oats a quick stir. If they are too thick, add a splash more milk. Top with your favorite fresh fruit or a dollop of almond butter and enjoy a zero-effort, high-flavor breakfast.
How to prep roasted veggies
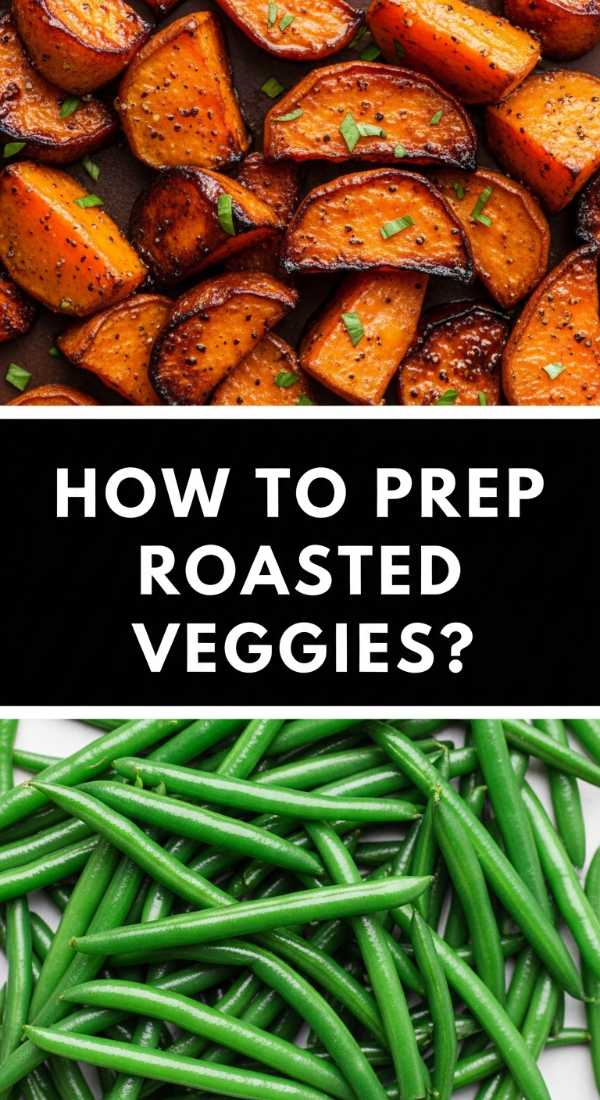
Why we love this
Roasted vegetables are a celebration of the earth’s bounty, transformed by the magic of high heat into caramelized jewels of flavor. The natural sugars in carrots, broccoli, and peppers intensify in the oven, creating a sweetness that is balanced by a smoky, charred finish. Every bite offers a different texture—from the tender heart of a brussels sprout to the crisp edge of a sweet potato—making this a vibrant and essential component for any health-conscious board.
Ingredients
- 4 cups mixed vegetables (broccoli florets, sliced carrots, bell peppers, red onion)
- 3 tbsp olive oil
- 1 tsp smoked paprika
- 1/2 tsp dried thyme
- Salt and pepper to taste
- 1 tbsp balsamic glaze (optional)
How to make it
- Preheat your oven to 400°F (200°C). The goal for roasting is ‘hot and fast’ to get caramelization without turning the veggies to mush.
- Cut your vegetables into uniform sizes to ensure they cook at the same rate. For example, slice carrots thinner than you would cut broccoli florets, as carrots take longer to soften.
- In a large bowl, toss the vegetables with olive oil and spices. Use your hands to massage the oil into every nook and cranny, especially for porous vegetables like broccoli. This ensures even browning.
- Spread the vegetables onto a large rimmed baking sheet. Crucial tip: leave space between the pieces. If the pan is crowded, the moisture released by the veggies will cause them to steam, and you’ll lose that beautiful roasted texture.
- Roast for 20-30 minutes, tossing once halfway through. You are looking for tender centers and dark, charred ‘kissed’ edges. Drizzle with balsamic glaze just before serving for a hit of acidity and sweetness.
How to make taco bowls

Why we love this
Taco bowls are a festival of flavor and color, offering a customizable experience that satisfies every craving. The warmth of spiced ground beef or beans against the cool, refreshing creaminess of ripe avocado and zesty lime creates a dynamic flavor profile that is both bold and comforting. It’s the perfect social food—messy in the best way, deeply satisfying, and packed with the vibrant spices of cumin and chili that transport your senses to a sunny outdoor patio.
Ingredients
- 1 lb ground beef or turkey
- 1 packet taco seasoning (or mix of cumin, chili powder, and garlic)
- 1/4 cup water
- Base: Rice, shredded lettuce, or cauliflower rice
- Toppings: Corn, black beans, salsa, avocado, sour cream, and lime wedges
How to make it
- In a large skillet over medium-high heat, brown the ground meat. Use a spatula to break it into very small, uniform crumbles. Once the meat is no longer pink, drain off any excess fat from the pan.
- Reduce the heat to medium. Sprinkle the taco seasoning over the meat and add the 1/4 cup of water. Stir well and let it simmer for 3-5 minutes. The water helps create a light ‘sauce’ that coats every piece of meat, keeping it moist and flavorful.
- While the meat simmers, prepare your ‘bar’ of toppings. Rinse the black beans and corn, and slice the avocado into thin wedges just before serving to prevent browning.
- To assemble, start with a base of warm rice or crisp lettuce. Add a generous portion of the taco meat to one side.
- Arrange the toppings in sections around the bowl to create a visually stunning, Instagram-ready look. Serve with plenty of lime wedges on the side—the fresh acidity is the secret to making all the other flavors ‘pop’.
How to prep salmon meals
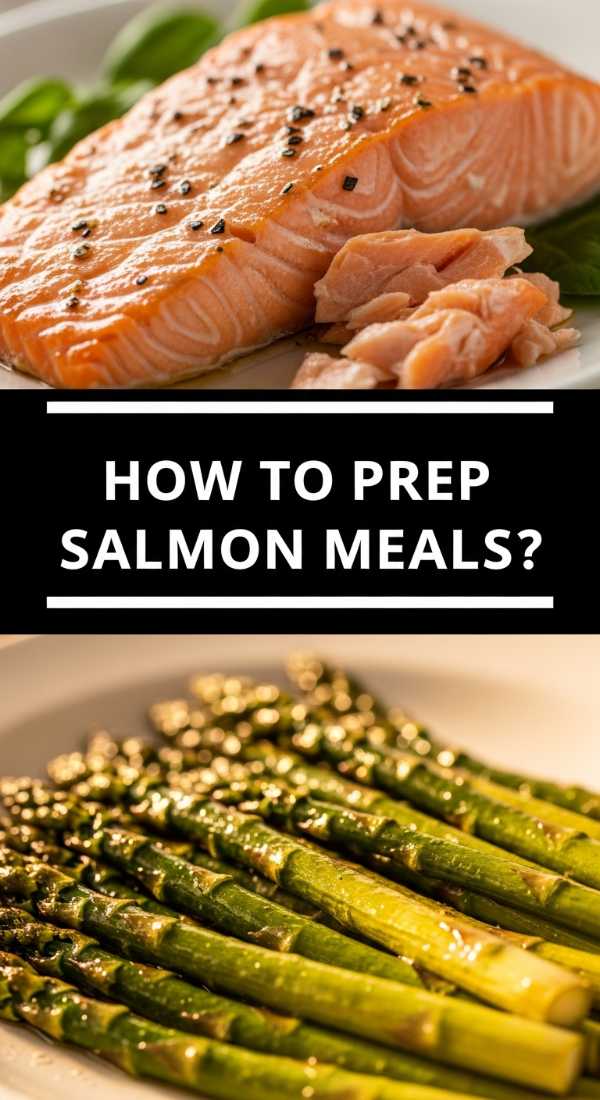
Why we love this
There is a refined elegance to a perfectly cooked piece of salmon. The skin, when rendered correctly, becomes a salty, potato-chip-crisp layer that protects the tender, flaky pink flesh beneath. Each bite is rich with healthy fats and a delicate sweetness, often enhanced by a honey-garlic glaze that caramelizes under the heat. It is a meal that feels light yet substantial, offering a clean and sophisticated flavor profile that pairs beautifully with almost any side dish.
Ingredients
- 2 large salmon fillets (about 6oz each)
- 2 tbsp honey
- 1 tbsp soy sauce
- 1 tsp grated fresh ginger
- 1 tbsp olive oil
- Lemon slices for roasting
How to make it
- Preheat your oven to 400°F (200°C). In a small bowl, whisk together the honey, soy sauce, and grated ginger to create a simple but potent glaze.
- Pat the salmon fillets dry with a paper towel. This is the most important step for getting a good sear and preventing the fish from sticking to the pan. Season the flesh side with a pinch of salt.
- In an oven-safe skillet, heat the olive oil over medium-high heat. Once the oil is shimmering, place the salmon fillets skin-side down in the pan. Press down gently with a spatula for 10 seconds to ensure the skin makes full contact with the heat.
- Sear for 3 minutes until the skin is golden and crispy. Carefully flip the fillets and immediately brush the honey glaze generously over the top.
- Transfer the entire skillet to the oven and roast for 5-8 minutes, depending on the thickness of the fish. The salmon is done when it flakes easily with a fork and the internal temperature reaches 145°F. Let it rest for 2 minutes before serving with a squeeze of fresh lemon.
Wrapping It All Up
Creating a viral food board isn’t just about the aesthetic—it’s about the feeling of abundance and the ease of choice. By mastering these ten simple yet stunning components, you are setting yourself up for hosting success and meal-prepping bliss. Remember, the best part of any meal is the love you put into it and the people you share it with. So, grab a tray, start cooking, and watch your kitchen become the heart of your home.