

Simple, Stunning, and Viral: The Best Food Board Ideas for Your Next Party
There is something truly magical about the way a beautifully arranged food board brings people together. I remember the first time I set out a massive spread for my best friend’s baby shower; the room was buzzing with laughter, and as guests hovered over the colorful varieties of cheese and fresh produce, the conversation flowed as naturally as the wine. It wasn’t just about the food; it was about that shared moment of discovery, picking up a perfectly ripe strawberry or a savory slice of prosciutto and realizing that the best memories are often made around a communal table.
In today’s fast-paced world, hosting shouldn’t feel like a chore that keeps you tucked away in the kitchen while your guests have all the fun. That is why I am so obsessed with the viral ‘Food Board’ trend. It’s the ultimate life hack for the modern host: stunning to look at, incredibly easy to customize, and designed for grazing. Whether you are hosting a backyard bash or an intimate sunset gathering, these ideas will help you create a spread that is not only Instagram-worthy but deeply satisfying for every palate.
How to make the best summer pasta salad?
Why we love this
This pasta salad is like capturing a Mediterranean sunset in a bowl. We love it because it balances the chewy, al dente texture of rotini with the burst-in-your-mouth sweetness of sun-ripened cherry tomatoes and the creamy, salty punch of feta cheese. Every bite offers a refreshing crunch from Persian cucumbers and a fragrant hit of fresh basil that lingers on the tongue. It’s a bright, vibrant dish that stays fresh for hours, making it the perfect centerpiece for a grazing board where guests can scoop up their own sunshine-filled portions.
Ingredients
- 16 oz Rotini or Fusilli pasta
- 1 cup cherry tomatoes, halved
- 1 cup Persian cucumbers, sliced into half-moons
- 1/2 cup Kalamata olives, pitted and halved
- 1/2 cup red onion, finely diced
- 6 oz high-quality feta cheese, crumbled
- 1/2 cup extra virgin olive oil
- 3 tbsp red wine vinegar
- 1 tsp dried oregano
- 1/2 cup fresh basil leaves, chiffonade
- Salt and cracked black pepper to taste
How to make it
- Begin by bringing a large pot of heavily salted water to a rolling boil. The water should taste like the sea to properly season the pasta from the inside out.
- Add the pasta and cook for exactly 8-10 minutes, or until just shy of al dente. You want a firm bite because the pasta will absorb the dressing later and soften slightly.
- While the pasta cooks, whisk together the olive oil, red wine vinegar, dried oregano, salt, and pepper in a small bowl until emulsified. Let this sit so the flavors meld.
- Drain the pasta and immediately rinse it under cold running water to stop the cooking process and remove excess starch, which prevents the pasta from sticking together.
- In a large wooden bowl, toss the cooled pasta with half of the dressing to coat every spiral.
- Add the tomatoes, cucumbers, olives, and red onions. Gently fold them in using a large spoon to avoid bruising the vegetables.
- Add the crumbled feta and fresh basil last. Drizzle with the remaining dressing and toss one final time. Refrigerate for at least 30 minutes before serving to allow the pasta to soak up the zesty vinaigrette.
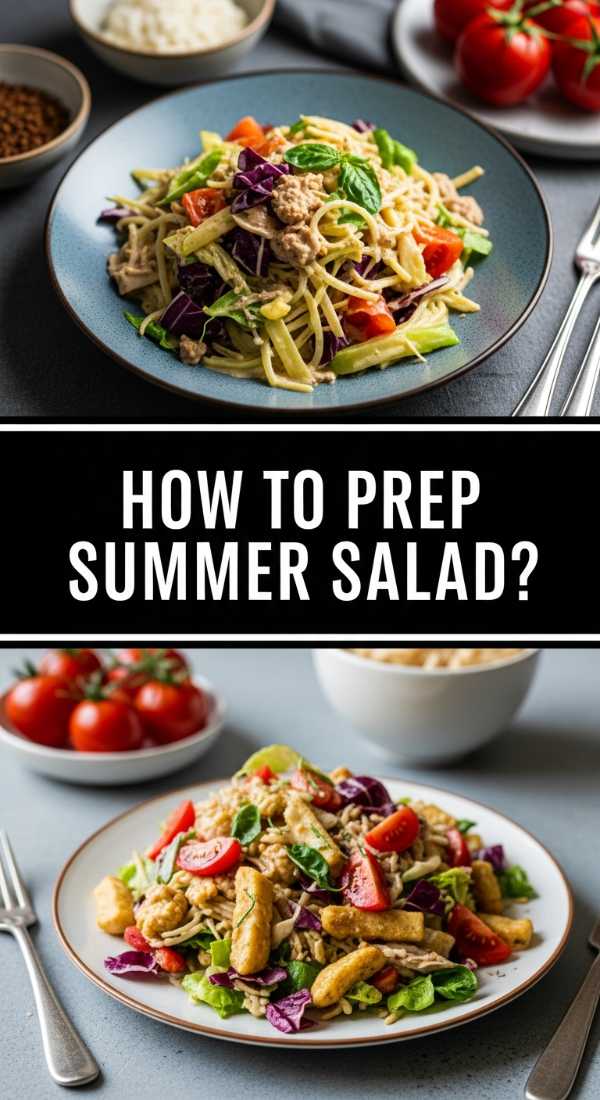
How to prep the perfect summer salad?

Why we love this
Prepping a salad isn’t just about tossing greens; it’s about creating a symphony of textures and temperatures. We love this approach because it elevates simple garden ingredients into a gourmet experience. Imagine the crisp, cool snap of butter lettuce paired with the velvety richness of avocado and the surprising crunch of toasted pine nuts. It’s light enough for a hot July afternoon but flavorful enough to stand alone. The aroma of citrus zest and fresh mint provides an olfactory experience that is just as invigorating as the taste itself.
Ingredients
- 2 heads of butter lettuce or bibb lettuce
- 1 ripe avocado, sliced
- 1/2 cup shaved radishes
- 1/4 cup toasted pine nuts
- 1/2 cup fresh peas (blanched)
- Zest of one lemon
- Dressing: 1/4 cup champagne vinegar, 1/2 cup avocado oil, 1 tsp honey, 1 tsp Dijon mustard
How to make it
- Start by washing your greens in ice-cold water. This ‘shocks’ the leaves, ensuring they are incredibly crisp and hold their structure under the weight of the dressing.
- Spin the lettuce completely dry in a salad spinner. Any lingering water will dilute your dressing and make the salad soggy.
- Prepare the radishes by slicing them paper-thin using a mandoline. Place them in a bowl of ice water for 5 minutes; this makes them curl and stay extra crunchy.
- In a dry skillet over medium-low heat, toast the pine nuts for 3-5 minutes. Watch them constantly and shake the pan frequently until they turn golden brown and smell nutty; they burn very quickly once they start to color.
- Whisk your dressing ingredients in a jar until completely smooth. The Dijon mustard acts as a natural emulsifier to keep the oil and vinegar from separating.
- Assemble by layering the greens first, then tucking the avocado and radishes into the folds of the lettuce.
- Just before serving, drizzle the dressing around the edges of the bowl and toss lightly with your hands to ensure every leaf is kissed by the vinaigrette without being drowned.
How to cook easy crockpot meals for summer?

Why we love this
The beauty of a summer crockpot meal lies in the ‘set it and forget it’ convenience that doesn’t heat up your entire house. We love these shredded honey-lime chicken tacos because they transition perfectly from a slow cooker to a DIY taco board. The chicken becomes so tender it practically melts at the touch of a fork, infused with a smoky, sweet, and tangy profile that screams summer. The aroma of cumin and lime wafting through the house all afternoon builds an incredible anticipation for dinner without you having to lift a finger during the golden hour.
Ingredients
- 2 lbs boneless skinless chicken breasts
- 1/2 cup honey
- 1/2 cup fresh lime juice
- 1 tbsp chili powder
- 1 tsp smoked paprika
- 1 tsp garlic powder
- 1/2 tsp salt
- Corn tortillas and toppings for the board
How to make it
- Place the chicken breasts in the bottom of a 6-quart slow cooker in a single layer to ensure even heat distribution.
- In a medium bowl, whisk together the honey, lime juice, chili powder, smoked paprika, garlic powder, and salt until the honey is fully incorporated into the liquid.
- Pour the mixture over the chicken, ensuring each breast is well-coated.
- Cover and cook on LOW for 6 to 7 hours or on HIGH for 3 to 4 hours. Cooking on low is recommended for the most tender, ‘melt-in-your-mouth’ texture.
- The chicken is done when it reaches an internal temperature of 165°F and pulls apart easily with a fork.
- Remove the chicken to a large bowl and shred using two forks. Avoid over-shredding; you want some chunky texture.
- Add a ladle of the cooking juices back into the shredded chicken to keep it moist and flavor-packed, then arrange on your board with tortillas, lime wedges, and pickled onions.
How to make a famous rotel dip?

Why we love this
This is the ultimate nostalgia food, the kind of dip that disappears within minutes of hitting the table. We love it because it’s the king of comfort—creamy, molten cheese mixed with the mild heat of green chilies and savory browned meat. The texture is silky and indulgent, perfect for clinging to a salty tortilla chip. It’s the centerpiece of any ‘snack board’ because it provides that warm, gooey contrast to cold veggies and crackers, creating a sensory balance that keeps everyone coming back for ‘just one more’ dip.
Ingredients
- 1 lb ground breakfast sausage or lean ground beef
- 1 block (16 oz) Velveeta cheese, cubed
- 1 can (10 oz) Ro-Tel Diced Tomatoes and Green Chilies (original or hot)
- 1/2 cup whole milk (optional, for desired consistency)
- 1/2 tsp cumin
- Fresh cilantro for garnish
How to make it
- In a large skillet over medium-high heat, brown the ground meat. Use a wooden spoon to break it into very small, uniform crumbles. Cook until no pink remains and the meat has a slight crispy golden edge.
- Drain the grease thoroughly. This is a critical step; leaving the fat will make the dip oily and cause it to separate.
- Lower the heat to medium-low and add the cubed Velveeta cheese. Cubing the cheese ensures it melts evenly and quickly without burning.
- Pour in the can of Ro-Tel, including the juices. The acidity in the tomato juice helps balance the richness of the cheese.
- Stir constantly with a heat-resistant spatula. As the cheese melts, it will look lumpy at first; keep stirring until it transforms into a smooth, liquid gold consistency.
- If the dip is too thick, whisk in the milk one tablespoon at a time until it reaches your preferred dipping thickness.
- Transfer to a warm crock or a bowl on your board and top with fresh cilantro for a pop of color and freshness.
How to bake easy summer desserts?

Why we love this
Summer desserts should feel effortless and celebrate the harvest. We love a classic Mixed Berry Galette because it’s ‘rustically perfect’—meaning it doesn’t have to look flawless to be stunning. The crust is buttery and flaky, shattering slightly with each bite to reveal a jammy, bubbling center of blueberries and raspberries. The scent of toasted pastry and simmering fruit is intoxicating. It’s the perfect addition to a dessert board because it can be served at room temperature and paired with bowls of whipped cream or lemon curd.
Ingredients
- 1 refrigerated pie crust (or homemade shortcrust)
- 3 cups mixed berries (blueberries, raspberries, blackberries)
- 1/4 cup granulated sugar
- 1 tbsp cornstarch
- 1 tsp vanilla extract
- 1 egg (for egg wash)
- Turbinado sugar for topping
How to make it
- Preheat your oven to 400°F (200°C). Line a large baking sheet with parchment paper to prevent sticking and catch any fruit juices that bubble over.
- In a medium bowl, gently toss the berries with granulated sugar, cornstarch, and vanilla. The cornstarch is vital as it thickens the juices, preventing a soggy bottom.
- Unroll the pie crust onto the parchment paper. If using homemade dough, roll it out to a 12-inch circle about 1/8 inch thick.
- Mound the fruit in the center of the dough, leaving a 2-inch border all the way around.
- Fold the edges of the dough over the fruit, pleating it as you go. The center should remain open, exposing the vibrant berries.
- Whisk the egg with a splash of water and brush the crust generously. Sprinkle with turbinado sugar for a professional, crunchy finish.
- Bake for 25-30 minutes. Look for the crust to be deep golden brown and the fruit filling to be vigorously bubbling in the center. Let it cool for at least 15 minutes to allow the filling to set before slicing.
How to prepare the best cookout sides?
Why we love this
Grilled street corn (Elote) is the undisputed heavyweight of cookout sides. We love it because it transforms simple sweet corn into a smoky, tangy, and creamy masterpiece. The charred kernels provide a toasted flavor that contrasts beautifully with the cool lime-crema and the salty kick of Cotija cheese. It’s a tactile, messy, and joyous food that perfectly complements a casual board of sliders or ribs. The aroma of corn husks charring on a hot grate is the quintessential scent of a summer evening.
Ingredients
- 6 ears of fresh sweet corn, husks removed
- 1/4 cup mayonnaise
- 1/4 cup Mexican crema or sour cream
- 1/2 cup Cotija cheese, crumbled
- 1 tsp ancho chili powder
- 1 lime, cut into wedges
- Fresh cilantro, chopped
How to make it
- Preheat your grill to high heat (about 400-450°F). Ensure the grates are clean and lightly oiled to prevent the corn from sticking.
- Place the corn directly on the grates. Grill for about 10-12 minutes, turning every 2-3 minutes. You are looking for even charring—dark brown to black spots—on all sides of the corn.
- While the corn grills, mix the mayonnaise, crema, and a squeeze of lime in a small bowl until smooth.
- Once the corn is charred and the kernels are tender (they should look plump and bright yellow), remove them from the grill.
- Immediately brush each ear generously with the crema mixture while the corn is still hot; the heat helps the sauce penetrate the kernels.
- Roll the coated corn in the crumbled Cotija cheese until well-covered.
- Dust with chili powder and garnish with cilantro. Serve immediately on your side-dish board with extra lime wedges for squeezing.
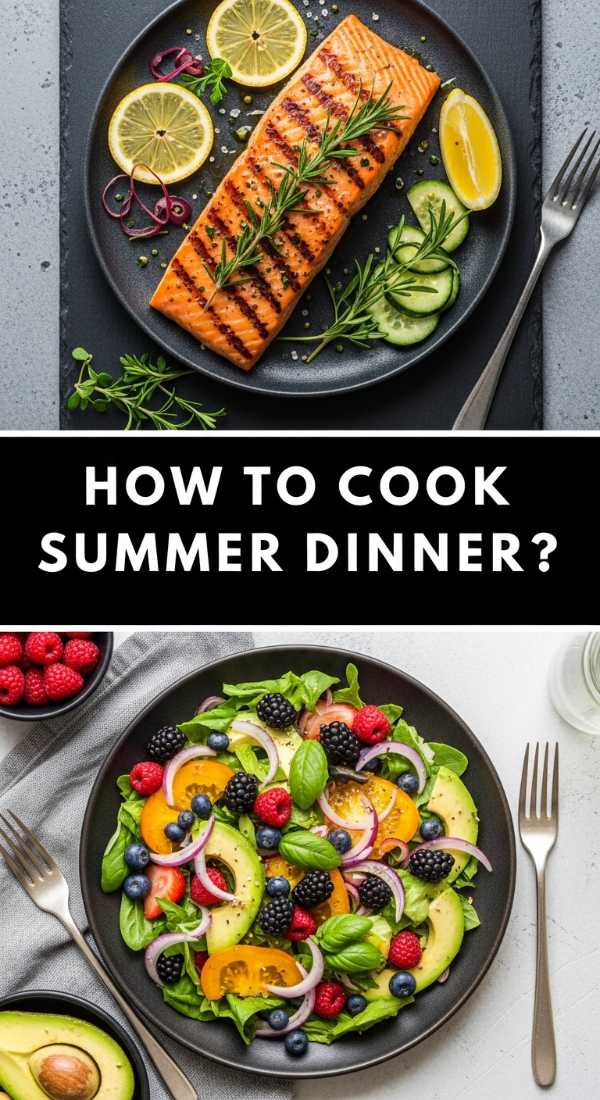
How to cook healthy summer dinner?

Why we love this
A healthy summer dinner should leave you feeling energized, not weighed down. We love grilled lemon-herb salmon skewers because they are lean, protein-packed, and incredibly fast to cook. The salmon develops a crisp, caramelized exterior while remaining buttery and moist on the inside. Infused with the brightness of charred lemon slices and the earthiness of fresh rosemary, this dish smells like an herb garden in bloom. It’s a sophisticated addition to a ‘Healthy Board’ alongside quinoa and roasted asparagus.
Ingredients
- 1.5 lbs salmon fillet, cut into 1.5-inch cubes
- 2 lemons (one sliced into thin rounds, one for juice)
- 2 tbsp olive oil
- 2 cloves garlic, minced
- 1 tbsp fresh rosemary, chopped
- Salt and pepper to taste
- Wooden or metal skewers
How to make it
- If using wooden skewers, soak them in water for at least 30 minutes to prevent them from burning on the grill.
- In a large bowl, whisk together the olive oil, lemon juice, minced garlic, rosemary, salt, and pepper.
- Add the salmon cubes to the marinade and toss gently. Let them marinate for no more than 15-20 minutes; any longer and the acid in the lemon will start to ‘cook’ the fish, changing the texture.
- Thread the skewers, alternating between a salmon cube and a folded lemon slice. The lemon slices will char and release juice directly onto the fish during grilling.
- Preheat the grill to medium-high heat. Clean and oil the grates thoroughly.
- Place skewers on the grill and cook for 3-4 minutes per side. Do not move them too early; wait until they naturally release from the grate to ensure a beautiful sear.
- The salmon is done when it is opaque and flakes easily with a fork, but still slightly translucent in the very center. Remove and serve warm.
How to make a refreshing summer soup?

Why we love this
Gazpacho is the ultimate ‘no-cook’ summer hero. We love it because it’s a chilled explosion of garden-fresh flavors—vine-ripened tomatoes, crunchy peppers, and cooling cucumbers. It’s incredibly refreshing, acting as a palate cleanser or a light starter. The texture can range from silky smooth to a chunky salsa-like consistency, depending on your preference. When served in small shot glasses on a food board, it adds a sophisticated, colorful element that keeps guests cool even in the peak of July heat.
Ingredients
- 2 lbs ripe Roma tomatoes, cored and chopped
- 1 English cucumber, peeled and chopped
- 1 red bell pepper, seeded and chopped
- 1/2 small red onion
- 2 cloves garlic
- 2 tbsp sherry vinegar
- 1/3 cup extra virgin olive oil
- Salt and black pepper to taste
How to make it
- Place the tomatoes, cucumber, bell pepper, red onion, and garlic into a high-powered blender.
- Pulse several times until the vegetables are broken down. For a ‘rustico’ style, stop here. For a classic, elegant gazpacho, blend on high until completely liquefied.
- With the blender running on low, slowly stream in the sherry vinegar and then the olive oil. This creates a stable emulsion that gives the soup a creamy mouthfeel without any dairy.
- Season generously with salt and pepper. Tomatoes need a surprising amount of salt to bring out their natural sweetness.
- Taste and adjust the acidity; if it’s too sharp, add a pinch of sugar. If it’s too flat, add another teaspoon of vinegar.
- Pour the soup into a glass container and chill in the refrigerator for at least 4 hours, or ideally overnight. Chilling is essential for the flavors to develop and for the soup to reach its refreshing potential.
- Serve in chilled glasses garnished with a drizzle of olive oil and a tiny sprig of basil.
How to prepare picnic side dishes?

Why we love this
Picnic sides need to be durable, and this Honey-Dijon Coleslaw is the gold standard. We love it because it swaps out the heavy, cloying mayo of traditional slaws for a zesty, light vinaigrette that actually gets better as it sits. The crunch of the shredded cabbage and carrots remains intact for hours, providing a satisfying texture that cuts through the richness of fried chicken or sandwiches. The aroma is a delightful mix of sweet honey and sharp mustard, making it a vibrant, ‘wake-up’ dish for your picnic board.
Ingredients
- 1 bag (14 oz) shredded cabbage mix (with carrots)
- 1/2 cup thinly sliced green onions
- 1/4 cup apple cider vinegar
- 2 tbsp honey
- 2 tbsp Dijon mustard
- 1/4 cup neutral oil (like canola or grapeseed)
- 1/2 tsp celery seed
- Salt and pepper to taste
How to make it
- In a large mixing bowl, combine the shredded cabbage and green onions. Toss them together to ensure the onions are evenly distributed.
- In a separate small bowl or mason jar, combine the apple cider vinegar, honey, Dijon mustard, celery seed, salt, and pepper.
- Whisk or shake vigorously while slowly adding the oil. The mustard will help the vinegar and oil stay blended.
- Pour the dressing over the cabbage mix. Use large salad tongs to toss the mixture thoroughly, ensuring every strand of cabbage is coated.
- Massage the slaw slightly with your tongs; this helps the dressing penetrate the tough cell walls of the cabbage, making it more tender without losing its crunch.
- Cover and refrigerate for at least 1 hour. This ‘marinating’ time is crucial for the cabbage to soften slightly and absorb the sweet and tangy flavors.
- Give it one quick toss before serving on your board to redistribute any dressing that has settled at the bottom.
How to mix fun summer drinks?
[IMAGE_10]
Why we love this
Nothing says ‘party’ like a Sparkling Watermelon Limeade. We love this drink because it’s visually stunning with its vibrant pink hue and incredibly refreshing with its balance of sweet fruit and tart citrus. The bubbles from the sparkling water add an effervescent lightness that makes it feel like a celebration in a glass. It’s a fantastic non-alcoholic option that guests of all ages can enjoy, but it’s also the perfect base for a splash of vodka or tequila for the adults. The smell of fresh-crushed mint and lime is the ultimate summer greeting.
Ingredients
- 4 cups cubed seedless watermelon, chilled
- 1/2 cup fresh lime juice (about 3-4 limes)
- 2-3 tbsp agave nectar or simple syrup
- 2 cups chilled sparkling mineral water
- Fresh mint leaves
- Ice cubes
How to make it
- Place the chilled watermelon cubes in a blender and process until completely smooth.
- Pour the watermelon puree through a fine-mesh sieve into a large pitcher. Use a spoon to press the pulp to extract every drop of juice, then discard the solids. This ensures your drink is light and crisp, not ‘pulpy.’
- Stir in the fresh lime juice and agave nectar. Taste as you go—if your watermelon is exceptionally sweet, you may need less agave.
- Muddle 5-6 fresh mint leaves in the bottom of the pitcher to release their aromatic oils.
- Just before serving, pour in the chilled sparkling water. Stir very gently with a long spoon to combine without losing the carbonation.
- Fill glasses with plenty of ice and pour the limeade over.
- Garnish each glass with a small watermelon wedge and a sprig of fresh mint for a ‘viral’ look that’s ready for the camera.
Creating Memories One Board at a Time
Hosting doesn’t have to be perfect to be wonderful. The real secret to a viral food board isn’t just the placement of the cheese or the color of the fruit; it’s the relaxed atmosphere it creates. When you simplify the menu with these tried-and-true summer favorites, you give yourself the greatest gift of all: the time to actually sit down and enjoy your own party. So, grab a big wooden board, pick a few of these recipes, and get ready to host a gathering that your friends will be talking about long after the sun goes down.
Frequently Asked Questions
Can I make these boards ahead of time?
Absolutely! Most of these components, like the pasta salad, rotel dip, and slaw, actually taste better if prepared a few hours in advance. However, I recommend waiting until 15 minutes before guests arrive to assemble the final board to keep the fresh produce looking its best.
How do I keep the food cold on a board outside?
For outdoor parties, I love the ‘tray-on-ice’ trick. Place your serving board or bowls on top of a larger tray filled with crushed ice. This keeps everything food-safe and refreshing even in the summer heat.
What is the best board to use for serving?
Large wooden butcher blocks are classic and beautiful, but don’t overlook marble slabs for cheeses or even large rimmed baking sheets lined with parchment paper for a more rustic, ‘industrial’ look!