
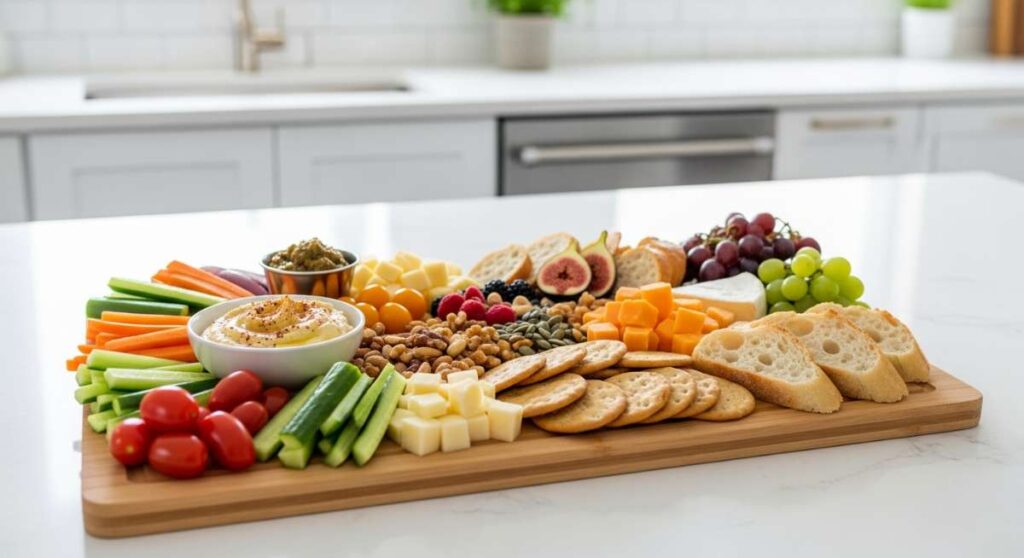
I used to spend hours in the kitchen before my friends arrived, sweating over four different pots and pans while trying to time everything to the second. By the time the doorbell rang, I was exhausted, flour-dusted, and honestly, not even hungry anymore. But then, I discovered the magic of the simple food board. It changed everything. Now, my kitchen is a place of laughter and connection rather than stress, where the meal itself becomes a beautiful, tactile centerpiece that everyone can dive into together.
There is something so inherently human about sharing a board. It strips away the formality of plated dinners and invites everyone to grab a slider, pinch a crispy potato, or assemble their own taco exactly how they like it. This trend isn’t just about the aesthetics (though, let’s be real, they look stunning on the grid); it’s about a lifestyle shift toward ease, warmth, and the kind of delicious, unfussy food that feeds the soul as much as the body. Let’s dive into my favorite board-ready staples that will transform your hosting game forever.
How to make juicy burgers?

Why we love this
There is nothing quite like the first bite of a perfectly seared, drippingly juicy burger nestled in a pillowy brioche bun. The contrast between the salty, caramelized crust—the Maillard reaction at its finest—and the tender, pink center is a sensory experience that brings back memories of backyard summer nights. As the melted cheese cascades down the sides and mixes with the tang of a secret sauce, the aroma of sizzling beef fills the air, creating an atmosphere of pure, unadulterated comfort that makes everyone at the table reach for seconds.
Ingredients
- 80/20 ground chuck beef
- Brioche buns
- Sharp cheddar cheese slices
- Kosher salt and cracked black pepper
- Unsalted butter
- Iceberg lettuce and heirloom tomatoes
How to make it
- Start with cold beef and form them into 6-ounce balls. Gently flatten them into patties about 1 inch wider than your buns, as they will shrink during cooking. Create a small thumbprint indentation in the center to prevent bulging.
- Heat a heavy-cast iron skillet or griddle over medium-high heat until it is screaming hot and just beginning to wisps smoke. Do not add oil; the fat in the beef is enough.
- Season the patties generously with salt and pepper only right before they hit the pan to prevent the salt from breaking down the meat proteins and making them tough.
- Place the patties in the pan. Sear for 3-4 minutes without moving them to develop a deep, dark brown crust. Flip only once.
- Immediately place the cheese on the cooked side. Cover the pan with a lid for 45 seconds to create a steam chamber that perfectly melts the cheese.
- Remove the burgers when the internal temperature reaches 145°F for medium. Rest them for at least 3 minutes on a warm plate to allow the juices to redistribute throughout the meat.
- While resting, swipe the buns with butter and toast them on the griddle until golden and crisp to ensure they don’t get soggy from the juices.
How to bake cheesy subs?
Why we love this
Imagine a long, crusty baguette transformed into a vessel of molten joy, where the edges of the bread become shatteringly crisp while the interior remains soft and soaked in savory juices. The way the mozzarella stretches into long, golden threads as you pull a piece away is pure culinary theater. The scent of toasted garlic and dried oregano wafts through the kitchen, promising a meal that is hearty, warm, and deeply satisfying—the ultimate crowd-pleaser that looks magnificent stretched across a wooden board.
Ingredients
- Hoagie rolls or a long French baguette
- Sliced provolone and shredded mozzarella
- Italian meatballs or deli ham and salami
- Marinara sauce or garlic aioli
- Fresh basil and red pepper flakes
How to make it
- Preheat your oven to 400°F (200°C). Slice your bread lengthwise, but don’t cut all the way through; you want a “hinge” to keep the ingredients tucked inside.
- Spread a thin layer of garlic butter or sauce on the inside of the bread and toast it in the oven for 5 minutes until the edges are just starting to firm up. This creates a barrier against sogginess.
- Layer your proteins first. If using meatballs, slice them in half so they sit flat. If using deli meats, fold them to create height and texture.
- Pile the cheese on top. Use a mix of provolone for sharp flavor and mozzarella for that iconic melt. Don’t be shy; the cheese should overtop the edges slightly.
- Bake for 10-12 minutes on the middle rack. For the final 2 minutes, turn on the broiler to get those beautiful brown “leopard spots” on the cheese.
- Watch closely! The transition from golden to burnt happens fast under a broiler. Remove when the cheese is bubbling vigorously and the bread is deep mahogany.
- Garnish with fresh herbs and slice into 3-inch portions immediately so the cheese stays gooey for serving.
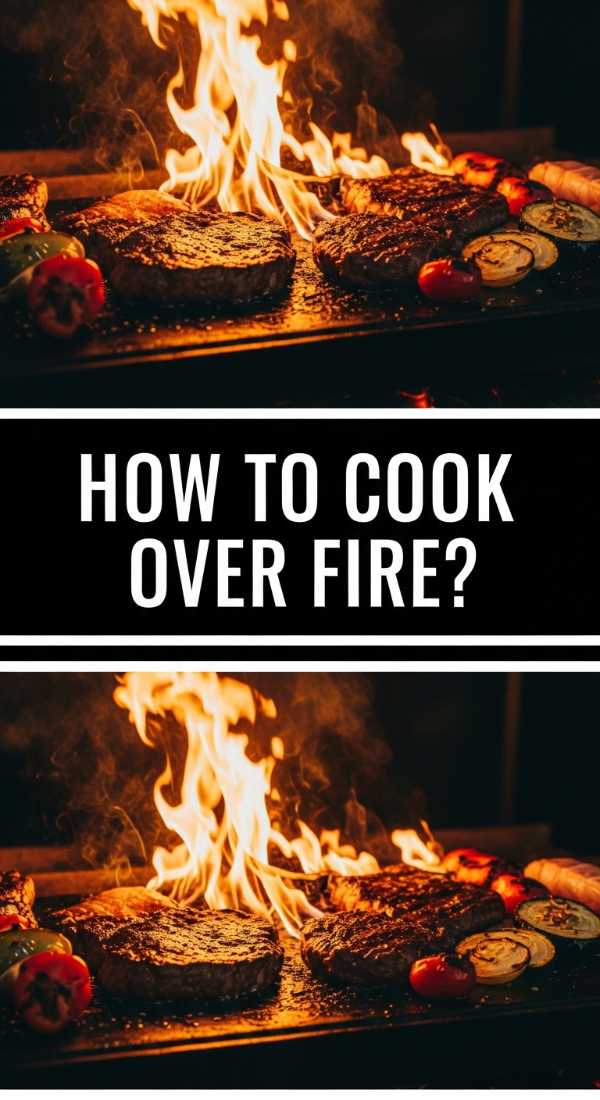
How to cook over fire?

Why we love this
Cooking over an open flame is the most primal and rewarding way to prepare food, infusing every ingredient with a complex, smoky depth that a kitchen stove simply cannot replicate. The dancing orange flames and the crackle of wood provide a hypnotic backdrop to the cooking process, while the intense heat creates charred, blistered surfaces on vegetables and meats alike. It’s a slow, intentional way of cooking that encourages guests to gather around the heat, glass of wine in hand, soaking in the rustic aroma of burning oak and sizzling fats.
Ingredients
- Hardwood (oak or hickory) or high-quality lump charcoal
- Cast iron Dutch oven or heavy-duty grate
- Thick-cut ribeye or whole seasonal vegetables (peppers, onions)
- Coarse sea salt
- High-smoke point oil (avocado or grapeseed)
How to make it
- Build your fire at least 45 minutes before cooking. You are looking for glowing red coals, not active, tall flames, which will soot your food and cook the outside too fast.
- Create a “two-zone” heat source by pushing the hot coals to one side of your pit. This allows you to sear over high heat and finish cooking over gentle, indirect heat.
- Place your cast iron or grate over the coals and let it preheat for at least 10 minutes. It needs to be incredibly hot to prevent sticking.
- Pat your food completely dry. Moisture is the enemy of a good char. Rub lightly with oil and season heavily with coarse salt.
- Place the food on the grate directly over the coals. Listen for a loud sizzle. Leave it for 2-3 minutes until it naturally releases from the metal—if it sticks, it’s not ready to flip.
- Move the food to the cooler side of the fire once you have achieved a deep char. Cover with a lid or foil to allow the internal temperature to rise slowly.
- Use long-handled tongs and heat-resistant gloves. The radiant heat from a fire is much more intense than a standard grill.
How to get crispy potatoes?

Why we love this
The perfect potato is a study in contrasts: a glass-like, golden exterior that shatters upon impact, revealing a fluffy, cloud-like center that melts on the tongue. There is a specific, addictive joy in that crunch, especially when paired with the earthy aroma of rosemary and the sharp bite of sea salt. These little golden nuggets are the backbone of any food board, providing a salty, starchy satisfaction that bridges the gap between the various proteins and dips, making them the most sought-after item on the table.
Ingredients
- Russet or Yukon Gold potatoes
- Baking soda
- Extra virgin olive oil or duck fat
- Fresh rosemary and thyme
- Flaky sea salt
How to make it
- Peel and cut potatoes into 1-inch chunks. Squarer edges mean more surface area for crunching.
- Boil a large pot of water and add a tablespoon of salt and a half-teaspoon of baking soda. The alkaline water breaks down the potato’s starch on the surface, creating a starchy mash that will crisp up later.
- Parboil the potatoes for about 10 minutes until the edges are softened but they aren’t falling apart. Drain thoroughly.
- Let the potatoes steam-dry in the colander for 2 minutes, then shake them vigorously. You want the outsides to look fuzzy and mashed—this is the secret to the ultimate crunch.
- Heat a baking sheet in a 425°F (220°C) oven with your fat of choice until the oil is shimmering.
- Carefully spread the potatoes on the hot sheet. Roast for 20 minutes, then flip. Roast for another 20-30 minutes, turning occasionally, until they are deep gold and sound like hollow pebbles when tapped.
- Toss with fresh herbs in the last 5 minutes of roasting so the herbs infuse the oil without burning.
How to make breakfast sliders?
Why we love this
Breakfast sliders are the ultimate brunch board hero, offering a miniature explosion of morning flavors in every bite. The combination of savory, salty sausage, silky folded eggs, and a hint of maple syrup glaze creates a sweet-and-savory harmony that is impossible to resist. There’s something so festive about a tray of these tiny sandwiches, their cheese gleaming under the light, topped with a dusting of everything bagel seasoning. They turn a standard breakfast into a communal celebration that feels both indulgent and effortlessly cool.
Ingredients
- Pack of Hawaiian sweet rolls
- Breakfast sausage patties
- 6 large eggs
- Cheddar cheese slices
- Maple syrup and melted butter
- Everything bagel seasoning
How to make it
- Keep the entire slab of Hawaiian rolls intact. Slice the whole block in half horizontally to create a giant top and bottom bun.
- In a large skillet, cook your sausage patties until browned and fully cooked. Set aside on paper towels.
- Whisk eggs with a splash of cream and cook them in a buttered skillet over low heat, moving them constantly with a spatula to create soft, ribbon-like folds. Do not overcook; they will finish in the oven.
- Place the bottom half of the rolls on a baking sheet. Layer the sausage patties, then the scrambled eggs, and finally a generous layer of cheese.
- Place the top half of the rolls back on. Mix melted butter with a tablespoon of maple syrup and brush it generously over the tops of the rolls. Sprinkle with everything bagel seasoning.
- Cover with foil and bake at 350°F (175°C) for 10 minutes. Remove the foil and bake for another 5 minutes to let the tops become golden and slightly crisp.
- Slice into individual sliders using a serrated knife and serve warm.
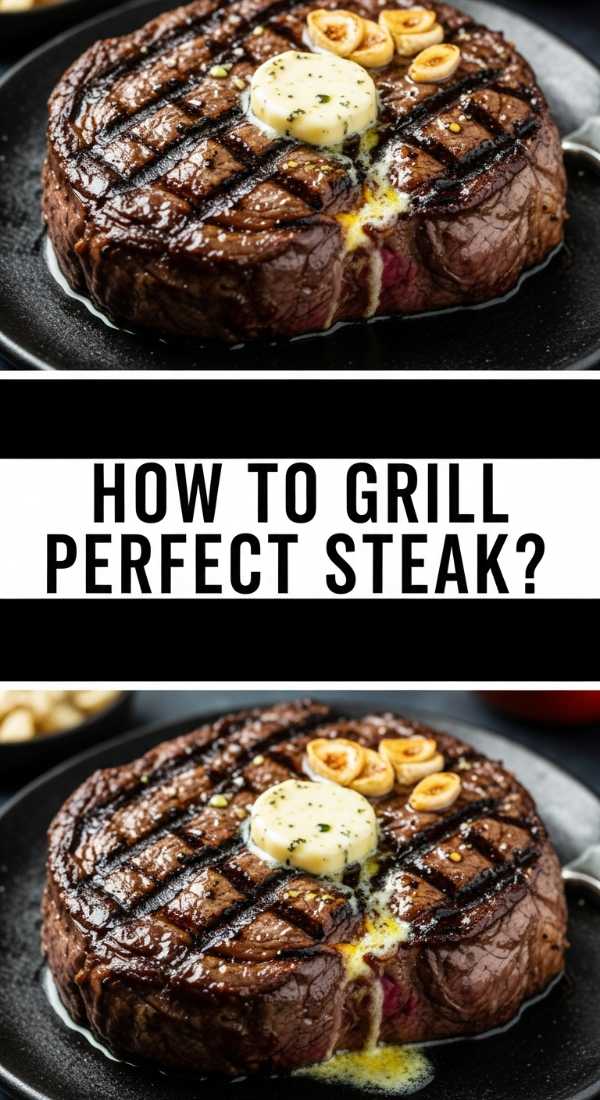
How to grill perfect steak?

Why we love this
A perfectly grilled steak is the crown jewel of any meat-centric food board. When done right, the meat possesses a smoky, charred exterior that gives way to a succulent, ruby-red interior that practically dissolves in your mouth. The aroma of rendered fat hitting the coals is the universal signal that something special is happening. Slicing it thin and fanning it out across the board allows guests to appreciate the edge-to-edge pink perfection, especially when drizzled with a vibrant, herby chimichurri that cuts through the rich, buttery intensity of the beef.
Ingredients
- 1.5-inch thick Ribeye or New York Strip
- Kosher salt
- Coarse black pepper
- Garlic cloves and fresh rosemary
- High-smoke point oil
How to make it
- Take the steak out of the fridge at least 45 minutes before grilling. A cold steak will not cook evenly and the center will remain raw while the outside burns.
- Pat the steak extremely dry with paper towels. Rub with a tiny bit of oil and season heavily with salt and pepper. Much of the seasoning falls off during grilling, so be generous.
- Preheat your grill to high heat (about 450-500°F). Clean the grates thoroughly with a wire brush.
- Place the steak at a 45-degree angle to the grates for 2 minutes to get professional grill marks. Rotate 90 degrees and cook for another 2 minutes. Flip.
- For a medium-rare finish, aim for an internal temperature of 130°F. The temperature will rise to 135°F as it rests.
- In the final minute, toss a knob of butter and some rosemary onto the steak if using a flat top, or simply move it to the cool side of the grill.
- Crucial Step: Let the steak rest for at least 10 minutes on a cutting board. This allows the fibers to relax and reabsorb the juices. Slicing too early will result in a puddle of juice and dry meat.
How to make better tacos?

Why we love this
Tacos are the life of the party because they are a vibrant explosion of color, texture, and zing. There’s the crunch of a toasted tortilla, the tenderness of slow-cooked or flash-seared meat, and the cool, creamy finish of avocado or crema. Each taco is a customizable canvas, allowing everyone to balance the heat of jalapeños with the brightness of freshly squeezed lime. Arranging all the components on a board—the charred corn, the pickled onions, the crumbled cotija—creates a visual feast that smells like sunshine and spice, inviting everyone to build their own perfect bite.
Ingredients
- Corn or flour tortillas
- Protein (flank steak, shredded chicken, or shrimp)
- Pickled red onions
- Fresh cilantro and lime wedges
- Cotija cheese and crema
How to make it
- The secret to a better taco is the tortilla. Never serve them raw. Char them directly over a gas flame for 10-15 seconds per side or in a dry stainless steel pan until they puff and develop brown spots. Keep them warm in a clean kitchen towel.
- Season your meat with a mix of cumin, chili powder, smoked paprika, and a pinch of cinnamon for depth. Sear over high heat to get crispy edges.
- Balance your flavors using the “fat, acid, heat” rule. If the meat is fatty, you need the acid of pickled onions or lime juice to cut through it.
- Don’t overstuff. A perfect taco should be able to close. Use two small corn tortillas if they are thin to prevent tearing.
- Finely mince your white onion and soak it in cold water for 10 minutes before serving. This removes the harsh sulfurous bite, leaving only a sweet crunch.
- Serve with a variety of salsas—a fresh salsa verde for acidity and a smoky chipotle salsa for heat.
How to roast golden chicken?

Why we love this
A roast chicken is the ultimate symbol of home-cooked warmth. When done correctly, the skin is translucent and crackling-thin, gleaming with natural oils and herb-infused butter. The meat underneath remains impossibly tender and steaming, pulling away from the bone with almost no effort. The scent of roasting poultry, garlic, and lemon is perhaps the most welcoming aroma in the culinary world, instantly making any space feel like home. Carving it and placing it on a board surrounded by its own pan juices and roasted root vegetables is the epitome of rustic elegance.
Ingredients
- Whole roasting chicken (4-5 lbs)
- Unsalted butter (room temperature)
- Lemon, garlic head, and fresh thyme
- Kosher salt and black pepper
How to make it
- Dry the chicken thoroughly, including inside the cavity. If you have time, leave it uncovered in the fridge for 4-24 hours. This dries out the skin, ensuring maximum crispness.
- Generously salt the inside of the cavity and stuff it with a halved lemon, a smashed head of garlic, and a bundle of thyme.
- Mix the room-temperature butter with minced herbs and salt. Carefully lift the skin over the breast meat and spread the butter underneath. Rub the remaining butter all over the outside.
- Truss the legs together with kitchen twine. This ensures the chicken cooks evenly and keeps the breast meat from drying out before the legs are done.
- Roast at 425°F (220°C). High heat is necessary for that golden skin. Roast for about an hour, or until a meat thermometer hits 165°F in the thickest part of the thigh.
- Baste the chicken with its own juices halfway through the cooking process.
- Let the chicken rest for 15-20 minutes before carving. If you cut it too soon, the steam will escape and the meat will dry out instantly.
How to bake firewood pizza?

Why we love this
There is a specific, charred flavor that only a wood fire can impart to pizza dough, creating those beautiful, airy “leopard spots” on the crust. The high heat blisters the dough in seconds, while the tomato sauce sweetens and the fresh mozzarella melts into creamy pools. The aroma of burning wood mixed with toasted flour and bubbling cheese is intoxicating. Serving a firewood pizza on a board, topped with a handful of fresh arugula and a drizzle of spicy honey, brings a touch of an Italian summer evening to your own backyard or kitchen.
Ingredients
- High-hydration pizza dough (70% water)
- San Marzano tomato sauce
- Fresh mozzarella pearls
- Fresh basil and extra virgin olive oil
- Semolina flour (for dusting)
How to make it
- Preheat your wood-fired oven (or a pizza stone in a conventional oven) for at least 45 minutes. You need a floor temperature of at least 700°F (370°C) for true wood-fired results.
- Stretch your dough by hand on a surface dusted with semolina. Avoid a rolling pin, which crushes the air bubbles; instead, use your knuckles to gently pull the edges outward.
- Keep toppings light. A wood-fired pizza cooks so fast (60-90 seconds) that heavy toppings will remain raw while the crust burns.
- Spread a very thin layer of sauce, leaving an inch for the crust (the cornicione) to rise.
- Slide the pizza onto the hot stone using a quick, confident flick of the wrist. If the dough sticks to the peel, you didn’t use enough semolina.
- Turn the pizza 90 degrees every 20 seconds using a turning peel. The side closest to the flame will cook much faster.
- Remove when the crust is puffed and charred and the cheese is bubbling. Finish with fresh basil and a swirl of olive oil after it comes out of the heat so the herbs don’t burn.
How to make creamy pasta?
[IMAGE_10]
Why we love this
Creamy pasta is the ultimate culinary hug, a velvety, silk-smooth sauce that coats every strand of pasta like a warm blanket. The rich, nutty scent of toasted garlic and aged Parmesan cheese creates an immediate sense of luxury and indulgence. Whether it’s a thick fettuccine or a ridged rigatoni, the way the sauce clings to the pasta ensures a perfect, decadent bite every time. It’s the kind of dish that makes people quiet down as they eat, savoring the richness and the delicate balance of cream, black pepper, and fresh parsley.
Ingredients
- Pasta (Fettuccine or Rigatoni)
- Heavy cream or high-quality butter
- Freshly grated Parmesan cheese
- Garlic and shallots
- Reserved pasta water
How to make it
- Boil your pasta in heavily salted water (it should taste like the sea). Cook it until it is slightly *under* al dente, as it will finish cooking in the sauce.
- While the pasta boils, sauté finely minced shallots and garlic in butter over medium-low heat. You want them translucent and fragrant, not brown or bitter.
- Add the heavy cream and bring to a gentle simmer. Let it reduce by about a third until it starts to thicken naturally.
- Crucial Step: Before draining the pasta, save 1 cup of the starchy pasta water. This is liquid gold for emulsifying your sauce.
- Add the pasta directly into the cream sauce. Toss vigorously. Add the Parmesan cheese slowly, stirring constantly to avoid clumps.
- Add splashes of the reserved pasta water. The starch in the water helps the fat in the cream and cheese bind to the pasta, creating a glossy, restaurant-quality sheen.
- Remove from heat immediately. The sauce will continue to thicken as it cools. Garnish with plenty of cracked black pepper and serve while steaming.
Conclusion
Transitioning to food boards has completely redefined how I view entertaining. It’s no longer about perfection; it’s about the joy of the assembly and the shared experience of a meal that looks as good as it tastes. Whether you’re roasting a golden chicken or piling up crispy potatoes, remember that the best ingredient is the atmosphere you create. So, clear off your biggest wooden board, invite your favorite people over, and let the food speak for itself. Happy hosting!