

Simple, Chic, and Viral: How to Build the Perfect Food Board
There is something undeniably magical about the way a perfectly curated food board brings people together. Whether it is a cozy Friday night in or a bustling Sunday brunch with friends, the ‘viral’ food board aesthetic has transformed the way we think about hosting. It’s no longer just about the meal; it’s about the experience, the textures, and that gorgeous, social-media-ready presentation that makes everyone reach for their phones before they reach for a fork.
Building the perfect board is an art form that balances comfort with elegance. My secret? I love mixing high-end proteins like seared steak and fresh salmon with nostalgic, soulful favorites like sloppy joes or creamy pasta. By combining these diverse flavors on one grand canvas, you create a conversational piece that caters to every craving while looking absolutely stunning on your kitchen island.
How to cook sloppy joes

Why we love this
There is a deep, soulful nostalgia tucked into every bite of a perfectly made sloppy joe. We love this dish because it strikes the perfect balance between sweet, tangy, and savory, offering a messy yet comforting experience that reminds us of childhood summers. The rich, mahogany-colored sauce clings to the tender ground beef, while the aroma of sautéed peppers and onions creates an inviting warmth that fills the entire home. It’s the ultimate ‘hug in a bun’ that adds a playful, rustic touch to any sophisticated food board.
Ingredients
- 1 lb lean ground beef
- 1 small yellow onion, finely diced
- 1 green bell pepper, finely diced
- 2 cloves garlic, minced
- 3/4 cup ketchup
- 1 tablespoon brown sugar
- 1 teaspoon yellow mustard
- 1 teaspoon Worcestershire sauce
- Salt and black pepper to taste
- Toasted brioche buns
How to make it
- Place a large skillet over medium-high heat. Add the ground beef, breaking it apart with a wooden spoon into small crumbles. Cook for 5-7 minutes until completely browned.
- Drain the excess fat from the pan to ensure the sauce doesn’t become greasy. Move the beef to one side and add the diced onion and bell pepper to the empty space.
- Sauté the vegetables for about 4 minutes until they are soft and translucent. Stir in the minced garlic and cook for another 60 seconds until fragrant, being careful not to burn it.
- Lower the heat to medium-low. Stir in the ketchup, brown sugar, mustard, and Worcestershire sauce. Mix thoroughly until the beef is fully coated in the glossy red sauce.
- Simmer the mixture gently for 10 minutes. You are looking for the sauce to thicken and reduce slightly so it becomes sticky rather than watery.
- Season with salt and pepper. Serve on butter-toasted brioche buns to add a sweet, pillowy contrast to the savory filling.
How to cook juicy steak

Why we love this
A perfectly cooked steak is the undisputed crown jewel of any viral food board. We love the dramatic contrast between the deeply caramelized, salty crust and the tender, butter-soft interior that practically melts on the tongue. The sensory experience of steak—the sizzle of the cast iron, the herbaceous aroma of browning butter and fresh rosemary—elevates a simple board into a gourmet feast. It provides a luxurious, high-protein anchor that feels indulgent and celebrates the beauty of high-quality ingredients handled with care.
Ingredients
- 2 thick-cut Ribeye or New York Strip steaks
- 2 tablespoons high-smoke point oil (like avocado or grapeseed)
- 3 tablespoons unsalted butter
- 4 cloves garlic, smashed
- 3 sprigs fresh rosemary or thyme
- Coarse kosher salt and cracked black pepper
How to make it
- Remove steaks from the refrigerator 45 minutes before cooking. This allows them to reach room temperature, ensuring an even cook throughout the meat.
- Pat the steaks extremely dry with paper towels. Any moisture on the surface will create steam, preventing that iconic golden-brown crust from forming.
- Season aggressively with kosher salt and black pepper on all sides, including the edges. Heat a cast-iron skillet over high heat until it begins to smoke slightly.
- Add the oil to the pan. Carefully lay the steaks away from you into the pan. Sear undisturbed for 3-4 minutes until a deep brown crust forms.
- Flip the steaks. Immediately add the butter, smashed garlic, and herbs to the pan. As the butter melts and foams, tilt the pan and use a large spoon to continuously baste the steak with the hot, aromatic butter for the remaining 3-4 minutes.
- Use a meat thermometer to pull the steaks at 130°F for medium-rare. Transfer to a cutting board and let them rest for at least 10 minutes to allow the juices to redistribute before slicing against the grain.
How to make greek chicken

Why we love this
Greek chicken brings a vibrant, Mediterranean brightness to your food board that is both healthy and incredibly flavorful. We love the way the zingy lemon juice tenderizes the meat while the dried oregano and garlic create a charred, aromatic exterior during cooking. Each bite is a refreshing explosion of citrus and herbs, offering a light yet satisfying component that pairs beautifully with feta cheese, olives, and warm pita bread. It’s the perfect dish for those who want ‘viral’ aesthetics without the heavy calories.
Ingredients
- 1.5 lbs boneless, skinless chicken thighs
- 1/4 cup extra virgin olive oil
- Juice of 2 large lemons
- 4 cloves garlic, minced
- 2 teaspoons dried oregano
- 1 teaspoon salt and 1/2 teaspoon black pepper
- Fresh parsley for garnish
How to make it
- In a large bowl or zip-top bag, whisk together the olive oil, lemon juice, minced garlic, oregano, salt, and pepper to create a bright marinade.
- Add the chicken thighs to the marinade, ensuring every piece is thoroughly coated. Refrigerate for at least 30 minutes, or up to 4 hours for maximum flavor penetration.
- Preheat a large non-stick or cast-iron skillet over medium-high heat. Add a tiny drizzle of oil to the pan.
- Place the chicken in the skillet, being careful not to overcrowd the pan. Cook for 6-7 minutes on the first side without moving them to develop a beautiful golden-brown sear.
- Flip the chicken and cook for another 5-6 minutes until the internal temperature reaches 165°F. The chicken should feel firm to the touch but remain juicy.
- Remove from heat and let rest for 5 minutes. Garnish with a squeeze of fresh lemon and chopped parsley before slicing into strips for the board.
How to roast fresh salmon
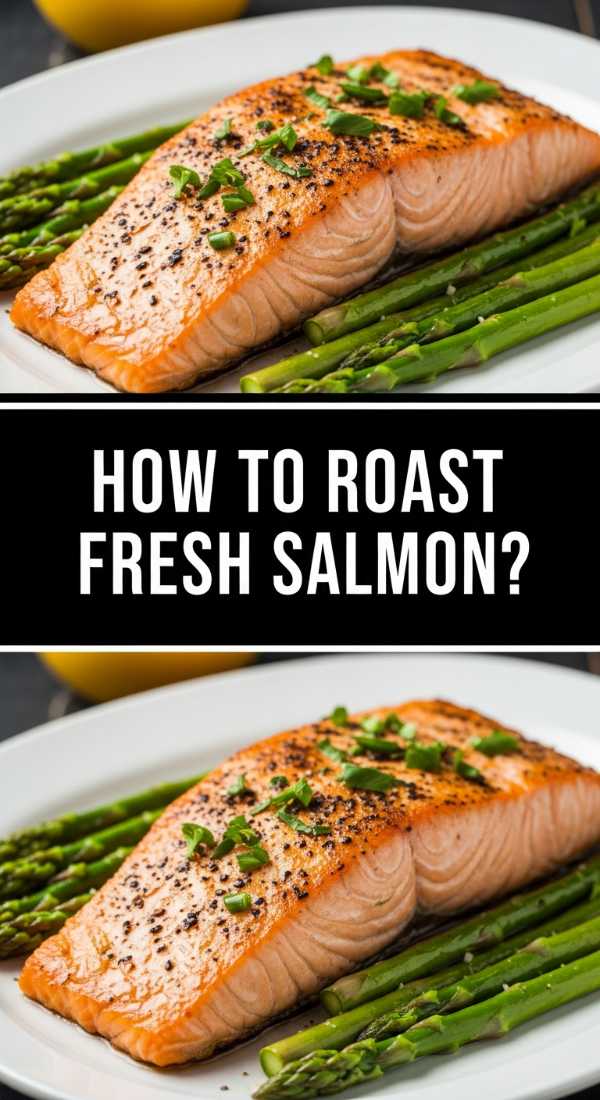
Why we love this
Freshly roasted salmon is a showstopper because of its stunning coral hue and delicate, buttery texture. We love how roasting intensifies the natural richness of the fish while maintaining a moist, flaky consistency that falls apart at the touch of a fork. When glazed with a hint of honey or dijon, the skin becomes slightly crisp while the fat melts into the flesh, creating a luxurious mouthfeel. It adds an element of elegance and sophistication to your board that feels both wholesome and decadent.
Ingredients
- 1 large side of salmon (or 4 individual fillets)
- 2 tablespoons olive oil
- 1 tablespoon Dijon mustard
- 1 tablespoon honey
- 1 lemon, thinly sliced
- 2 cloves garlic, minced
- Fresh dill for garnish
How to make it
- Preheat your oven to 400°F (200°C) and line a large baking sheet with parchment paper or aluminum foil for easy cleanup.
- Place the salmon fillets on the prepared sheet. Pat the skin and flesh dry with a paper towel to ensure the glaze sticks and the fish roasts rather than steams.
- In a small bowl, whisk together the olive oil, Dijon mustard, honey, and minced garlic. Brush this mixture generously over the top of the salmon.
- Top the salmon with thin lemon slices. This adds a visual pop and infuses the fish with a gentle citrus aroma as it roasts.
- Roast in the center of the oven for 12-15 minutes. The exact time depends on the thickness; the salmon is done when it is opaque throughout and flakes easily with a fork in the thickest part.
- Remove from the oven and let it sit for 2 minutes. Garnish with plenty of fresh dill and a sprinkle of coarse sea salt before serving.
How to bake chicken pie

Why we love this
The chicken pie is the ultimate centerpiece for a cozy, rustic food board. We love the dramatic contrast between the golden, shatteringly crisp layers of puff pastry and the rich, velvety cream sauce hidden beneath. It smells like a holiday kitchen—earthy thyme, sweet carrots, and roasted chicken all simmering together in a thick, comforting gravy. It provides a hearty, ‘scoopable’ element to the board that encourages guests to dig in and enjoy a warm, homemade classic that feels like home.
Ingredients
- 2 cups cooked rotisserie chicken, shredded
- 1 sheet frozen puff pastry, thawed
- 1 cup frozen peas and carrots
- 1 small onion, diced
- 3 tablespoons butter
- 3 tablespoons all-purpose flour
- 2 cups chicken broth
- 1/2 cup heavy cream
- 1 teaspoon dried thyme
- 1 egg (for egg wash)
How to make it
- Preheat your oven to 400°F (200°C). In a large skillet, melt the butter over medium heat. Add the onions and sauté for 5 minutes until soft.
- Whisk in the flour to create a roux. Cook the flour-butter mixture for 2 minutes, stirring constantly, to remove the raw flour taste.
- Slowly pour in the chicken broth and heavy cream while whisking vigorously to prevent lumps. Continue to simmer until the sauce thickens into a rich gravy.
- Stir in the shredded chicken, peas, carrots, and thyme. Season generously with salt and pepper. Pour this mixture into a deep pie dish or a cast-iron skillet.
- Roll out the puff pastry and drape it over the filling. Trim the edges and use a knife to cut three small slits in the center to allow steam to escape.
- Brush the pastry with a beaten egg. Bake for 20-25 minutes until the pastry has puffed up significantly and turned a deep, glistening golden brown.
How to sear garlic shrimp
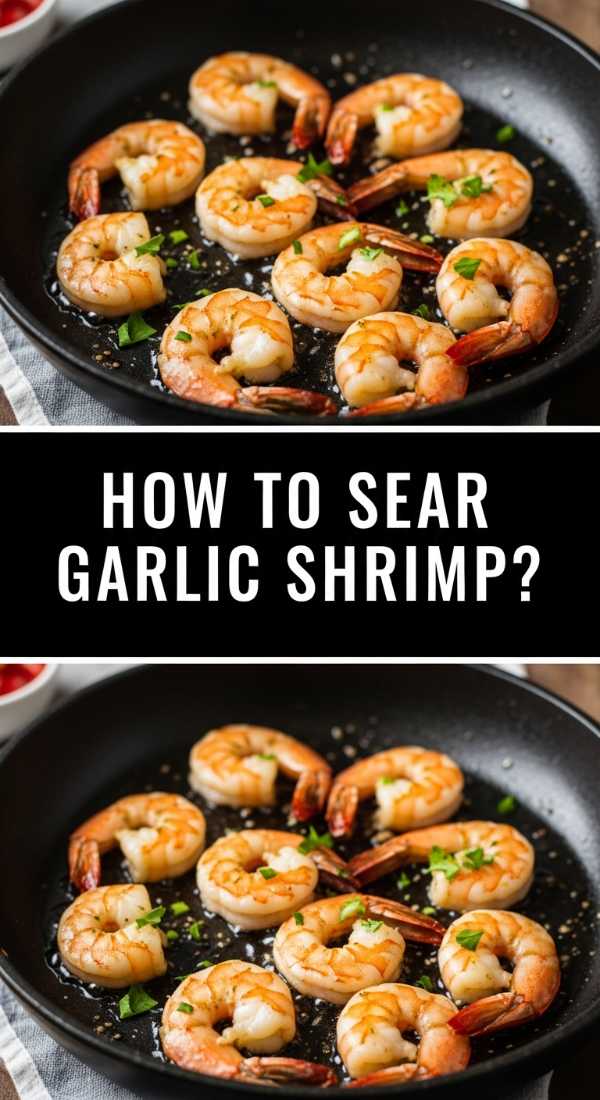
Why we love this
Garlic shrimp is the ultimate ‘fast gourmet’ addition to a viral food board. We love the satisfying ‘snap’ of a perfectly seared shrimp combined with the punchy, addictive flavor of toasted garlic and red pepper flakes. The butter emulsifies with the lemon juice to create a silk-like sauce that coats each shrimp in a shimmering, savory glaze. It’s a dish that looks incredibly high-end with its bright pink curls and flecks of green parsley, yet it comes together in mere minutes, making it a stress-free hosting win.
Ingredients
- 1 lb large shrimp, peeled and deveined
- 4 tablespoons unsalted butter
- 5 cloves garlic, thinly sliced
- 1/2 teaspoon red pepper flakes
- Juice of half a lemon
- 2 tablespoons fresh parsley, chopped
- Salt to taste
How to make it
- Ensure the shrimp are very dry by patting them with paper towels. Season them lightly with salt.
- In a large skillet, melt 2 tablespoons of butter over medium-high heat until it begins to bubble.
- Add the shrimp in a single layer. Sear for 2 minutes without moving them until the bottoms are pink and slightly charred.
- Flip the shrimp and immediately add the remaining 2 tablespoons of butter, the sliced garlic, and the red pepper flakes.
- Cook for another 1-2 minutes, tossing the shrimp constantly so the garlic browns gently without burning. The shrimp should form a ‘C’ shape—if they curl into an ‘O’, they are overcooked.
- Remove from heat, squeeze the lemon juice over the top, and toss in the parsley. The residual heat will finish the sauce, creating a glossy coating.
How to make creamy pasta
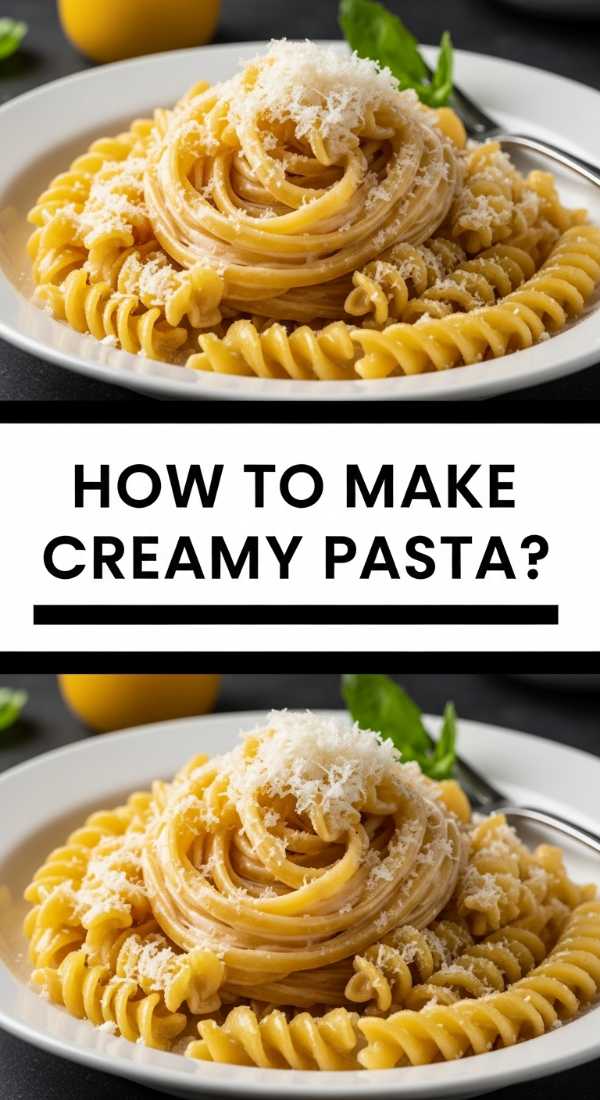
Why we love this
Creamy pasta is the ultimate crowd-pleaser that adds a soft, indulgent texture to your board. We love the way a well-made Alfredo or cream sauce clings to every ridge of the pasta, providing a rich, savory base that feels incredibly luxurious. The aroma of nutty Parmesan cheese and toasted garlic is intoxicating, creating a sense of Italian bistro elegance right in your kitchen. It acts as a perfect neutral yet flavorful vessel that pairs beautifully with the proteins on the board, like the steak or garlic shrimp.
Ingredients
- 12 oz pasta (fettuccine or penne)
- 1 cup heavy cream
- 1/2 cup unsalted butter
- 1.5 cups freshly grated Parmesan cheese
- 2 cloves garlic, minced
- 1/2 cup reserved pasta water
- Black pepper and nutmeg (optional)
How to make it
- Bring a large pot of heavily salted water to a boil. Cook the pasta for 1-2 minutes less than the package instructions for a true ‘al dente’ texture.
- Before draining, reserve at least 1 cup of the starchy pasta water—this is the secret to a smooth, non-clumping sauce.
- In a wide pan, melt the butter over medium heat. Add the garlic and sauté for 30 seconds until fragrant but not browned.
- Pour in the heavy cream and bring to a gentle simmer for 3 minutes until it thickens slightly. Lower the heat to low.
- Add the cooked pasta directly into the cream mixture. Sprinkle the Parmesan cheese over the top in batches, tossing constantly.
- Add the reserved pasta water a tablespoon at a time while tossing. The starch in the water helps the cheese and cream emulsify into a silky, cohesive sauce. Season with plenty of black pepper.
How to make crispy falafel

Why we love this
Crispy falafel adds an essential crunch and an earthy, herbaceous depth to any food board. We love the dramatic contrast between the rugged, dark-brown exterior and the vibrant, emerald-green center packed with fresh parsley and cilantro. These little fritters are a flavor explosion of cumin, coriander, and garlic, offering a satisfying plant-based protein option that feels both ancient and modern. They provide a wonderful textural element that guests love to dip into creamy tahini or cool tzatziki.
Ingredients
- 1 cup dried chickpeas (soaked overnight, do not use canned)
- 1/2 cup fresh parsley
- 1/2 cup fresh cilantro
- 4 cloves garlic, chopped
- 1 small onion, roughly chopped
- 1 tablespoon ground cumin
- 1 teaspoon ground coriander
- 2 tablespoons all-purpose flour
- 1 teaspoon salt
- Vegetable oil for frying
How to make it
- Drain the soaked chickpeas and pat them dry. Place them in a food processor along with the parsley, cilantro, onion, garlic, cumin, coriander, and salt.
- Pulse the mixture until it reaches a coarse meal consistency. Be careful not to over-process into a paste; you want visible bits of herbs and chickpeas for texture.
- Transfer the mixture to a bowl, stir in the flour, and refrigerate for at least 30 minutes. This helps the starch set so the falafel doesn’t fall apart in the oil.
- Form the mixture into small balls or patties using wet hands or a scoop. Heat 2 inches of oil in a heavy pot to 350°F (175°C).
- Fry the falafel in batches for 3-4 minutes, turning occasionally, until they are a deep golden-brown on all sides.
- Drain on paper towels immediately and sprinkle with a touch more salt while hot. Serve warm for the ultimate crispy experience.
How to make stuffed peppers
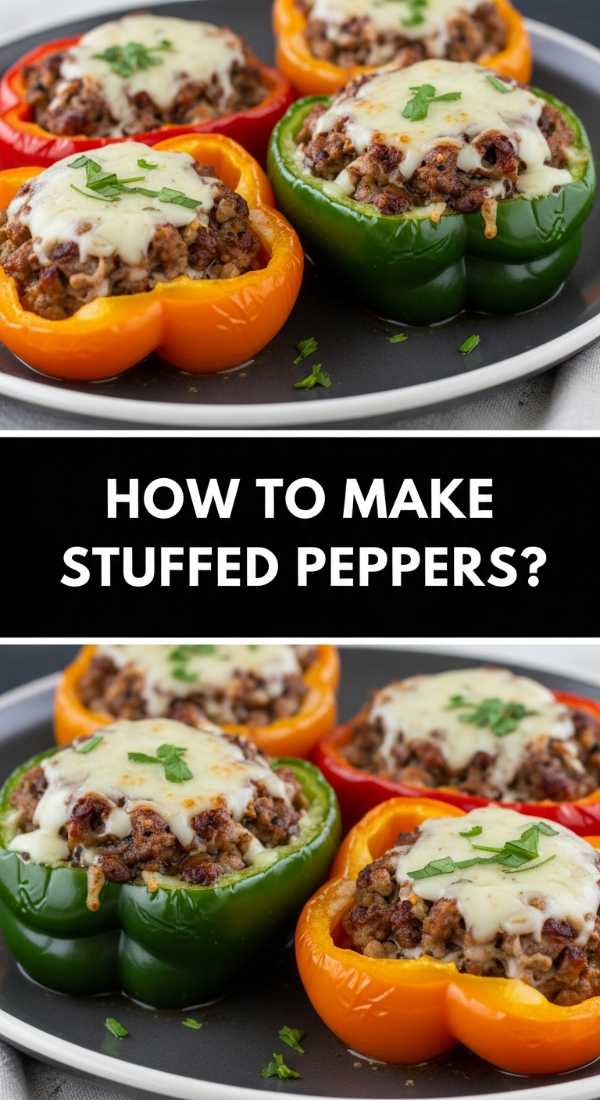
Why we love this
Stuffed peppers are like little edible bowls of joy that add height and vibrant color to your presentation. We love the way the bell peppers become sweet and tender in the oven, holding a savory treasure chest of seasoned meat, rice, and melted cheese. They are a complete meal in a single bite, offering a balance of acidity from the tomato sauce and richness from the beef. They look incredibly chic lined up on a board, providing a structured, colorful element that feels sophisticated and thoughtful.
Ingredients
- 4 large bell peppers (any color), tops removed and deseeded
- 1 lb ground turkey or beef
- 2 cups cooked white rice
- 1.5 cups marinara sauce
- 1 teaspoon Italian seasoning
- 1 cup shredded mozzarella cheese
- 1/2 cup water
How to make it
- Preheat your oven to 375°F (190°C). Place the hollowed-out peppers in a baking dish so they stand upright.
- In a large skillet, brown the ground meat over medium heat until cooked through. Drain any excess fat.
- Stir the cooked rice, 1 cup of the marinara sauce, and the Italian seasoning into the meat. Taste and add salt or pepper if needed.
- Stuff each pepper generously with the meat and rice mixture, pressing down lightly to fill all the gaps.
- Pour the remaining 1/2 cup of marinara over the tops of the peppers and pour the 1/2 cup of water into the bottom of the baking dish (this steams the peppers to keep them tender).
- Cover the dish tightly with foil and bake for 30 minutes. Remove the foil, top with mozzarella cheese, and bake uncovered for another 10-15 minutes until the cheese is bubbly and slightly browned.
How to make zesty tacos

Why we love this
Zesty tacos bring an interactive, high-energy vibe to your viral food board that everyone loves. We love the punchy combination of charred corn tortillas, smoky seasoned meat, and the bright, acidic lift of fresh lime and cilantro. Tacos are the ultimate ‘customizable’ food; they invite guests to build their own perfect bite, making the meal feel communal and relaxed. The vibrant colors of radishes, pickled onions, and green salsas make them a visual highlight that screams ‘fresh and fun.’
Ingredients
- 1 lb flank steak or chicken breast, thinly sliced
- 12 small corn tortillas
- 2 tablespoons taco seasoning (cumin, chili powder, garlic powder)
- 1 cup fresh pico de gallo
- 1/2 cup crumbled cotija cheese
- 2 limes, cut into wedges
- Fresh cilantro for garnish
How to make it
- Toss the sliced meat with the taco seasoning and a drizzle of oil. Let it sit for 15 minutes to absorb the spices.
- Heat a heavy skillet or griddle over high heat. Sear the meat quickly (about 2-3 minutes per side) to get a nice char while keeping the inside juicy.
- While the meat rests, char the corn tortillas. Place them directly over a low gas flame for 10-15 seconds per side using tongs until the edges are slightly blackened and the tortilla is pliable.
- Assemble the tacos by placing a generous portion of meat in each warm tortilla.
- Top with a spoonful of pico de gallo and a sprinkle of cotija cheese. The saltiness of the cheese balances the spice of the meat perfectly.
- Finish with a heavy-handed garnish of cilantro and serve with lime wedges on the side for that essential ‘zesty’ squeeze right before eating.
The Art of the Final Board
As you arrange these ten incredible dishes onto your board, remember that the ‘viral’ look comes from abundance. Fill in the gaps between your main dishes with bunches of grapes, sprigs of rosemary, small bowls of dipping sauces, and piles of toasted nuts. The goal is a lush, overflowing landscape of flavors that invites your guests to explore and enjoy. Building a food board is about celebrating the simple joy of good food, beautifully presented.