
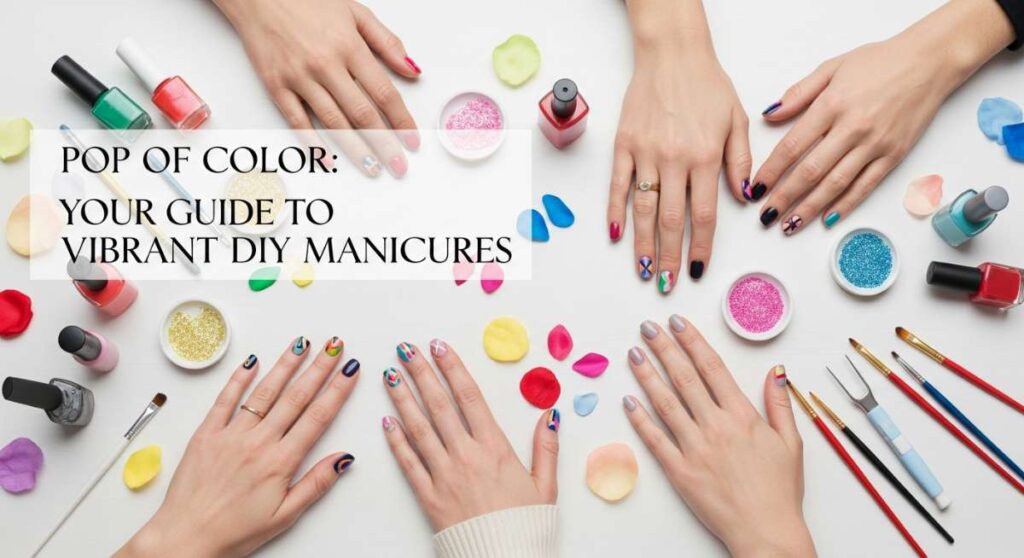
Pop of Color: Your Guide to Vibrant DIY Manicures
Hello, my loves! Pull up a chair and grab a warm cup of tea, because today we are talking about one of my favorite ways to practice self-care: the magic of the manicure. There is something so incredibly soothing about sitting down with a palette of colors and turning your fingertips into a canvas. It’s more than just polish; it’s a tiny celebration of who you are, a little spark of joy that catches your eye every time you reach for your phone or type on your laptop.
I remember a time when I felt so overwhelmed by the grey world outside, and simply painting my nails a bright, sunny yellow completely shifted my energy. I want that for you, too. Whether you’re a seasoned pro or you’ve never touched a cuticle pusher, this guide is a soft place for you to land and explore your creativity. We are going to walk through these vibrant tutorials together, step by step, like two friends dreaming up a masterpiece over a weekend brunch.
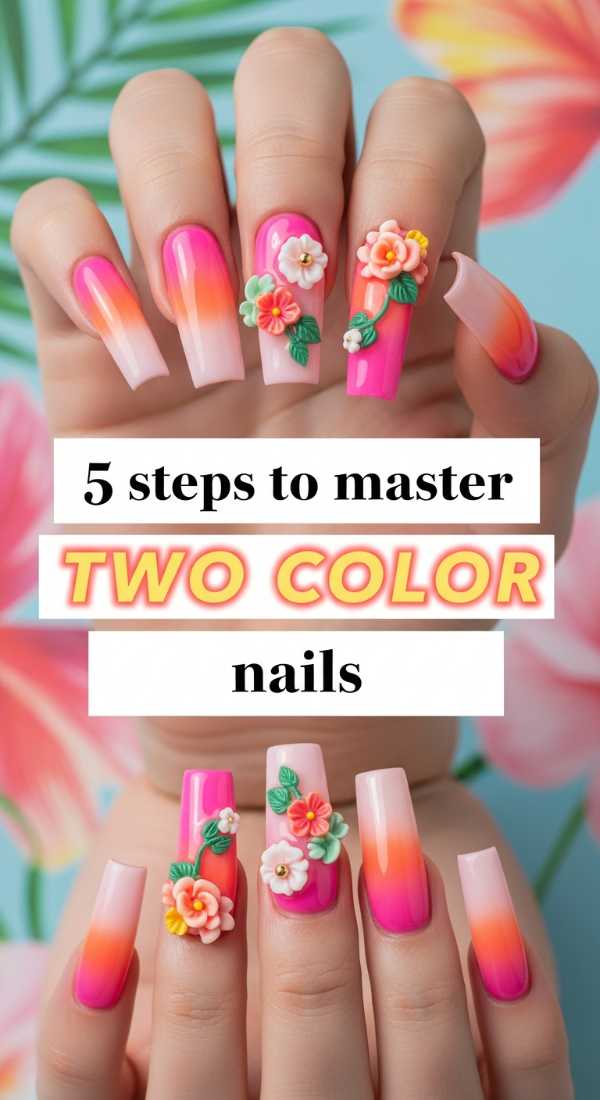
5 Steps to Master Two Color Nails
Why to love this recipe:
There is something so satisfying about the harmony of two shades meeting right in the middle. It’s like a conversation between your favorite moods, and it makes your hands look like a modern art piece without the museum price tag. It’s simple, elegant, and perfectly balanced.
Essential Ingredients:
- Two contrasting nail polish shades
- Striping tape or a steady hand
- Clear top coat
- Base coat
- Small cleanup brush
How to Prepare:
- Apply a nourishing base coat to protect your natural nails.
- Paint the entire nail with your lighter shade and let it dry completely.
- Place a piece of striping tape down the center or diagonally to create a crisp line.
- Apply the darker shade to one side of the tape and peel it off immediately while wet.
- Seal the look with a high-shine top coat for a seamless finish.
Budget Range
- Essie Glossy Shine Polish ($10)
- Holler and Glow Nail Tape ($5)
- Seche Vite Dry Fast Top Coat ($9)
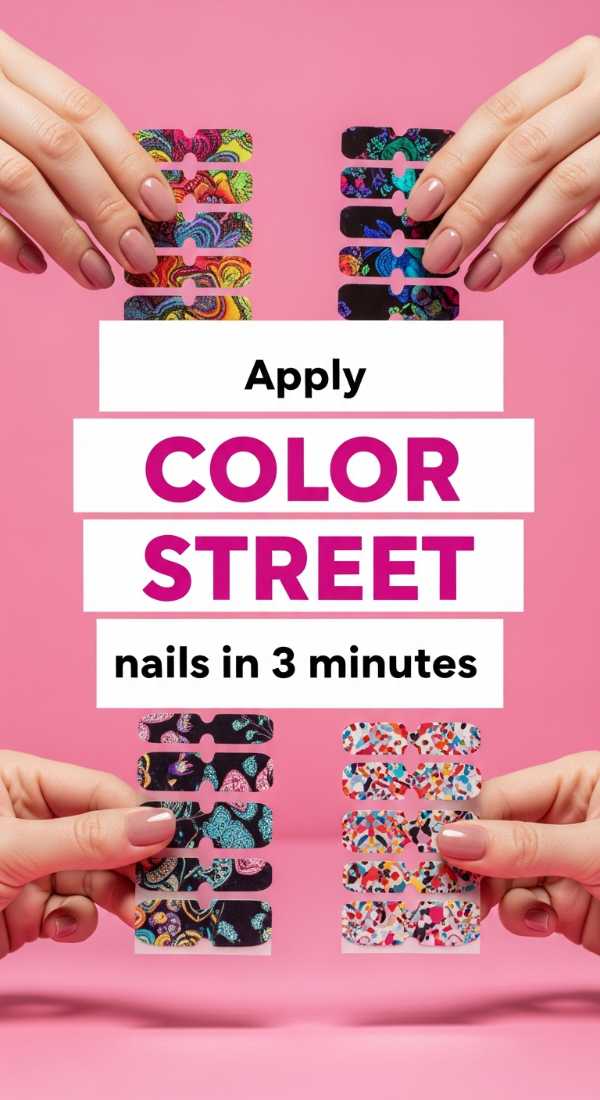
Apply Color Street Nails in 3 Minutes
Why to love this recipe:
We’ve all had those ‘I have 10 minutes to get out the door’ moments. Color Street is my secret weapon for instant glamour when life feels a bit too fast-paced. It gives you that salon-quality look with zero dry time and zero stress.
Essential Ingredients:
- Color Street nail strips
- Nail prep pad (alcohol wipe)
- Small nail file
- Your own beautiful hands
How to Prepare:
- Clean your nails thoroughly with the prep pad to remove any oils.
- Select the strip size that best fits your nail.
- Peel the clear plastic cover and the paper backing away.
- Apply the strip to the nail, smoothing it from the cuticle to the tip.
- Perforate the excess over the edge with your fingernail or a file and peel away.
Budget Range
- Color Street Real Nail Polish Strips ($12-$15)
- Mini Glass Nail File ($3)
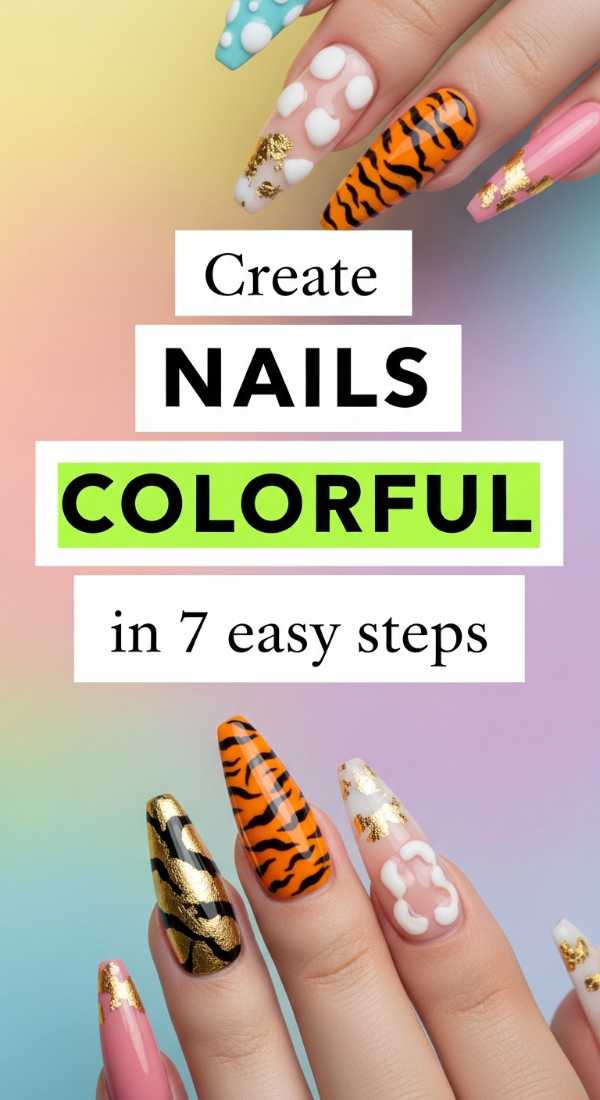
Create Nails Colorful in 7 Easy Steps
Why to love this recipe:
Rainbows shouldn’t just be for after the rain. Bringing every shade of the sun to your fingertips is the ultimate act of self-love and creative expression. This tutorial helps you organize the chaos into a beautiful, wearable rainbow.
Essential Ingredients:
- 5-7 different vibrant polish colors
- Dotting tool
- Makeup sponge
- Liquid latex (for easy cleanup)
- Top coat
How to Prepare:
- Apply a white base coat to make the colors pop.
- Apply liquid latex to the skin around your nails.
- Paint your chosen colors in stripes onto the makeup sponge.
- Dab the sponge onto your nail repeatedly to build opacity.
- Use a dotting tool to add small accents if desired.
- Peel off the liquid latex barrier.
- Apply a thick layer of top coat to blend the colors together.
Budget Range
- Wet n Wild Wild Shine Polishes ($1.50 each)
- Pueen Latex Tape ($9)
Design Multicolor Nails in 4 Quick Phases
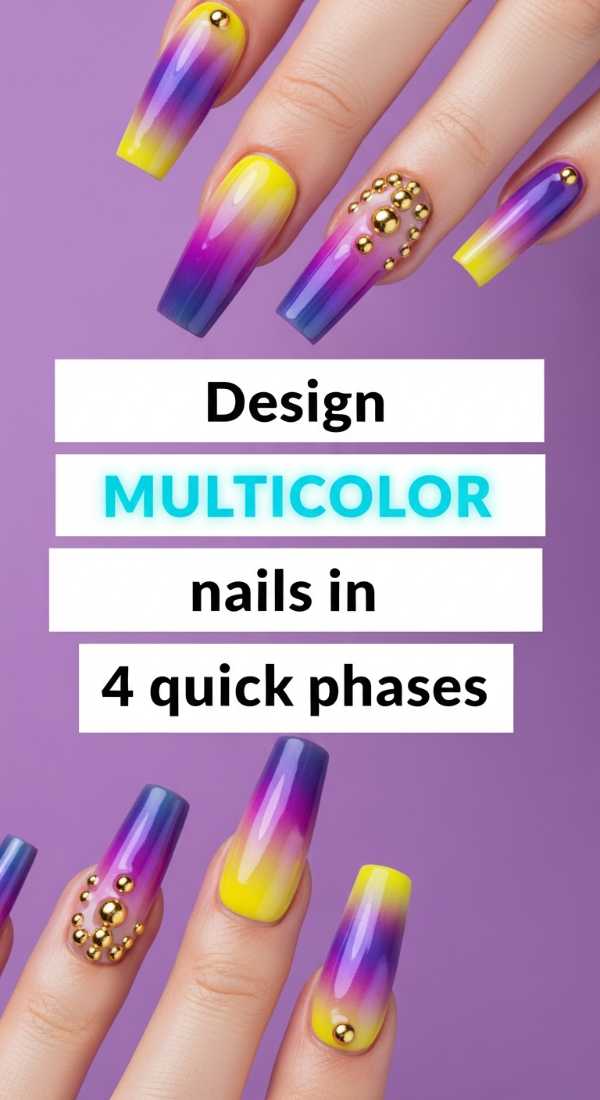
Why to love this recipe:
Multicolor doesn’t have to be messy. By breaking it into phases, we turn a complex look into a rhythmic, calming process that feels more like meditation than a chore. It’s about building layers of joy until your nails tell a story.
Essential Ingredients:
- Primary color palette (Red, Blue, Yellow)
- Thin detail brush
- Palette or piece of foil
- Quick-dry spray
How to Prepare:
- Phase 1: Apply a neutral base and let it set.
- Phase 2: Use the detail brush to paint organic, colorful blobs in random spots.
- Phase 3: Connect the shapes with thin black or gold lines for a ‘stained glass’ effect.
- Phase 4: Finish with a quick-dry spray to set your art in seconds.
Budget Range
- Sally Hansen Insta-Dri Polishes ($7)
- Winstonia Detail Nail Art Brushes ($8)
Get Colorful Nail Inspo in 10 Seconds

Why to love this recipe:
Sometimes we just need a spark. This quick-fire method is for when you’re standing at your vanity, polish in hand, waiting for that ‘aha!’ moment to strike. It’s the visual equivalent of a deep, refreshing breath.
Essential Ingredients:
- Pinterest or Instagram
- A ‘Favorites’ folder
- A mood board mindset
How to Prepare:
- Open your favorite visual app and search ‘Vibrant Abstract Nails’.
- Scroll for exactly 10 seconds and screenshot the first image that makes you smile.
- Pick the three dominant colors from that image.
- Don’t overthink—just start painting using those three shades.
Budget Range
- Free Apps (Pinterest/Instagram)
- Your existing polish collection
6 Tricks for Colourful Acrylic Nails
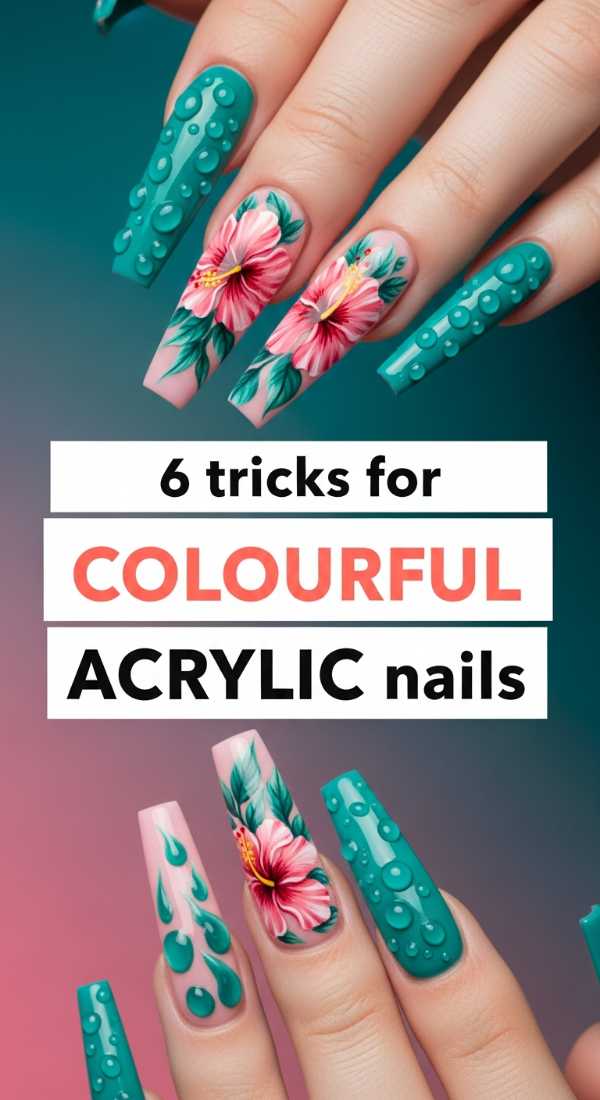
Why to love this recipe:
Acrylics are the architecture of the nail world. These little secrets help you keep that vibrancy locked in so your set stays as fresh as your morning coffee. It’s all about the professional touch from the comfort of your home.
Essential Ingredients:
- Colored acrylic powder
- Monomer
- Acrylic brush (Size 8 or 10)
- Dappen dish
- Nail primer
How to Prepare:
- Trick 1: Dehydrate the nail bed thoroughly for better color adhesion.
- Trick 2: Use a high-quality monomer that won’t yellow your bright pigments.
- Trick 3: Work in small beads to control the color placement.
- Trick 4: Wipe your brush constantly to keep colors from muddying.
- Trick 5: Encapsulate bright glitters in clear acrylic for depth.
- Trick 6: Buff to a high shine before the final top coat.
Budget Range
- Mia Secret Colored Acrylic Powder ($6)
- Modelones Acrylic Liquid Monomer ($12)
Sculpt Colorful Stiletto Nails in 8 Steps
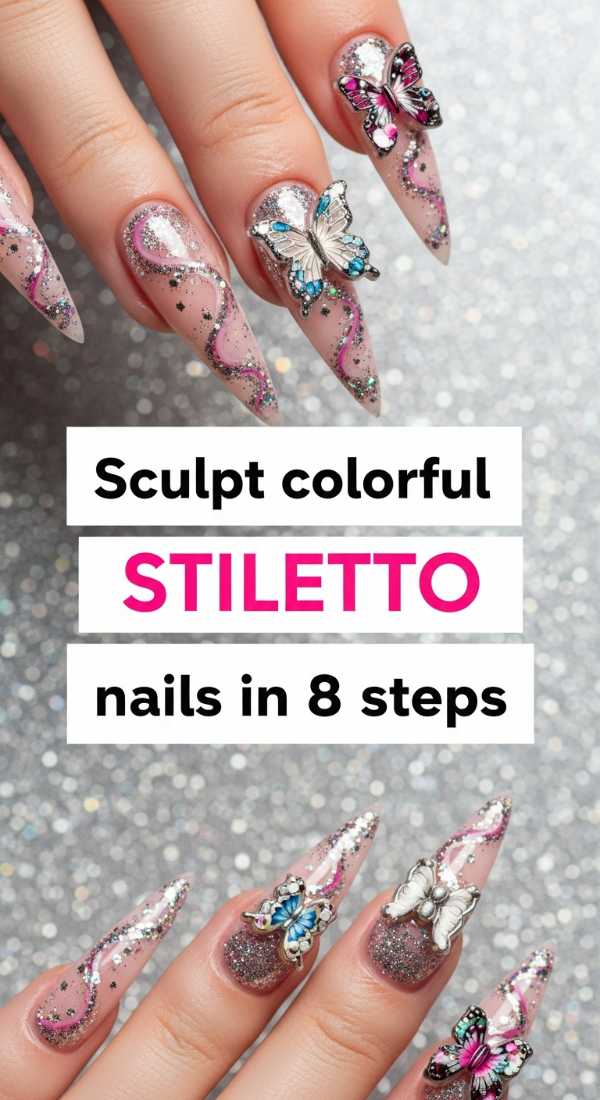
Why to love this recipe:
The stiletto is the queen of shapes—sharp, bold, and unapologetic. Adding a splash of color to these peaks turns your hands into a powerful statement of intent. It’s for the days when you feel like a goddess.
Essential Ingredients:
- Nail forms
- Building gel or acrylic
- Electric file (optional)
- Neon pigments
How to Prepare:
- Apply the nail form securely under the free edge.
- Apply primer and a base layer of clear gel.
- Sculpt the length and the sharp point of the stiletto.
- Mix neon pigment into clear gel for a custom ‘jelly’ look.
- Apply the color gel from the mid-section to the tip.
- Cure under a UV/LED lamp.
- File the sides to ensure a perfect, crisp point.
- Seal with a high-gloss gel top coat.
Budget Range
- Saviland Builder Gel Kit ($20)
- Neon Resin Pigments ($10)
Blend Two Color Nails in 4 Simple Swipes
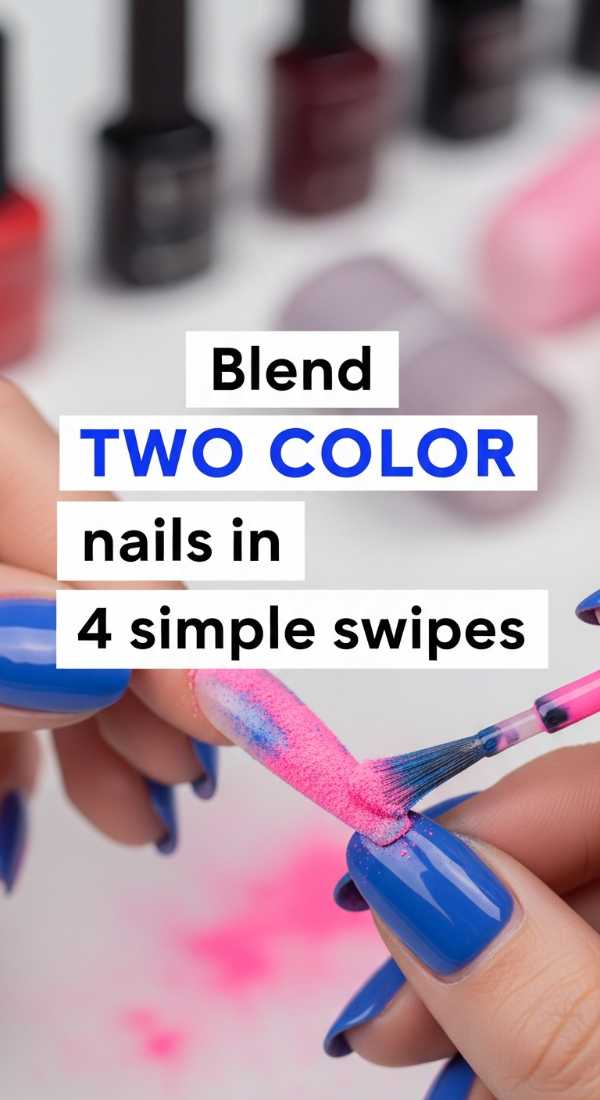
Why to love this recipe:
Blending is the softest way to transition between colors. It’s like watching a sunset on your nails, where one beautiful moment melts right into the next. This ‘swipe’ method is the easiest way to achieve a professional ombre.
Essential Ingredients:
- Two complementary colors (e.g., Pink and Orange)
- An ombre brush (fan brush or slanted)
- Mixing palette
How to Prepare:
- Apply the first color to the top half of the nail.
- Apply the second color to the bottom half, letting them touch.
- Take your ombre brush and swipe horizontally across the middle line.
- Gently swipe vertically to soften the gradient.
Budget Range
- Zoya Professional Lacquer ($12)
- Beetles Nail Art Brush Set ($9)
Build Multicolor Nails Using 3D Charms
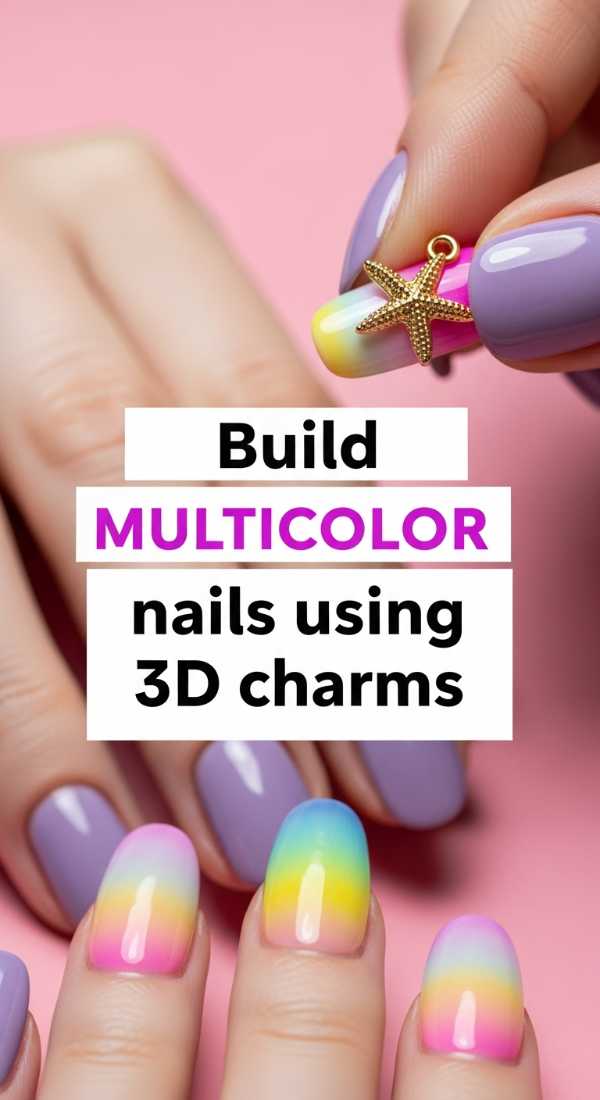
Why to love this recipe:
Texture adds a whole new dimension to your story. Charms are like the jewelry for your jewelry, adding that tactile 3D magic that catches every bit of light. It’s whimsical, fun, and totally ‘you’.
Essential Ingredients:
- Nail glue or resin
- Assorted colorful 3D charms (bears, hearts, gems)
- Tweezers
- Clear thick top coat
How to Prepare:
- Paint your base colors and let them dry completely.
- Apply a small dot of nail glue where you want the charm.
- Use tweezers to carefully place the charm and press for 5 seconds.
- Apply a thick top coat around the base of the charm to ‘lock’ it in.
Budget Range
- Amazon Resin Nail Charms Bulk Pack ($8)
- Makartt Rhinestone Glue ($10)
5 Ways to Style Colourful Acrylic Nails
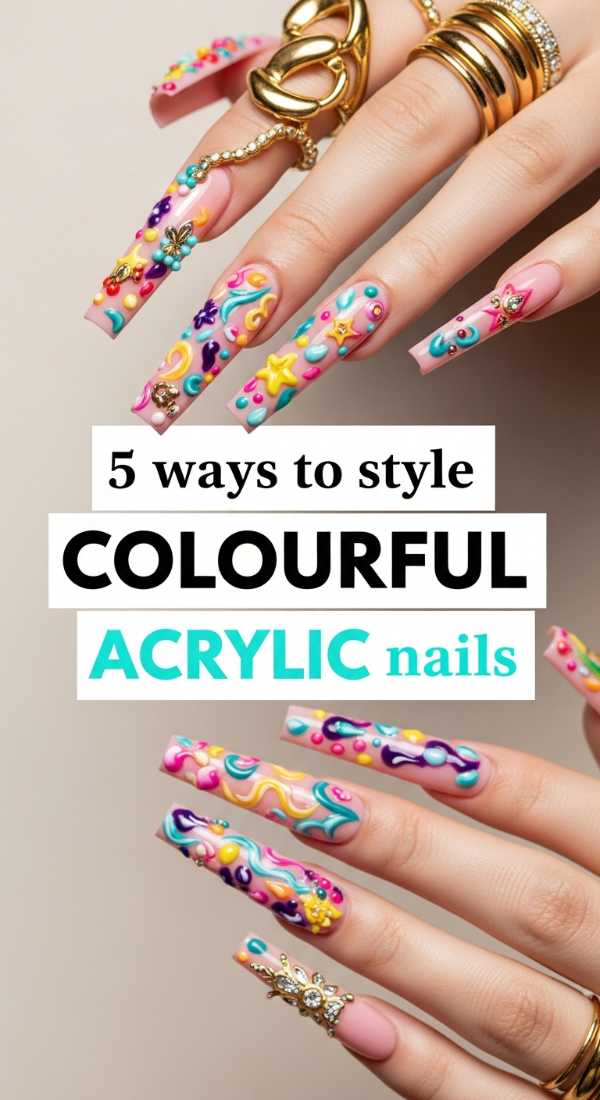
Why to love this recipe:
It’s all in the finish! Whether you’re feeling a velvet matte or a glass-like shine, styling your acrylics is the final hug you give your manicure. These variations ensure your nails always match your outfit and your vibe.
Essential Ingredients:
- Matte top coat
- Holographic topper
- Gold leaf flakes
- Buffer block
How to Prepare:
- The Velvet Touch: Use a matte top coat over neon colors for a sophisticated ‘suede’ look.
- The Disco Dream: Add a holographic flakie top coat for rainbow shifts in the sun.
- The Midas Touch: Press gold leaf into the tacky layer of your polish for a royal feel.
- The Classic Glass: Double-layer your glossiest top coat for a wet-look finish.
- The Minimalist: Leave one ‘accent nail’ colorful while the others remain sheer.
Budget Range
- OPI Matte Top Coat ($11)
- Kupa Ultra Gloss Top Coat ($15)
Embrace Your Vibrant Self
As we wrap up our little nail sanctuary today, I want you to remember that these colors are just a reflection of the light you already carry inside. Whether you chose a bold stiletto or a soft two-tone blend, you’ve taken a moment for yourself, and that is what truly matters. Go out there and let your hands tell your story—vibrant, colorful, and completely unique. I can’t wait to see what you create! Stay bright, my loves.