
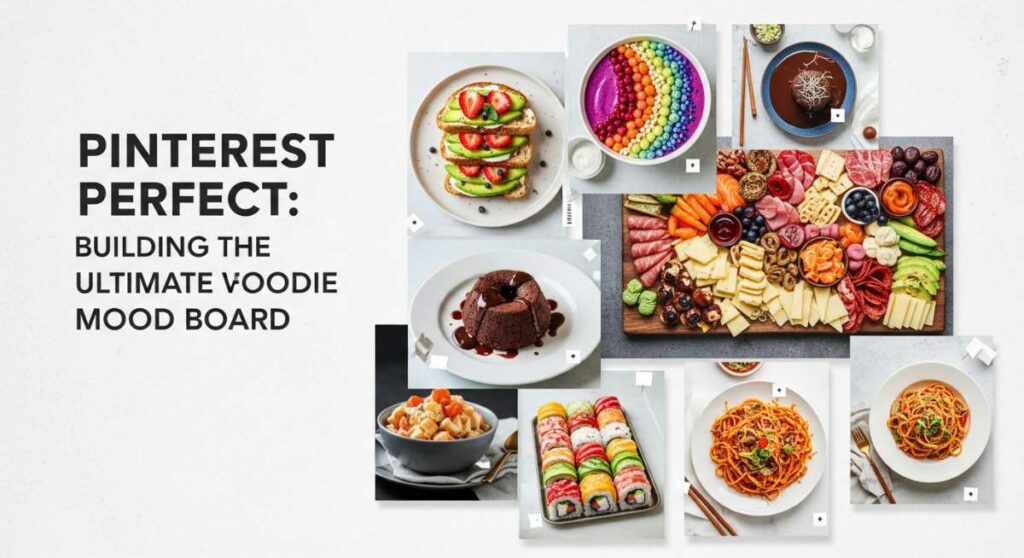
Hello, my loves! Pull up a chair, wrap yourself in your favorite oversized cardigan, and let’s chat about something that makes my heart flutter: the art of the perfect foodie mood board. There is something so incredibly soothing about scrolling through Pinterest, seeing those vibrant colors and textures, and realizing that we can bring that exact same magic right into our own cozy kitchens. Food isn’t just about fuel; it’s about the feeling of a warm bowl in your hands and the scent of garlic drifting through your home on a rainy afternoon.
I’ve spent the last few weeks curated the ultimate list of ‘viral’ recipes that aren’t just trendy—they are soul-filling. These are the dishes that have been living rent-free in my head, and I knew I had to share them with you so we can create our own delicious memories together. Whether you’re meal prepping for a busy week or looking for that one show-stopping dinner to impress your favorite people, I’ve got you covered with every single detail you need to make these Pinterest dreams a reality.
So, let’s dive into this digital scrapbook of flavors. I hope these recipes bring as much light and joy to your table as they have to mine. Remember, the secret ingredient is always a little bit of love (and maybe an extra clove of garlic or two). Let’s start building that ultimate mood board, one bite at a time!
Secret Creamy Garlic Pasta Recipe

Why we love this
There is nothing quite like a big bowl of pasta to make everything feel right in the world again, especially when it is coated in a sauce this velvety. This specific recipe has become my go-to whenever I need a gentle culinary hug because it is incredibly rich yet surprisingly simple to whip up on a whim. The way the garlic mellows out into the cream creates a flavor profile that feels sophisticated but remains deeply rooted in pure, unadulterated comfort. It is the kind of dish that makes your kitchen smell like a professional Italian bistro, bringing a touch of luxury to your everyday life.
Ingredients
- 1 lb fettuccine or linguine
- 4 tbsp unsalted butter
- 6 cloves of garlic, minced
- 2 cups heavy cream
- 1 cup freshly grated Parmesan cheese
- 1/2 tsp red pepper flakes
- Fresh parsley for garnish
- Salt and pepper to taste
How to make it
- Bring a large pot of heavily salted water to a rolling boil and cook your pasta until it is perfectly al dente, usually about 8 to 10 minutes.
- While the pasta is cooking, melt the butter in a large skillet over medium heat until it begins to foam and sizzle gently.
- Add the minced garlic to the butter and sauté for about 1 to 2 minutes, being careful not to let it brown, just until it becomes fragrant and soft.
- Pour in the heavy cream and bring the mixture to a low simmer, letting it thicken slightly for about 3 to 5 minutes while stirring occasionally.
- Whisk in the Parmesan cheese until the sauce is completely smooth and glossy, then season with salt, pepper, and red pepper flakes.
- Reserve a splash of pasta water, then drain the noodles and toss them directly into the cream sauce, adding the water if it needs more silkiness.
Best Ever Air Fryer Chicken

Why we love this
If you haven’t joined the air fryer revolution yet, let this be the recipe that finally convinces you to take the plunge into this crispy, golden world. This chicken is a total game-changer because it achieves that perfect, crackling exterior without the need for deep frying or excessive amounts of heavy oils. It remains incredibly juicy and tender on the inside, providing a satisfying crunch that feels like a treat but fits perfectly into a balanced lifestyle. I love how it saves time on busy weeknights while still delivering a main course that feels like it took hours of careful preparation.
Ingredients
- 2 large chicken breasts, sliced into strips
- 2 tbsp olive oil
- 1 tsp smoked paprika
- 1 tsp garlic powder
- 1/2 tsp onion powder
- 1/2 tsp dried oregano
- Salt and freshly cracked black pepper
How to make it
- Start by patting your chicken strips completely dry with a paper towel, as removing excess moisture is the secret to getting that perfect golden crust.
- In a medium-sized mixing bowl, whisk together the olive oil, paprika, garlic powder, onion powder, oregano, salt, and pepper until well combined.
- Toss the chicken strips in the seasoned oil, ensuring every single piece is thoroughly and evenly coated with the spice mixture for maximum flavor.
- Preheat your air fryer to 400°F for about 3 minutes to ensure it is hot and ready for the chicken to sear immediately upon contact.
- Place the chicken in the air fryer basket in a single layer, making sure not to overcrowd the pieces so the hot air can circulate freely.
- Cook for 10 to 12 minutes, flipping halfway through, until the internal temperature reaches 165°F and the outside is beautifully browned and crisp.
No Bake Chocolate Peanut Butter Bars

Why we love this
When the sweet cravings hit but the thought of turning on the oven feels like too much work, these no-bake bars are the absolute answer to your prayers. There is something timeless and magical about the combination of salty peanut butter and rich, dark chocolate that appeals to the inner child in all of us. These bars are thick, fudge-like, and incredibly satisfying, making them the perfect centerpiece for a dessert platter or a simple midnight snack. I find the process of pressing the crust into the pan almost meditative, and the result is a treat that looks just as good as it tastes.
Ingredients
- 1 cup melted unsalted butter
- 2 cups graham cracker crumbs
- 2 cups powdered sugar
- 1 1/2 cups creamy peanut butter
- 1 1/2 cups semi-sweet chocolate chips
- 2 tbsp additional peanut butter (for the topping)
How to make it
- In a large mixing bowl, combine the melted butter, graham cracker crumbs, and powdered sugar, stirring until the mixture is thick and well-incorporated.
- Stir in 1 cup of the creamy peanut butter until the base is smooth, then press it firmly into an 8×8 inch baking pan lined with parchment paper.
- Use the back of a spoon or a flat measuring cup to smooth out the surface of the peanut butter base so it is even across the entire pan.
- In a microwave-safe bowl, combine the chocolate chips and the remaining 2 tablespoons of peanut butter, heating in 30-second increments until fully melted.
- Pour the melted chocolate mixture over the peanut butter base and spread it evenly with a spatula, creating a beautiful, glossy top layer.
- Place the pan in the refrigerator for at least 2 hours, or until the bars are completely firm, before slicing them into generous, decadent squares.
Healthy Overnight Oats Meal Prep

Why we love this
Mornings can often feel like a bit of a whirlwind, which is why I am so obsessed with these overnight oats that do all the hard work while you sleep. They are like a little gift from your past self to your future self, waiting in the fridge to start your day with a boost of energy and calm. The texture is creamy and soft, almost like a healthy version of pudding, and the customization options are absolutely endless depending on your mood. It transforms the most stressful part of the day into a moment of intentional, delicious nourishment that keeps you full until lunch.
Ingredients
- 1/2 cup rolled oats
- 1/2 cup unsweetened almond milk
- 1/4 cup non-fat Greek yogurt
- 1 tbsp chia seeds
- 1 tbsp maple syrup
- 1/2 tsp vanilla extract
- Fresh berries and nuts for topping
How to make it
- Find a cute mason jar or a small airtight container and add the rolled oats, chia seeds, and a pinch of salt to provide a flavor base.
- Pour in the almond milk, Greek yogurt, maple syrup, and vanilla extract, ensuring that all the dry ingredients are fully submerged in the liquid.
- Stir the mixture vigorously with a spoon to break up any clumps of chia seeds or oats, making sure everything is evenly distributed throughout the jar.
- Secure the lid tightly and place the container in the refrigerator to soak for at least 6 hours, though overnight is truly the best for texture.
- In the morning, give the oats another quick stir and add a splash of extra milk if you prefer a thinner, more pourable consistency for your breakfast.
- Top with your favorite fresh berries, a handful of crunchy nuts, or even a drizzle of nut butter to complete your aesthetic and healthy morning meal.
Ultimate Cheesy Baked Ziti

Why we love this
Baked ziti is the quintessential ‘Pinterest perfect’ dinner because it looks absolutely stunning when it comes out of the oven with those golden, bubbling cheese peaks. It is the ultimate crowd-pleaser that brings everyone to the table with a smile, offering layers of pasta, tangy marinara, and gooey melted mozzarella. I love how this dish feels like a celebration of family and togetherness, filling the home with an aroma that is both nostalgic and deeply welcoming. It’s a hearty, soulful meal that tastes even better the next day, making it a staple in my recipe rotation for any season.
Ingredients
- 1 lb ziti pasta
- 1 jar (24 oz) high-quality marinara sauce
- 15 oz ricotta cheese
- 1 egg, lightly beaten
- 3 cups shredded mozzarella cheese
- 1/2 cup grated Parmesan cheese
- 2 tbsp fresh basil, chopped
How to make it
- Preheat your oven to 375°F and lightly grease a 9×13 inch baking dish with olive oil or cooking spray to prevent the pasta from sticking.
- Cook the ziti pasta in boiling salted water for about 2 minutes less than the package directions suggest, so it stays firm enough to bake further.
- In a medium bowl, combine the ricotta cheese, the beaten egg, half of the Parmesan, and the fresh basil, mixing until the filling is light and airy.
- Drain the pasta and return it to the pot, tossing it with the marinara sauce and the ricotta mixture until every noodle is beautifully coated.
- Pour half of the pasta into the prepared baking dish, sprinkle with half of the mozzarella, then layer the remaining pasta and the rest of the cheeses.
- Bake for 20 to 25 minutes until the cheese is melted and slightly browned in spots, then let it rest for 5 minutes before serving to your loved ones.
High Protein Chicken Meal Prep
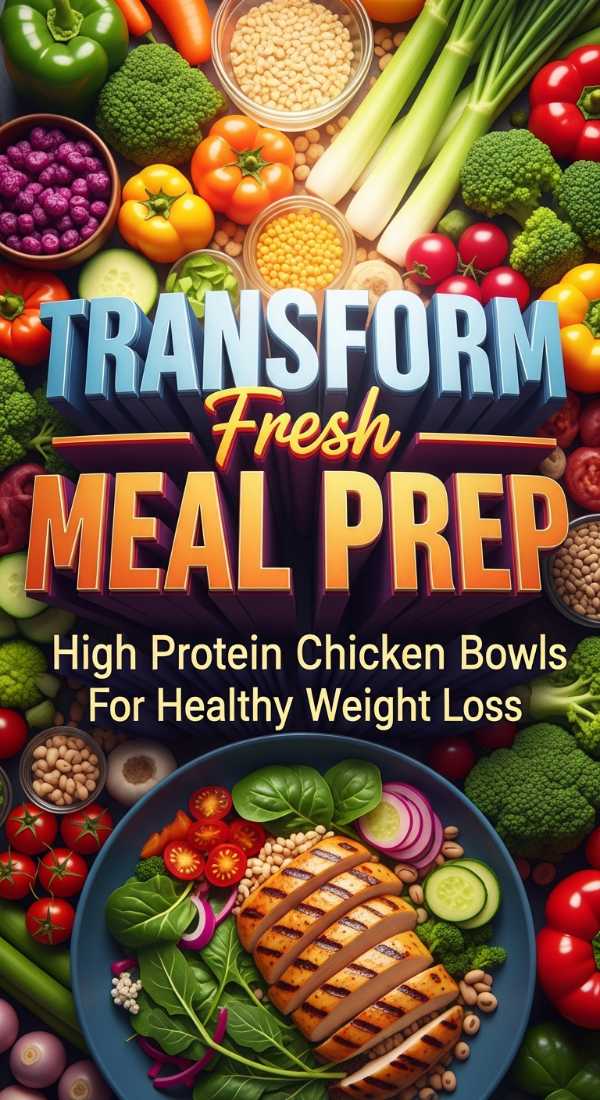
Why we love this
Staying on track with your health goals doesn’t have to mean eating bland or boring food, and this high-protein chicken prep is the living proof of that. It is all about balance, featuring lean protein, complex carbohydrates, and vibrant greens that look as beautiful in a glass container as they do on a plate. I find that when my meals look this organized and colorful, I am much more likely to enjoy the process of eating well throughout the week. It takes the guesswork out of lunch and provides a steady stream of energy that keeps me feeling vibrant and focused all day long.
Ingredients
- 1 lb chicken breast, cubed
- 1 cup dry quinoa
- 2 cups broccoli florets
- 1 red bell pepper, sliced
- 2 tbsp lemon juice
- 3 tbsp olive oil
- 1 tsp lemon pepper seasoning
How to make it
- Rinse the quinoa thoroughly and cook it according to the package instructions using chicken broth instead of water for an extra boost of savory flavor.
- While the quinoa simmers, toss the cubed chicken in a bowl with 1 tablespoon of olive oil and the lemon pepper seasoning until evenly coated.
- Heat a large skillet over medium-high heat and cook the chicken until it is golden brown and cooked through, then set it aside to rest.
- In the same skillet, add the remaining oil along with the broccoli and bell peppers, sautéing them until they are tender-crisp and still brightly colored.
- Whisk together the lemon juice and a splash of olive oil to create a light dressing that will tie all the meal prep components together perfectly.
- Divide the cooked quinoa, chicken, and sautéed vegetables into four airtight containers, drizzle with the lemon dressing, and store in the fridge for up to four days.
Budget Friendly Family Dinner

Why we love this
There is a special kind of satisfaction that comes from creating a massive, delicious meal that feeds the whole family without stretching the monthly grocery budget. This recipe focuses on humble pantry staples like beans and rice but elevates them with fresh aromatics and bold spices that create a truly festive atmosphere. It’s proof that you don’t need expensive cuts of meat to create a dinner that everyone will be asking for seconds of, making it a win for both your wallet and your palate. It’s a warm, inclusive way to eat that emphasizes the joy of sharing simple, honest food with the people you love.
Ingredients
- 2 cups long-grain white rice
- 2 cans (15 oz) black beans, rinsed
- 1 can (15 oz) sweet corn
- 1 large yellow onion, diced
- 2 cloves garlic, minced
- 1 tbsp taco seasoning
- Lime wedges and cilantro for serving
How to make it
- Cook the white rice according to the package directions, fluffing it with a fork once finished to ensure the grains stay light and separate.
- In a large pot or Dutch oven, sauté the diced onion in a splash of oil over medium heat until it becomes translucent and slightly sweet.
- Add the minced garlic and taco seasoning to the onions, stirring for 30 seconds to wake up the spices and infuse the oil with flavor.
- Pour in the rinsed black beans and the corn, stirring everything together and letting it cook for about 5 to 7 minutes until heated through.
- Gently fold the cooked rice into the bean and corn mixture, making sure the seasoning is distributed evenly throughout the entire large batch.
- Serve the mixture in big bowls, topped with plenty of fresh cilantro and a generous squeeze of lime juice to brighten up all the earthy flavors.
Air Fryer Garlic Parmesan Potato Wedges

Why we love this
These potato wedges are the ultimate side dish that often threatens to steal the entire show, thanks to their incredible crunch and savory, cheesy coating. They offer that addictive ‘fast food’ texture but are made right in your own kitchen with wholesome ingredients and much less oil than traditional fries. I love serving these at gatherings because they are such a universal favorite, and the combination of garlic and Parmesan is a classic for a reason. They come out of the air fryer looking absolutely stunning, with little bits of crispy cheese clinging to the perfectly seasoned potato skins.
Ingredients
- 3 large Russet potatoes
- 2 tbsp olive oil
- 1/2 cup grated Parmesan cheese
- 1 tsp garlic powder
- 1/2 tsp dried parsley
- Salt and pepper to taste
How to make it
- Wash the potatoes thoroughly and slice them into even wedges, then soak them in a bowl of cold water for 30 minutes to remove excess starch.
- Drain the wedges and pat them very dry with a clean kitchen towel, which is the most important step for achieving maximum air-fried crispiness.
- In a large bowl, toss the dried wedges with olive oil, garlic powder, parsley, salt, and pepper until each wedge is well-lubricated and spiced.
- Preheat your air fryer to 390°F and place the wedges inside, making sure they are not overlapping too much to allow for even browning.
- Cook for 15 to 20 minutes, shaking the basket every 5 minutes to ensure that every side of the potato gets that perfect golden-brown finish.
- Immediately after taking them out, toss the hot wedges with the grated Parmesan cheese so it melts slightly and sticks to the surface of the potatoes.
Low Carb Ground Beef Zucchini Boats

Why we love this
Zucchini boats are such a clever and beautiful way to enjoy a hearty, meaty filling while keeping things light and focusing on fresh garden produce. They look like little green canoes filled with savory treasures, making them a fantastic visual addition to any dinner table or foodie mood board you’re building. This recipe is particularly great for those nights when you want something that feels substantial but won’t leave you feeling weighed down or sluggish afterward. The way the zucchini softens in the oven while the beef remains juicy and the cheese gets melty is a textural masterpiece.
Ingredients
- 4 medium zucchinis
- 1 lb lean ground beef
- 1/2 cup marinara sauce
- 1/2 cup diced onion
- 1 cup shredded cheddar or mozzarella
- 1 tsp Italian seasoning
- Salt and pepper to taste
How to make it
- Preheat your oven to 400°F and slice each zucchini in half lengthwise, then use a spoon to gently scoop out the seeds and center flesh.
- Place the hollowed-out zucchini shells on a baking sheet lined with parchment paper and sprinkle them lightly with a bit of salt and pepper.
- In a large skillet over medium-high heat, brown the ground beef along with the diced onions until the meat is fully cooked and the onions are soft.
- Drain any excess fat from the skillet, then stir in the marinara sauce and Italian seasoning, simmering for 2 minutes to meld the flavors together.
- Spoon the beef mixture generously into the hollowed zucchini boats, pressing down slightly to ensure they are packed with as much filling as possible.
- Top each boat with a layer of shredded cheese and bake for 15 to 20 minutes, or until the zucchini is tender and the cheese is bubbly.
Viral Shredded Chicken Tacos

Why we love this
There is a very good reason why these shredded chicken tacos have taken the internet by storm—they are quite possibly the easiest and most flavorful tacos you will ever make. By slow-cooking the chicken in a bath of salsa and spices, you end up with meat that literally falls apart at the touch of a fork. It’s a set-it-and-forget-it kind of meal that delivers high-impact flavor with almost zero active effort, which is exactly what we need for those busy days. Every bite is a burst of zesty, tender goodness that transforms a simple Tuesday night into a full-blown taco fiesta.
Ingredients
- 1.5 lbs chicken breasts
- 1 cup of your favorite jarred salsa
- 1 tbsp taco seasoning
- Small flour or corn tortillas
- Toppings: avocado, lime, sour cream, pickled onions
How to make it
- Place the raw chicken breasts in the bottom of a slow cooker or a heavy-bottomed pot, ensuring they are laid out in an even, single layer.
- Pour the salsa over the chicken and sprinkle the taco seasoning on top, then give it a quick stir to make sure the chicken is well-coated.
- Cover and cook on high for 3 to 4 hours (or low for 6 to 8 hours) until the chicken is tender enough to be easily shredded.
- Remove the chicken from the pot and use two forks to shred it into small, bite-sized pieces before returning it to the juices to soak up flavor.
- Warm your tortillas in a dry skillet or over an open flame for a few seconds on each side to make them pliable and slightly toasted.
- Fill each tortilla with a generous scoop of the shredded chicken and finish with your favorite fresh toppings like creamy avocado and zesty lime.
A Note from My Heart to Yours
Building a foodie mood board is about more than just looking at pretty pictures; it’s about inviting that beauty and nourishment into your daily life. I hope these recipes serve as a starting point for your own culinary adventures, filling your home with warmth and your heart with peace. Thank you for letting me share these little pieces of my kitchen with you, my loves. Until next time, stay cozy and keep dreaming of delicious things!