
Pastels and Pixels: Refresh Your Look with These Spring 2026 Nail Tutorials
Hi there, my loves! Can you feel it? That soft, humming energy in the air? Spring 2026 has officially arrived, and it feels like a beautiful collision between a digital dream and a wildflower meadow. It’s a time for shedding those heavy winter layers and letting our fingertips tell a story of renewal, softness, and just a hint of tech-inspired edge. I’ve spent the last few weeks manifesting the perfect palette for us, and I am so excited to share these little moments of art with you.
Your hands are the tools you use to create your life, sweets. Whether you’re typing away at your latest project or holding a warm cup of herbal tea, your nails should be a reflection of the light you carry inside. This season, we’re leaning into ‘Pastels and Pixels’—a mix of those classic, cloud-soft hues we adore, infused with the sharp, vibrant energy of the future. Grab your favorite beverage, find a sunny corner, and let’s dive into our spring nail ritual together.
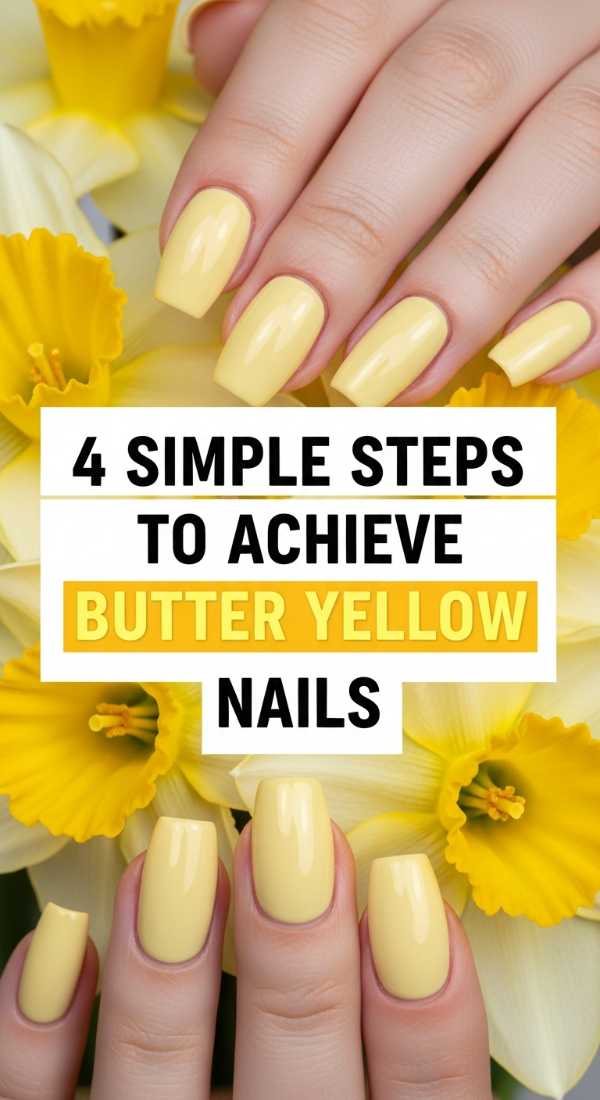
The Softest Butter Yellow Bliss
Why to love this Design:
Butter yellow is the ultimate hug in a bottle. It’s not quite neon and not quite beige; it’s that perfect, creamy sunshine that makes every skin tone look radiant and warm. It’s like wearing a little bit of morning light on your fingers.
Essential Elements:
- Opaque pastel yellow polish
- High-gloss top coat
- Soft rounded nail shape
How to Prepare:
- Gently push back your cuticles to create a clean canvas.
- Apply a ridge-filling base coat for a smooth surface.
- Apply two thin, even coats of butter yellow, allowing them to dry in between.
- Seal with a ultra-glossy top coat to give it that ‘melted’ look.
Budget Range
- Essie ‘Canary Coast’ ($10)
- Sally Hansen Insta-Dri Top Coat ($7)
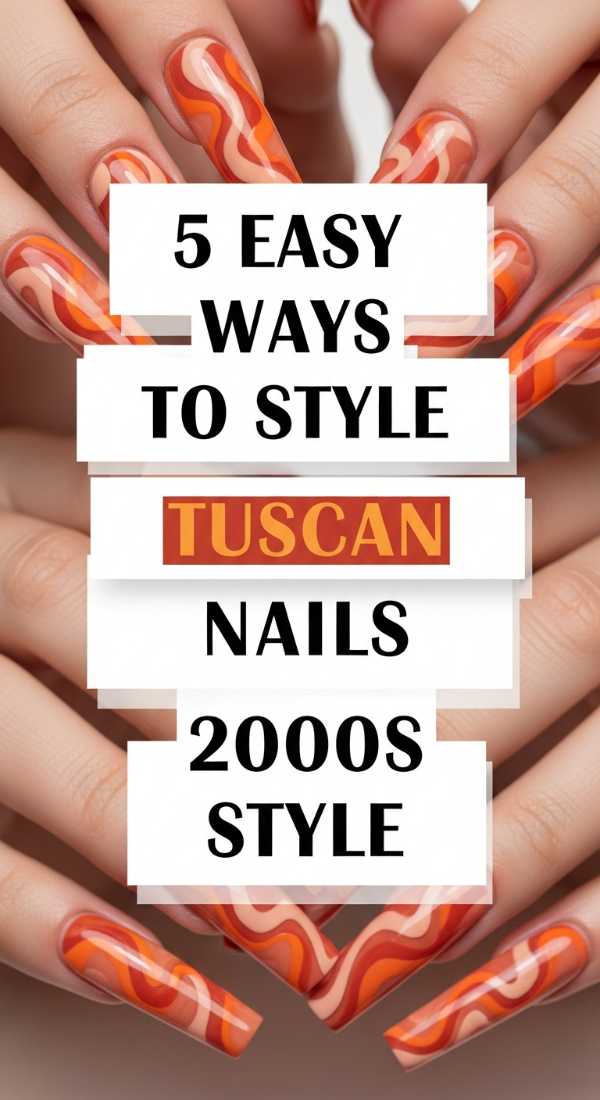
Tuscan Dreams: 2000s Style
Why to love this Design:
We are bringing back that Y2K Italian Riviera energy! This look is all about frosted finishes, playful charms, and a sun-drenched aesthetic that feels like a vintage postcard found in a digital archive.
Essential Elements:
- Frosty white or blue base
- Tiny rhinestone accents
- Square nail shape
How to Prepare:
- Style with a frosty, pearlescent base for that nostalgic shimmer.
- Add a single tiny rhinestone at the base of each nail.
- Incorporate a butterfly decal on the ring finger.
- Opt for a crisp square tip to nail the 2000s silhouette.
- Finish with a light-reflecting oil to make the skin glow.
Budget Range
- OPI ‘Kyoto Pearl’ ($11)
- Nail Art Rhinestone Kit from Amazon ($8)
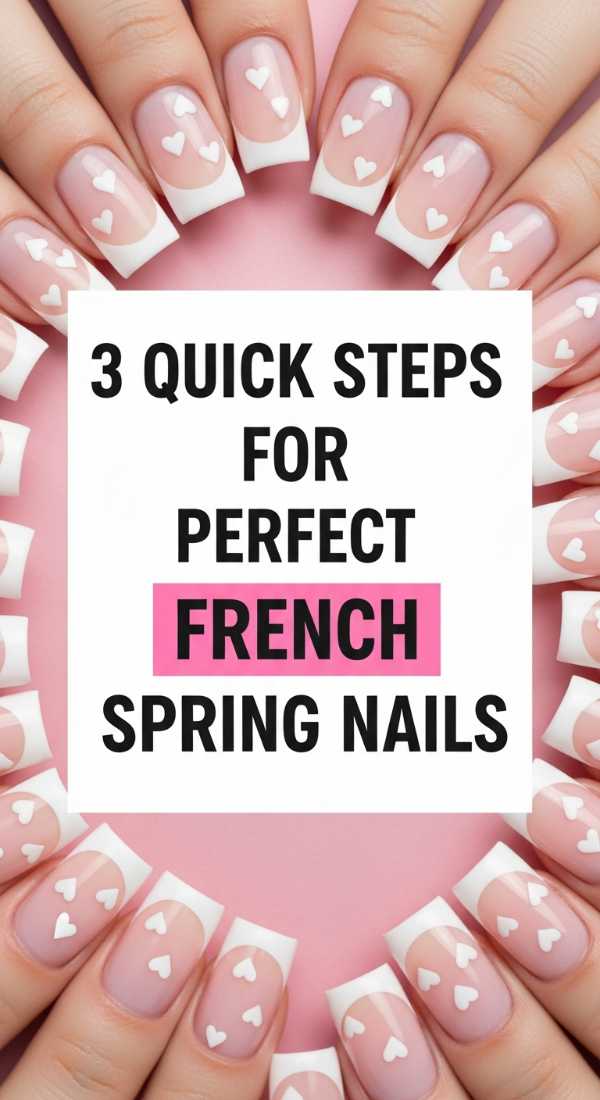
The Perfect French Spring
Why to love this Design:
A classic that never sleeps, but this spring, we’re giving it a pixel-soft twist. Instead of stark white, we’re using whispered tones of lavender and mint to define the tips of our dreams.
Essential Elements:
- Sheer nude base
- Pastel polish for tips
- Precision brush
How to Prepare:
- Apply one coat of a sheer ‘your nails but better’ base.
- Use a fine liner brush to swipe a thin curve of pastel lavender across the tip.
- Finish with a quick-dry top coat for a salon-quality shine.
Budget Range
- Zoya ‘Naked Manicure’ Base ($12)
- Holler and Glow Pastel Polish ($5)
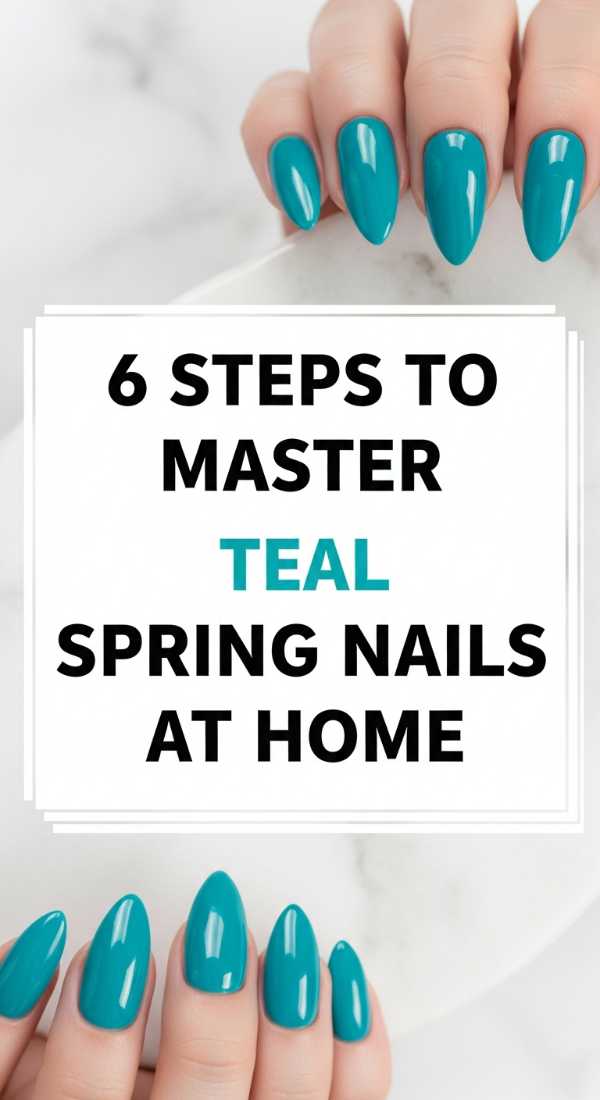
Mystic Teal Garden
Why to love this Design:
Teal is the bridge between the deep ocean and the fresh spring leaves. It’s sophisticated, grounding, and feels incredibly modern when paired with the digital aesthetic of 2026.
Essential Elements:
- Creamy teal polish
- Silver foil accents
- Almond shape
How to Prepare:
- Buff the nails to ensure a snag-free surface.
- Apply a strong bonding base coat.
- Paint two thin layers of deep teal.
- Press a small piece of silver foil onto the ring finger while tacky.
- Apply a second layer of teal around the foil for a ‘caged’ look.
- Seal everything with a thick gel-effect top coat.
Budget Range
- Lights Lacquer ‘Paper Snow’ ($13)
- Silver Nail Foil Flakes ($6)
The Baddie Spring Manifestation
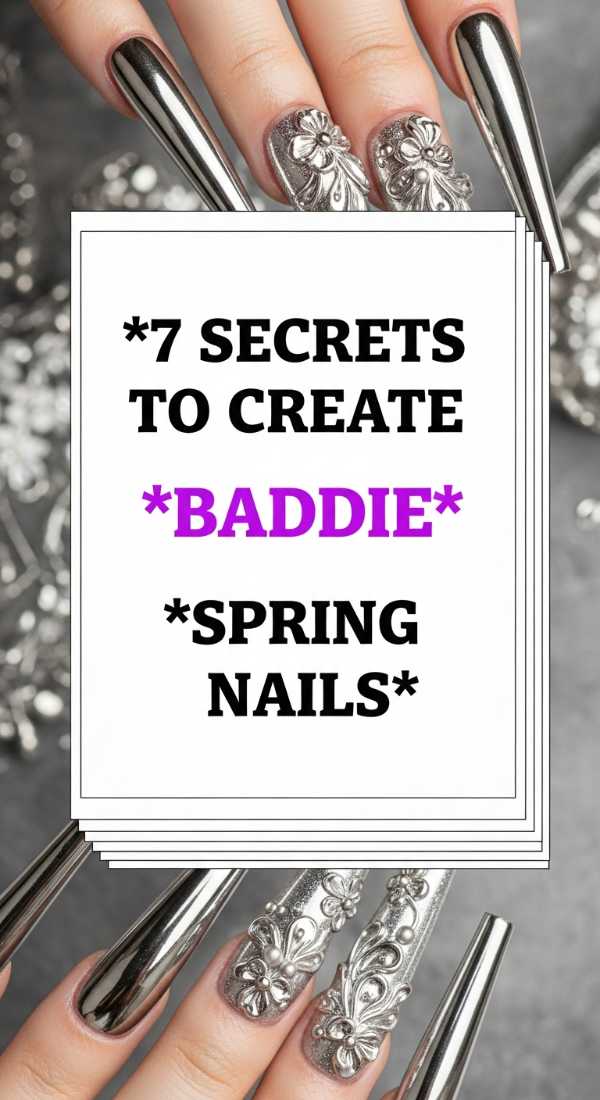
Why to love this Design:
Sometimes we need to tap into our inner powerhouse. This ‘baddie’ look combines extra length with soft spring colors, proving that you can be both fierce and delicate at the same time.
Essential Elements:
- XL Coffin extensions
- Matte and Glossy finishes
- 3D flower charms
How to Prepare:
- Apply your long coffin-shaped tips or extensions.
- Create a matte pink ombre effect.
- Use a high-gloss top coat only on the tips.
- Apply a 3D acrylic flower charm to the middle nail.
- Add a tiny silver stud to the center of the flower.
- Use a chrome powder on the pinky nail for extra flash.
- Clean up edges with a sharp brush and acetone.
Budget Range
- KISS Gel Fantasy XL Nails ($9)
- 3D Floral Nail Charms ($7)
Pucci-Inspired Color Waves
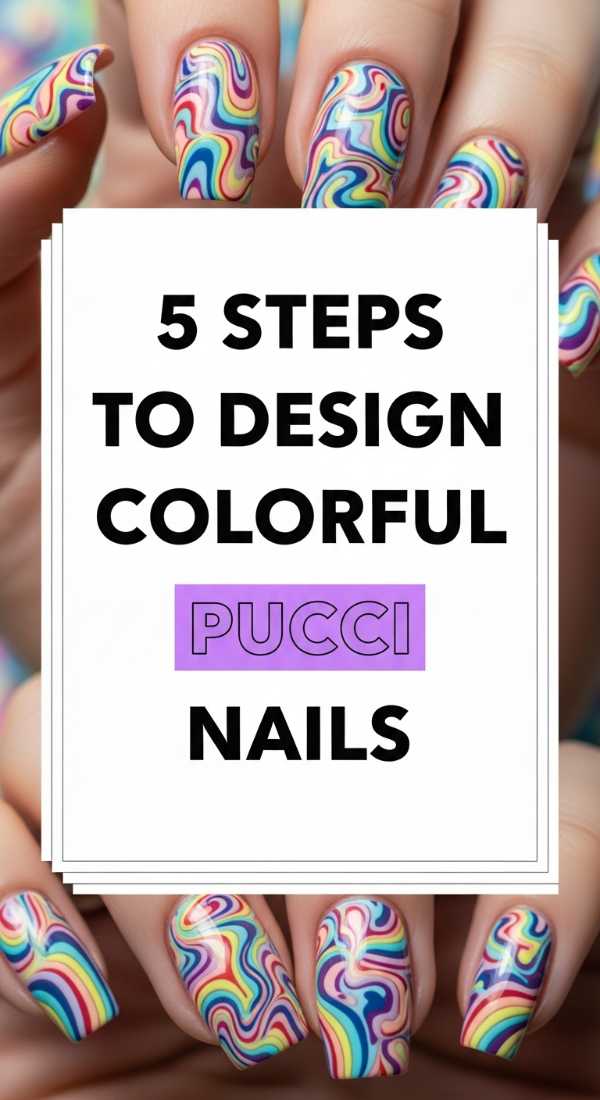
Why to love this Design:
Channeling the iconic swirls of Pucci, this design is for my loves who aren’t afraid of a little organized chaos. It’s colorful, rhythmic, and feels like high-fashion digital art.
Essential Elements:
- 4-5 contrasting pastel polishes
- Black detailing pen
- Steady hand
How to Prepare:
- Start with a clean, white base coat to make colors pop.
- Drop small blobs of pink, blue, and orange randomly.
- Use a toothpick or thin brush to swirl them into organic shapes.
- Outline the shapes with a fine black line once dry.
- Apply a leveling top coat to smooth out the layers.
Budget Range
- Nail Art Striping Brushes ($5)
- Pastel Polish Bundle ($20)
Short & Sweet Spring Ideas
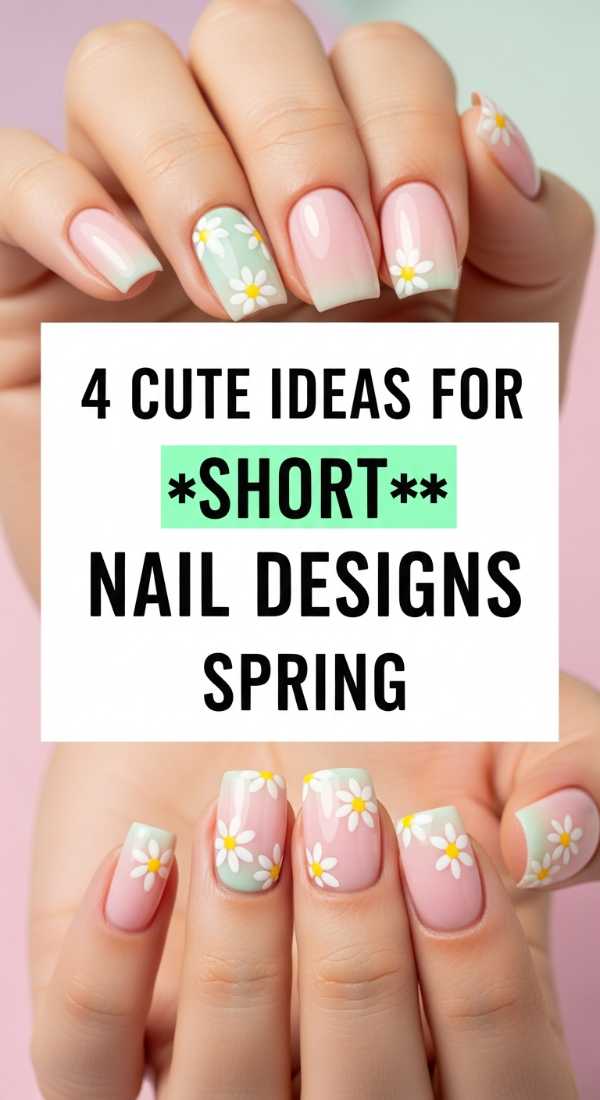
Why to love this Design:
Short nails are a vibe! They are practical, chic, and look incredibly intentional when decorated with tiny, delicate details that celebrate the season’s small joys.
Essential Elements:
- Clear or milky base
- Floral stickers
- Short active length
How to Prepare:
- Shape nails into a neat ‘squoval’.
- Apply a milky white base for a ‘cloud’ effect.
- Place one tiny daisy sticker near the cuticle of each nail.
- Seal with a matte top coat for a velvet feel.
Budget Range
- Olive & June Flower Stickers ($8)
- Orly ‘Rose-Colored Glasses’ ($12)
Vibrant Orange Sorbet
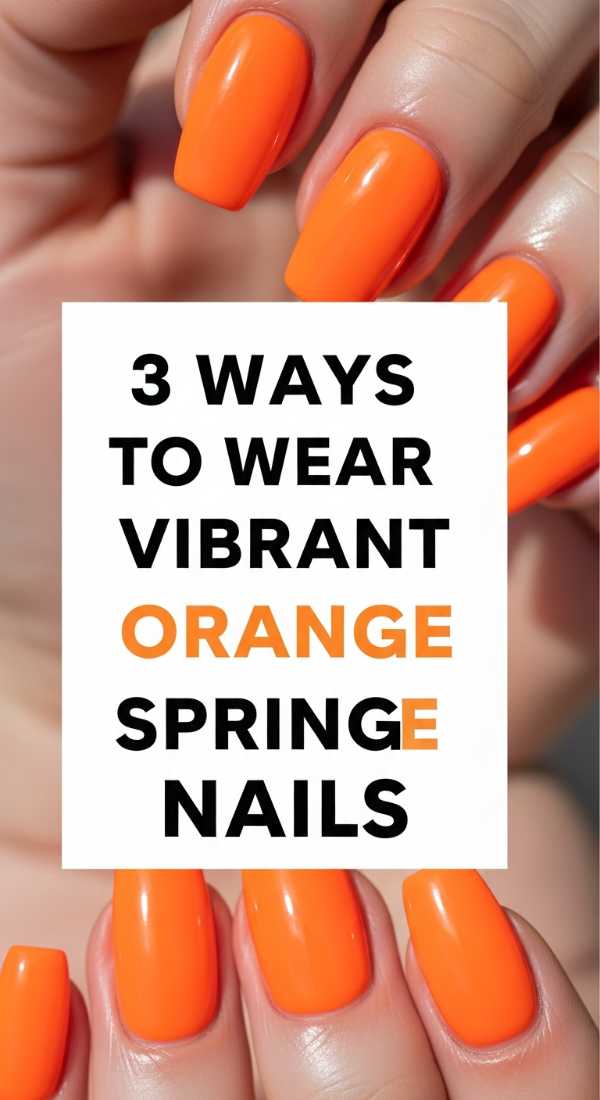
Why to love this Design:
Orange is the color of creativity and joy. This spring, we are opting for a sorbet-inspired orange that feels fresh, juicy, and ready for those first outdoor brunch dates.
Essential Elements:
- Semi-sheer orange jelly polish
- Gold micro-shimmer
- Oval shape
How to Prepare:
- Apply a gradient of orange, darker at the base and lighter at the tip.
- Dust a tiny bit of gold shimmer over the wet polish.
- Apply two coats of top coat for a ‘glass’ finish.
Budget Range
- Cirque Colors Jelly Polish ($12)
- Gold Dust Pigment ($5)
Five-Minute Abstract Pixels
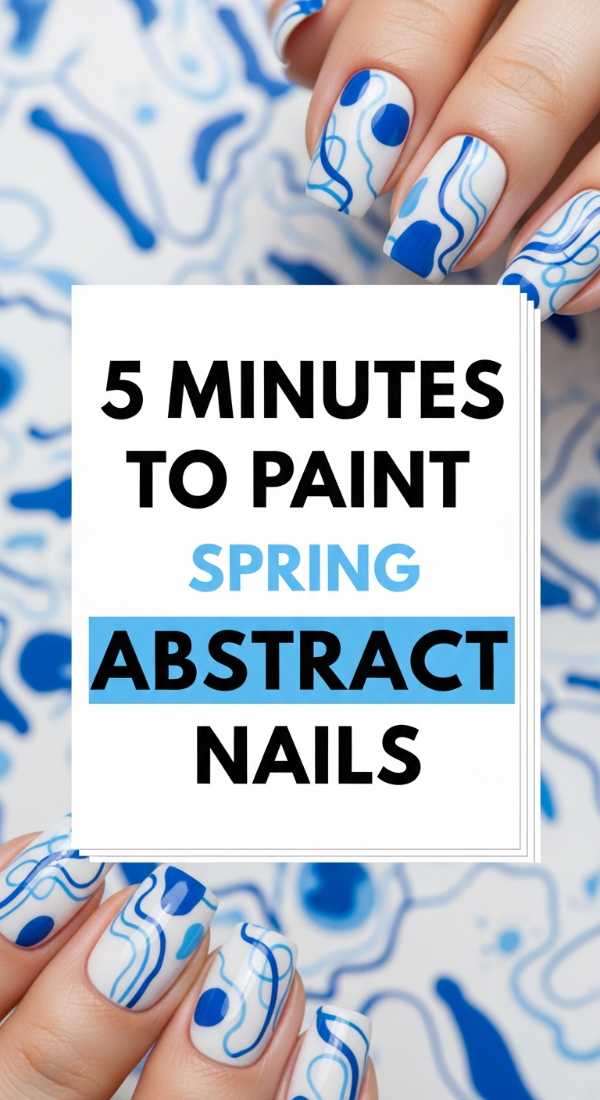
Why to love this Design:
For my busy loves! This look is all about the ‘perfectly imperfect.’ It’s fast, artistic, and looks like you spent hours at a boutique salon in the city.
Essential Elements:
- Primary pastel colors
- Dotting tool
- Fast-dry spray
How to Prepare:
- Swipe a random stroke of mint green across the nail.
- Add a contrasting dot of lilac using a dotting tool.
- Place a tiny streak of gold leaf on one corner.
- Wait 60 seconds and apply a top coat.
- Mist with fast-dry spray to get out the door!
Budget Range
- Essie Speed Setter Top Coat ($10)
- Wooden Dotting Tools ($4)
Edgy Black Spring Bloom
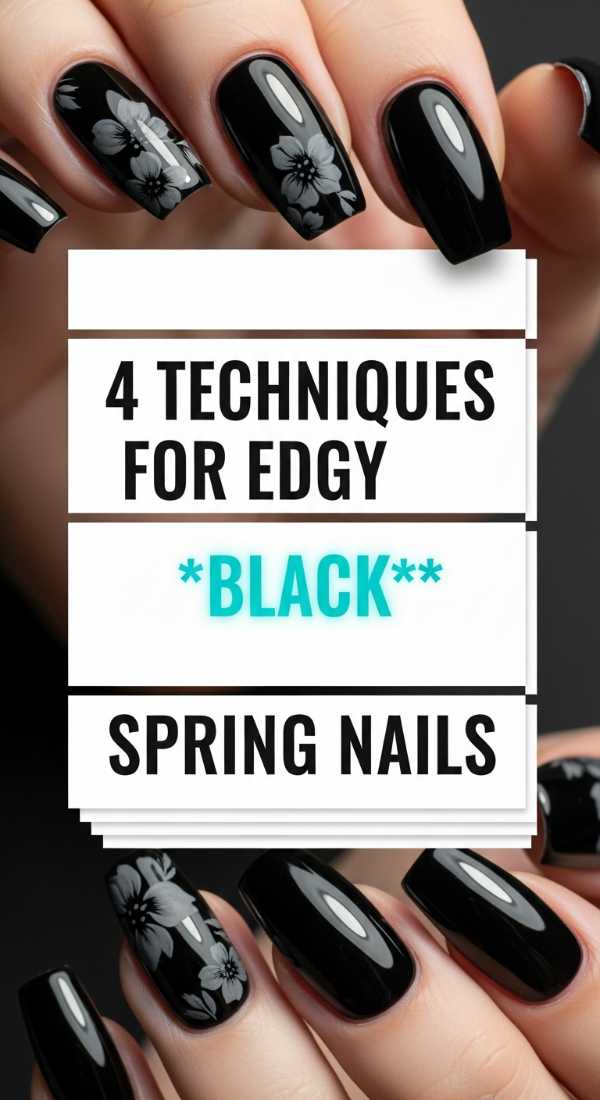
Why to love this Design:
Who says black isn’t for spring? By pairing a dark, edgy base with delicate floral negative space, we create a ‘Midnight Garden’ look that is both moody and hopeful.
Essential Elements:
- Matte black polish
- Negative space stickers
- Stiletto shape
How to Prepare:
- Apply floral-shaped stickers to the center of your bare nails.
- Paint over the entire nail with matte black polish.
- Carefully peel off the stickers while the polish is still slightly damp.
- Refine the flower edges with a tiny brush dipped in pink polish.
Budget Range
- Revlon Matte Top Coat ($6)
- OPI ‘Black Onyx’ ($11)
Embrace Your Spring Glow
As you finish your home manicure, take a deep breath and admire your beautiful hands. These tutorials aren’t just about the colors or the trends; they are about taking ten minutes for yourself in a world that often asks for too much. Whether you chose the soft butter yellow or the edgy black blooms, remember that you are the artist of your own life. May your spring be as bright and beautiful as your new manicure. Shine on, loves!
Frequently Asked Questions
Q: How do I make my DIY manicure last longer?
A: The secret is all in the prep! Make sure your nails are completely free of oils by wiping them with alcohol before applying your base coat. Always seal the ‘free edge’ of your nail with your top coat.
Q: Are 2000s trends really back for 2026?
A: Absolutely! But with a digital twist. Think of it as ‘Y2K 2.0’—taking the fun charms and frost and making them look more refined and high-tech.
Q: What is the best nail shape for short fingers?
A: Almond or oval shapes are wonderful for elongating the fingers, even if you keep the length relatively short!