

Pastel Power & Petal Prints: Your Complete Spring 2026 Mani Guide
Hi my loves! Can you feel it? That first whisper of warmth dancing against your window, the way the light lingers just a little bit longer in the evenings? Spring 2026 isn’t just a season this year; it feels like a collective exhale. As the world begins to bloom in shades of lilac and soft sage, I find myself wanting to carry that renewal right at my fingertips. There is something so deeply soul-soothing about sitting down with a cup of herbal tea and painting your intentions onto your nails.
This season, we are leaning into the ‘soft-tech’ aesthetic—mixing those dreamy, cloud-like pastels with high-shine finishes and nostalgic pops of color. Whether you’re a minimalist who loves a clean, natural look or someone who wants to wear a Tuscan sunset on their hands, I’ve gathered the ultimate inspiration for our spring rituals. Let’s dive into these ten dreamy designs together, shall we?
4 Easy Steps to Paint Butter Yellow Nails

Why to love this Design:
Butter yellow is the undisputed sweetheart of 2026. It’s like wearing a little squeeze of sunshine. Unlike the harsh neons of years past, this shade is creamy, comforting, and surprisingly flattering on every skin tone. It’s the color of optimism and fresh daffodils.
Essential Elements:
- Opaque creamy yellow polish
- Smoothing ridge-filler base coat
- High-gloss top coat
How to Prepare:
- Apply a ridge-filling base coat to ensure a perfectly smooth canvas for the light pigment.
- Apply the first thin layer of butter yellow polish, moving from the center to the sides.
- Add a second coat to achieve full opacity and that ‘custard’ depth.
- Seal with a thick gel-effect top coat for a plush, cushioned finish.
Budget Range
- Essie ‘Soothe Bolt’ ($10)
- OPI ‘Blindfold Me’ ($11)
- Sally Hansen Insta-Dri in ‘Butter-fly’ ($7)
5 Simple Ways to Design Yellow Blueberry Nails
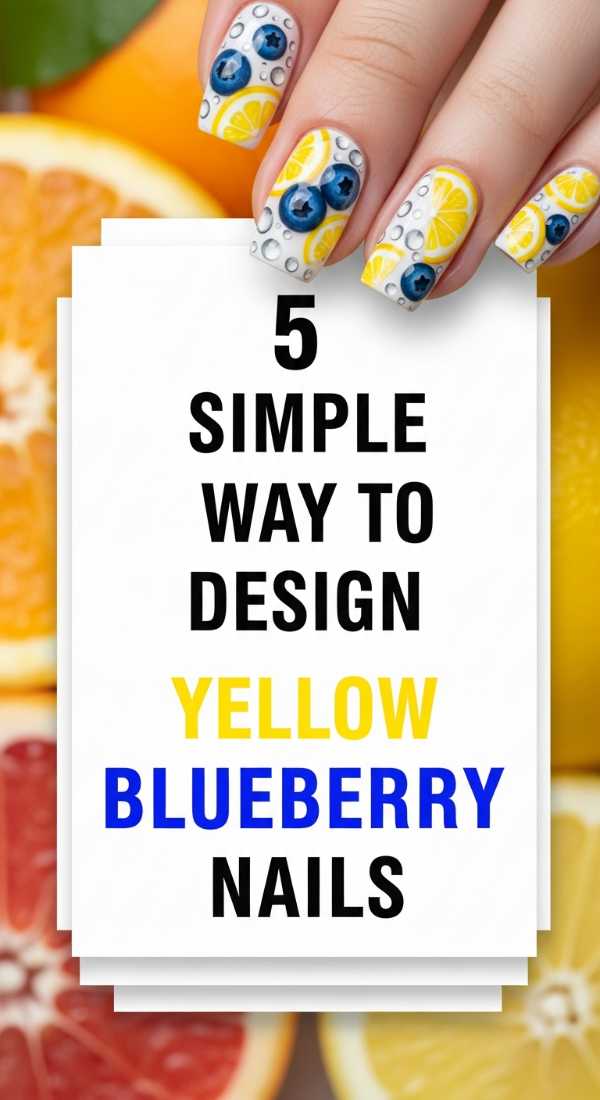
Why to love this Design:
This is the ‘picnic on your nails’ aesthetic we didn’t know we needed. Combining the warmth of yellow with the cool, tart pop of blueberry blue creates a visual harmony that feels playful yet sophisticated. It’s a conversation starter that feels like a spring morning at the farmer’s market.
Essential Elements:
- Pale yellow base color
- Deep navy or cornflower blue polish
- Fine-point detailing brush
- Matte or glossy finish
How to Prepare:
- Paint your base with two coats of creamy yellow and let dry completely.
- Use a dotting tool to place small clusters of two or three blue ‘berries’.
- Add a tiny green leaf or stem using a toothpick or fine brush.
- Mix and match: try one accent nail with berries and others solid yellow.
- Lock it in with a long-wear top coat.
Budget Range
- Zoya ‘Daisy’ ($12)
- Holler and Glow Blue Polish ($4)
- Nail Art Brushes Set ($6 via Amazon)
3 Quick Techniques for Natural Spring Nails
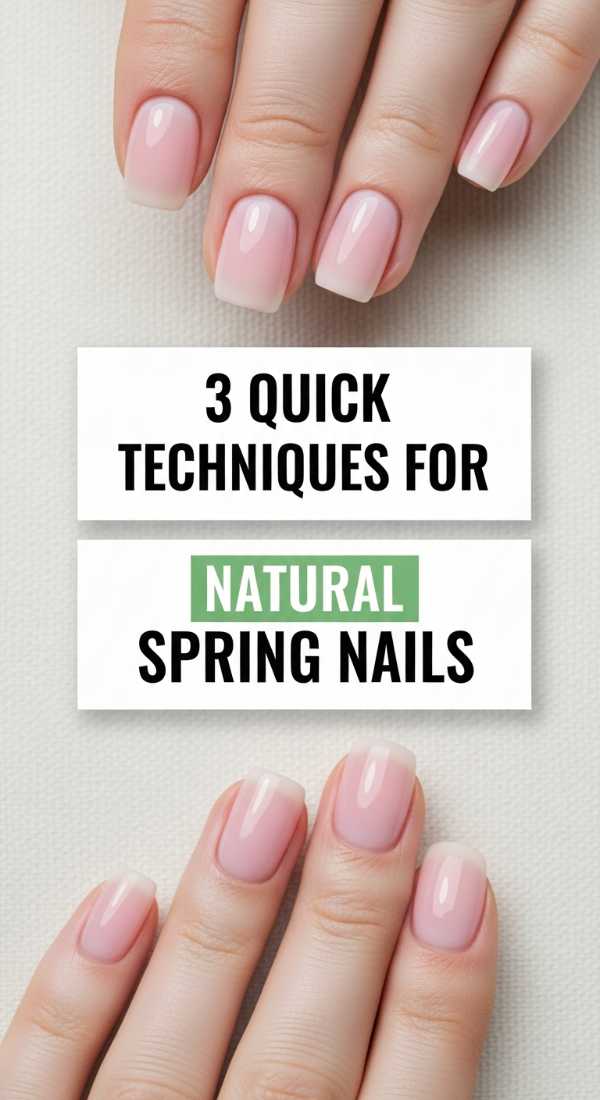
Why to love this Design:
For my loves who adore the ‘clean girl’ look, 2026 is all about the ‘Glass Petal’ finish. It’s not just unpainted; it’s curated health. It makes your hands look elongated, soft, and eternally elegant without ever trying too hard.
Essential Elements:
- Sheer pink or nude tint
- Nail buffer
- Cuticle oil
How to Prepare:
- Gently buff the nail surface to a natural shine to stimulate blood flow.
- Apply one single layer of a sheer, ‘your-nails-but-better’ tint.
- Massage a generous amount of apricot or jojoba oil into the cuticles for that healthy glow.
Budget Range
- Dior Abricot Cuticle Cream ($30)
- Olive & June ‘7-Free’ Polish ($9)
- Revlon Shine Buffer ($5)
6 Secrets to Achieve Vibrant Red Spring Nails
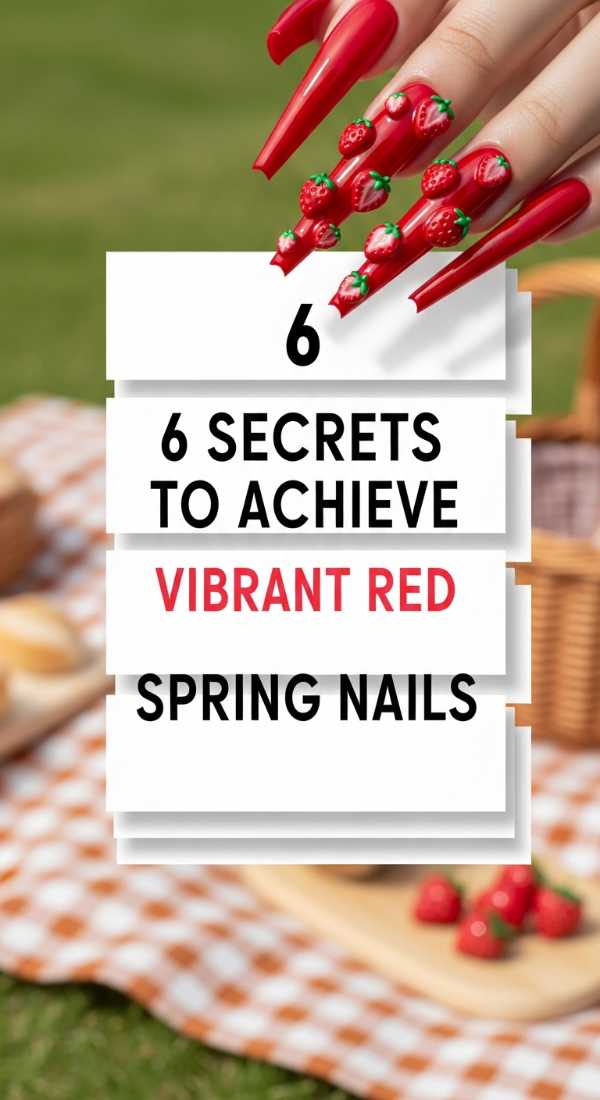
Why to love this Design:
Who says red is only for winter? The Spring 2026 red is ‘Poppy Fire’—it has orange undertones that make it feel alive and floral rather than heavy. It’s bold, it’s confident, and it looks incredible against fresh denim and white linen.
Essential Elements:
- Orange-toned red lacquer
- Stain-preventing base coat
- Precision clean-up brush
How to Prepare:
- Start with a high-quality base coat to prevent the red pigment from staining your natural nail.
- Apply your first coat using only three strokes: middle, left, right.
- Keep the layers thin to avoid bubbling.
- Use a brush dipped in acetone to crisp up the edges near the cuticle.
- Apply a UV-resistant top coat to keep the orange-red from fading.
- Hydrate the surrounding skin immediately after drying.
Budget Range
- Chanel Le Vernis in ‘Incendiaire’ ($32)
- Orly ‘Red Flare’ ($15)
- Wet n Wild ‘Red Red’ ($3)
5 Steps to Apply Shiny Spring Chrome Nails
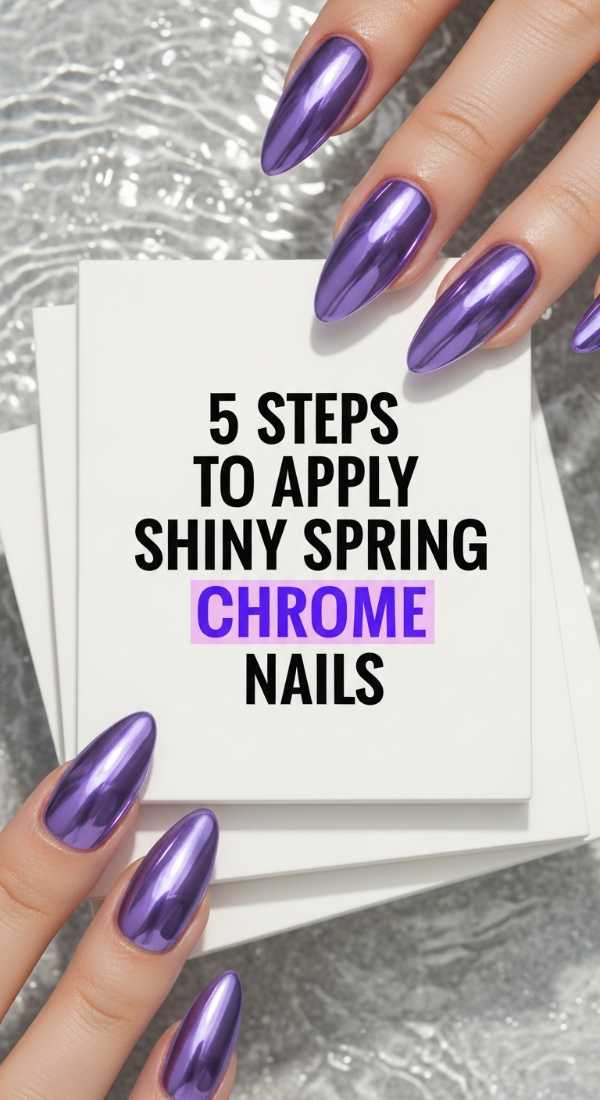
Why to love this Design:
We are taking the chrome trend and softening it for the season. Think ‘Pearl Shell’—it’s iridescent, ethereal, and catches the light like dew on a rose petal. It’s the futuristic side of spring that feels like a fairy tale.
Essential Elements:
- White or lavender base polish
- Pearl chrome powder
- Sponge applicator
- Water-based top coat
How to Prepare:
- Paint your nails a soft pastel shade and let them get ‘tacky’ (not fully dry).
- Gently buff the chrome powder over the surface using the sponge.
- Wipe away excess dust with a soft fan brush.
- Apply a specialized top coat that won’t dull the metallic shine.
- Finish with a final high-gloss layer for depth.
Budget Range
- Born Pretty Chrome Powder ($8)
- Lights Lacquer ‘Paper Snow’ ($13)
- Essence Extreme Shine Top Coat ($5)
4 Ways to Master Short Square French Nails
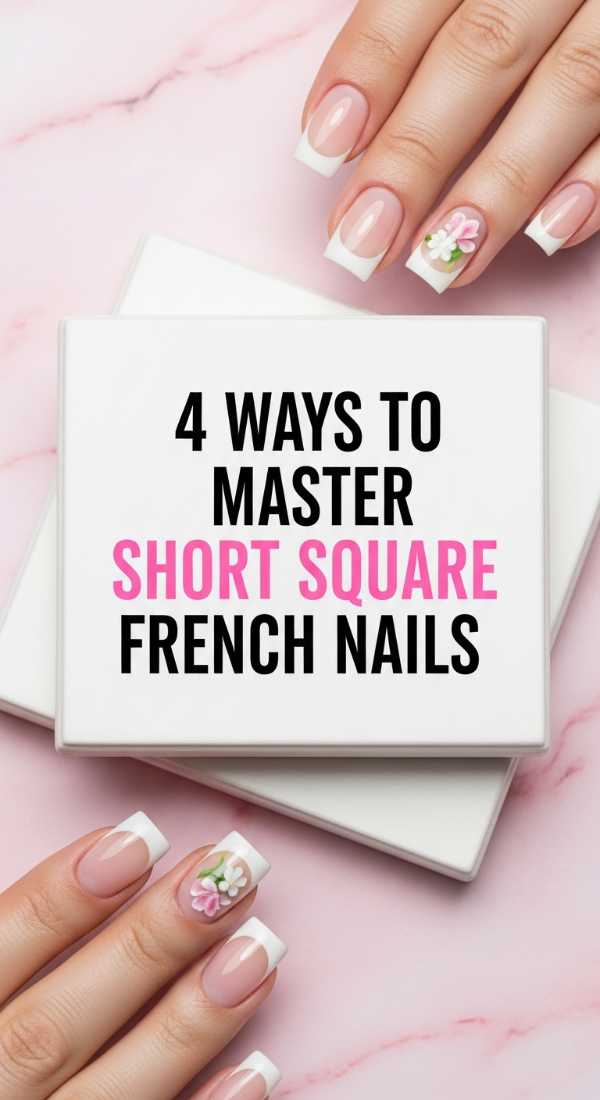
Why to love this Design:
Short nails are having a massive moment! This version of the French mani is ‘Micro-Chic.’ It’s practical for our busy lives but keeps that timeless French elegance. It feels modern, clean, and very ‘Old Money’ spring.
Essential Elements:
- Short-square file shape
- Milky base color
- Crisp white polish
How to Prepare:
- File nails into a soft square with slightly rounded edges to prevent snagging.
- Apply a milky, semi-translucent base.
- Draw a ‘micro-thin’ line at the very tip using a striping brush.
- Keep the white tip narrow to maximize the appearance of the nail bed.
Budget Range
- Butter London ‘Cotton Buds’ ($18)
- Ella + Mila ‘Pure’ ($11)
- Glass Nail File ($10)
7 Steps to Create Trendy Spring Checkered Nails
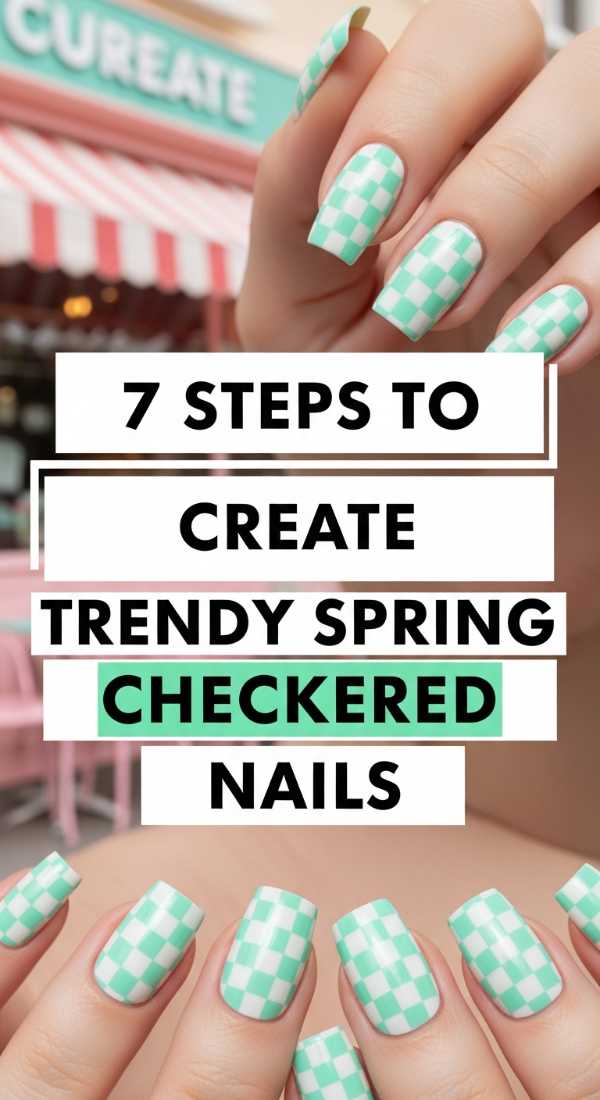
Why to love this Design:
This design is for the playful souls! The 2026 checkered look uses ‘mismatched pastels’ like mint and lavender. It’s retro-cool and reminds me of vintage 1960s garden parties. It’s a bit of a project, but the results are so rewarding.
Essential Elements:
- Two contrasting pastel polishes
- Fine grid tape or a steady detailing brush
- Steady hand
How to Prepare:
- Apply your lighter pastel shade as the base.
- Once dry, use a thin brush to draw vertical lines.
- Cross them with horizontal lines to create a grid.
- Carefully fill in every other square with the darker pastel.
- Touch up any wobbly lines with your base color.
- Wait longer than usual for it to dry to avoid smearing the pattern.
- Seal with a thick top coat.
Budget Range
- Cirque Colors Pastels ($14 each)
- Nail Art Striping Tape ($5)
- Seche Vite Dry Fast Top Coat ($10)
5 Minutes to Style Bright Teal Spring Nails
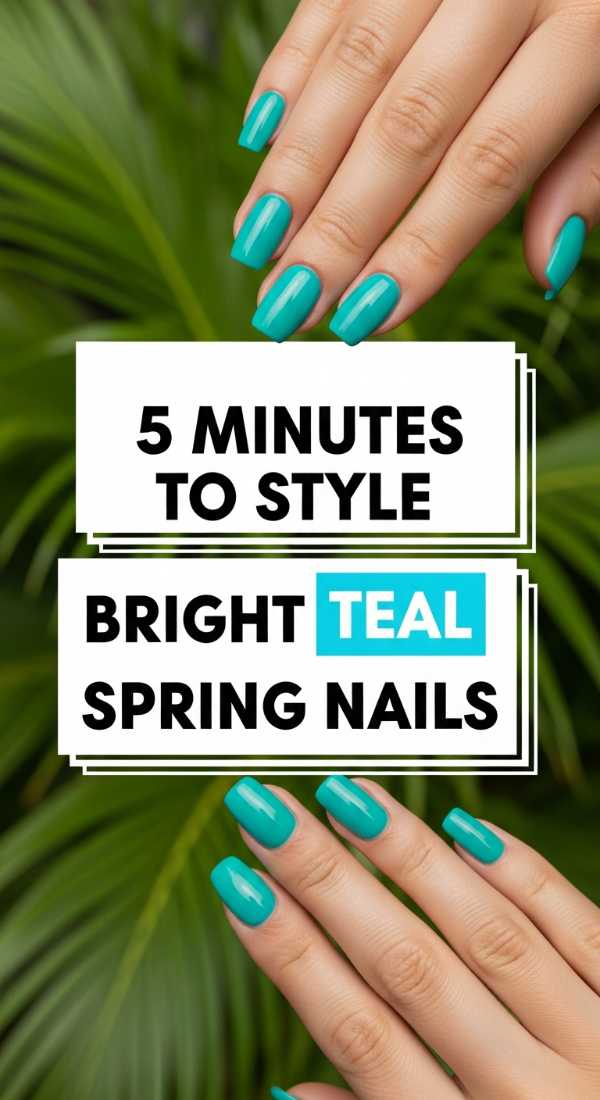
Why to love this Design:
Bright teal is the ‘power color’ of the season. It’s the color of a clear tropical pool. If you’re feeling a bit sluggish after winter, this color is an instant shot of energy. It’s vibrant, deep, and looks stunning with gold jewelry.
Essential Elements:
- High-pigment teal lacquer
- Gold foil accents (optional)
- Quick-dry drops
How to Prepare:
- Apply one coat of teal—quality polishes usually only need one for this shade!
- Add a tiny fleck of gold foil at the base for a luxury touch.
- Use quick-dry drops so you can get back to your day in minutes.
- Apply cuticle oil to keep the edges looking salon-fresh.
- Pair with a matching teal accessory to tie the look together.
Budget Range
- Morgan Taylor ‘Go-To Teal’ ($9)
- Nails Inc. ‘Mayfair Made Me Do It’ ($15)
- Gold Leaf Flakes ($6)
4 Ways to Get Edgy Goth Spring Nails
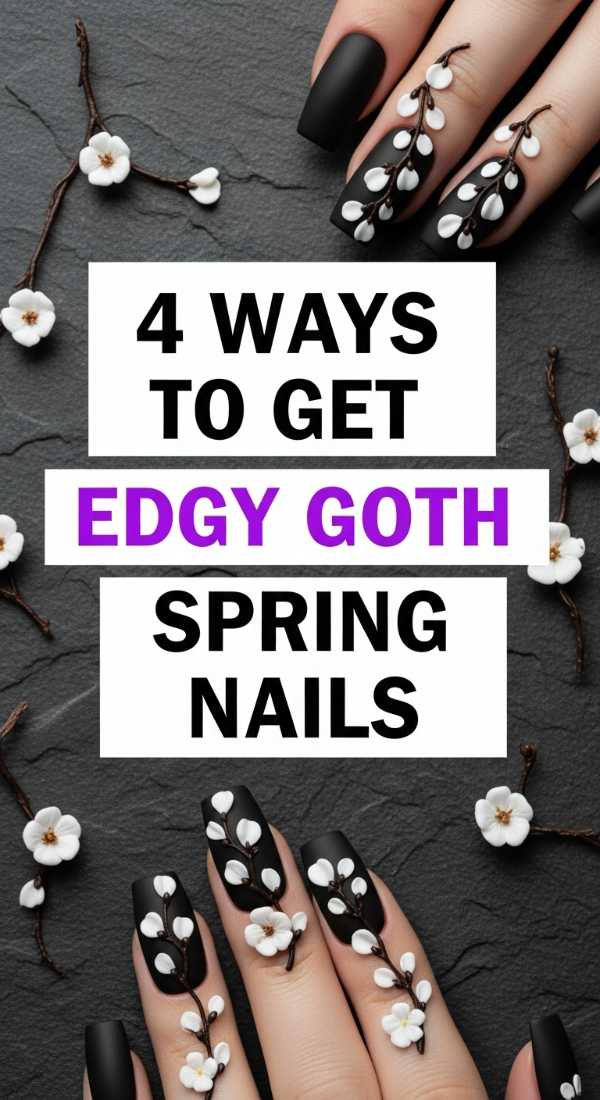
Why to love this Design:
For those of us who aren’t always about the sunshine and rainbows, ‘Spring Goth’ is a vibe. It’s about taking dark, moody tones like charcoal or plum and softening them with matte finishes or tiny floral accents. It’s the ‘rainy spring day’ aesthetic.
Essential Elements:
- Deep plum or charcoal polish
- Matte top coat
- Delicate flower stickers
How to Prepare:
- Apply your dark base color to all nails.
- Add a matte top coat to give it that velvety, soft-goth feel.
- Apply a single, delicate white flower sticker to the ring finger.
- Keep the nails short and rounded for a softer look.
Budget Range
- ILNP ‘Eclipse’ ($12)
- Pacific Matte Top Coat ($9)
- Deco Miami Nail Stickers ($8)
6 Steps to Recreate Tuscan 2000s Nail Designs
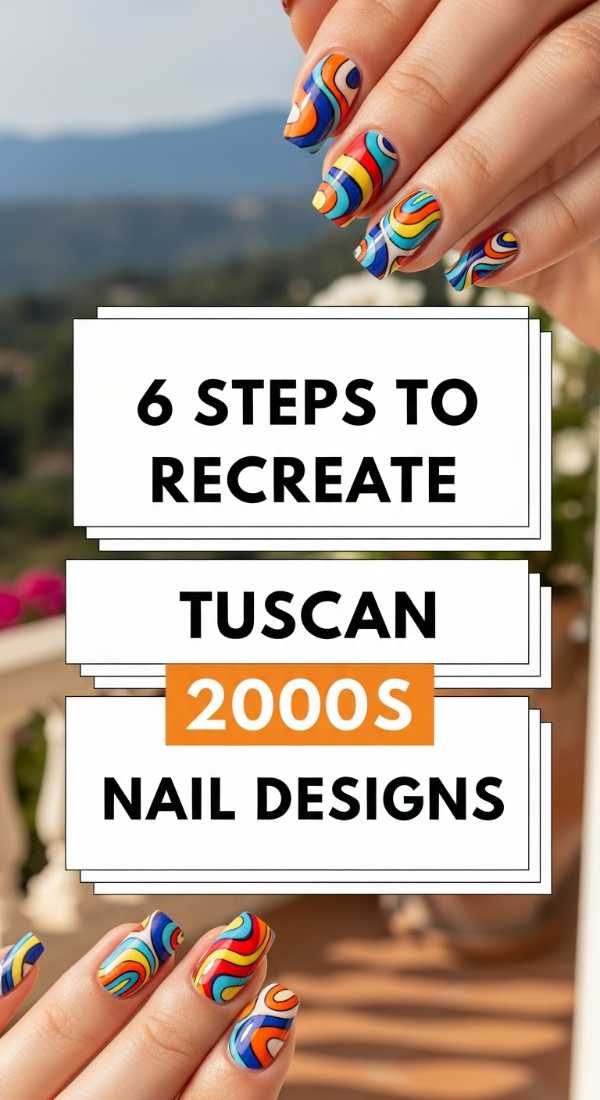
Why to love this Design:
This is pure nostalgia mixed with Mediterranean luxury. Think hand-painted tiles, lemon groves, and the aesthetic of a Y2K starlet on vacation in Amalfi. It’s intricate, artistic, and feels like a vacation on your hands.
Essential Elements:
- Bright white base
- Cobalt blue detailing polish
- Lemon yellow accent
How to Prepare:
- Paint a stark white base for that ’tile’ look.
- Use blue polish to create swirls or geometric ’tile’ patterns.
- Add a small yellow circle (the lemon) in the corner of one nail.
- Add a tiny green dot for the leaf.
- Ensure all detail work is dry before applying the final coat.
- Use a super-shiny top coat to mimic the look of glazed ceramic.
Budget Range
- Londontown ‘Lakur’ in White ($16)
- Holo Taco ‘Blue Freezie’ ($14)
- Artistic Painting Gel ($12)
Embrace Your Spring Glow
As you choose your first mani of the season, remember that these colors are more than just trends—they are reflections of how you want to feel. Whether you choose the quiet peace of a natural nail or the bold energy of poppy red, let your nails be a reminder to bloom at your own pace. You deserve this little moment of beauty, my loves. Happy painting!