
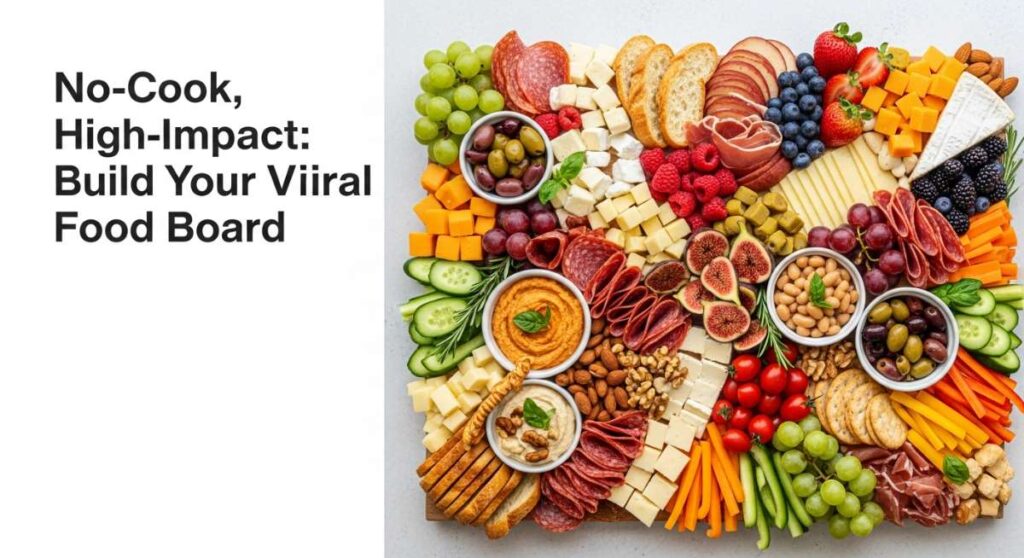
We’ve all been there: the guests are arriving in twenty minutes, the kitchen looks like a flour-dusted disaster zone, and you’re still hovering over a hot stove, missing out on the laughter in the next room. I used to think hosting meant being a private chef, but then I discovered the magic of the food board. It’s more than just a meal; it’s an interactive, sensory experience that invites everyone to lean in, grab a bite, and stay a while. It’s the ultimate secret to becoming the ‘host with the most’ without the burnout.
The beauty of a high-impact food board lies in the visual abundance. When you lay out vibrant colors, contrasting textures, and aromatic herbs across a wooden surface, you aren’t just serving dinner—you’re creating a viral-worthy centerpiece. This guide is your roadmap to transitioning from frantic kitchen duty to effortless, stylish entertaining. We’re taking classic favorites and reimagining them as stunning, communal spreads that look as good as they taste.
How to Build the Ultimate Mini Slider Board?

Why we love this
There is something inherently joyful about a platter piled high with juicy, caramelized sliders. The aroma of toasted brioche mingled with the savory scent of melting cheddar immediately draws a crowd, while the varied textures—from the crunch of a pickle to the pillowy soft bun—ensure every bite is a celebration. It’s a playful, approachable way to serve a crowd that feels festive and cozy all at once, making your living room feel like the best bistro in town.
Ingredients
- 12 mini brioche slider buns
- 1 lb ground chuck (80/20 fat content)
- Sharp cheddar cheese slices
- Caramelized onions
- Bread and butter pickles
- Special sauce (mayo, ketchup, mustard, relish)
- Salt and cracked black pepper
How to make it
- Divide your ground chuck into twelve 2-ounce portions and roll them into loose balls, ensuring you don’t overwork the meat to maintain tenderness.
- Heat a large cast-iron skillet over medium-high heat until it begins to smoke slightly, then place the meat balls in the pan, leaving space between each.
- Using a heavy spatula, smash each ball flat until it is about half an inch thick; season generously with salt and pepper immediately to build a flavorful crust.
- Cook for 2-3 minutes until the edges are dark brown and crispy, then flip. Place a square of cheddar on each patty and cover the pan for 30 seconds to melt the cheese perfectly.
- Toast the split brioche buns on a buttered griddle over medium heat for about 1 minute until golden and fragrant.
- Assemble the sliders on your board: spread the special sauce on the bottom bun, add the patty, top with caramelized onions and a pickle, then secure with a decorative bamboo skewer.
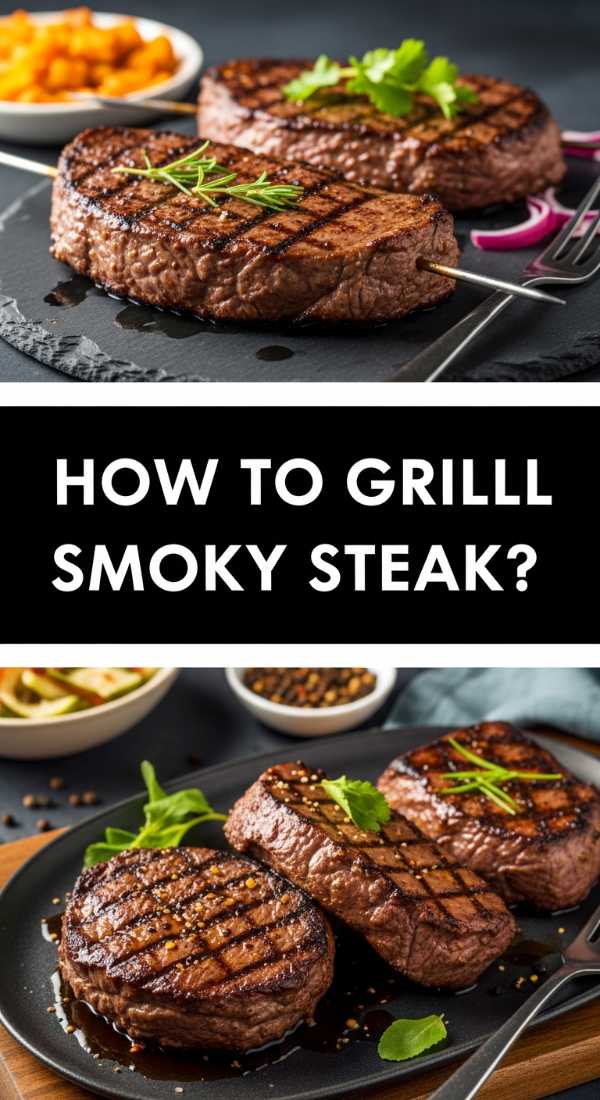
How to Craft a Sliced Steak & Chimichurri Spread?
Why we love this
This board is the epitome of rustic elegance, featuring perfectly seared steak sliced into succulent ribbons that reveal a beautiful medium-rare center. The vibrant, neon-green chimichurri provides an acidic, herbal punch that cuts through the richness of the beef, while the aroma of charred garlic and fresh parsley fills the air. It’s a sophisticated, high-protein platter that feels indulgent and healthy at the same time, perfect for a sunset dinner on the patio.
Ingredients
- 2 large Ribeye or New York Strip steaks
- 1 bunch fresh flat-leaf parsley
- 3 cloves garlic, minced
- 1/4 cup red wine vinegar
- 1/2 cup extra virgin olive oil
- 1 tsp red pepper flakes
- Flaky sea salt
How to make it
- Take your steaks out of the refrigerator at least 45 minutes before cooking to allow them to reach room temperature, ensuring an even cook throughout the cut.
- Pat the steaks extremely dry with paper towels; moisture is the enemy of a good crust. Season heavily with kosher salt and black pepper.
- Heat a heavy skillet (preferably cast iron) over high heat with a tablespoon of high-smoke-point oil until the oil shimmers and wisps of smoke appear.
- Lay the steaks in the pan and sear for 4 minutes per side without moving them, allowing a deep, mahogany crust to form. Use a meat thermometer to aim for 130°F for medium-rare.
- Remove steaks to a cutting board and let them rest for at least 10 minutes; this allows the juices to redistribute so they don’t run out when sliced.
- While resting, whisk together minced parsley, garlic, vinegar, oil, and pepper flakes to create the chimichurri. Slice the steak against the grain into 1/2 inch strips and fan them out on the board, drizzling with the sauce.
How to Style a Midnight Milk & Cookies Board?

Why we love this
Nothing evokes nostalgia quite like the scent of warm vanilla and melting chocolate chips wafting through the house. This board transforms a simple childhood snack into a decadent dessert experience, featuring cookies with crisp, buttery edges and soft, chewy centers that practically melt on the tongue. Serving them alongside cold, creamy milk in vintage glasses creates a visual and sensory contrast that is both comforting and incredibly photogenic for your feed.
Ingredients
- 2 cups all-purpose flour
- 1 cup unsalted butter, browned and cooled
- 3/4 cup brown sugar and 1/2 cup white sugar
- 2 cups semi-sweet chocolate chunks
- 1 tsp vanilla bean paste
- 1 egg + 1 yolk
- Maldon sea salt for topping
How to make it
- Brown your butter in a saucepan over medium heat, stirring constantly until it smells nutty and small brown bits form at the bottom; let it cool completely to room temperature.
- Cream the cooled brown butter with both sugars for at least 3 minutes using a stand mixer until the mixture is light, fluffy, and looks like pale caramel.
- Add the egg, yolk, and vanilla paste, beating on low until just combined. Fold in the flour and salt by hand to avoid over-mixing, which can lead to tough cookies.
- Stir in the chocolate chunks and chill the dough in the refrigerator for at least 2 hours; this hydration step is crucial for a deep flavor and the perfect spread.
- Preheat your oven to 350°F and scoop rounded tablespoons of dough onto a parchment-lined sheet. Bake for 10-12 minutes until the edges are just set but the centers look slightly underbaked.
- Let them cool on the pan for 5 minutes to firm up, then arrange on your board with a sprinkle of flaky salt and small carafes of chilled milk.
How to Design a Loaded Smashed Potato Platter?

Why we love this
Imagine the ultimate baked potato, but with ten times the surface area for crunch—that’s the magic of the smashed potato board. These little golden nuggets are incredibly crispy on the outside, while the centers remain light, fluffy, and infused with garlic butter. When topped with dollops of cool sour cream and a sprinkle of fresh chives, they offer a satisfying, salty crunch that makes them the undisputed star of any gathering.
Ingredients
- 2 lbs baby Yukon Gold potatoes
- 1/4 cup olive oil
- 4 cloves garlic, crushed
- 1/2 cup sour cream
- 1/4 cup chopped chives
- 1/2 cup shredded sharp white cheddar
- Smoked paprika
How to make it
- Place the potatoes in a large pot of cold, salted water and bring to a boil. Simmer for 15-20 minutes until they are fork-tender but not falling apart.
- Drain the potatoes and let them steam-dry for 5 minutes; removing excess moisture is the key to achieving maximum crispiness in the oven.
- Preheat your oven to 425°F and grease a large baking sheet with olive oil. Place the potatoes on the sheet and use the bottom of a heavy glass to gently press down until they are about 1/2 inch thick.
- Drizzle the flattened potatoes with olive oil and the crushed garlic. Sprinkle with salt, pepper, and a dash of smoked paprika for color and depth.
- Roast for 25-30 minutes, flipping halfway through, until the skins are deeply golden and the edges are shatteringly crisp.
- Remove from the oven, immediately sprinkle with shredded cheddar so it melts, and arrange on the board with small bowls of sour cream and chives for dipping.
How to Master the S’mores Fire-Pit Platter?
Why we love this
There is a primal, cozy joy in gathered around a fire, and this board brings that experience to life with a gourmet twist. The combination of toasted, gooey marshmallows, snapping dark chocolate, and honeyed graham crackers creates a symphony of textures that is hard to resist. The faint scent of woodsmoke and the sight of melting chocolate dripping over a golden marshmallow make this the ultimate late-night board for making memories under the stars.
Ingredients
- 1 pack artisan vanilla marshmallows
- 2 bars of high-quality dark chocolate
- 1 box honey graham crackers
- Fresh strawberries, sliced
- 1 jar salted caramel sauce
- Pretzel thins for a salty twist
How to make it
- Assemble your board by creating a ‘base’ of graham crackers and pretzel thins, fanning them out to cover the center of the platter.
- Break the chocolate bars into individual squares and tuck them into the gaps between the crackers, ensuring they are easy for guests to grab.
- Place the marshmallows in a central bowl or scattered near the edge. If you aren’t using a real fire, you can use a kitchen torch to lightly toast half of them for visual appeal.
- Add the sliced strawberries and a small bowl of salted caramel to provide a fresh and salty contrast to the sweet components.
- Provide long metal or bamboo skewers next to the board so guests can toast their own marshmallows safely.
- The secret tip: encourage guests to layer a strawberry slice inside their s’more to add a bright acidity that balances the heavy sugar and chocolate.
How to Create a Rustic Focaccia & Dip Display?
Why we love this
A fresh loaf of focaccia is a thing of beauty, with its dimpled surface acting as little reservoirs for golden olive oil and flaky salt. The texture is pillowy and soft, with a bottom crust that fried slightly in the pan for a satisfying crunch. When paired with a whipped feta dip or a rich balsamic reduction, it becomes a Mediterranean dream that fills the kitchen with the intoxicating aroma of rosemary and yeast.
Ingredients
- 1 portion of fermented pizza or bread dough
- 1/3 cup high-quality olive oil
- 2 sprigs fresh rosemary
- 3 cloves garlic, sliced thin
- 1 cup whipped feta or hummus
- Dried oregano and sea salt
How to make it
- Generously coat a 9×13 inch baking pan with olive oil and place the room-temperature dough inside, turning to coat it completely.
- Let the dough rise in the pan for 1-2 hours until it has doubled in size and looks bubbly and fragile.
- Preheat your oven to 425°F. Use your fingertips to press deep dimples into the surface of the dough, going all the way down to the bottom of the pan.
- Drizzle more olive oil over the top, then press the sliced garlic and rosemary sprigs into the dimples. Sprinkle generously with sea salt and oregano.
- Bake for 18-22 minutes until the top is golden brown and the bottom sounds hollow when tapped.
- Allow it to cool slightly, then slice into long fingers. Arrange them on a board around a central bowl of whipped feta, garnished with a swirl of oil and extra herbs.
How to Assemble a Crispy Wings & Blue Cheese Board?

Why we love this
This isn’t your average sports bar plate; it’s a curated wing experience. The wings are cooked until the skin is impossibly thin and crackling, yielding to tender, juicy meat inside. The contrast between the spicy, vinegary buffalo glaze and the cool, funky creaminess of a homemade blue cheese dip is a flavor profile that never goes out of style. It’s messy, it’s fun, and it’s the ultimate way to bring a high-energy vibe to your dinner party.
Ingredients
- 2 lbs chicken wings (flats and drums)
- 1 tbsp baking powder (the secret for crispiness)
- 1/2 cup Frank’s RedHot sauce
- 4 tbsp unsalted butter
- 1 cup blue cheese crumbles
- 1/2 cup sour cream or Greek yogurt
- Celery and carrot sticks
How to make it
- Dry the wings thoroughly with paper towels and toss them in a bowl with the baking powder and a teaspoon of salt; the baking powder raises the pH of the skin, allowing it to brown and crisp better.
- Preheat your oven to 400°F and place the wings on a wire rack set over a baking sheet to allow hot air to circulate around the entire wing.
- Bake for 45-50 minutes, flipping halfway through, until they are deep golden brown and the fat has completely rendered out.
- While the wings bake, melt the butter and whisk it into the hot sauce to create a smooth, emulsified buffalo glaze.
- In a separate bowl, mash half the blue cheese into the sour cream with a splash of lemon juice to make the dip, then stir in the remaining crumbles for texture.
- Toss the hot wings in the sauce, then pile them on one side of the board. Balance the heat with the cool dip and rows of fresh, crunchy veggie sticks.
How to Serve a Deconstructed Pasta Bar?

Why we love this
Traditional pasta can feel heavy, but a deconstructed pasta board keeps things light and interactive. It features al dente noodles tossed in just enough oil to keep them glistening, surrounded by piles of fresh parmesan, bright basil, and slow-simmered marinara. The aroma of roasted garlic and aged cheese is intoxicating, inviting guests to customize their perfect plate. It’s a carb-lover’s paradise that looks like a still-life painting on your table.
Ingredients
- 1 lb Rigatoni or Pappardelle pasta
- 2 cups homemade or high-quality marinara
- 1 cup fresh pesto
- 8 oz fresh mozzarella pearls
- 1/2 cup grated Parmigiano-Reggiano
- Fresh basil leaves
- Red pepper flakes and olive oil
How to make it
- Boil the pasta in a large pot of heavily salted water—it should taste like the sea—until it is ‘al dente’, meaning it still has a slight bite in the center.
- Drain the pasta and immediately toss it with two tablespoons of extra virgin olive oil to prevent sticking and add a silky sheen.
- Warm the marinara and pesto separately and place them in small, beautiful ceramic bowls on different corners of your board.
- Arrange the pasta in the center of the board, nesting it into a circular shape. Surround it with the mozzarella pearls and small piles of grated parmesan.
- Garnish the entire spread with fresh basil leaves and a dusting of red pepper flakes for a pop of color and heat.
- Provide small tongs and spoons so guests can scoop their pasta and then ‘paint’ it with their choice of sauces and toppings.
How to Present Lasagna Roll-Ups for a Crowd?

Why we love this
Lasagna is a crowd-pleaser, but a whole tray can be messy to serve. These roll-ups solve the problem by providing individual, perfectly portioned spirals of cheesy goodness. Each roll-up features a crispy top edge and a molten, ricotta-filled center that oozes with savory meat sauce. The sight of the golden, bubbling cheese and the individual portions makes this board look incredibly organized and professional, while still delivering that home-cooked comfort.
Ingredients
- 12 lasagna noodles, cooked
- 15 oz ricotta cheese
- 1 egg
- 2 cups shredded mozzarella
- 1 lb Italian sausage, browned
- 3 cups marinara sauce
- 1/2 cup grated parmesan
How to make it
- Preheat your oven to 375°F. Mix the ricotta, egg, half the mozzarella, and the cooked sausage in a bowl until well combined and creamy.
- Lay the cooked lasagna noodles flat on a clean surface and spread a thin layer of the ricotta mixture across each noodle, leaving half an inch at the end.
- Roll the noodles up tightly and place them seam-side down in a baking dish that has been coated with a layer of marinara sauce.
- Top each roll-up with an extra spoonful of marinara and the remaining mozzarella and parmesan cheese.
- Bake for 20-25 minutes until the cheese is bubbling and starting to brown at the edges.
- Let them rest for 5 minutes so they hold their shape, then use a spatula to transfer them onto a large board, garnishing with fresh parsley and extra sauce on the side.
How to Layer a Sticky BBQ Rib & Slaw Board?
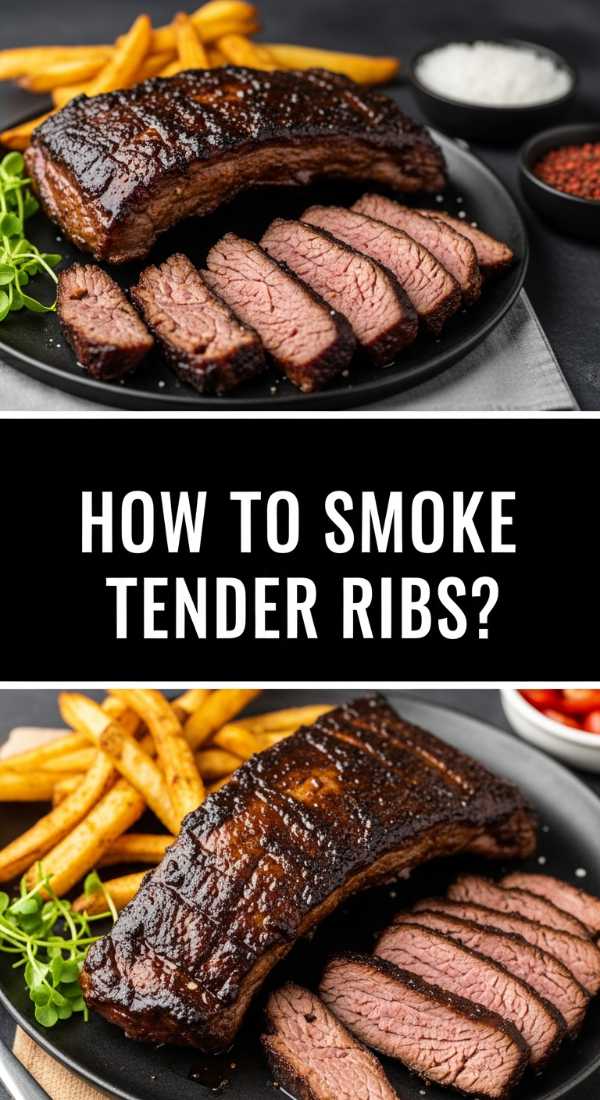
Why we love this
This is the ultimate ‘hands-on’ board, featuring fall-off-the-bone ribs coated in a thick, glossy BBQ glaze that is both sweet and smoky. The rich, tender meat is perfectly balanced by the bright, acidic crunch of a vinegar-based slaw. The aroma of hickory and brown sugar is enough to make anyone’s mouth water. It’s a messy, glorious feast that encourages everyone to roll up their sleeves and dig in, making it the perfect centerpiece for a summer bash.
Ingredients
- 1 rack Baby Back Ribs
- 1 cup BBQ dry rub (paprika, sugar, garlic, onion)
- 1 cup BBQ sauce
- 1/2 head cabbage, shredded
- 1/4 cup apple cider vinegar
- 1 tbsp Dijon mustard
- Corn on the cob, grilled
How to make it
- Remove the silver skin from the back of the ribs using a paper towel for grip; this ensures the ribs are tender rather than chewy.
- Coat the ribs generously in the dry rub and wrap them tightly in heavy-duty aluminum foil. Bake at 275°F for 2.5 to 3 hours until they are tender but not quite falling apart.
- Carefully remove from the foil and brush a thick layer of BBQ sauce over the top. Turn your broiler on high or move them to a hot grill.
- Cook for 3-5 minutes until the sauce is bubbling and begins to char and caramelize into a sticky lacquer.
- While the ribs rest, toss the shredded cabbage with vinegar, mustard, and a pinch of sugar to create a quick, tangy slaw.
- Slice the ribs into individual bones and pile them on the board next to the slaw and grilled corn, providing plenty of napkins for your guests.
The Art of the Board: Final Thoughts
Building a viral food board is less about following a strict recipe and more about embracing the spirit of sharing. It’s about the colors, the textures, and the way people’s eyes light up when they see a table full of their favorites presented in such a thoughtful way. Whether you’re hosting a formal dinner or a casual movie night, remember that the best boards are the ones that reflect your personality and make your guests feel right at home. So grab a board, pick a theme, and start creating something beautiful!