

Manifest Your Best Self: The Lifestyle Inspiration Board You Need Today
Have you ever woken up and felt a sudden, electric urge to reinvent your surroundings? There is a profound magic in the way we curate our lives, from the flowers on our tables to the way we celebrate our biggest milestones. This blog is more than just a list of ideas; it is a manifestation of the life you deserve—one filled with intentionality, beauty, and that warm, fuzzy feeling of home. We are diving deep into the aesthetic shifts that turn a regular day into a viral-worthy memory.
Lately, I’ve been obsessed with the idea of ‘the curated life.’ It isn’t about perfection, but about the sensory experience of our daily routines. Imagine the scent of fresh lemons on a sun-drenched patio or the soft texture of a silk ribbon tied around a Mother’s Day bouquet. Today, I’m sharing my ultimate lifestyle inspiration board to help you elevate every corner of your world. Let’s create something beautiful together.
How to Personalize Graduation Regalia for a Stylish Celebration
Why we love this
There is a specific, heart-fluttering pride that comes with donning a graduation gown, but personalizing it adds a layer of soul to the ceremony. We love the way custom embroidery feels against the heavy polyester fabric and the sparkle of hand-applied crystals catching the stadium lights. It transforms a mass-produced garment into a tactile archive of your hard work, smelling faintly of celebratory perfume and the crisp air of a new beginning. It is a visual representation of your journey that looks just as good in photos as it feels on your shoulders.
Essential Elements:
- Plain graduation cap and gown
- Fabric adhesive or hot glue gun
- Assorted silk flowers or custom embroidery patches
- Glitter cardstock or vinyl lettering
- Satin ribbons and decorative pins
How to make it
- Begin by laying your graduation cap flat on a clean surface to map out your design; use a pencil to lightly mark where your central focal point will be so your layout remains symmetrical.
- If you are using a cap topper, cut your cardstock to the exact dimensions of the cap square, ensuring you cut a small hole in the center for the tassel button to poke through.
- Apply your background material using a strong, flexible fabric adhesive, smoothing it from the center outward to prevent any air bubbles or wrinkles from forming under the surface.
- Carefully arrange your 3D elements like silk flowers or pearls around the edges; use a low-heat glue gun for precision, holding each piece in place for 15 seconds to ensure a permanent bond.
- For the gown, use iron-on patches or delicate stitching to add your name or graduation year to the stole, being careful to use a pressing cloth so you don’t scorch the delicate synthetic fabric of the regalia.
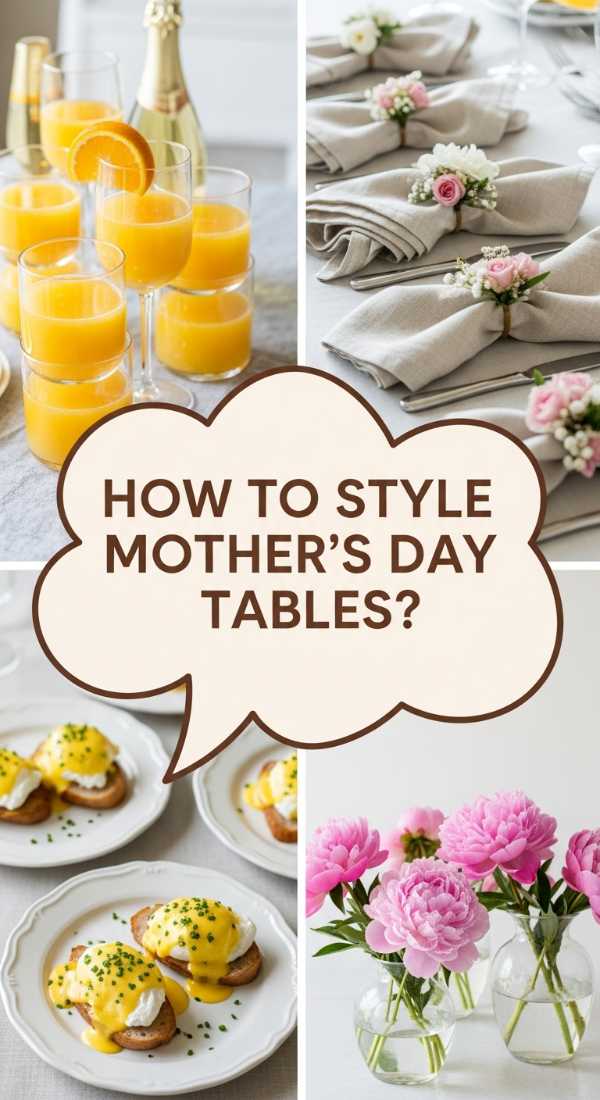
How to Create Mother’s Day Brunch Tablescapes for a Memorable Morning
Why we love this
Nothing says ‘I love you’ quite like a table that looks like a watercolor painting come to life. The soft clinking of vintage porcelain against linen placemats and the delicate aroma of vanilla-scented candles create an atmosphere of pure serenity. We adore the play of light through crystal mimosa flutes and the way a well-placed sprig of lavender can make the entire room feel like a high-end garden bistro. It’s a sensory hug for the most important woman in your life, designed for lingering conversations over flaky croissants.
Essential Elements:
- Pastel-colored linen tablecloth and napkins
- Mismatched vintage china or floral plates
- Tiered serving trays for pastries
- Woven charger plates
- Fresh floral centerpieces in low-profile vases
How to make it
- Start with your base layer by draping a freshly steamed linen tablecloth over your table, allowing for an even 10-inch overhang on all sides for a classic, sophisticated look.
- Layer your place settings starting with a natural woven charger to add texture, followed by the dinner plate and a smaller salad plate with a contrasting floral pattern to create visual depth.
- Fold your linen napkins into a simple rectangular shape and slide on a decorative ring or tie with a velvet ribbon, tucking a small piece of greenery inside for an organic touch.
- Arrange your centerpiece by grouping three vases of varying heights in the center of the table; fill them with soft blooms like peonies or ranunculus, ensuring they are low enough so guests can see each other across the table.
- Finalize the setting by polishing your glassware with a microfiber cloth until it sparkles, then place your cutlery in order of use, ensuring everything is perfectly aligned with the edge of the table.
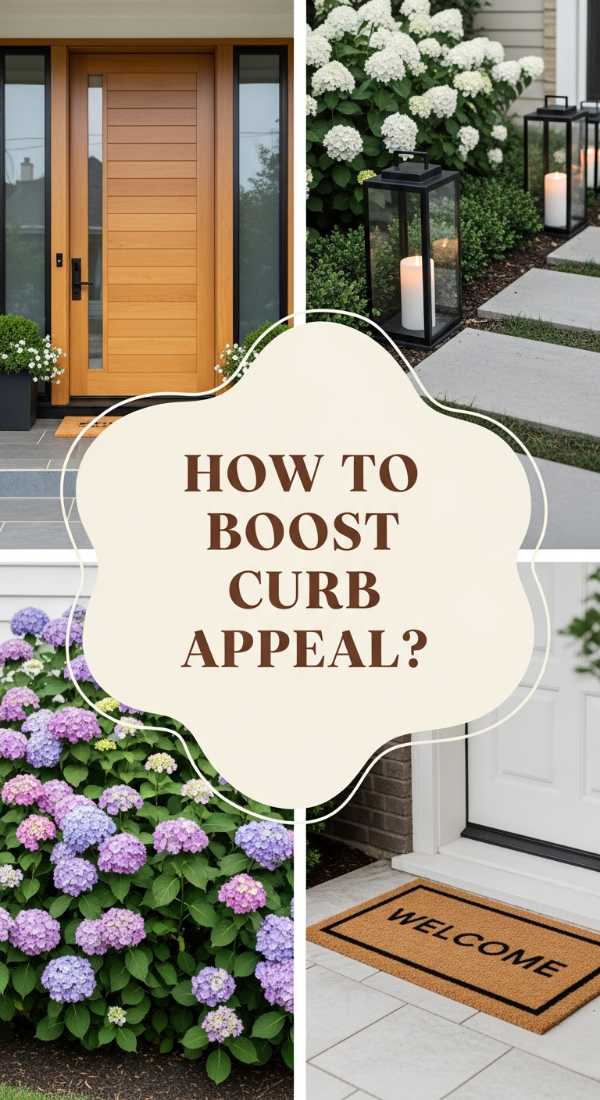
How to Elevate Front Yard Landscaping for Instant Curb Appeal
Why we love this
Walking up to a house with lush, intentional landscaping is an immediate mood booster. The earthy, rich scent of fresh cedar mulch mixed with the vibrant green of manicured boxwoods creates a professional and polished aesthetic. We love how different textures—from the smoothness of river rocks to the feathered leaves of ornamental grasses—interact under the afternoon sun. It gives your home a ‘finished’ look that feels both welcoming and expensive, providing a beautiful frame for your daily life.
Essential Elements:
- Hardwood mulch or decorative stone
- Evergreen shrubs for year-round structure
- Perennial flowers for seasonal color
- Steel or stone garden edging
- Solar-powered pathway lights
How to make it
- Define your garden beds by using a garden hose to outline curved, organic shapes, then use a sharp spade to cut a clean edge into the turf to separate the lawn from the planting area.
- Prepare the soil by tilling in three inches of organic compost, which improves drainage and provides the essential nutrients your new plants will need to thrive during their first season.
- Position your largest shrubs first towards the back of the bed to create a backdrop, spacing them according to their mature width to avoid overcrowding in future years.
- Plant your perennials in clusters of three or five for a more natural, professional appearance, ensuring the base of the stem is level with the soil surface before firming the dirt down around them.
- Apply a two-to-three-inch layer of mulch across the entire bed to suppress weeds and retain moisture, being careful not to pile the mulch directly against the trunks of your plants.
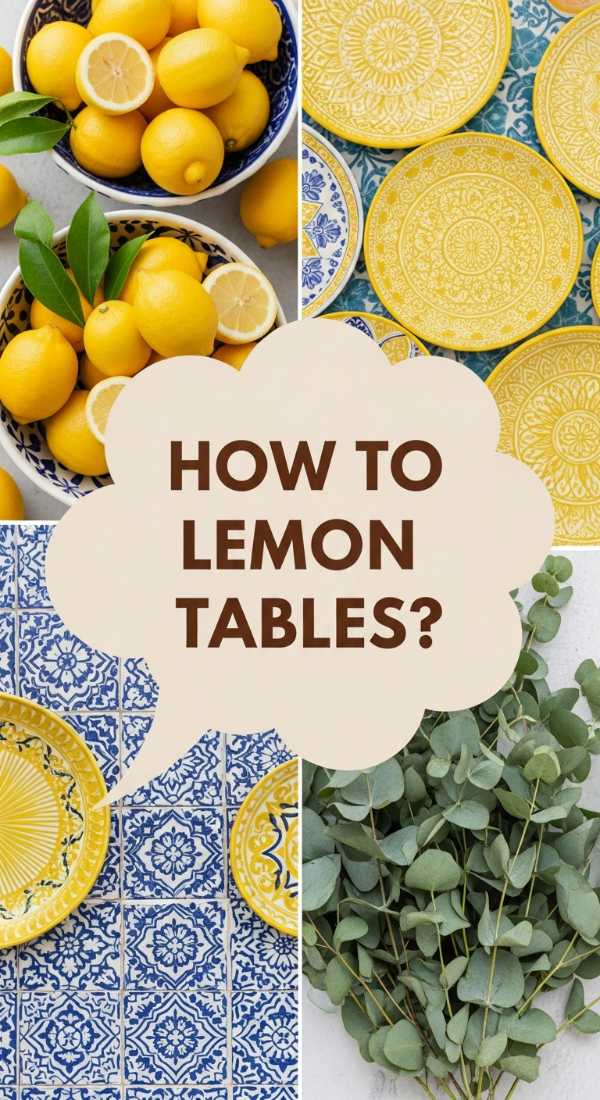
How to Design Lemon Table Settings for Refreshing Summer Vibes

Why we love this
There is something undeniably joyful about the bright, zesty yellow of a lemon-themed table setting. It smells like sunshine and citrus zest, instantly transporting you to an Amalfi Coast terrace. We love the crisp contrast between vivid yellow fruit and deep Mediterranean blue accents or clean white ceramics. The tactile experience of textured lemon skins nestled among green leaves adds an organic, effortless chic that makes even a simple Tuesday lunch feel like a celebratory summer event.
Essential Elements:
- Fresh whole lemons and sliced lemon garnishes
- Yellow and white striped table runner
- Blue willow or white ceramic dinnerware
- Clear glass pitchers with citrus-infused water
- Eucalyptus or lemon leaf greenery
How to make it
- Lay a crisp white or yellow-striped runner down the center of your table to act as a bright foundation that will make your citrus accents pop against the wood or linen.
- Create a ‘living’ runner by scattering a mix of fresh lemons and sprigs of eucalyptus down the center of the table, varying the heights of the fruit by placing some on small pedestals or bowls.
- Set each place with a simple white plate, topped with a folded navy blue napkin to provide a high-contrast visual that mimics classic Mediterranean aesthetics.
- For a personalized touch, use a gold paint pen to write guests’ names directly onto the skin of a smooth lemon and place one in the center of each salad plate as a unique place card.
- Fill a large glass carafe with ice, water, and thin wheels of lemon and mint, placing it in the center of the table to serve as both a refreshing beverage and a visual component of the decor.
How to Arrange Patio Furniture for Cozy Outdoor Living

Why we love this
An outdoor space should feel like an extension of your living room, inviting you to kick off your shoes and breathe. We love the feeling of sinking into weather-resistant plush cushions while the evening breeze carries the scent of nearby jasmine. A well-arranged patio encourages intimacy, with furniture placed just close enough to share secrets but open enough to feel the expanse of the sky. It is the ultimate setting for golden hour cocktails and starlit conversations, blending the comfort of the indoors with the wild beauty of the outdoors.
Essential Elements:
- Sectional sofa or comfortable armchairs
- Outdoor area rug to define the space
- Central coffee table or fire pit
- Weatherproof throw pillows and blankets
- Side tables for drinks and books
How to make it
- Start by placing a large, durable outdoor rug to anchor the space; ensure all front legs of your furniture sit on the rug to create a cohesive ‘room’ feeling that doesn’t feel disjointed.
- Orient your main seating piece—like a sectional or sofa—towards the most beautiful view or a central focal point like a fireplace to establish a natural orientation for the space.
- Place armchairs at a 45-degree angle to the sofa to create a conversational ‘U’ shape, ensuring there is at least 18 inches of walking space between the edges of the furniture.
- Position a sturdy coffee table in the center, reachable from all seats, and add smaller side tables next to individual chairs to provide a convenient spot for drinks or lanterns.
- Layer in softness by adding high-quality outdoor pillows in varied textures and a lightweight throw blanket draped over the back of a chair for when the temperature drops at night.
How to Decorate Graduation Cookies for a Sweet Sendoff

Why we love this
The scent of buttery vanilla sugar cookies baking in the oven is the ultimate nostalgia trip. We love the satisfying ‘snap’ of dried royal icing and the smooth, matte finish that looks almost too perfect to eat. Decorating these cookies is a labor of love—the delicate piping of ‘Class of 2024’ or the tiny shimmer of gold sanding sugar on a diploma. These treats are more than just dessert; they are edible trophies that celebrate the sweetness of success and the beginning of a new chapter.
Essential Elements:
- Sugar cookies cut into caps, diplomas, and stars
- Royal icing in school colors
- Piping bags with fine tips
- Edible gold leaf or metallic dust
- Scribe tool for smoothing icing
How to make it
- Outline your cooled cookies with a stiff ‘outline’ consistency royal icing, leaving a tiny margin from the edge to prevent the icing from overflowing during the next step.
- Fill the center of the outlined area with ‘flood’ consistency icing (which should be the thickness of heavy cream), using a scribe tool to pop any air bubbles and push the icing into the corners.
- Allow the base layer of icing to dry completely for at least 6 to 8 hours in a cool, dry place until the surface is hard to the touch and has a slight sheen.
- Using a fine #1 or #1.5 piping tip, add the intricate details like the tassel on the graduation cap or the ribbon on the diploma using a contrasting color of stiff icing.
- For a professional finish, mix a small amount of gold luster dust with lemon extract and use a fine paintbrush to highlight the ‘tassel’ or the date, giving the cookies a metallic glow.
How to Select Garden Ornaments for a Charming Yard Aesthetic

Why we love this
Garden ornaments are the ‘jewelry’ of your outdoor space, adding personality and a sense of discovery to hidden corners. We love the weathered patina of a stone birdbath or the whimsical rustle of a copper wind spinner. These pieces provide a visual resting point among the greenery, evoking the feeling of an old English garden. Whether it’s a classical statue or a modern geometric sculpture, these elements catch the morning dew and age beautifully with the seasons, telling a story of time and care.
Essential Elements:
- Birdbaths or stone water features
- Decorative garden stakes or wind chimes
- Weather-resistant statues or sculptures
- Ornamental spheres or gazing balls
- Vintage-inspired lanterns
How to make it
- Assess your garden’s scale; choose one large ‘statement’ piece like a tall birdbath for a focal point, and supplement with smaller ornaments that won’t get lost in the foliage.
- Select a material theme—such as aged bronze, weathered stone, or bright ceramic—to ensure your ornaments feel like a curated collection rather than a random assortment.
- Place ornaments at different heights; use a stone plinth to elevate a statue, or hang a wind chime from a low tree branch to draw the eye upward and add movement to the space.
- Nestle ornaments slightly into the planting beds so they appear as if they have always been there, rather than sitting them on top of the mulch where they may look unstable.
- Ensure stability by clearing a level patch of ground or pouring a small concrete base for heavier items, preventing them from tipping over during heavy rain or high winds.
How to Incorporate Patio Lighting for a Dreamy Evening Glow

Why we love this
When the sun dips below the horizon, the right lighting transforms a patio into a magical, ethereal sanctuary. We love the warm, amber hum of Edison bulbs strung overhead and the flickering, romantic dance of candlelight on a tabletop. It creates a soft-focus world where everything looks more beautiful and feels more intimate. The gentle glow highlights the textures of your outdoor fabrics and the silhouette of your plants, making the night feel like a special occasion every single evening.
Essential Elements:
- LED string lights (Edison style)
- Solar-powered walkway lanterns
- Dimmable outdoor smart plugs
- Votive candles or hurricane lanterns
- Low-voltage spotlighting for trees
How to make it
- Map out your overhead string light path, ensuring you have a secure anchor point like a house gutter or a sturdy wooden post every 10 to 15 feet to prevent excessive sagging.
- Install ‘guide wire’ (a thin aircraft cable) across the span first; this provides the tension needed to support the weight of the lights and keeps the lines perfectly straight and professional.
- Clip your string lights to the guide wire using carabiners or zip ties, making sure the bulbs are tightened securely into their sockets before you hoist the line into the air.
- Layer your lighting levels by placing solar lanterns along the floor and grouping hurricane candles on tables to provide a warm ‘glow’ at eye level that complements the overhead lights.
- Connect your lights to an outdoor-rated dimmer or a smart timer so you can adjust the brightness to match the mood and ensure they turn on automatically at dusk.
How to Arrange Mother’s Day Bouquets for a Heartfelt Gift
Why we love this
A hand-arranged bouquet is a fragrant, living poem. We love the velvet-soft petals of a garden rose and the spicy, fresh scent of carnations and stock. There is a deep satisfaction in the weight of the stems in your hand and the way the colors bleed into each other like an impressionist painting. It’s a gift that engages all the senses, from the visual beauty of the arrangement to the cool moisture on the leaves, representing a moment of pure, unadulterated appreciation for Mom.
Essential Elements:
- A mix of focal flowers (Peonies, Roses)
- Filler flowers (Baby’s breath, Waxflower)
- Greenery (Eucalyptus, Ferns)
- Floral shears and florist tape
- Decorative ribbon and craft paper
How to make it
- Strip all foliage from the bottom two-thirds of your stems to ensure no leaves sit below the waterline, which prevents bacterial growth and keeps your flowers fresh for longer.
- Start with a ‘greenery base’ in your hand, crossing the stems in a spiral fashion to create a sturdy structural frame that will support your heavier focal blooms.
- Add your largest ‘focal’ flowers one by one, rotating the bouquet as you go to ensure a balanced, 360-degree view that looks lush from every possible angle.
- Tuck in ‘filler’ flowers like Queen Anne’s Lace into the gaps between the larger blooms to add texture and a sense of ‘wildflower’ whimsy to the overall design.
- Trim the stems to an even length at a 45-square angle under running water, then wrap the bundle in brown craft paper and tie with a generous silk ribbon for a boutique finish.
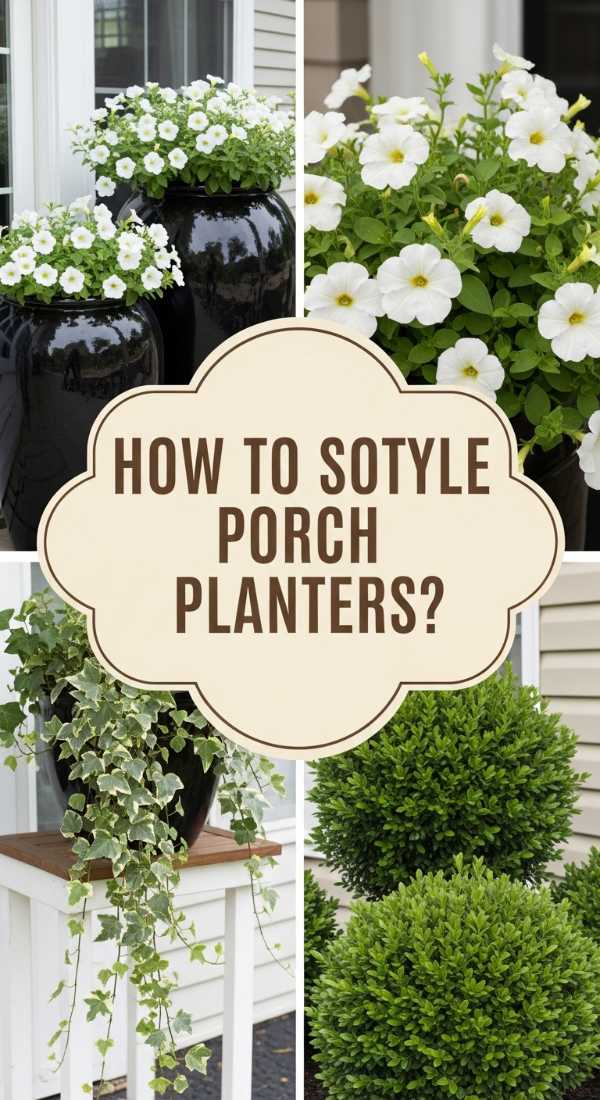
How to Update Front Yard Planters for Seasonal Beauty
[IMAGE_10]
Why we love this
Front yard planters are the ‘handshake’ of your home, offering a warm welcome before anyone even steps inside. We love the rich, damp smell of fresh potting soil and the vibrant ‘pop’ of seasonal color against the front door. The combination of textures—the trailing ivy, the upright grasses, and the blooming flowers—creates a miniature ecosystem of beauty. It’s an instant gratification project that provides a burst of life and color, making your entrance feel cared for and seasonally relevant.
Essential Elements:
- Large, weather-resistant planters or urns
- High-quality potting mix with slow-release fertilizer
- ‘Thriller’ plants (Dracaena, Fountain Grass)
- ‘Filler’ plants (Petunias, Geraniums)
- ‘Spiller’ plants (Sweet Potato Vine, Ivy)
How to make it
- Fill your planter three-quarters full with a lightweight potting mix, avoiding garden soil which is too heavy and can compact, preventing the roots from breathing properly.
- Place your ‘Thriller’—a tall, eye-catching plant—in the center or towards the back of the pot to provide height and a dramatic vertical element to the arrangement.
- Surround the thriller with ‘Fillers,’ which are mid-height blooming plants that add bulk and color, ensuring you pack them closely enough to look full but with room to grow.
- Plant your ‘Spillers’ along the very edge of the pot, angling them slightly outward so they are encouraged to cascade over the sides and soften the hard edges of the planter.
- Water the arrangement thoroughly until water runs out of the drainage holes at the bottom, then finish by wiping the outside of the pot with a damp cloth to remove any stray soil.
Conclusion
Manifesting your best self starts with the intentionality you bring to your immediate environment. Whether you are piping the perfect graduation cookie or stringing lights across your patio, these small acts of curation build a life that feels as good as it looks. Remember, beauty isn’t about the price tag—it’s about the sensory details and the love you pour into your home. Now, go forth and create your own viral-worthy lifestyle!