
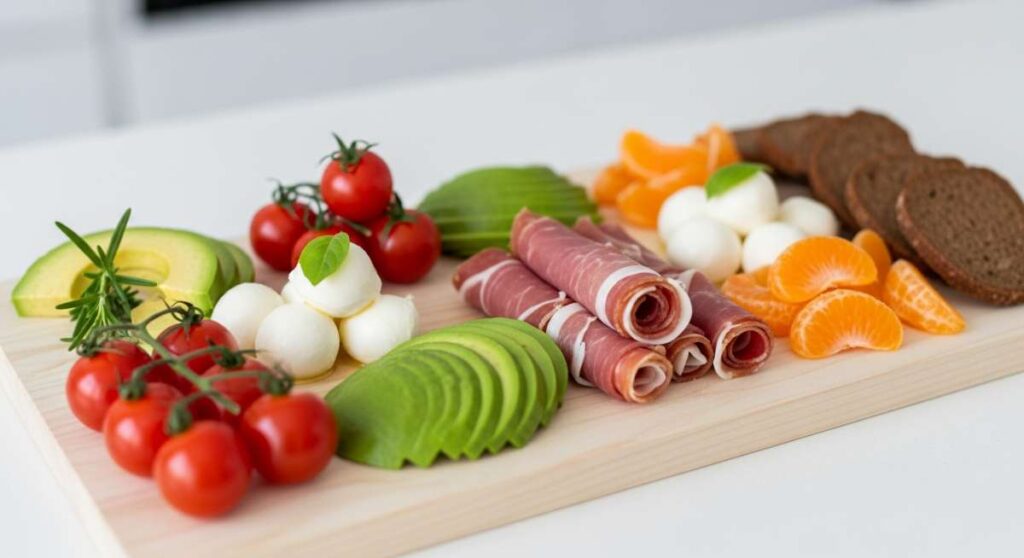
There is something magical about a golden hour gathering where the conversation flows as easily as the chilled rosé. I used to spend hours stressing over complex five-course meals, only to end up stuck in the kitchen while my friends laughed on the patio. But lately, I’ve embraced a new philosophy: the viral minimalist food board. It’s not just about aesthetics; it’s about creating a curated, effortless experience that invites everyone to graze and connect without the formality of a seated dinner.
This minimalist approach focuses on high-quality ingredients, vibrant colors, and textures that tell a story of the season. By arranging simple, flavorful components on a beautiful wooden slab, you create a focal point that is as much a piece of decor as it is a meal. Let’s dive into how you can level up your hosting game with these simple, crowd-pleasing elements that turn any ordinary evening into a viral-worthy celebration.
How to make summer crockpot chicken?

Why we love this
This chicken is the ultimate summer life hack, delivering melt-in-your-mouth tenderness without ever turning on your oven and heating up the whole house. Imagine succulent thighs infused with bright lemon zest and earthy rosemary, simmering slowly until they practically fall apart at the touch of a fork. The aroma fills your home with a cozy, savory warmth that feels indulgent yet light enough for a humid afternoon. It’s the perfect protein base that stays juicy and flavorful even when served at room temperature on a shared board.
Ingredients
- 2 lbs boneless skinless chicken thighs
- 1/2 cup low-sodium chicken broth
- 3 cloves garlic, smashed
- 1 lemon, sliced into rounds
- 2 sprigs fresh rosemary
- 1 tsp sea salt
- 1/2 tsp cracked black pepper
How to make it
- Pat the chicken thighs completely dry with paper towels to ensure the seasoning sticks and the texture doesn’t become mushy during the slow cooking process.
- Season both sides of the chicken generously with sea salt and cracked black pepper, pressing the spices into the meat.
- Layer the bottom of the crockpot with the lemon rounds and smashed garlic cloves to create a flavorful aromatic bed for the meat.
- Place the chicken thighs on top of the aromatics in a single layer if possible, or slightly overlapping, then nestle the rosemary sprigs in between the pieces.
- Carefully pour the chicken broth around the edges of the chicken—not over the top—to avoid washing off the seasoning.
- Cover and cook on the ‘Low’ setting for 6 to 7 hours. Do not use the ‘High’ setting, as the slow, gentle heat is what breaks down the connective tissue for that signature shred-ability.
- Once finished, remove the chicken and shred it using two forks, adding a splash of the remaining cooking liquid to keep it moist before serving.
How to prep summer salads?

Why we love this
A true summer salad is a symphony of crunch and freshness, celebrating the peak of the harvest with every bite. There is a satisfying snap from cold, crisp greens paired with the juicy burst of ripe heirloom tomatoes and the cooling sensation of sliced cucumbers. When prepped correctly, these salads hold their integrity, offering a refreshing palate cleanser that feels like a breeze on a plate. The vibrant colors make your minimalist board pop, turning simple produce into a visual and edible masterpiece.
Ingredients
- 4 cups mixed baby greens or arugula
- 1 pint heirloom cherry tomatoes, halved
- 2 Persian cucumbers, thinly sliced
- 1/4 red onion, shaved paper-thin
- Fresh basil leaves, torn
- Champagne vinaigrette
How to make it
- Begin by washing your greens in ice-cold water and immediately using a salad spinner to remove every drop of moisture; dry greens are essential for the dressing to adhere properly.
- Place your clean greens in a large bowl and chill them in the refrigerator for at least 30 minutes before serving to ensure maximum crispness.
- Prepare your vegetables by slicing the cucumbers into thin rounds and halving the tomatoes; keep these in separate containers until the moment of assembly to prevent the salad from becoming soggy.
- To take away the bite of the red onion, soak the thin shavings in a small bowl of ice water for 10 minutes, then drain and pat dry.
- When ready to serve, layer the greens first, then scatter the vegetables and torn basil over the top.
- Drizzle the vinaigrette only at the very last second, or better yet, serve it on the side to allow guests to customize their portion while keeping the board looking pristine.
How to cook picnic sides?

Why we love this
Picnic sides are the unsung heroes of the minimalist board, providing that nostalgic, comforting element that everyone craves. We love a classic smashed potato salad because it offers a rustic texture that is both creamy and slightly chunky, seasoned with the bright tang of vinegar and the zip of fresh chives. It feels like a summer afternoon in a bowl—sturdy enough to be transported outdoors but refined enough to sit alongside artisanal cheeses. The contrast between the soft potatoes and the crisp herbs creates a sensory experience that is deeply satisfying.
Ingredients
- 1.5 lbs baby yellow potatoes
- 1/4 cup mayonnaise
- 1 tbsp Dijon mustard
- 1 tbsp apple cider vinegar
- 2 stalks celery, finely diced
- 3 tbsp fresh chives, minced
- Salt and pepper to taste
How to make it
- Place the baby potatoes in a large pot and cover with cold water by at least two inches, adding a generous pinch of salt to the water.
- Bring the water to a rolling boil, then reduce the heat to a simmer and cook for 12-15 minutes until the potatoes are fork-tender but not falling apart.
- Drain the potatoes and let them cool for 5 minutes. While they are still warm, lightly smash them with the back of a spoon to create more surface area for the dressing.
- In a separate small bowl, whisk together the mayonnaise, Dijon mustard, and apple cider vinegar until completely smooth and emulsified.
- Fold the dressing into the warm potatoes along with the diced celery; the warmth of the potatoes allows them to absorb the flavors more deeply than cold potatoes would.
- Stir in the fresh chives and season with salt and pepper, then refrigerate for at least two hours to let the flavors meld before placing on your board.
How to make pasta salad?
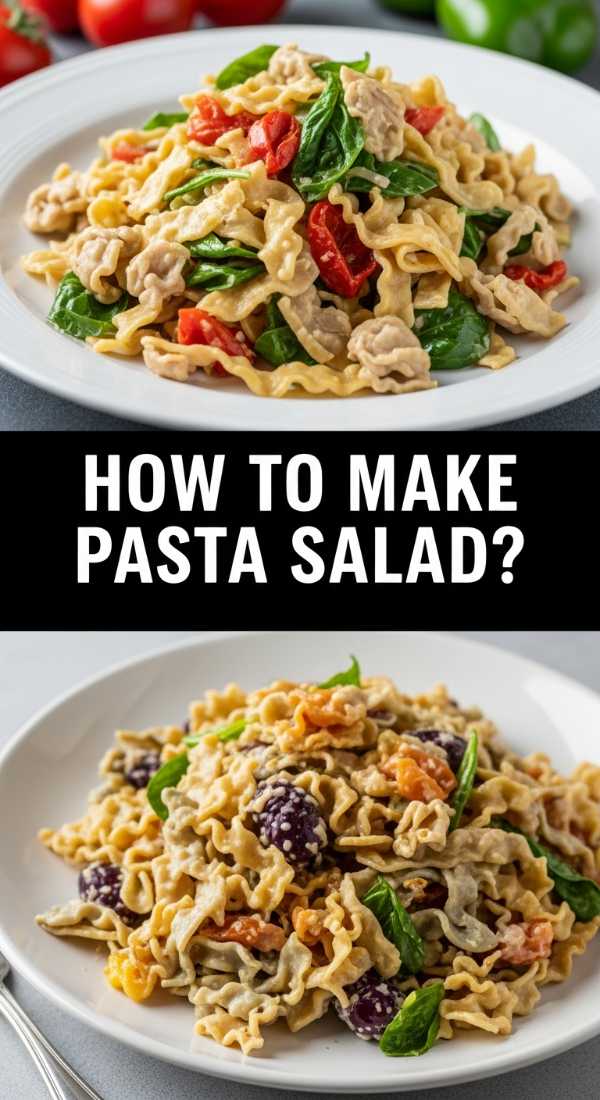
Why we love this
Pasta salad is the ultimate crowd-pleaser because it is incredibly versatile and behaves perfectly in a self-serve setting. There’s something addictive about al dente rotini spirals that capture little pockets of tangy vinaigrette, mixed with the salty punch of feta and the sweetness of sun-dried tomatoes. It’s a dish that actually tastes better as it sits, making it the perfect stress-free addition to your hosting lineup. Each forkful provides a variety of textures, from the chewy pasta to the soft cheese and the snap of fresh bell peppers.
Ingredients
- 1 lb rotini or fusilli pasta
- 1/2 cup sun-dried tomatoes in oil, chopped
- 1/2 cup crumbled feta cheese
- 1/2 cup Kalamata olives, pitted and halved
- 1/3 cup Italian herb vinaigrette
- 1/4 cup fresh parsley, chopped
How to make it
- Cook the pasta in a large pot of heavily salted water until it reaches a true al dente texture; avoid overcooking as the pasta will soften further once it absorbs the dressing.
- Drain the pasta and immediately rinse it under cold running water for 60 seconds to stop the cooking process and remove excess starch, which prevents clumping.
- In a large mixing bowl, toss the cooled pasta with half of the vinaigrette to coat every spiral while the pasta is still fresh.
- Add the chopped sun-dried tomatoes, halved olives, and crumbled feta, folding them in gently so the cheese doesn’t completely dissolve into the sauce.
- Let the salad rest in the refrigerator for at least one hour to allow the pasta to marinate in the dressing.
- Before serving, add the remaining dressing and the fresh parsley, tossing one last time to give the dish a glossy, vibrant appearance on your board.
How to cook healthy dinners?

Why we love this
When you want to keep the board light and nutritious without sacrificing flavor, a garlic-lemon shrimp skewer is the way to go. These are elegant, high in protein, and cook in a matter of minutes, featuring a beautiful pink char that looks stunning against a wooden board. The zing of fresh lemon juice combined with the aromatic punch of sautéed garlic creates a clean, bright profile that feels sophisticated. It’s a guilt-free luxury that leaves your guests feeling energized rather than weighed down, making it a staple for summer entertaining.
Ingredients
- 1 lb large shrimp, peeled and deveined
- 3 tbsp olive oil
- 4 cloves garlic, minced
- 1 tsp lemon zest
- 1/2 tsp red pepper flakes
- Fresh parsley for garnish
How to make it
- Whisk together the olive oil, minced garlic, lemon zest, and red pepper flakes in a shallow bowl to create a quick, potent marinade.
- Add the shrimp to the bowl and toss to coat thoroughly, letting them marinate for no more than 15-20 minutes—too much time in the citrus will begin to ‘cook’ the delicate seafood.
- Thread 3-4 shrimp onto each small bamboo skewer, ensuring they are not pressed too tightly together so the heat can circulate around each one.
- Heat a cast-iron skillet or grill pan over medium-high heat until a drop of water flicked onto the surface sizzles instantly.
- Place the skewers in the pan and sear for 2 minutes per side; look for the shrimp to turn opaque and form a slight golden-brown crust.
- Remove immediately from the heat to prevent toughening, and finish with a squeeze of fresh lemon juice and a sprinkle of parsley before arranging them on your minimalist board.
How to make creamy dips?

Why we love this
No food board is complete without a center-piece dip that acts as the anchor for everything else. A whipped feta dip with honey and pistachios is a viral sensation for a reason—it’s the perfect balance of salty, sweet, and nutty. The texture is cloud-like and airy, providing a luxurious mouthfeel that pairs perfectly with crunchy pita chips or raw vegetables. It’s an evocative dip that feels high-end but is incredibly simple to execute, offering a sophisticated twist on the traditional hummus or ranch.
Ingredients
- 8 oz feta cheese, room temperature
- 1/2 cup Greek yogurt
- 1 small clove garlic, grated
- 2 tbsp olive oil
- 1 tbsp honey
- 1/4 cup crushed pistachios
How to make it
- Ensure your feta cheese and Greek yogurt are at room temperature; this is the secret to achieving a perfectly smooth, lump-free consistency.
- Place the crumbled feta, Greek yogurt, and grated garlic into a food processor or high-speed blender.
- Process on high for about 2 minutes, stopping to scrape down the sides once or twice, until the mixture is completely silky and aerated.
- With the processor running on low, slowly stream in the olive oil to emulsify the dip and give it a glossy finish.
- Transfer the dip to a shallow bowl and use the back of a spoon to create deep swirls and wells on the surface.
- Generously drizzle the honey into the wells and scatter the crushed pistachios over the top for a beautiful contrast of color and a satisfying crunch in every dip.
How to make summer desserts?

Why we love this
Summer desserts should feel effortless and fruit-forward, and a rustic peach galette is the epitome of that vibe. We love the way the buttery, flaky crust folds casually over jammy, sun-ripened peaches, creating a dessert that looks intentionally imperfect and artisanal. The aroma of baking fruit and cinnamon wafting through the air is intoxicating, signaling the perfect end to a long, sun-drenched day. It’s a warm, comforting treat that tastes even better when served with a dollop of cold cream right on the board.
Ingredients
- 1 pre-made pie crust (or homemade)
- 3 large peaches, sliced
- 2 tbsp honey or agave
- 1/2 tsp cinnamon
- 1 egg (for egg wash)
- Turbinado sugar for sprinkling
How to make it
- Preheat your oven to 400°F (200°C) and line a baking sheet with parchment paper to prevent the fruit juices from sticking.
- In a medium bowl, gently toss the sliced peaches with honey and cinnamon until they are evenly coated and beginning to release their natural juices.
- Roll out your chilled pie dough on the parchment paper until it’s about 12 inches in diameter; don’t worry about the edges being perfectly round.
- Arrange the peach slices in the center of the dough, leaving a 2-inch border all the way around the edge.
- Fold the edges of the dough up and over the peaches, pleating the crust as you go to create a rustic, enclosed border.
- Beat the egg with a teaspoon of water and brush the crust thoroughly; then sprinkle with turbinado sugar for a crunchy, sparkling finish.
- Bake for 25-30 minutes until the crust is a deep golden brown and the peach filling is bubbling vigorously. Let it cool slightly before sliding it onto your board.
How to cook summer soup?

Why we love this
When the temperature rises, a chilled gazpacho is the most refreshing way to incorporate garden-fresh flavors into your board. This isn’t just a soup; it’s a liquid salad, bursting with the brightness of lime, the garden-fresh scent of cilantro, and the cooling crunch of cucumbers. We love serving it in small shot glasses or ramekins on the board, offering a vibrant red pop of color and a cold, savory sip that resets the palate. It’s a sophisticated, healthy addition that always impresses guests with its complexity and depth of flavor.
Ingredients
- 4 cups ripe tomatoes, chopped
- 1 red bell pepper, seeded and chopped
- 1 cucumber, peeled and chopped
- 1/2 red onion, chopped
- 2 tbsp sherry vinegar
- 1/4 cup extra virgin olive oil
- Salt and lime juice to taste
How to make it
- Place all the chopped vegetables, including the tomatoes, bell pepper, cucumber, and red onion, into a high-powered blender.
- Add the sherry vinegar and a generous pinch of salt, then blend on high until the mixture is completely liquefied and smooth.
- While the blender is on a low setting, slowly drizzle in the olive oil to create an emulsion that gives the soup a creamy, velvety texture without any dairy.
- Pass the blended mixture through a fine-mesh sieve if you prefer a perfectly clear, elegant soup, or leave it as is for a more rustic, fiber-rich texture.
- Chill the gazpacho in the refrigerator for at least 4 hours—this step is non-negotiable as the flavors need time to develop and the soup must be served ice-cold.
- Just before serving, stir in a squeeze of fresh lime juice and pour into small vessels for your board, garnishing with a tiny sprig of cilantro.
How to grill chicken kabobs?

Why we love this
Grill chicken kabobs are the ultimate interactive food, offering a rainbow of charred vegetables and juicy, flame-kissed meat. We love the smoky aroma that lingers on the chicken and the way the peppers and onions become sweet and tender-crisp over the open flame. These skewers are visually stunning on a minimalist board, providing height and architectural interest. Each bite is a perfect ratio of savory protein and caramelized veg, making them a balanced and satisfying centerpiece that guests can easily grab and enjoy while mingling.
Ingredients
- 1.5 lbs chicken breast, cut into 1-inch cubes
- 2 bell peppers (different colors), cut into squares
- 1 large red onion, cut into chunks
- 1/2 cup Greek vinaigrette (for marinade)
- Wooden or metal skewers
How to make it
- If using wooden skewers, soak them in water for at least 30 minutes prior to use to prevent them from burning or catching fire on the grill.
- Cut your chicken and vegetables into uniform 1-inch pieces; consistency is key to ensuring everything cooks at the same rate.
- Marinate the chicken cubes in the Greek vinaigrette for 30 to 60 minutes in the refrigerator to infuse them with herbs and acidity.
- Thread the skewers, alternating between chicken, pepper, and onion to create a vibrant pattern and ensure the juices from the meat flavor the vegetables.
- Preheat your grill to medium-high heat (about 400°F) and lightly oil the grates to prevent sticking.
- Grill the kabobs for 10-12 minutes, turning them a quarter-turn every few minutes until the chicken is cooked through and the vegetables have beautiful char marks.
- Let the kabobs rest for 5 minutes before placing them on the board to allow the juices to redistribute within the meat.
How to make summer drinks?

Why we love this
A signature summer drink is the finishing touch that ties the whole minimalist board experience together. A watermelon lime spritzer is incredibly refreshing, with the natural sweetness of the fruit balanced by the sharp tang of citrus and the effervescence of sparkling water. It’s light, hydrating, and looks absolutely stunning when garnished with fresh mint leaves and a slice of lime. We love how this drink acts as a vibrant, non-alcoholic option (or a perfect mixer) that keeps the vibe cool and sophisticated even on the hottest days.
Ingredients
- 4 cups seedless watermelon, cubed
- 2 tbsp fresh lime juice
- 1 tbsp agave or simple syrup (optional)
- Sparkling mineral water or club soda
- Fresh mint sprigs and lime slices for garnish
How to make it
- Place the watermelon cubes in a blender and process until completely liquefied and smooth.
- Pour the watermelon juice through a fine-mesh strainer into a large pitcher to remove any pulp or fibers, resulting in a clean, crisp liquid base.
- Stir in the fresh lime juice and agave, adjusting the sweetness based on how ripe your watermelon is.
- Fill highball glasses or a large glass carafe with plenty of ice—the drink must be served very cold to be truly refreshing.
- Fill the glasses halfway with the watermelon base and top with the sparkling mineral water, stirring gently with a long spoon to combine without losing the bubbles.
- Garnish each glass with a slapped mint sprig (this releases the oils) and a thin lime wheel before placing the pitcher in the center of your board setup for a splash of color.
Conclusion
Hosting doesn’t have to be a source of stress or a reason to hide away in the kitchen. By embracing the viral minimalist food board, you’re choosing to prioritize connection and quality over complexity. Whether it’s the smoky char of a chicken kabob or the refreshing sip of a watermelon spritzer, these simple summer favorites are designed to be enjoyed slowly and shared generously. So, pull out your favorite wooden board, prep these vibrant dishes, and let the summer memories begin!