

Level Up Your Hosting: 5 Viral Food Boards You Can Make Tonight
There is something truly magical about a house full of laughter, the clinking of glasses, and the shared joy of a meal that looks as good as it tastes. We’ve all been there—scrolling through social media and seeing those breathtaking food boards that look like a work of art, wondering how on earth someone found the time to make it so perfect. The truth? Creating a viral-worthy food board isn’t about professional culinary training; it’s about the heart you put into the presentation and the ease of grazing with the people you love.
In today’s fast-paced world, the ‘board’ concept has evolved far beyond simple cheese and crackers. It has become a lifestyle statement—a way to serve a complete, themed meal that invites guests to linger, pick their favorite bits, and truly engage with their food. Whether you are hosting a chaotic playdate or a sophisticated backyard soirée, these boards are designed to be low-stress and high-impact. Let’s dive into these ten incredible board inspirations that will make you the ultimate hosting pro tonight.
10 Easy Summer Meals Your Kids Will Love

Why we love this
This board is a total game-changer for parents who are tired of the ‘what’s for dinner’ battle during the golden hour of summer. Imagine a vibrant spread of golden-brown chicken tenders, vibrant slices of sweet watermelon, and creamy mac-and-cheese bites that catch the evening sun. The aroma is a comforting blend of savory warmth and fruity sweetness, creating a relaxed atmosphere where even the pickiest eaters find something to smile about. Watching little hands reach for colorful fruit skewers and tiny sandwiches makes the effort feel like pure magic, turning a routine Tuesday night into a festive backyard memory.
Ingredients
- Golden chicken nuggets or tenders
- Miniature grilled cheese triangles
- Fresh watermelon wedges
- Seedless grapes and strawberry halves
- Cucumber rounds and baby carrots
- Creamy ranch and honey mustard dipping sauces
- Small pretzels and mild cheddar cubes
How to make it
- Begin by preheating your oven or air fryer to 400°F (200°C) to ensure the chicken and grilled cheese achieve a perfect, audible crunch. Cook the chicken for 12-15 minutes, flipping halfway through until the internal temperature reaches 165°F and the coating is a deep, burnished gold.
- While the hot items cook, wash all produce thoroughly in cold water and pat them completely dry; moisture is the enemy of a crisp board, so use a paper towel to ensure no droplets remain on the grapes or cucumbers.
- Slice the grilled cheese into tiny, crustless triangles using a sharp serrated knife to keep the bread from squishing, ensuring the melted cheese stays tucked inside the golden-brown crust.
- Place small dipping bowls for the ranch and honey mustard in opposite corners of a large wooden board to serve as structural anchors for the rest of your layout.
- Arrange the hot chicken and sandwiches in the center of the board, then radiate outward with the cold fruits and vegetables, filling any small gaps with pretzels and cheese cubes to create a lush, abundant look that kids can’t resist.
5 Best Chicken Caesar Wrap Recipes for Lunch
Why we love this
There is nothing quite like the sophisticated crunch of a perfectly executed Caesar wrap board to elevate a midday gathering. The air fills with the sharp, salty aroma of aged Parmesan and the bright, zesty tang of fresh lemon juice, instantly waking up the senses. Each wrap offers a symphony of textures: the soft, pillowy embrace of a flour tortilla, the juicy snap of grilled chicken breast, and the refreshing, watery crunch of chilled romaine hearts. It’s a clean, elegant way to serve lunch that feels incredibly indulgent without the heaviness of a traditional sit-down meal.
Ingredients
- Sliced grilled chicken breast (seasoned with garlic and black pepper)
- Large flour tortillas (plain, spinach, and sun-dried tomato)
- Crisp romaine lettuce, chopped into bite-sized ribbons
- Shaved Parmesan cheese curls
- House-made Caesar dressing with extra black pepper
- Crispy croutons and fried capers for texture
- Lemon wedges for a bright finish
How to make it
- Start by grilling your chicken breasts over medium-high heat (about 375°F) for 6-7 minutes per side until they show distinct char marks and remain juicy inside; let them rest for at least 5 minutes before slicing into thin strips to lock in the moisture.
- Warm the tortillas slightly in a dry pan for 10 seconds per side; this makes them much more pliable and prevents them from tearing when you begin the rolling process.
- Lay a tortilla flat and spread a thin, even layer of Caesar dressing across the center, leaving a two-inch border around the edges to ensure a clean seal once rolled.
- Layer a generous handful of romaine, several strips of chicken, and a sprinkle of Parmesan; fold the sides in tightly and roll from the bottom up, tucking the filling as you go to create a firm, professional cylinder.
- Slice each wrap on a sharp diagonal to showcase the beautiful interior layers and arrange them on the board in a shingled pattern, garnishing with extra lemon wedges and a bowl of dipping sauce in the center for guests to customize their bite.
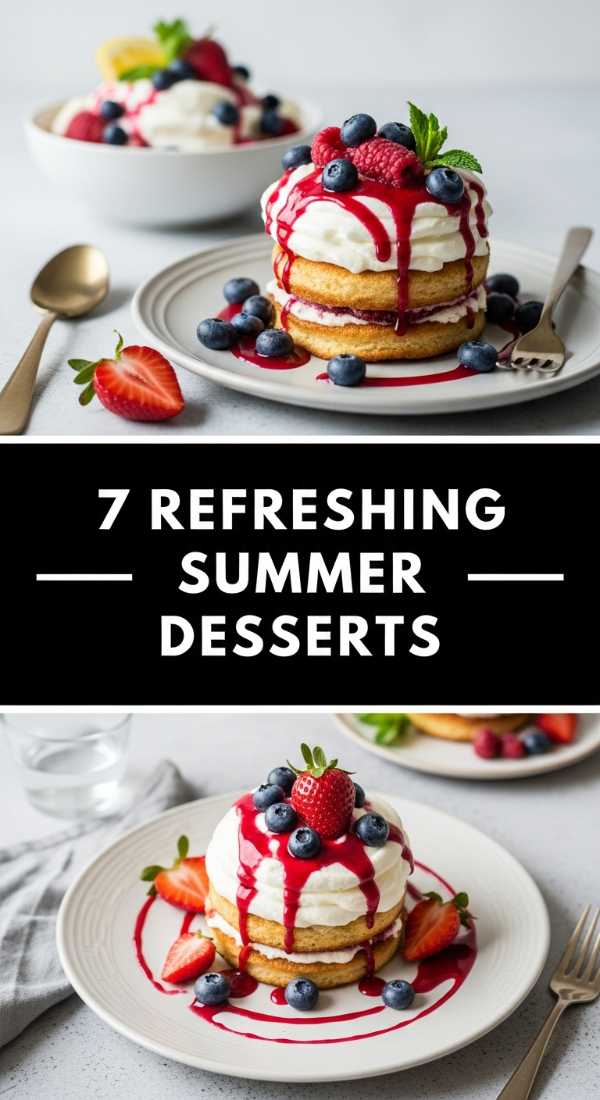
7 Best Summer Desserts to Cool You Down

Why we love this
When the humidity peaks and the sun lingers late into the evening, this frozen dessert board becomes the ultimate sanctuary. The sight of frosty sorbet scoops and glistening frozen grapes nestled against dark chocolate squares is enough to lower the temperature of the room. You can practically feel the refreshing chill radiating from the board, accompanied by the sweet, floral scent of fresh mint and ripe berries. It’s a sensory experience that combines the childhood joy of an ice cream truck with the refined elegance of a summer garden party, leaving everyone feeling light and revitalized.
Ingredients
- Assorted sorbet scoops (raspberry, lemon, and mango)
- Frozen red and green grapes
- Dark chocolate shards and white chocolate chips
- Fresh raspberries, blueberries, and blackberries
- Miniature meringues for a sweet crunch
- Fresh mint leaves for garnish
- Chilled honey or agave syrup for drizzling
How to make it
- The secret to a successful frozen board is temperature management: place your serving board (preferably stone or marble) in the freezer for at least 30 minutes before you begin assembling to prevent immediate melting.
- Prepare the ‘frosted’ grapes by washing them, keeping them on the vine, and freezing them for at least 4 hours until they are hard and covered in a beautiful, natural frost.
- Using a standard ice cream scoop, create perfectly round balls of each sorbet flavor and place them on a parchment-lined tray in the freezer to firm up for 20 minutes before moving them to the final board.
- Arrange the frozen grapes and sorbet scoops on the chilled board first, as they are your most temperature-sensitive items, then quickly fill the spaces with fresh berries and chocolate shards.
- Scatter the miniature meringues and mint leaves across the top for a professional finish, and serve immediately with small spoons or chilled dessert forks so guests can dive in while everything is at its peak frostiness.
8 Simple Picnic Food Ideas for Park Days

Why we love this
Nothing says summer lifestyle like a perfectly packed picnic board enjoyed under the shade of an old oak tree. The aroma is earthy and inviting—think nutty crackers, savory cured meats, and the sweet, concentrated scent of dried apricots. It captures the essence of slow living, encouraging you to put down your phone and enjoy the tactile pleasure of assembling the perfect bite while feeling the grass between your toes. This board is rugged yet refined, designed to travel well and provide a steady stream of energy for a full day of park activities and sunshine.
Ingredients
- Hard cheeses like Manchego or sharp Cheddar
- Dry-cured salami and Prosciutto
- Multigrain crackers and sea salt pita chips
- Dried apricots and chewy figs
- Roasted almonds and walnuts
- Kalamata olives and cornichons
- Small jar of wildflower honey or fig jam
How to make it
- Select a sturdy wooden board or a flat-bottomed wicker tray that can withstand being moved; if you’re traveling, choose ingredients that don’t require constant refrigeration to maintain their texture.
- Slice the hard cheeses into uniform wedges or cubes while they are cold, but allow them to come to room temperature for about 15 minutes before serving to unlock their full aromatic profile and creamy mouthfeel.
- Roll the prosciutto into tight ribbons and fold the salami into ‘fans’ by folding a circle in half and then in half again, securing them against each other on the board to keep their shape.
- Place the ‘wet’ items—olives, cornichons, and jams—into small, leak-proof jars with tight-fitting lids to prevent their juices from making the crackers soggy during transport.
- Fill all remaining crevices with the nuts and dried fruits, ensuring the board looks ‘bountiful’ with no visible wood showing, which helps keep the items from shifting while you carry the board to your picnic spot.
5 Refreshing Summer Cocktails for Your Party
Why we love this
A cocktail garnish board is the height of interactive hosting, turning every guest into a master mixologist. The air becomes thick with the intoxicating fragrance of bruised mint, zesty lime oil, and the sweetness of macerated berries. It’s a visually stunning display of color and texture that acts as a focal point for the party, sparking conversation as people customize their drinks. There is a sophisticated ‘spa-water’ vibe mixed with festive energy, making the simple act of pouring a drink feel like a curated, artisanal experience that celebrates the bounty of the season.
Ingredients
- Fresh citrus slices (blood orange, lime, and lemon)
- Fresh herbs (mint, basil, and rosemary sprigs)
- Mixed berries (blackberries, raspberries, and strawberries)
- Cucumber ribbons (peeled with a vegetable peeler)
- Dehydrated fruit wheels for a professional touch
- Small bowls of coarse sea salt and chili-lime seasoning
- Agave nectar and simple syrup in small dispensers
How to make it
- Wash all fruits and herbs in ice-cold water to ensure they are crisp and vibrant; for the herbs, give them a gentle ‘slap’ between your palms right before placing them on the board to release their essential oils.
- Use a mandoline or a very sharp chef’s knife to create paper-thin slices of citrus and cucumber; thin slices look more elegant in a glass and release flavor more quickly into the liquid.
- Create ‘flavor clusters’ on the board: group the mint and lime together for mojito fans, and the basil and berries together for gin-based drinks, making it easy for guests to navigate their choices.
- Prepare the rimming station by placing the salt and chili-lime seasoning on small flat plates or in shallow bowls on the corner of the board next to a few sliced lime wedges for easy rim-wetting.
- Keep a small bowl of ice nearby (or place the entire board on a bed of crushed ice) to ensure the fresh produce stays turgid and bright throughout the duration of your party.
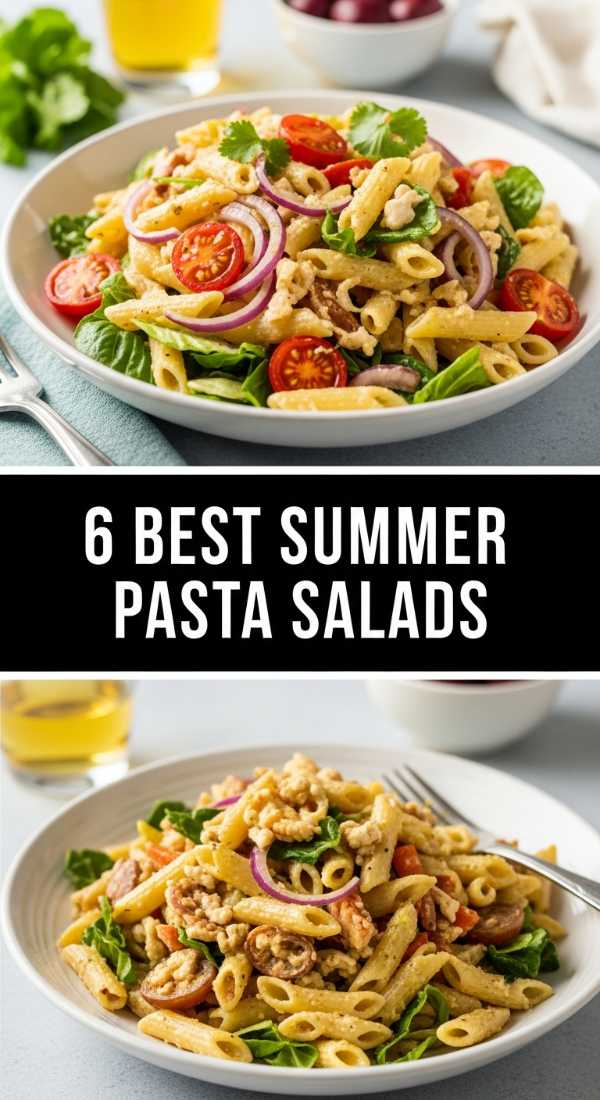
6 Best Summer Pasta Salads to Share

Why we love this
The pasta salad board is a brilliant modern twist on a potluck classic, allowing guests to sample a variety of flavors without committing to a single giant bowl. The scent is an herbaceous delight, dominated by fresh pesto, balsamic glaze, and sun-ripened tomatoes. Each section of the board offers a different discovery—from the chewy bite of al dente rotini to the creamy softness of fresh mozzarella pearls. It feels like a tour of the Mediterranean coastline, offering a satisfying heartiness that still feels light enough for a humid summer evening under the string lights.
Ingredients
- Tri-color rotini and farfalle (bow-tie) pasta
- Fresh basil pesto and balsamic vinaigrette
- Cherry tomatoes, halved, and sun-dried tomatoes
- Fresh mozzarella pearls and crumbled feta
- Artichoke hearts and roasted red peppers
- Toasted pine nuts and fresh parsley
- Salami pearls or mini pepperoni
How to make it
- Boil your pasta in heavily salted water until it is just ‘al dente’—it should have a slight resistance to the tooth; overcooked pasta will fall apart when tossed with dressing and look unappealing on the board.
- Immediately rinse the cooked pasta under cold running water to stop the cooking process and remove excess starch, then toss it with a teaspoon of olive oil to prevent the noodles from sticking together.
- Divide the pasta into three separate mixing bowls and dress each differently (e.g., one with pesto, one with vinaigrette, one with lemon-tahini) to create a diverse flavor profile on a single board.
- Arrange the different pasta salads in distinct mounds across a long wooden plank, using rows of fresh ingredients like cherry tomatoes or cucumber slices to act as ‘dividers’ between the flavors.
- Top with fresh herbs and toasted nuts just before serving to add a final layer of texture and a pop of bright green color that makes the board look professionally styled.
9 Healthy Summer Recipes That Taste Amazing

Why we love this
This ‘Healthy Glow’ board is proof that nutritious eating can be the highlight of the party. It is a stunning rainbow of raw, blanched, and fermented vegetables that celebrate the earth’s natural vibrant colors. The aroma is clean and garden-fresh, highlighted by the earthy scent of beet hummus and the sharp, clean snap of radishes. There is something deeply satisfying about the varied textures—the crunch of a snap pea, the creaminess of avocado, and the silkiness of a well-made dip—making you feel nourished and energized with every single bite.
Ingredients
- Rainbow carrots (purple, orange, and yellow)
- Watermelon radishes, sliced thin
- Blanched snap peas and asparagus spears
- Beet hummus and traditional chickpea hummus
- Sliced avocado with a squeeze of lime
- Endive leaves for natural ‘scoops’
- Sprouted nuts and hemp seeds for topping
How to make it
- Prepare your ‘hard’ vegetables like carrots and asparagus by blanching them: submerge them in boiling water for exactly 60 seconds, then immediately plunge them into an ice bath to lock in their neon colors and keep them perfectly crisp-tender.
- Use a vegetable peeler or mandoline to slice the watermelon radishes into translucent rounds; soak them in ice water for 10 minutes to make them extra crunchy and cause them to curl slightly for better presentation.
- Place your dips—beet hummus for a shock of pink and traditional hummus for a neutral contrast—in small ceramic bowls and create a swirl on top with the back of a spoon, filling the indentation with olive oil and seeds.
- Arrange the vegetables in a gradient of color (the ‘ROYGBIV’ method) to create a visually striking flow that naturally draws the eye across the board.
- Tuck the endive leaves and avocado slices in last, as they are more delicate, and finish with a light dusting of sea salt across the entire spread to enhance the natural sugars in the vegetables.
10 Top Cookout Side Dishes Everyone Craves
Why we love this
The ultimate cookout board is a nostalgic tribute to American summer traditions, gathered in one epic, shareable display. You can smell the charred sweetness of grilled corn, the smoky paprika on deviled eggs, and the tangy vinegar of a classic potato salad. It brings the ‘comfort food’ factor to the outdoors, allowing guests to build their own perfect plate of sides without the clunky mess of multiple bowls. It feels generous, soulful, and deeply satisfying—the kind of food that makes you want to lean back in your chair and enjoy the sunset with a cold drink in hand.
Ingredients
- Grilled corn on the cob (cut into 3-inch ‘ribs’)
- Classic potato salad with fresh dill
- Vinegar-based coleslaw for crunch
- Deviled eggs with a sprinkle of smoked paprika
- Baked beans in a small cast-iron crock
- Cornbread squares with honey butter
- Pickled red onions and jalapeños
How to make it
- Grill the corn over high heat (450°F) until char marks appear on all sides, then carefully slice them into smaller ‘ribs’ or rounds to make them easier to grab and eat without a mess.
- Keep your potato salad and coleslaw in the refrigerator until the very last second; for the board, place them in chilled bowls to help maintain their temperature against the heat of the grilled items.
- Prepare deviled eggs by boiling eggs for 9 minutes, cooling in ice, and mixing the yolks with Dijon mustard and mayo until ultra-smooth; use a piping bag to fill the whites for a clean, ‘viral’ look.
- Arrange the heavier items like the cornbread and the crock of beans first to establish the ‘weight’ of the board, then surround them with the lighter, colorful salads and eggs.
- Garnish the entire board with sprigs of fresh dill and extra paprika to tie the different flavors together visually, ensuring every corner looks seasoned and intentional.
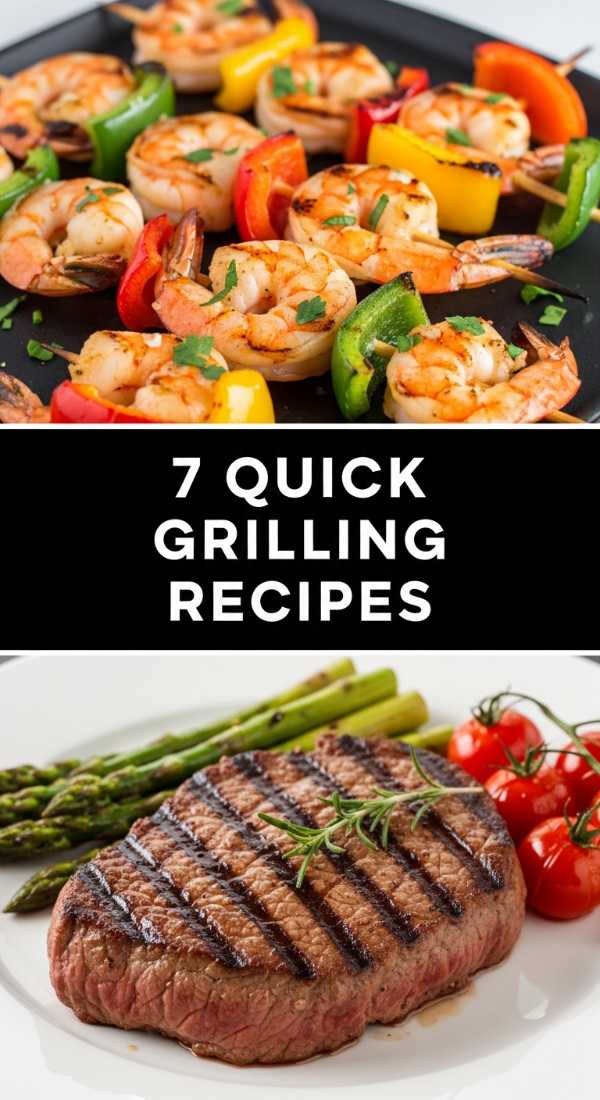
7 Quick Summer Grilling Recipes for Weeknights
Why we love this
This weeknight grilling board is the antidote to the boring dinner routine, bringing the excitement of a steakhouse to your patio table in under 30 minutes. The air is filled with the mouthwatering scent of seared protein and caramelized peppers, creating an instant ‘restaurant-at-home’ vibe. It’s an interactive way to eat, where everyone can grab a skewer of shrimp or a slice of perfectly rested steak. The charred edges of the vegetables and the glisten of high-quality olive oil make the whole spread feel high-end, even if it only took a few minutes of prep after work.
Ingredients
- Garlic-butter shrimp skewers
- Marinated steak bites (sirloin or flank)
- Grilled bell pepper and red onion wedges
- Zucchini ribbons, grilled quickly
- Chimichurri sauce for drizzling
- Grilled sourdough bread slices
- Blistered shishito peppers
How to make it
- Ensure your grill is screaming hot—at least 500°F—before any meat touches the grates; this high heat is essential for creating the ‘Maillard reaction’ (that beautiful brown crust) without overcooking the center.
- Thread your shrimp and steak onto separate skewers; since shrimp cook in 2-3 minutes and steak takes 5-7, keeping them separate ensures nothing ends up rubbery or overdone.
- Brush the sourdough slices with olive oil and grill them for 45 seconds per side until they have clear grill marks and a smoky aroma, providing the perfect vessel for soaking up meat juices.
- Let the steak bites rest on a separate plate for at least 5 minutes after grilling; skipping this step will cause the juices to run all over your board, making the bread and vegetables soggy.
- Lay a bed of grilled zucchini and peppers down first, then place the skewers and steak on top, finishing with a generous bowl of chimichurri in the center for a bright, acidic contrast to the smoky proteins.
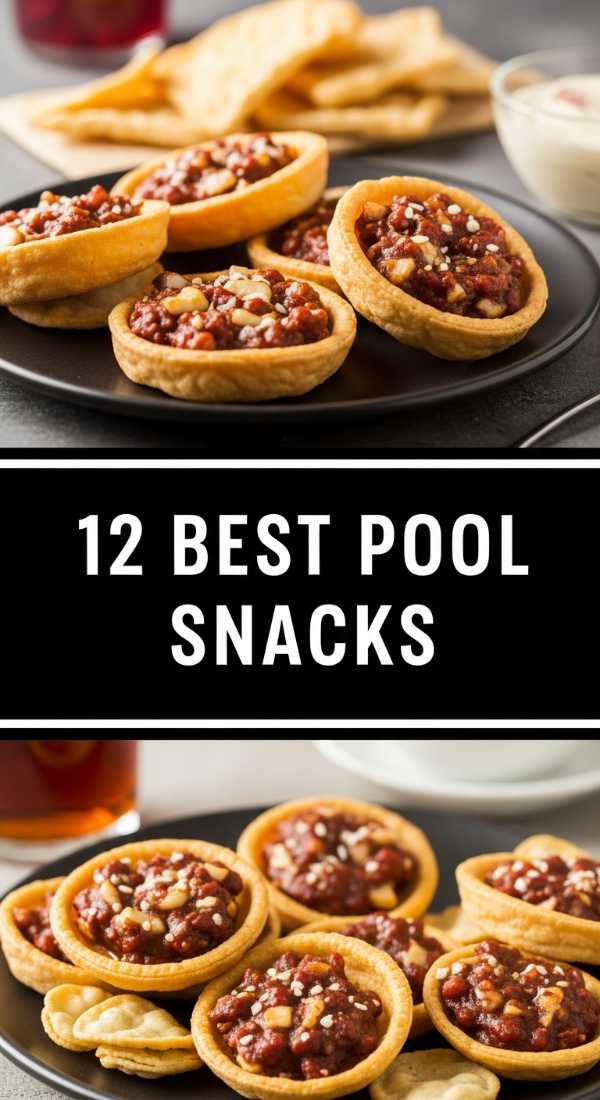
12 Best Pool Snacks for Summer Fun
[IMAGE_10]
Why we love this
The pool snack board is the ultimate ‘low-maintenance’ hosting win, designed for wet hands and sunshine-filled afternoons. It’s a playful mix of salty, sweet, and hydrating snacks that keep the energy high without making anyone feel weighed down. You’ll catch the scent of salty pretzels and the tropical sweetness of pineapple, instantly putting everyone in a vacation state of mind. It’s colorful, carefree, and incredibly durable—designed to be dipped into between laps, making it the perfect companion for a day spent by the water with friends and family.
Ingredients
- Fresh pineapple chunks and mango slices
- Large salted pretzels and pita crackers
- Hummus and pineapple salsa
- Jerky strips or turkey sticks
- Popcorn seasoned with lime and sea salt
- Frozen yogurt-covered blueberries
- Cucumber spears with tajin seasoning
How to make it
- Focus on ‘finger foods’ that don’t require utensils; ensure everything is cut into bite-sized pieces that can be easily grabbed with one hand while lounging.
- Use a large plastic or melamine board instead of wood or slate; these materials are safer for pool areas where glass or heavy breakables are usually discouraged.
- Place the ‘salty’ items like popcorn and pretzels in separate clusters away from the ‘wet’ fruits like pineapple to ensure they stay crunchy and don’t absorb stray moisture.
- Dust the cucumber spears and mango slices with Tajin seasoning just before serving; the lime and chili flavors provide a refreshing ‘zing’ that perfectly complements the heat of the sun.
- Keep the yogurt-covered blueberries in a small bowl nestled inside a larger bowl of ice to prevent them from melting into a sticky mess, ensuring they stay as a refreshing, chilled treat throughout the afternoon.
The Secret to a Perfect Board
As you can see, the beauty of a viral food board lies in its versatility and the joy of assembly. Whether you’re focusing on healthy greens or indulgent desserts, the key is to fill the space, use contrasting colors, and always prioritize fresh, seasonal ingredients. These boards aren’t just about feeding people; they are about creating an atmosphere where guests feel welcome to explore, taste, and connect. So, grab your largest platter, gather your favorite ingredients, and start building your own masterpiece tonight!
Frequently Asked Questions
Everything you need to know about becoming a board-building pro.