

There is something truly magical about the way food can transform a simple afternoon on the patio into a memory that sticks with you for years. We have all seen that viral food board scrolling through our feeds—the one overflowing with colors, textures, and flavors that seem almost too beautiful to eat. It is more than just a meal; it is an invitation to slow down, graze, and actually talk to the people sitting across from you while the golden hour sun hits the table just right.
I decided to stop just liking those photos and started recreating that effortless, abundant vibe in my own kitchen. What I discovered is that the secret isn’t about being a professional chef; it’s about the art of the assembly. It is about combining warm, indulgent dips with crisp, refreshing salads and charred, smoky proteins. Today, I’m pulling back the curtain on every single component you need to build the ultimate summer food board that will have your friends reaching for their cameras and their forks at the same time.
How to Make Creamy Rotel Dip?
Why we love this
This dip is the ultimate nostalgic comfort food, reimagined for a modern gathering with an ultra-velvety texture that never breaks. Imagine the spicy, zesty kick of diced tomatoes and green chilies folding into a rich, molten cheese base that clings perfectly to every chip. The aroma of simmering spices and melting cheese fills the room, creating an instant sense of warmth and hospitality that draws everyone to the center of the table for just one more scoop.
Ingredients
- 16 oz high-quality processed cheese (like Velveeta), cubed
- 1 can (10 oz) Ro-Tel Diced Tomatoes and Green Chilies, undrained
- 1/2 lb ground breakfast sausage or lean ground beef
- 4 oz cream cheese, softened
- 1/2 teaspoon smoked paprika
- Fresh cilantro for garnish
How to make it
- Begin by browning your choice of meat in a heavy-bottomed skillet over medium-high heat. Use a wooden spoon to break the meat into very small crumbles; this ensures an even distribution of protein in every bite. Cook until no pink remains and the edges are slightly crispy.
- Carefully drain the excess fat from the skillet to prevent the dip from becoming oily. Lower the heat to medium-low.
- Add the cubed processed cheese and the softened cream cheese to the skillet. Adding cream cheese is the professional secret to achieving that signature “silky” mouthfeel that doesn’t seize up as it cools.
- Pour in the entire can of Ro-Tel, including the juices, which contain the acidity needed to balance the richness of the dairy.
- Stir continuously using a heat-resistant spatula. You are looking for a slow melt—if the cheese begins to bubble too aggressively, drop the heat to low. Constant motion prevents the bottom from scorching.
- Once completely smooth, stir in the smoked paprika. Transfer to a warmed ceramic bowl and garnish with freshly chopped cilantro for a pop of color and herbal brightness.
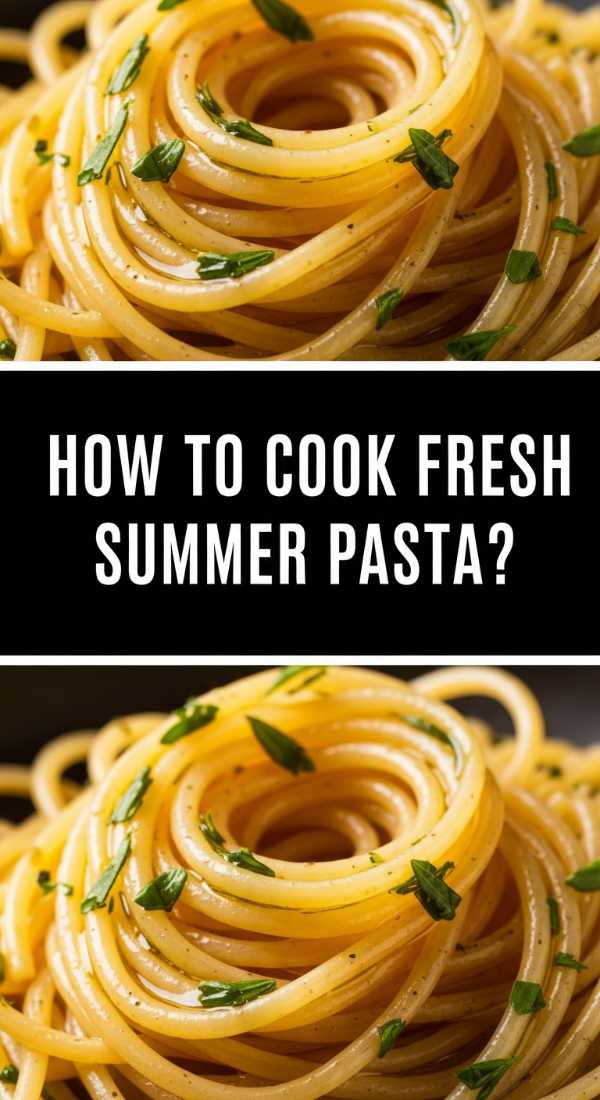
How to Cook Fresh Summer Pasta?
Why we love this
Fresh summer pasta is like a garden party in a bowl, celebrating the peak of the season’s harvest with every al dente bite. The scent of bruised basil leaves and garlic sautéing in golden olive oil is enough to make anyone’s mouth water before the dish even hits the table. It feels light and ethereal rather than heavy, with the natural juices of bursting cherry tomatoes creating a delicate sauce that tastes like pure sunshine and sea salt.
Ingredients
- 1 lb Linguine or Tagliatellle
- 2 cups cherry tomatoes, halved
- 4 cloves garlic, thinly sliced
- 1/2 cup extra virgin olive oil
- 1 bunch fresh basil, torn
- 1/2 cup freshly grated Parmesan Reggiano
- 1/2 teaspoon red pepper flakes
How to make it
- Bring a large pot of heavily salted water to a rolling boil—it should taste like the ocean to properly season the pasta from the inside out. Drop the pasta and cook for 1-2 minutes less than the package directions for true al dente.
- While the pasta cooks, heat the olive oil in a wide pan over medium heat. Add the sliced garlic and red pepper flakes. Watch closely; you want the garlic to become translucent and fragrant, not brown and bitter.
- Add the halved cherry tomatoes to the oil. Turn the heat up slightly and sauté until the skins begin to blister and wrinkle, releasing their sweet nectar into the oil. Use the back of a spoon to gently press a few tomatoes to help create the base of the sauce.
- Before draining the pasta, reserve exactly one cup of the starchy pasta water—this is liquid gold for emulsifying your sauce.
- Transfer the pasta directly into the tomato pan. Pour in half of the pasta water and toss vigorously with tongs. The starch will bind the oil and tomato juice together into a silky glaze.
- Turn off the heat, fold in the torn basil and grated Parmesan, adding more pasta water if the dish looks dry. The residual heat will melt the cheese into a perfect coating.
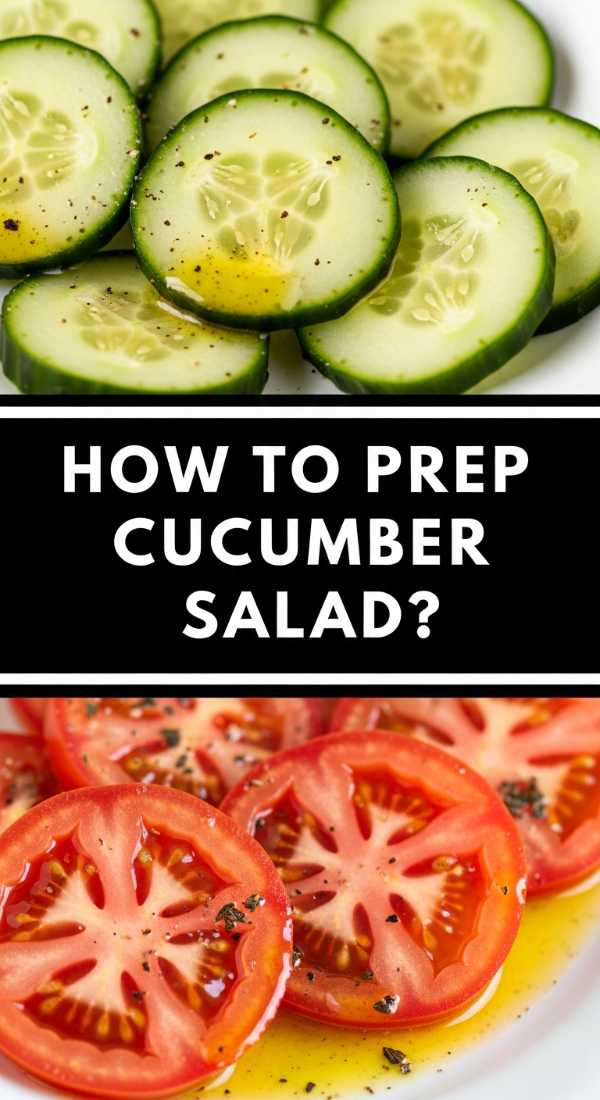
How to Prep Cucumber Salad?
Why we love this
This salad is the essential cooling element for any food board, providing a sharp, vinegary snap that cleanses the palate between richer bites. The translucent, paper-thin slices of cucumber offer a satisfying crunch that echoes with the freshness of a summer rainstorm. Drizzled with a light vinaigrette and tossed with red onions, it brings a vibrant, architectural beauty to your spread while keeping the overall meal feeling balanced and airy.
Ingredients
- 3 large English cucumbers
- 1/2 small red onion, paper-thinly sliced
- 1/2 cup rice wine vinegar
- 2 tablespoons honey or agave
- 1 tablespoon fresh dill, chopped
- 1 teaspoon sea salt
- 1/2 teaspoon cracked black pepper
How to make it
- Start by washing the cucumbers thoroughly. Using a mandoline slicer is highly recommended here to achieve those professional, uniform, paper-thin rounds. If using a knife, take your time to slice as thinly as possible.
- Place the cucumber slices in a colander and sprinkle with the sea salt. Let them sit for about 10 minutes. This “sweating” process draws out excess water, ensuring your salad stays crunchy and the dressing doesn’t get watered down.
- While the cucumbers rest, whisk together the rice wine vinegar, honey, and black pepper in a small glass bowl until the honey is fully dissolved.
- Gently pat the cucumbers dry with a clean kitchen towel and place them in a large mixing bowl along with the sliced red onions.
- Pour the dressing over the vegetables and toss gently with your hands or wooden spoons to ensure every slice is coated.
- Fold in the fresh dill last to preserve its delicate aroma and bright green color. Let the salad chill in the refrigerator for at least 20 minutes before serving to allow the flavors to marry.
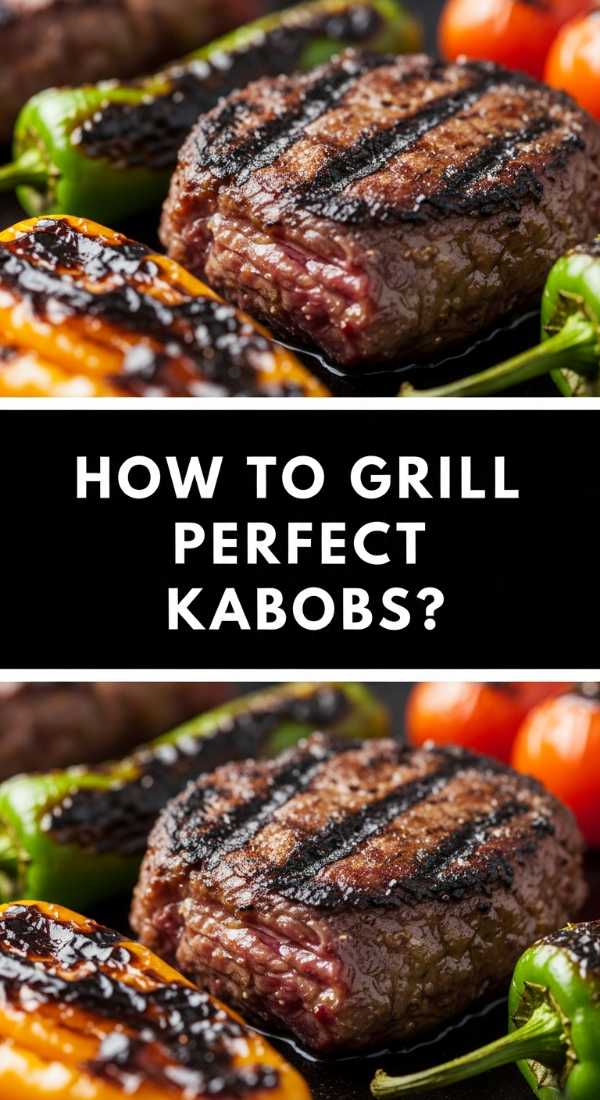
How to Grill Perfect Kabobs?

Why we love this
Kabobs bring a primal, smoky element to the board that is visually striking and incredibly fun to eat. There is something deeply satisfying about the charred, caramelized edges of the vegetables contrasting with the juicy, tender center of the protein. The aroma of woodsmoke and marinating spices wafting from the grill creates an irresistible magnetic pull, signaling to everyone that the main event is almost ready.
Ingredients
- 1.5 lbs top sirloin or chicken breast, cut into 1.5-inch cubes
- 1 red bell pepper and 1 green bell pepper, cut into chunks
- 1 large red onion, cut into wedges
- 8 oz whole button mushrooms
- 1/2 cup balsamic vinaigrette or teriyaki marinade
- Wooden or metal skewers
How to make it
- If using wooden skewers, soak them in water for at least 30 minutes prior to grilling to prevent them from igniting over the flames.
- Place your cubed meat in a bowl with the marinade for at least 1 hour in the fridge. For maximum tenderness, don’t skip this step; the acidity in the marinade breaks down tough fibers.
- Thread the skewers, alternating between meat and vegetables. Pro tip: Don’t crowd the items too tightly. Leaving a tiny bit of space between each piece allows the heat to circulate, ensuring the meat browns on all sides instead of steaming.
- Preheat your grill to medium-high heat (about 400°F). Clean the grates thoroughly and lightly oil them to prevent sticking.
- Place the kabobs on the grill. Sear for 3-4 minutes on the first side without moving them to develop those beautiful grill marks.
- Turn the kabobs 90 degrees every few minutes. Use an instant-read thermometer to check for doneness: 145°F for beef (medium-rare) or 165°F for chicken. Let them rest on a platter for 5 minutes before adding to the board to allow the juices to redistribute.
How to Make Hummingbird Food?
Why we love this
While not for the human guests, having a hummingbird feeder near your outdoor food board adds a layer of enchanting, live entertainment to your lifestyle setup. It is a simple gesture that connects your gathering to the natural world, bringing the iridescent shimmer of tiny wings and the quiet hum of nature right to your balcony or patio. It makes your home feel like a sanctuary where every living thing is invited to feast.
Ingredients
- 1 cup granulated white sugar
- 4 cups filtered water
How to make it
- The ratio is the most critical part: 1 part sugar to 4 parts water. This mimics the sucrose content of natural flower nectar. Never use honey, brown sugar, or artificial sweeteners, as these can be fatal to birds.
- Pour the water into a small saucepan and bring it to a boil. Boiling the water helps remove impurities and ensures the sugar dissolves completely and quickly.
- Add the sugar to the boiling water and stir until the liquid is crystal clear. Remove from the heat immediately.
- Allow the mixture to cool to room temperature. This is vital; hot nectar can warp plastic feeders or harm the birds.
- Never add red food coloring. The red parts of your feeder are enough to attract them, and the dye can be harmful to their delicate systems.
- Fill your clean feeder and store any extra in a glass jar in the fridge for up to a week. Change the nectar every 2-3 days to prevent fermentation.
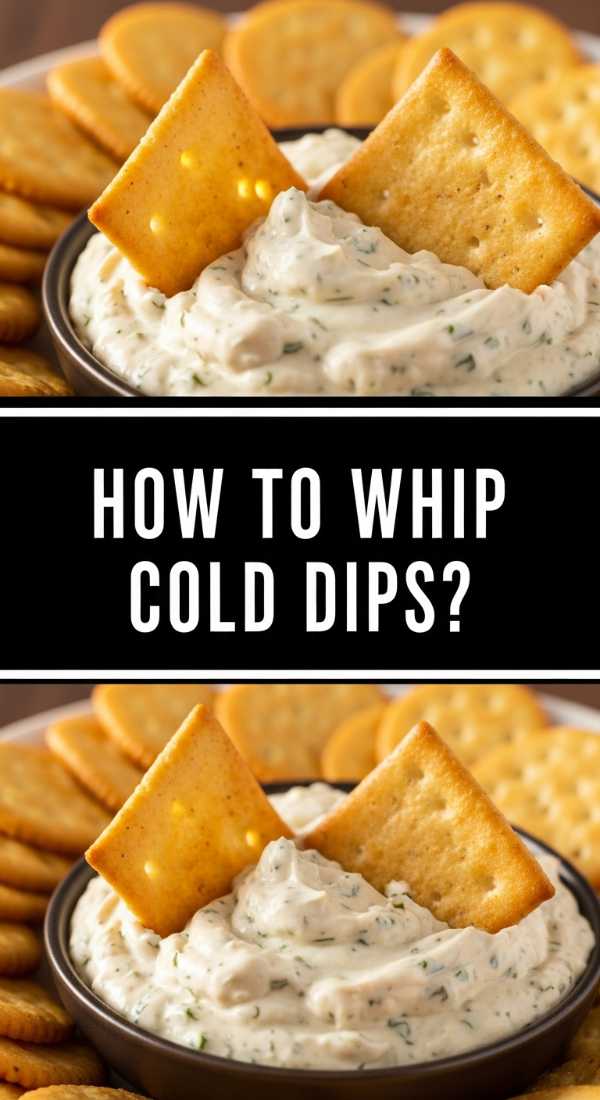
How to Whip Cold Dips?
Why we love this
A whipped cold dip is the epitome of elegance, offering a cloud-like texture that feels incredibly sophisticated compared to standard store-bought versions. The process of aeration transforms humble ingredients into a light, mousse-like spread that catches the light and holds its shape on a cracker. It’s airy, refreshing, and carries flavors like lemon zest or cracked pepper with a delicate intensity that lingers beautifully on the tongue.
Ingredients
- 8 oz feta cheese or goat cheese, room temperature
- 1/2 cup Greek yogurt or Ricotta
- 2 tablespoons extra virgin olive oil
- Zest of one lemon
- 1 clove garlic, grated
How to make it
- Ensure your cheese is at true room temperature. If it’s too cold, it will remain lumpy instead of becoming a smooth cream.
- Place the cheese and the Greek yogurt into a food processor or a high-powered blender. The yogurt provides the necessary moisture and a pleasant tang.
- Process on high for 30 seconds, then stop to scrape down the sides with a rubber spatula to ensure no chunks remain.
- While the processor is running on low, slowly drizzle in the olive oil. This emulsification process is what creates that stable, whipped “cloud” effect.
- Add the lemon zest and grated garlic. Pulse a few more times just to incorporate. Using a grater or microplane for the garlic ensures it melts into the dip without leaving sharp, raw pieces.
- Transfer to a bowl and use a spoon to create deep swirls on the surface. Drizzle with a little more oil and a sprinkle of herbs for a professional finishing touch.
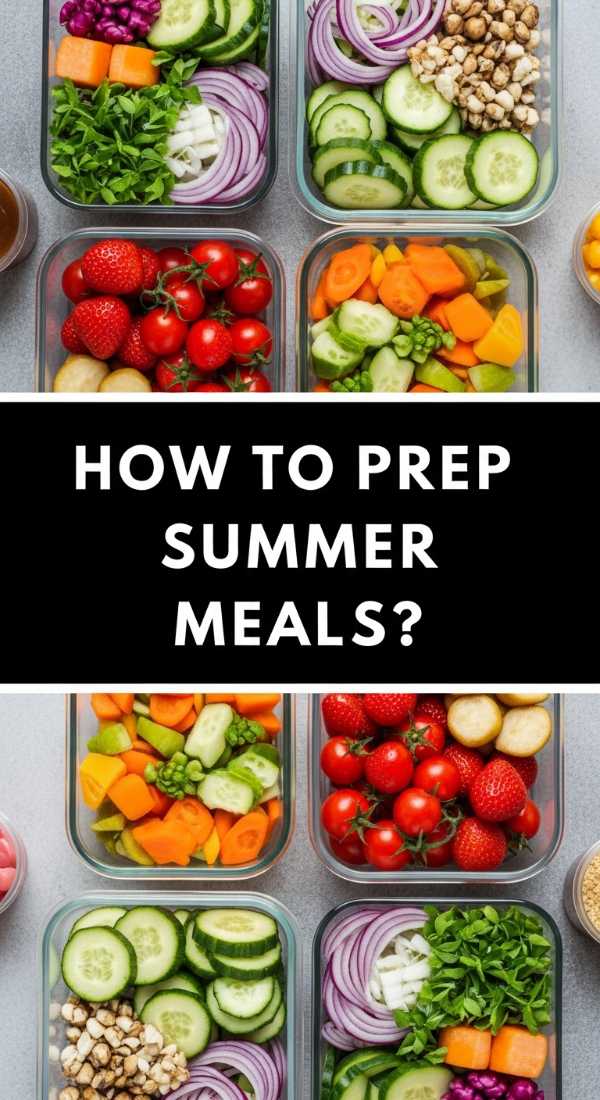
How to Prep Summer Meals?

Why we love this
Prepping summer meals is all about reclaiming your time so you can actually enjoy the sunset instead of being stuck in a hot kitchen. It’s a rhythmic, meditative process of washing crisp greens, dicing sun-ripened fruit, and organizing ingredients so that assembly takes mere minutes. There is a deep satisfaction in seeing a fridge stocked with vibrant, prepped components that promise a week of healthy, effortless eating that tastes like the peak of the season.
Ingredients
- Variety of seasonal proteins (chicken, shrimp, chickpeas)
- Pre-washed leafy greens
- Hard-boiled eggs
- Sliced seasonal fruits (peaches, berries)
- Pre-cooked grains (quinoa or farro)
How to make it
- Dedicate a “prep hour” in the cool of the morning. Start by cooking your grains. Rinse quinoa or farro thoroughly and simmer in broth instead of water for extra flavor. Once cooked, spread them on a baking sheet to cool quickly before refrigerating to keep them fluffy.
- Wash and dry all produce immediately. Use a salad spinner for greens; moisture is the enemy of freshness and causes wilting. Store greens in a container lined with a dry paper towel.
- Prepare a “universal” vinaigrette—lemon, olive oil, mustard, and honey. Store this in a mason jar; having a high-quality dressing ready means a gourmet salad is only 30 seconds away.
- Pre-cook your proteins. Grill a large batch of chicken or shrimp with neutral seasoning (salt, pepper, garlic) so they can be added to tacos, salads, or boards throughout the week.
- Use clear glass containers. When you can see the vibrant colors of the sliced peppers and berries, you are much more likely to reach for them, making healthy summer eating the path of least resistance.
How to Make Summer Desserts?
Why we love this
Summer desserts should feel like a reward—cool, bright, and celebrationally sweet without being heavy. The best ones highlight the natural candy of the season, like macerated strawberries or juicy peaches, paired with something creamy and cold. The scent of vanilla bean and fresh mint garnishes creates a sensory experience that signals the perfect end to a long, sun-drenched day, leaving everyone feeling refreshed and satisfied.
Ingredients
- 1 lb fresh berries (strawberries, blueberries, raspberries)
- 2 cups heavy whipping cream
- 1/4 cup powdered sugar
- 1 teaspoon vanilla bean paste
- Shortcake biscuits or angel food cake
How to make it
- Start with the fruit. Slice the strawberries and toss them in a bowl with a tablespoon of sugar. Let them sit at room temperature for 30 minutes. This is called maceration; the sugar draws out the juices to create a natural, brilliant red syrup.
- Chill your mixing bowl and whisk attachment in the freezer for 10 minutes. Cold equipment is the secret to high-volume, stable whipped cream.
- Pour the heavy cream into the chilled bowl. Begin whisking on medium speed. Once it begins to thicken, slowly add the powdered sugar and the vanilla bean paste.
- Whisk until stiff peaks form—this means when you lift the whisk, the cream stands straight up without drooping. Be careful not to over-whisk, or you’ll end up with vanilla butter!
- To assemble, split your shortcake or cake. Layer a generous spoonful of the syrupy berries, followed by a mountain of the whipped cream.
- Garnish with a sprig of fresh mint. The contrast between the cold cream, the macerated fruit, and the herbal mint is the ultimate summer flavor profile.
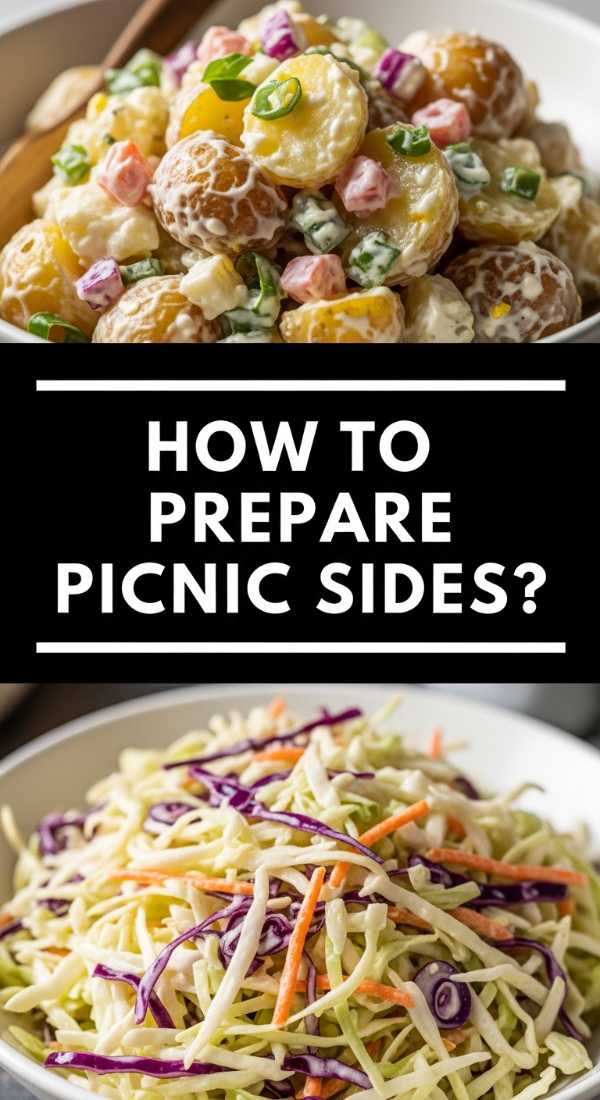
How to Prepare Picnic Sides?

Why we love this
Picnic sides are the sturdy, reliable heroes of the food board, designed to travel well and taste even better as they sit. We love the way a well-made pasta salad or a tangy slaw develops deeper flavor over time, absorbing dressings and spices. They provide a grounding, savory base for your spread, offering textures that range from the creaminess of a potato salad to the zesty crunch of a corn relish, making the meal feel complete and hearty.
Ingredients
- 1 lb pasta (rotini or farfalle)
- 1 cup cubed salami or ham
- 1 cup cubed provolone cheese
- 1/2 cup black olives and pepperoncinis
- 1 cup Italian dressing
- 1/2 cup diced celery and onions
How to make it
- For pasta-based sides, overcook the pasta by just 30 seconds past al dente. Cold pasta firms up significantly, so a slightly softer start ensures it feels right when eaten chilled.
- Rinse the cooked pasta under cold water immediately to stop the cooking process and wash away excess starch, which prevents the noodles from sticking together.
- Dice your “add-ins” (meat, cheese, veggies) into uniform, bite-sized pieces. Consistency in size ensures you get a bit of everything in every spoonful.
- Toss the pasta with only half of the dressing initially. Pasta acts like a sponge; it will drink up the dressing as it sits in the fridge.
- Chill for at least 4 hours. This is non-negotiable for picnic sides; it allows the flavors of the olives, meats, and dressing to permeate the pasta.
- Just before serving or packing your picnic, toss with the remaining half of the dressing to restore that glossy, moist appearance and punch up the flavor.
How to Mix Summer Drinks?
[IMAGE_10]
Why we love this
A perfectly mixed summer drink is the ultimate accessory to a food board, providing a sparkling, effervescent lift to the palate. The sound of ice clinking against glass and the sight of condensation beads forming on a chilled pitcher are the universal signals of relaxation. Whether it’s a muddled fruit mocktail or a citrusy spritz, these drinks capture the essence of the season with their bright colors and floral aromas, making every sip feel like a mini-vacation.
Ingredients
- 1 cup fresh fruit (watermelon, peaches, or berries)
- 1 bunch fresh mint or basil
- 2 cups sparkling water or club soda
- 1/4 cup fresh lime or lemon juice
- Simple syrup (optional)
- Plenty of ice
How to make it
- Start with the “muddle.” Place your fresh fruit and herbs in the bottom of a sturdy pitcher or individual glasses. Use a muddler or the back of a wooden spoon to gently bruise them. You want to release the oils and juices, not pulverize them into a paste.
- Add your citrus juice. Freshly squeezed is a must; the bottled stuff lacks the bright, essential oils that make summer drinks pop.
- If you prefer a sweeter drink, add simple syrup (equal parts sugar and water dissolved together) one tablespoon at a time, tasting as you go.
- Fill your vessel to the brim with ice. In the heat of summer, more ice is actually better—it keeps the drink colder longer, which actually slows down the melting and prevents dilution.
- Top with the sparkling water right before serving to ensure maximum carbonation and “fizz.”
- Give it one gentle stir from the bottom up to integrate the fruit flavors. Garnish with an extra wheel of citrus or a slap of fresh mint to release its aroma.
Conclusion
Building a viral-worthy food board isn’t about perfection; it’s about abundance and the joy of sharing. By combining these creamy dips, fresh pastas, and charred kabobs, you create a landscape of flavors that invites everyone to dig in and stay a while. Summer is fleeting, but the memories made over a beautiful, shared meal last forever. So, grab your biggest board, start prepping, and get ready to be the host everyone is talking about.