
Have you ever spent an entire afternoon scrolling through your feed, losing yourself in the hazy, sun-drenched images of English country gardens and sleek, modern outdoor sanctuaries? There’s a specific kind of magic in those spaces—a feeling of peace that seems to radiate through the screen, making you want to reach out and touch the velvet petals or feel the cool stone beneath your feet. It’s that ‘Main Character’ energy we all crave, where our homes aren’t just places we live, but curated backdrops for a life well-lived.
The good news is that those dreamy aesthetics aren’t reserved for five-star resorts or high-budget professional landscape shoots. Transforming your own patch of earth into an internet-worthy oasis is more about the thoughtful details and a bit of creative DIY spirit than it is about a massive renovation. Whether you have a sprawling backyard or a cozy balcony, the right mix of textures, colors, and functional art can turn a plain space into a retreat that feels like a permanent vacation. Let’s dive into the most viral garden and home trends that are currently capturing our hearts.
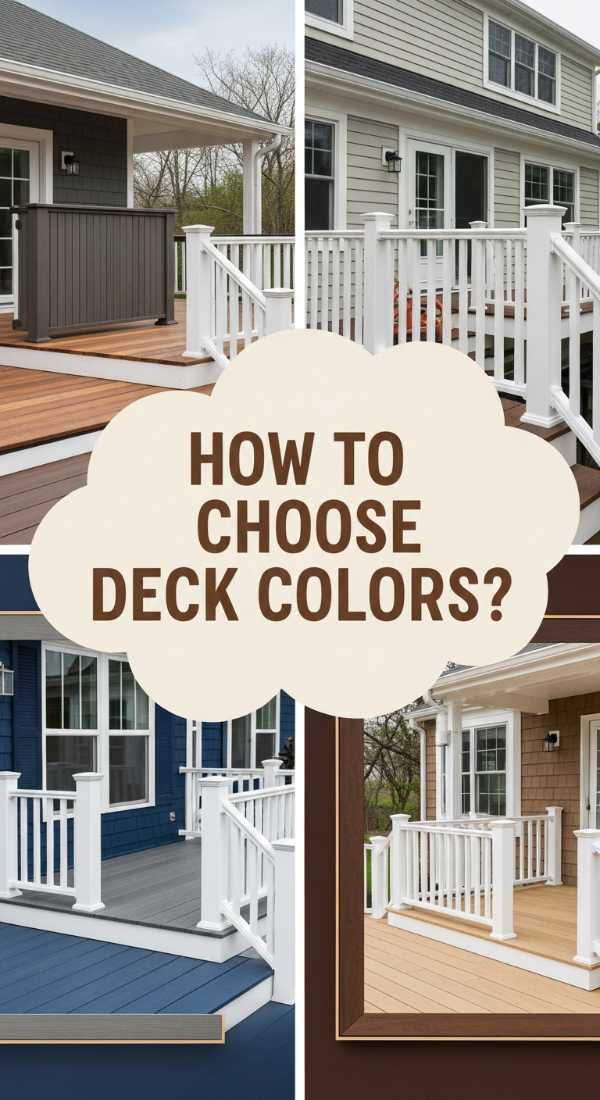
How to Select Two Tone Deck Colors for a Sophisticated Outdoor Space
Why we love this
There is something undeniably upscale about a two-tone deck; it breaks up the visual monotony of a single-color expanse and adds architectural depth that feels custom-built. Imagine stepping out onto a cool, driftwood-grey main floor framed by a sharp, charcoal border that defines the space like a piece of fine art. The contrast between the light and dark wood grains creates a rhythmic texture underfoot, catching the afternoon light and making your outdoor furniture pop with renewed vibrancy. It’s a sophisticated way to ground your outdoor lounge area, giving it a structured, intentional feel that mimics the interior design of a luxury penthouse.
Essential Elements:
- Primary deck stain (lighter neutral like sand, light grey, or cedar)
- Accent border stain (darker contrast like ebony, slate, or chocolate brown)
- High-quality painter’s tape for crisp lines
- Synthetic bristle brushes for edges and gaps
- Lambswool applicator for large surface areas
How to make it
- Deep clean your deck using a specialized wood cleaner and a stiff brush to remove all dirt, algae, and old finish; let it dry for at least 48 hours until the moisture content is below 15%.
- Sand the entire surface with 60-80 grit sandpaper to open the wood pores, ensuring you follow the grain to prevent swirl marks, then vacuum away all dust thoroughly.
- Identify your “picture frame” border—the outermost boards of the deck—and apply your darker accent stain to these pieces first, using a small brush to get into the crevices and a pad for the flat surfaces.
- Once the border is dry (usually 24 hours), carefully apply high-quality painter’s tape along the edge where the two colors will meet to ensure a razor-sharp transition.
- Apply the primary, lighter stain to the main body of the deck using long, even strokes with a lambswool applicator, working board by board from one end to the other to avoid lap marks.
- Allow the first coat to dry according to the manufacturer’s instructions before deciding if a second coat is needed for depth; remove the tape while the second coat is still slightly tacky for the cleanest line.
How to Plan Low Maintenance Flower Beds for Effortless Curb Appeal

Why we love this
We all want that lush, overflowing floral look without the back-breaking labor of daily weeding and constant replanting. A low-maintenance bed relies on the stunning architecture of perennials and the earthy, rich aroma of cedar mulch to create a self-sustaining ecosystem of beauty. Picture silver-blue hostas nestled against vibrant purple salvia, creating a tapestry of color that returns faithfully every spring with minimal intervention. There’s a deep sense of satisfaction in watching your garden thrive on its own, allowing you to spend your weekends sipping iced tea on the porch rather than hunched over a trowel in the heat.
Essential Elements:
- Native perennial plants (specific to your hardiness zone)
- Heavy-duty landscape fabric or cardboard for sheet mulching
- Slow-release organic fertilizer
- 3 inches of organic wood mulch
- Edging material (stone or metal)
How to make it
- Map out your bed shape using a garden hose to create natural, flowing curves that guide the eye toward your home’s entryway.
- Clear the area of existing grass and weeds, then lay down a layer of plain brown cardboard; soak the cardboard with water to begin the process of breaking down the soil and suppressing future weeds.
- Space your plants while they are still in their nursery pots to visualize the mature height and spread—place the tallest plants in the back and the shortest, ground-covering varieties at the front.
- Dig holes twice as wide as the root ball, mix in a handful of organic fertilizer, and plant your perennials, ensuring the crown of the plant is level with the soil surface.
- Install a crisp edge using stones or metal strips to keep the lawn from creeping into your bed, which significantly reduces long-term maintenance.
- Apply a generous 3-inch layer of mulch around the plants, being careful not to touch the stems, to lock in moisture and prevent sunlight from reaching weed seeds.
How to Arrange Wildflower Centerpieces for a Rustic Round Table Setting

Why we love this
There is a whimsical, untamed elegance to a wildflower arrangement that structured florist bouquets simply can’t replicate. It’s the scent of sun-warmed hay and sweet clover brought indoors, a chaotic but beautiful dance of delicate stems, varying heights, and unexpected pops of color. When placed on a rustic round table, these arrangements create an inviting, effortless atmosphere that encourages long conversations and late-night laughter. The textures of Queen Anne’s Lace, wild cosmos, and wispy grasses feel tactile and organic, bridging the gap between the wild outdoors and the cozy heart of your home.
Essential Elements:
- Selection of wildflowers (Cosmos, Zinnias, Grasses, Yarrow)
- Vintage glass jars or stoneware pitchers
- Floral shears or sharp scissors
- Floral frog or chicken wire for structure
- Fresh, cool water with floral preservative
How to make it
- Gather your blooms in the early morning when their water content is highest, cutting them at a 45-degree angle and immediately placing them in a bucket of lukewarm water to hydrate.
- Prepare your vessel by placing a weighted floral frog at the bottom or creating a small “pillow” of crumpled chicken wire inside the opening to hold the stems in place.
- Start with your “thriller” or focal flowers—the largest or most colorful blooms—and place them at varying heights to create a natural, asymmetrical silhouette.
- Add “fillers” like baby’s breath or feverfew to provide volume and fill in any large gaps, ensuring you rotate the vase as you work to keep the arrangement balanced from all sides.
- Incorporate “spillers” or airy grasses that drape over the edge of the vessel, giving it that “just gathered from the field” look that is central to the rustic aesthetic.
- Strip any leaves that fall below the water line to prevent bacterial growth, and change the water every two days to keep the arrangement vibrant and fragrant.
How to Build a Dye Table for Your Creative Textile Studio

Why we love this
For the modern maker, a dedicated dye table is the ultimate functional luxury, offering a sturdy, splash-proof surface where color comes to life. It’s a space that feels industrial and purposeful, yet full of creative potential, where the tactile crunch of dried linen meets the liquid swirl of indigo or botanical pigments. A well-built table provides the height necessary to work comfortably for hours without strain, and its rugged aesthetic adds a professional, studio-like vibe to any spare corner or shed. It’s not just a piece of furniture; it’s an invitation to experiment, get messy, and discover the alchemy of textile art.
Essential Elements:
- Pressure-treated 4×4 posts for legs
- Marine-grade plywood or reclaimed wood tabletop
- Waterproof sealant or zinc sheeting cover
- Built-in sink or drainage hole
- Heavy-duty casters for mobility
How to make it
- Construct a heavy-duty rectangular frame using 2×4 lumber, securing the corners with wood glue and long galvanized lag bolts for maximum stability.
- Attach your 4×4 legs to the inside corners of the frame, ensuring they are perfectly square; for an ergonomic height, the top of the table should sit roughly at your waist level.
- Install a secondary shelf halfway down the legs to store heavy dye pots and buckets, which also acts as a brace to prevent the table from wobbling during vigorous stirring.
- Attach the marine-grade plywood top and, for the ultimate dye-proof surface, wrap it in a thin sheet of zinc or stainless steel, securing the edges underneath with flat-head screws.
- If you are including a drainage system, use a hole saw to cut a circle in one corner and install a basic bar sink or a simple PVC drain flange that leads to a bucket below.
- Sand all wooden surfaces and apply three coats of outdoor-grade polyurethane to protect the frame from the inevitable splashes and high humidity of a dye studio.
How to Install Black Rentry Dividers for a Modern Entryway Refresh

Why we love this
Modern entryways often struggle with defining space without making it feel claustrophobic, and that’s where the magic of black slat dividers comes in. The matte black finish provides a bold, graphic contrast against light walls, creating a sophisticated visual rhythm as the light filters through the vertical lines. It offers a sense of privacy and separation from the living area while maintaining an airy, open-concept feel that lets the sun dance across your hardwood floors. It’s an architectural statement that feels both grounded and ethereal, instantly elevating a simple hallway into a high-design foyer.
Essential Elements:
- 1×2 or 2×2 wood slats (pine or poplar)
- Matte black wood stain or paint
- Finish nailer and 2-inch brad nails
- Wood glue
- Level and measuring tape
How to make it
- Measure the height from your floor to the ceiling and cut your wood slats to size, subtracting 1/8th of an inch to allow for easy installation without scraping the ceiling.
- Sand each slat thoroughly and apply two coats of matte black stain, ensuring you cover all four sides and the ends for a seamless, high-end look.
- Lay out a “top plate” and “bottom plate” (horizontal boards) on the floor and mark the spacing for your vertical slats; a gap of 1.5 to 2 inches is usually ideal for the perfect balance of light and privacy.
- Secure the vertical slats to the top and bottom plates using wood glue and a finish nailer, creating a pre-fabricated “panel” that is easier to install than individual boards.
- Position the panel in your entryway, using a level to ensure it is perfectly vertical, then secure the top and bottom plates into the ceiling joists and floor using long screws.
- Fill any visible nail holes with black wood filler and do a final touch-up with paint to ensure the finish is flawless and uniform.
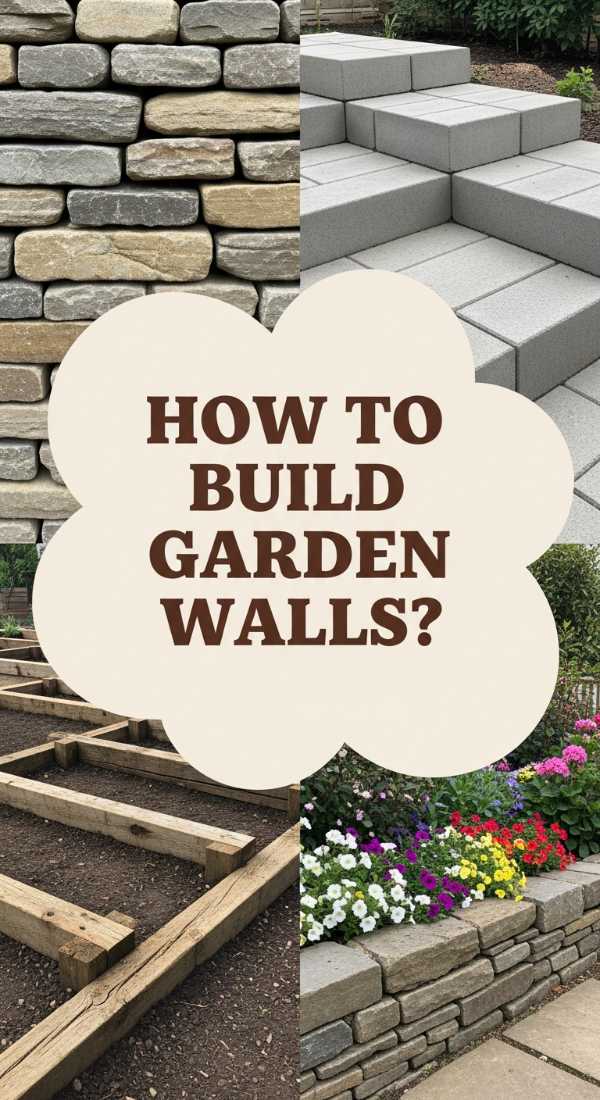
How to Construct Low Retaining Walls for a Beautiful Tiered Garden
Why we love this
Low retaining walls are the secret to turning a flat, uninspired lawn into a multi-dimensional masterpiece filled with depth and movement. There is a classic, timeless beauty in the texture of stacked stone or weathered blocks, especially when they are softening the slope of a hill or framing a lush bed of overflowing creeping phlox. These walls create “outdoor rooms” that guide the eye and provide convenient ledges for extra seating during summer garden parties. The earthy scent of damp soil held behind the stone and the way moss begins to cling to the edges over time gives the garden a sense of history and permanence.
Essential Elements:
- Retaining wall blocks or natural fieldstone
- Crushed gravel (leveling base)
- Perforated drainage pipe
- Landscape adhesive
- Tamper and level
How to make it
- Excavate a trench that is roughly 6 inches deep and twice as wide as your wall blocks, ensuring the bottom is firmly compacted with a hand tamper.
- Fill the trench with 4 inches of crushed gravel and level it perfectly; this base is critical for preventing the wall from shifting or leaning during freeze-thaw cycles.
- Lay the first course of blocks, checking each one with a level both side-to-side and front-to-back; if the first row isn’t perfect, the rest of the wall will be crooked.
- Install a perforated drainage pipe behind the first course of blocks, sloping it slightly toward an exit point to prevent water pressure from building up behind the wall.
- Stack subsequent courses in a “running bond” pattern (staggering the joints), and use a bead of heavy-duty landscape adhesive between every layer for added stability.
- Backfill the space behind the wall with more gravel to allow for drainage, then top it off with high-quality topsoil before planting your tiered garden favorites.
How to Create Simple DIY Outdoor Showers for Your Summer Oasis

Why we love this
There is no luxury quite like the feeling of cool water on your skin while the sun warms your shoulders and a light breeze rustles the leaves nearby. An outdoor shower is the ultimate summer indulgence, turning a functional necessity into a sensory ritual that feels like a trip to a tropical spa. The sound of water splashing against cedar slats and the smell of eucalyptus hanging in the humid air create an atmosphere of pure relaxation and freedom. It’s the perfect way to rinse off after a dip in the pool or a long day of gardening, keeping the mess outside while bringing the serenity of nature into your daily routine.
Essential Elements:
- Outdoor-rated shower head and hardware
- Cedar or teak wood for the privacy screen
- Gravel or slatted wood drainage floor
- Garden hose adapter or PEX plumbing
- Hooks for towels and a small wooden bench
How to make it
- Choose a location that offers natural privacy or is adjacent to an existing exterior wall with easy access to your home’s water lines or a high-pressure garden faucet.
- Build a simple 3-sided privacy screen using rot-resistant cedar slats, leaving 1/2-inch gaps between boards for airflow and light while maintaining total privacy.
- For the flooring, dig out a 4-inch deep square and fill it with smooth river rocks to provide excellent natural drainage and a comfortable, spa-like surface for your feet.
- Mount your shower fixture to a sturdy vertical post or the exterior wall; for a simple DIY version, use a high-quality hose-to-pipe adapter to connect your garden hose directly to the shower head.
- Install a shut-off valve within easy reach so you can control the water flow without having to walk back to the spigot every time.
- Finish the space with weather-resistant hooks for your fluffiest towels and a small teak bench for holding your organic soaps and loofahs.
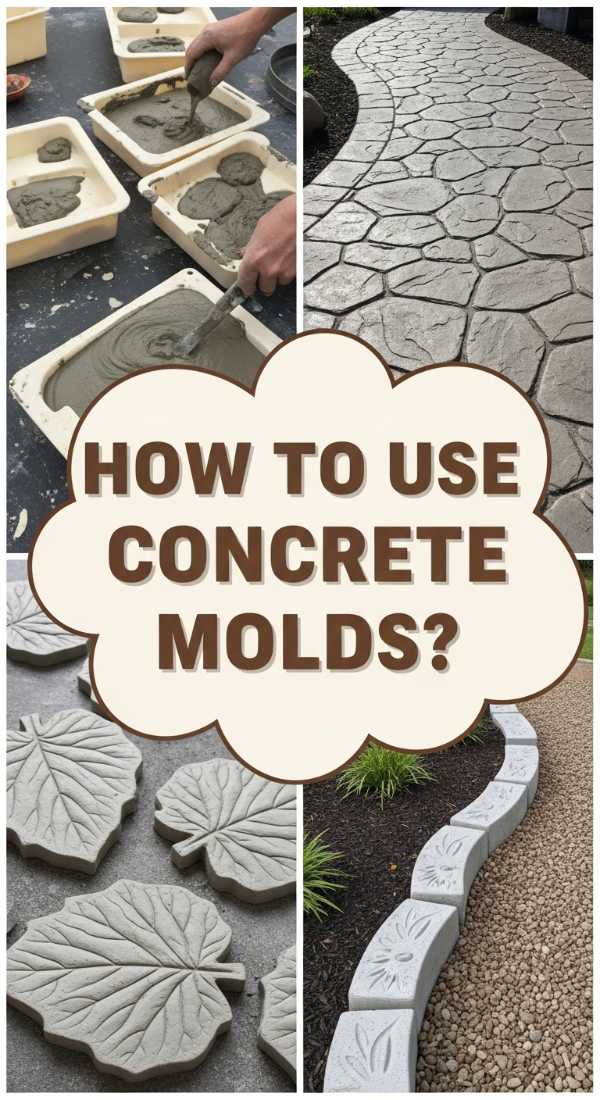
How to Use Concrete Molds for Custom Path and Garden Accents
Why we love this
Concrete molds are the “cheat code” for achieving an expensive, custom-stonework look on a budget that makes sense for every homeowner. There is a rhythmic, meditative quality to mixing the cool, wet concrete and smoothing it into the geometric or organic shapes of the mold. The result is a pathway that looks like it was painstakingly laid by a master mason, but with the durability and uniformity of modern materials. Whether you choose a classic cobblestone pattern or a sleek, modern plank design, these paths add a structured elegance to your garden that feels permanent and deeply professional.
Essential Elements:
- Reusable plastic concrete molds (various patterns)
- Quikrete or high-strength concrete mix
- Concrete pigment (optional, for a stone-like color)
- Trowel and stiff-bristled brush
- Vegetable oil or mold release spray
How to make it
- Clear and level the path area, removing all grass and loose soil, then spread a thin layer of sand to create a smooth working surface for the molds.
- Mix your concrete in a wheelbarrow to a consistency that resembles thick peanut butter; it should hold its shape when squeezed but still be wet enough to pour.
- Lightly coat the inside of your mold with vegetable oil or release spray to ensure the concrete doesn’t stick as you lift it away.
- Place the mold on the sand and fill each cavity with concrete, using a trowel to press it firmly into the corners and smoothing the top surface flush with the mold’s edge.
- Wait about 5-10 minutes (depending on the temperature) until the concrete begins to set slightly, then carefully lift the mold straight up to reveal your perfect “stones.”
- Use a wet sponge to smooth any rough edges and, once the entire path is dry (after 24 hours), fill the gaps with polymeric sand or fine gravel to lock the pieces in place.
How to Style Pink Spring Wallpaper for a Dreamy Bedroom Refresh

Why we love this
Bringing the garden indoors starts with the walls, and nothing captures the soft, romantic essence of spring like a blush-toned floral wallpaper. Imagine waking up surrounded by oversized peonies or delicate cherry blossoms, the soft pink hues catching the morning light and creating a warm, rosy glow throughout the room. The texture of high-quality paper adds a layer of coziness that paint simply can’t match, turning your bedroom into a floral sanctuary that feels like a permanent spring afternoon. It’s a bold design choice that somehow feels incredibly soothing, providing a sophisticated feminine touch that is both trendy and timeless.
Essential Elements:
- Non-pasted or peel-and-stick floral wallpaper
- Wallpaper paste and a smoothing tool
- Utility knife with fresh blades
- Level and plumb line
- Seam roller
How to make it
- Prepare your walls by filling any holes with spackle, sanding them smooth, and wiping them down with a damp cloth to ensure a dust-free surface for the adhesive.
- Use a level to draw a perfectly vertical plumb line on the wall where you want to start; never trust the corners of your room to be straight!
- Measure the height of the wall and cut your first strip of wallpaper, adding 2 inches of “bleed” at the top and bottom to allow for precise trimming.
- Apply the adhesive to the back of the paper (or the wall, if using “paste-the-wall” paper) and carefully align the edge of the strip with your plumb line.
- Use a plastic smoothing tool to push out any air bubbles, working from the center of the strip outward to the edges, and then use a sharp utility knife to trim the excess at the ceiling and baseboard.
- Match the pattern for the second strip carefully before cutting, and use a seam roller to ensure the edges where the strips meet are flat and nearly invisible.
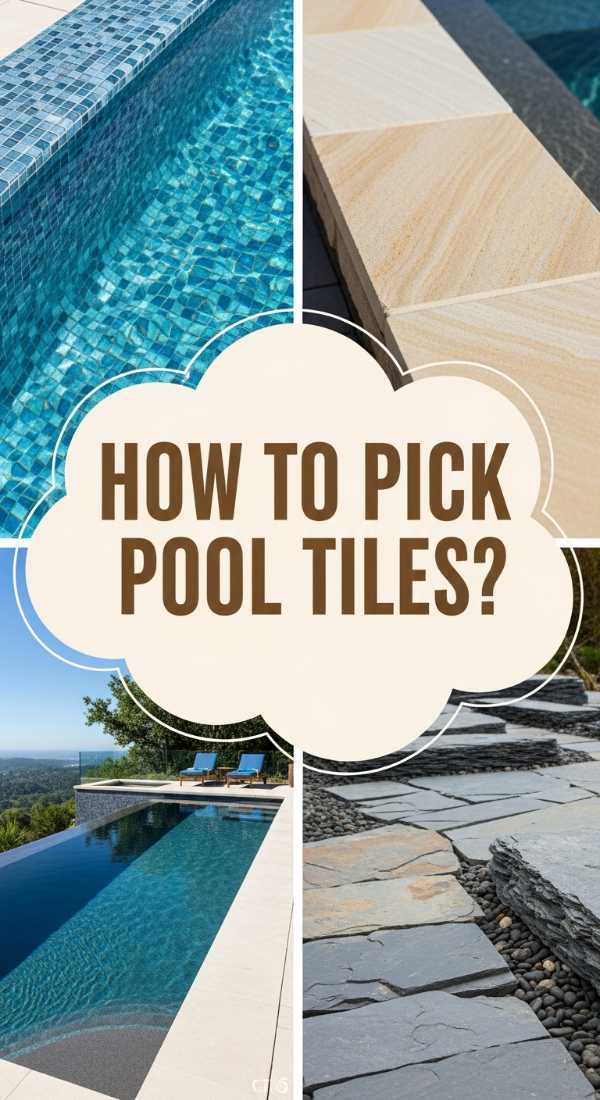
How to Match Pool Stone and Tile for a Luxury Resort Aesthetic
Why we love this
The hallmark of a high-end luxury resort is the seamless visual transition between the cool, shimmering water of the pool and the surrounding stone deck. When you match the subtle grey-blue tones of travertine with a complementary glass mosaic tile, you create a cohesive environment that feels expansive and incredibly expensive. The tactile contrast between the smooth, cool tile and the slightly porous, non-slip stone underfoot provides a sensory experience that screams vacation. Under the midday sun, the coordinated colors reflect the light in a way that makes the water look deeper and clearer, turning your backyard into a sophisticated architectural statement.
Essential Elements:
- Travertine or limestone pavers
- Glass or porcelain pool tiles (1×1 or 2×2 mosaics)
- Waterproof thin-set mortar
- Matching grout (epoxy-based for durability)
- Wet saw for precision cuts
How to make it
- Select your stone and tile together in natural daylight to ensure the undertones (cool blue, warm beige, or neutral grey) match perfectly when wet and dry.
- Start by installing the pool coping—the stone edge that hangs over the water—ensuring it is perfectly level and has a slight “bullnose” edge for comfort and safety.
- Apply your mosaic tiles to the waterline using a waterproof thin-set, using spacers to keep the lines perfectly straight as you move around the perimeter of the pool.
- Lay the surrounding stone pavers in a French pattern or a classic offset brick pattern, ensuring there is a slight slope away from the pool to prevent dirty runoff water from entering the basin.
- Grout the tiles with an epoxy-based grout that is resistant to pool chemicals and UV rays, which prevents the color from fading and stops mold from growing in the joints.
- Seal the natural stone with a penetrating, breathable sealer that protects against salt and chlorine while maintaining the stone’s natural, non-slip texture.
Bringing the Dream Home
Creating a dreamy, internet-worthy home and garden isn’t about perfectly replicating a photo; it’s about finding the elements that make your heart skip a beat and bringing them to life in your own unique way. Whether it’s the crisp line of a two-tone deck or the soft romance of pink wallpaper, these projects allow you to craft a life that feels as good as it looks. Remember, the most beautiful spaces are those that are lived in, loved, and constantly evolving. Happy styling!