

How to Master the Simple Food Board Trend in Seconds
There is something truly magical about a table filled with small bites and vibrant colors that feels less like a formal dinner and more like a shared experience. We’ve all seen those stunning food boards circulating on social media—overflowing with textures and flavors that seem almost too beautiful to eat—but the secret is that it doesn’t have to be complicated. Mastering the simple food board trend is all about celebrating the season’s best ingredients and arranging them with a relaxed, effortless touch that invites everyone to dig in.
Whenever I host a gathering, my favorite moments happen around a board like this. It’s the sound of laughter over the clinking of glasses, the sight of friends reaching for a crisp cracker or a slice of fresh cake, and the overwhelming sense of warmth that comes from sharing a meal made with love. This approach to entertaining takes the pressure off the host and puts the focus back on connection. Today, I’m sharing ten of my favorite spring-inspired recipes that will help you build the ultimate viral-worthy food board that tastes even better than it looks.
How to bake a fresh lemon cake

Why we love this
This lemon cake is the absolute embodiment of a sunny spring afternoon. Each bite is incredibly moist and tender, bursting with the bright, citrusy zing of fresh zest and a delicate floral sweetness that lingers on the palate. The aroma of citrus oil filling your kitchen as it bakes is purely intoxicating, creating an atmosphere of freshness and joy before you even take a slice. It’s the perfect centerpiece for a food board because its golden hue and light, fluffy crumb provide a refreshing contrast to richer savory elements.
Ingredients
- 1 ½ cups all-purpose flour
- 1 cup granulated sugar
- 2 tsp baking powder
- ½ tsp salt
- 1 cup Greek yogurt
- 3 large eggs
- 2 tsp fresh lemon zest
- ½ tsp vanilla extract
- ½ cup vegetable oil
- ⅓ cup fresh lemon juice (for the glaze)
How to make it
- Preheat your oven to 350°F (175°C) and thoroughly grease a loaf pan or line it with parchment paper to ensure an easy release later.
- In a medium bowl, whisk together the flour, baking powder, and salt until well-combined, ensuring there are no clumps in the dry mixture.
- In a separate large bowl, whisk the sugar, yogurt, eggs, lemon zest, and vanilla together until the mixture is smooth and pale yellow; do not over-mix, just incorporate thoroughly.
- Slowly fold the dry ingredients into the wet ingredients using a spatula, being careful not to deflate the batter, then gradually whisk in the oil until the batter is glossy and emulsified.
- Pour the batter into the prepared pan and bake for 45-50 minutes, or until a toothpick inserted into the center comes out clean with just a few moist crumbs.
- While the cake is cooling slightly, whisk together lemon juice and powdered sugar for a glaze; pour it over the warm cake so it seeps into the top layer, creating a tart, sugary crust.
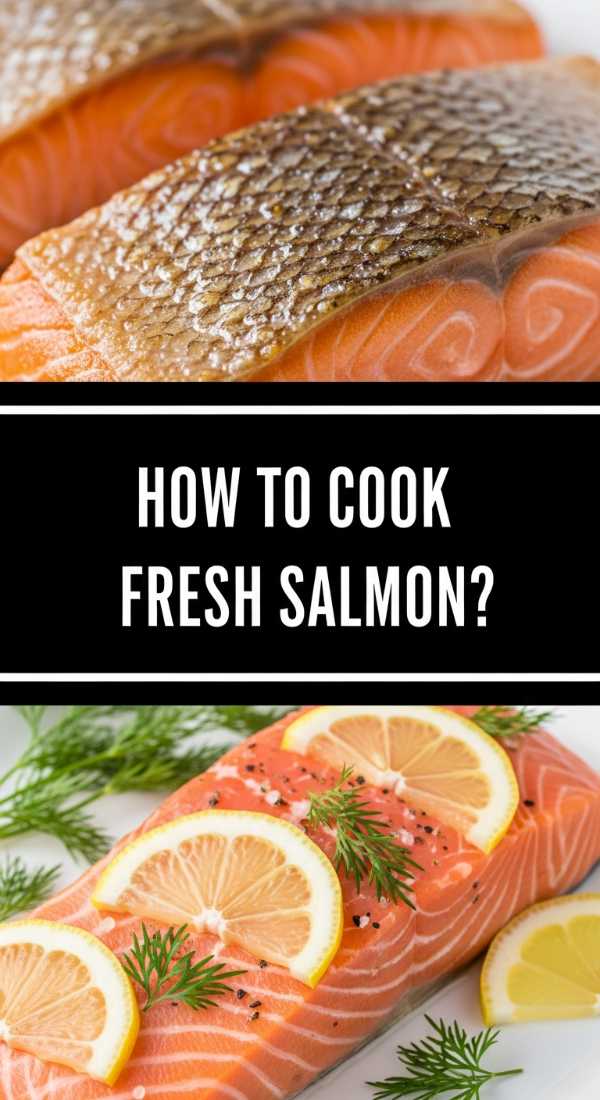
How to cook fresh salmon
Why we love this
Freshly cooked salmon adds a sophisticated, protein-rich element to any board that feels both indulgent and incredibly healthy. When prepared correctly, the skin becomes shatteringly crisp while the interior remains buttery, flaky, and rich with natural omega-3 oils. The subtle oceanic flavor of the fish is elevated by a simple squeeze of lemon and a sprinkle of flaky sea salt, making it an irresistible addition that pairs beautifully with spring greens and sourdough. It is the kind of dish that looks high-end but comes together in minutes with the right technique.
Ingredients
- 2 center-cut salmon fillets (6 oz each)
- 2 tbsp avocado oil or high-heat oil
- 1 tbsp unsalted butter
- 2 sprigs fresh thyme
- 1 clove garlic, smashed
- Kosher salt and black pepper to taste
- Lemon wedges for serving
How to make it
- Pat the salmon fillets extremely dry with paper towels on all sides; moisture is the enemy of a crispy crust, so take your time with this step.
- Season the flesh side generously with kosher salt and cracked black pepper, but leave the skin side plain for now to maximize crispiness.
- Heat a heavy stainless steel or cast-iron skillet over medium-high heat until the oil is shimmering and just starting to show a faint wisp of smoke.
- Place the salmon skin-side down in the pan, pressing down firmly with a spatula for 10 seconds to prevent curling and ensure even contact with the heat.
- Lower the heat to medium and cook undisturbed for 6-7 minutes until the skin is golden brown and the opaque color has climbed about three-quarters of the way up the side of the fillet.
- Flip the fish carefully, add the butter, garlic, and thyme to the pan, and baste the skin with the foaming butter for about 1 minute until the salmon reaches an internal temperature of 125°F-130°F for medium-rare.
How to use sourdough discard

Why we love this
There is a deep sense of culinary satisfaction in turning sourdough discard—the byproduct of your bread-making journey—into something crunchy and craveable. These discard crackers are thin, tangy, and possess a complex fermented flavor that store-bought versions simply cannot replicate. They offer a satisfying snap that provides the perfect base for creamy cheeses or herb-flecked dips on your food board. Making them is a tactile, earthy process that connects you to the rhythms of traditional baking while reducing food waste in the most delicious way possible.
Ingredients
- 1 cup sourdough discard (unfed)
- ¼ cup all-purpose flour
- 2 tbsp melted butter or olive oil
- ½ tsp sea salt
- 1 tsp dried herbs (herbes de Provence or rosemary)
- Flaky salt for topping
How to make it
- Preheat your oven to 325°F (165°C) and prepare two large baking sheets by lining them with silicone mats or parchment paper.
- In a small bowl, mix the discard, melted butter, flour, salt, and herbs until you have a smooth, spreadable paste that is roughly the consistency of thick pancake batter.
- Use an offset spatula to spread the mixture onto the baking sheets in an incredibly thin, even layer; the thinner you spread it, the crispier the final cracker will be.
- Bake for 10 minutes, then remove the sheets from the oven and use a pizza cutter or a sharp knife to score the dough into squares or diamonds.
- Return the sheets to the oven and bake for another 15-20 minutes, or until the crackers are deeply golden brown and no longer feel soft to the touch.
- Allow them to cool completely on the pan to reach maximum crunchiness before breaking them along the scored lines and arranging them on your board.
How to make tea sandwiches

Why we love this
Tea sandwiches are the epitome of delicate elegance, offering tiny, precise bursts of flavor that feel wonderfully nostalgic yet perfectly modern. Their soft, crustless bread acts as a canvas for creamy spreads and crisp vegetables, creating a texture that is light as air and incredibly sophisticated. There is a quiet joy in the preparation—the careful slicing of cucumbers and the spreading of herb-infused butter—that translates into a beautiful presentation on a board. They are the ultimate finger food, inviting guests to sample different combinations without ever feeling weighed down.
Ingredients
- 8 slices of thin white or whole wheat sandwich bread
- 4 oz softened cream cheese
- 1 tbsp fresh dill, finely chopped
- 1 English cucumber, sliced paper-thin
- 4 slices of smoked salmon or thin ham
- Softened salted butter
How to make it
- Begin by preparing your fillings: whip the cream cheese with the fresh dill and a pinch of salt until it is light and airy, then slice your cucumbers as thin as possible using a mandoline.
- Spread a very thin, even layer of softened butter on one side of each bread slice; this acts as a moisture barrier to prevent the sandwiches from getting soggy.
- On four slices, spread the herb cream cheese and layer the cucumber slices in an overlapping shingle pattern, or add your protein of choice.
- Top with the remaining bread slices and use a very sharp serrated knife to carefully trim away all of the crusts, ensuring perfectly straight edges.
- Cut the sandwiches into three long rectangles or four small triangles, wiping the knife blade between cuts to keep the edges clean and the bread pristine.
- Cover the finished sandwiches with a slightly damp paper towel if not serving immediately to keep the bread from drying out before they hit the food board.
How to make asparagus soup

Why we love this
This soup is spring in a bowl, capturing the vibrant, grassy essence of fresh asparagus in a texture that is as smooth as velvet. Its brilliant green color provides a stunning visual pop on a food board, especially when served in small espresso cups or glass votives for sipping. The flavor is clean and bright, balanced by a hint of cream and the earthy depth of sautéed leeks, creating a sensory experience that feels both nourishing and refined. It’s a wonderful way to incorporate a liquid element into a board, offering a warm, savory contrast to cold meats and cheeses.
Ingredients
- 2 lbs fresh asparagus, woody ends trimmed
- 2 tbsp butter
- 2 medium leeks, white and light green parts only, chopped
- 1 clove garlic, minced
- 4 cups vegetable or chicken broth
- ½ cup heavy cream (optional)
- Fresh lemon juice
How to make it
- Melt the butter in a large heavy-bottomed pot over medium heat and add the chopped leeks, cooking them slowly until they are soft and translucent but not browned.
- Add the minced garlic and cook for just 30 seconds until fragrant, then add the asparagus pieces (save the tips for a garnish if desired).
- Pour in the broth, bring the mixture to a gentle boil, then reduce the heat to low and simmer for about 10-15 minutes until the asparagus is fork-tender.
- Using an immersion blender or a high-speed countertop blender, puree the soup until it is completely smooth and liquid, being careful with the hot liquid.
- Stir in the heavy cream and a squeeze of fresh lemon juice to brighten the flavors, then season generously with salt and white pepper.
- For a professional finish, pass the soup through a fine-mesh sieve to remove any remaining fibers, resulting in a silky, restaurant-quality consistency.
How to bake spring cookies

Why we love this
Spring cookies are all about celebrating lightness, often featuring buttery shortbread bases topped with delicate floral notes or bright citrus glazes. They have a satisfying, sandy texture that melts in your mouth, leaving behind a trail of vanilla and sweet cream. These cookies are a visual delight on a food board, especially when decorated with edible dried flowers or pastel-colored icing that echoes the colors of a blooming garden. They offer a sweet, crunchy finish to the meal that feels festive and light, perfectly capturing the optimistic spirit of the season.
Ingredients
- 2 ½ cups all-purpose flour
- 1 cup unsalted butter, softened
- ¾ cup powdered sugar
- 1 tsp vanilla extract
- 1 tbsp dried culinary lavender or lemon zest
- Pinch of salt
How to make it
- In the bowl of a stand mixer, cream together the softened butter and powdered sugar for 3-5 minutes until the mixture is exceptionally pale and fluffy.
- Beat in the vanilla extract and your choice of aromatics, such as lemon zest or finely crushed lavender, ensuring the flavor is evenly distributed.
- Gradually add the flour and salt on low speed, mixing only until the dough just starts to come together in a ball; over-mixing will make the cookies tough.
- Roll the dough out between two sheets of parchment paper to a thickness of about ¼ inch, then chill the entire sheet in the refrigerator for at least 30 minutes.
- Use circular or floral-shaped cookie cutters to stamp out your shapes, then place them on a baking sheet lined with parchment paper.
- Bake at 325°F (165°C) for 12-15 minutes, or until the edges are just barely beginning to turn a pale golden brown, then cool completely on a wire rack.
How to make spring salad

Why we love this
A spring salad is a masterclass in textures, combining the crunch of radishes, the pop of sweet peas, and the soft fluffiness of bibb lettuce or microgreens. It smells like a fresh rain on a garden, with the sharp aroma of mint and chives cutting through the sweetness of a light vinaigrette. This dish brings a necessary element of freshness and hydration to a food board, acting as a palate cleanser between richer items. Its vibrant greens and pinks make the entire board look alive and healthful, inviting guests to enjoy the bounty of the new season.
Ingredients
- 4 cups mixed spring greens (pea shoots, arugula, bibb lettuce)
- 1 cup sugar snap peas, blanched
- 4 radishes, thinly sliced
- ¼ cup crumbled feta or goat cheese
- Fresh mint and chives, torn
- 3 tbsp olive oil
- 1 tbsp champagne vinegar
How to make it
- Prepare your vinaigrette by whisking together the olive oil, champagne vinegar, a touch of honey, and a pinch of salt in a small jar until emulsified.
- Wash and thoroughly dry your spring greens using a salad spinner; any leftover water will dilute the dressing and prevent it from sticking to the leaves.
- Blanch the sugar snap peas in boiling water for 60 seconds, then immediately plunge them into an ice bath to lock in their bright green color and crisp texture.
- In a large wide bowl, gently toss the greens with half of the dressing using your hands or tongs to ensure every leaf is lightly coated but not weighed down.
- Top the greens with the blanched peas, sliced radishes, and fresh herbs, then sprinkle the crumbled cheese over the top for a hit of creamy saltiness.
- Drizzle the remaining dressing just before serving to keep the salad from wilting, and place it in a low bowl directly on your food board.
How to make strawberry tarts

Why we love this
Strawberry tarts are the jewels of the spring food board, featuring glossy, red berries nestled in a crisp, buttery pastry shell. The contrast between the crunchy crust, the smooth vanilla pastry cream, and the juicy, slightly tart strawberries is pure bliss in every bite. They offer a sophisticated sweetness that isn’t heavy, making them the perfect dessert option for a grazing-style meal. The bright red color of the fruit provides a stunning focal point that draws the eye and promises a burst of fresh, seasonal flavor that everyone loves.
Ingredients
- 1 pre-baked tart shell (or mini shells)
- 1 cup whole milk
- 2 egg yolks
- ¼ cup sugar
- 2 tbsp cornstarch
- 1 tsp vanilla bean paste
- 1 lb fresh strawberries, hulled and sliced
- 2 tbsp apricot jam (for the glaze)
How to make it
- To make the pastry cream, whisk egg yolks, sugar, and cornstarch together while bringing the milk to a simmer in a small saucepan over medium heat.
- Slowly temper the eggs by drizzling a little hot milk into the egg mixture while whisking constantly, then pour everything back into the pot.
- Cook over medium-low heat, whisking vigorously, until the mixture thickens into a pudding-like consistency, then stir in the vanilla and chill with plastic wrap directly on the surface.
- Fill your pre-baked and cooled tart shells with the chilled pastry cream, smoothing the top with a spoon to create an even base for the fruit.
- Arrange the strawberry slices in a circular, overlapping pattern starting from the outside edge and moving inward toward the center for a professional look.
- Heat the apricot jam with a splash of water until liquid, then brush the strawberries lightly with the glaze to give them a high-gloss finish and prevent them from drying out.
How to make sourdough pancakes

Why we love this
Sourdough pancakes are a revelation, offering a complexity of flavor that standard pancakes simply can’t touch. They have a signature tang that balances the sweetness of maple syrup perfectly, and their texture is uniquely airy with a slightly crisp edge. Cooking these on a griddle fills the air with a warm, yeasty aroma that is deeply comforting and welcoming. They make a fantastic addition to a brunch-style food board, providing a warm, comforting base that pairs equally well with savory bacon or fresh spring berries and whipped cream.
Ingredients
- 1 cup sourdough starter (discard or active)
- 1 cup all-purpose flour
- 1 cup buttermilk
- 2 tbsp sugar
- 1 large egg
- 2 tbsp melted butter
- 1 tsp baking soda
- ½ tsp salt
How to make it
- In a large bowl, whisk together the sourdough starter, flour, buttermilk, and sugar until a thick batter forms, then cover and let it sit for at least 30 minutes (or overnight in the fridge) for the best flavor.
- When ready to cook, whisk in the egg, melted butter, salt, and finally the baking soda, which will cause the batter to foam and become light and airy.
- Heat a non-stick griddle or cast-iron skillet over medium heat and lightly grease it with a small amount of butter or neutral oil.
- Pour about ¼ cup of batter for each pancake, leaving enough space between them so they don’t run together as they expand.
- Cook until bubbles form on the surface and the edges look set and dry, which usually takes about 2-3 minutes depending on the heat of your pan.
- Flip the pancakes gently and cook for another 1-2 minutes until the other side is golden brown; keep them warm in a low oven until you are ready to assemble your board.
How to roast spring chicken

Why we love this
A perfectly roasted spring chicken is the ultimate savory anchor for a large food board, offering juicy meat and golden, herb-scented skin that feels truly celebratory. The aroma of roasting poultry mixed with garlic and rosemary is the universal scent of home and hospitality. It is a dish that invites people to gather around, pulling tender pieces of meat away to pair with fresh bread and salad. When roasted at high heat, the skin becomes incredibly savory and crisp, providing a rich, satisfying contrast to the lighter, vegetable-forward elements of the board.
Ingredients
- 1 whole chicken (3-4 lbs), patted dry
- 3 tbsp softened butter
- 1 tbsp fresh rosemary, chopped
- 1 tbsp fresh thyme, chopped
- 1 lemon, halved
- 1 head of garlic, halved crosswise
- Kosher salt and black pepper
How to make it
- Preheat your oven to 425°F (220°C); a high temperature is crucial for rendering the fat and achieving that coveted crispy, golden-brown skin.
- Mix the softened butter with the chopped herbs, salt, and pepper, then use your fingers to gently loosen the skin of the chicken breast and spread the herb butter directly onto the meat.
- Stuff the cavity of the chicken with the lemon halves and the garlic head, which will steam from the inside out and infuse the meat with incredible aroma.
- Tie the legs together with kitchen twine and tuck the wing tips under the body to ensure the bird roasts evenly and maintains a beautiful shape for presentation.
- Generously season the outside of the skin with more salt and pepper, then place the chicken on a rack in a roasting pan to allow hot air to circulate underneath.
- Roast for 50-60 minutes, or until the juices run clear and the internal temperature in the thickest part of the thigh reaches 165°F; let the chicken rest for at least 15 minutes before carving to keep the juices inside.
Wrapping Up Your Simple Food Board
Building a viral-worthy food board is less about perfection and more about the rhythm of the season. By combining these fresh, handmade elements—from the tang of sourdough to the brightness of lemon cake—you create a tapestry of flavors that tells a story of spring. Remember to fill the gaps on your board with handfuls of fresh berries, sprigs of herbs, and little bowls of honey or nuts. The most important ingredient, as always, is the company you share it with. Happy hosting!