
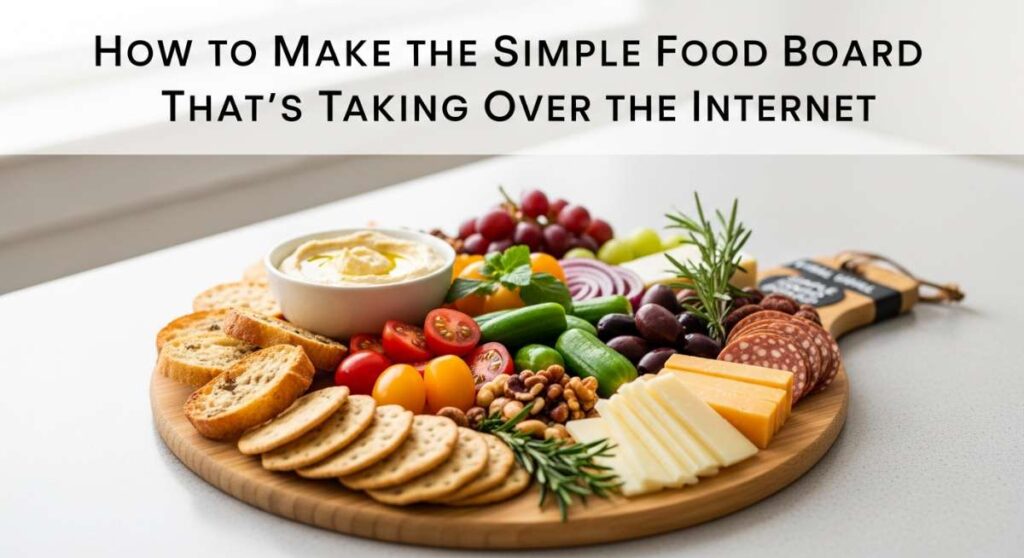
How to Make the Simple Food Board That’s Taking Over the Internet
We’ve all been there—standing in front of an open fridge at 6:00 PM, the blue light reflecting off a single jar of pickles and some wilted spinach, wondering how the day got away from us again. There’s a specific kind of soul-deep exhaustion that comes from the daily ‘what’s for dinner’ mental gymnastics. But lately, my social media feed has been filled with something that feels like an antidote to that chaos: the Simple Food Board. It’s not just a charcuterie tray; it’s a lifestyle shift that turns meal prep into a colorful, tactile, and deeply satisfying art form.
When I first tried building my own board, I realized it wasn’t about being a professional chef; it was about reclaiming the joy of simple ingredients. There is something profoundly calming about seeing a week’s worth of nourishment laid out in vibrant rows—golden roasted chicken, crisp rainbow veggies, and perfectly seared steak. It transforms the ‘chore’ of eating into an experience of abundance. Today, I’m sharing the secrets to mastering the elements of the board that has completely saved my sanity (and my grocery budget).
How to prep healthy bowls?

Why we love this
There is nothing quite like the architectural beauty of a well-constructed healthy bowl. It’s a symphony of textures: the creamy give of a ripe avocado, the grounding weight of fluffy quinoa, and the sharp, bright snap of pickled red onions. When you dive in, every bite offers a different story, a mix of warmth and coolness that feels like a hug for your digestive system. It’s the ultimate way to feel fueled without the heavy slump that follows a traditional lunch, leaving you vibrant and energized for the rest of your afternoon.
Ingredients
- 2 cups cooked quinoa or farro
- 1 cup roasted chickpeas with paprika
- Fresh kale or baby spinach
- Sliced cucumber and shredded carrots
- Lemon-tahini dressing
- Half an avocado per bowl
How to make it
- Start by prepping your base grains; rinse quinoa under cold water to remove the bitter saponin coating, then simmer in vegetable broth instead of water for extra depth of flavor. Use a 2:1 ratio of liquid to grain and fluff with a fork once the liquid is fully absorbed.
- Massage your kale with a splash of olive oil and a pinch of sea salt for at least two minutes; this breaks down the tough fibers, making it tender and sweet rather than bitter and chewy.
- Arrange the ingredients in distinct sections or ‘zones’ atop the greens to maintain textural integrity. Keep the wet ingredients (like cucumbers) away from the grains until serving.
- Whisk your tahini dressing until it reaches a ribbon-like consistency, adding warm water one tablespoon at a time if it seizes up. Drizzle over the top just before eating to ensure the greens stay crisp and the avocado remains vibrant green.
How to make easy chicken?
Why we love this
The aroma of golden, pan-seared chicken thighs wafting through the house is the universal language for ‘home.’ When done right, the skin achieves a glass-like shatter that gives way to meat so succulent it practically melts. It’s the versatile backbone of the food board, offering a rich, savory protein that pairs beautifully with everything from spicy salsas to cooling tzatziki. It’s simple, honest cooking that reminds us you don’t need fancy ingredients to create a masterpiece; you just need heat, salt, and patience.
Ingredients
- 1.5 lbs boneless, skinless chicken thighs
- 2 tablespoons olive oil
- 1 teaspoon smoked paprika
- 1 teaspoon garlic powder
- Kosher salt and cracked black pepper
- Fresh lemon wedges
How to make it
- Pat the chicken thighs completely dry with paper towels; moisture is the enemy of a good sear and will cause the meat to steam rather than brown.
- Season aggressively on both sides with the paprika, garlic powder, salt, and pepper. Let the meat sit at room temperature for 15 minutes to ensure even cooking throughout.
- Heat a heavy-bottomed cast iron skillet over medium-high heat until the oil shimmers. Lay the chicken in the pan, moving away from you to avoid splatters, and do not crowd the pan—work in batches if necessary.
- Press down lightly with a spatula to ensure full surface contact. Cook undisturbed for 6-7 minutes until a deep golden-brown crust forms and the meat releases easily from the pan. Flip and cook for another 5 minutes until the internal temperature reaches 165°F. Rest for 5 minutes before slicing to keep the juices locked inside.
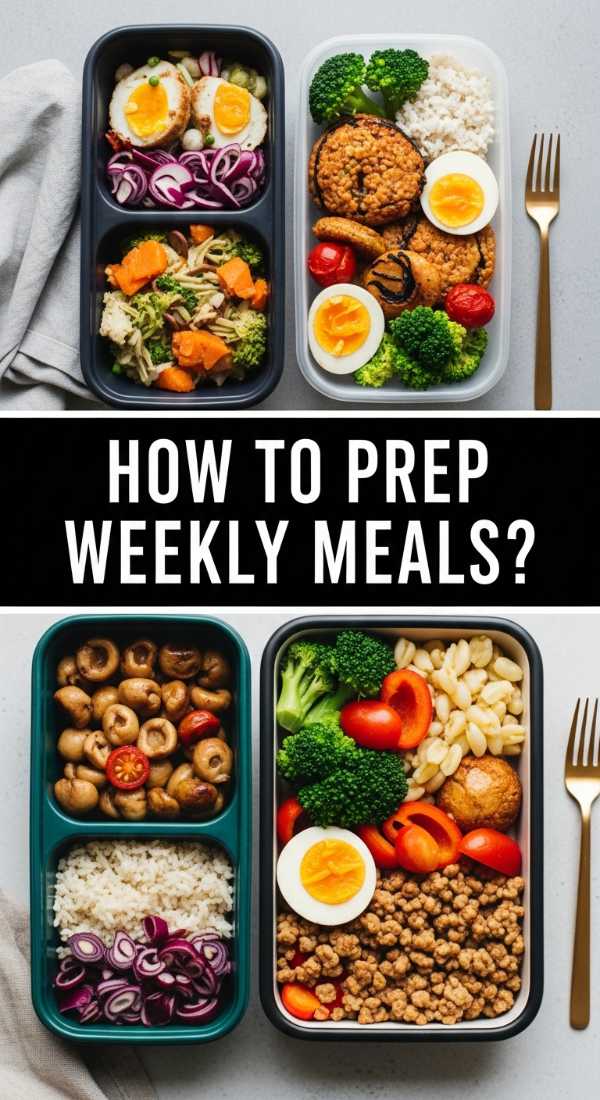
How to prep weekly meals?

Why we love this
The feeling of opening a fridge stocked with prepped containers is pure, unadulterated peace. It’s the gift your ‘Sunday self’ gives to your ‘Wednesday self’ during the mid-week hustle. There’s a rhythmic, meditative quality to the chopping and sorting, a ritual that signals the start of a productive week. Seeing the stacks of glass containers filled with colorful ingredients feels like an insurance policy against stress, ensuring that no matter how wild the day gets, a nourishing meal is only minutes away.
Ingredients
- Bulk grains (rice, farro, or couscous)
- 3-4 types of seasonal vegetables
- 2 types of lean protein
- Glass storage containers with airtight lids
- 3 signature sauces (pesto, vinaigrette, spicy mayo)
How to make it
- Adopt the ‘component’ method rather than making full recipes; cook your grains, proteins, and veggies separately to prevent everything from tasting the same by Thursday.
- Roast your hardier vegetables (like broccoli, sweet potatoes, and cauliflower) at 400°F with oil and salt until caramelized on the edges, which preserves their texture during reheating.
- Portion out the denser ingredients at the bottom of your containers, placing delicate items like herbs or soft greens at the very top or in separate small jars to maintain freshness.
- Label every container with the date and contents using masking tape and a marker; this professional kitchen trick helps you track freshness and ensures nothing gets lost in the ‘refrigerator abyss.’
How to cook budget dinners?

Why we love this
There is a unique creative thrill in turning humble, affordable staples like beans, eggs, and root vegetables into a feast that looks like it belongs in a magazine. Budget dinners are the ultimate test of a cook’s pantry skills, relying on spices and techniques rather than expensive cuts of meat. The result is often a hearty, comforting meal that feels grounded and resourceful. It’s about the smoky richness of toasted cumin and the way a simple fried egg can transform a bowl of lentils into a luxury experience.
Ingredients
- 1 bag of dried brown lentils or canned black beans
- 4 large eggs
- 2 large yellow onions
- 6 cloves of garlic
- Cumin, chili flakes, and salt
- Stale crusty bread or tortillas
How to make it
- Transform cheap onions into ‘culinary gold’ by caramelizing them slowly over low heat with a pinch of salt for 30 minutes until they are jammy and sweet; this provides a flavor base that tastes expensive.
- If using dried lentils, simmer them with a bay leaf and a whole garlic clove until tender but not mushy (about 20-25 minutes). Drain well and toss with a splash of vinegar while warm to brighten the earthy flavors.
- Fry your eggs in a generous amount of oil over high heat to achieve those crispy, ‘lacy’ edges while keeping the yolk runny; the yolk acts as a natural sauce for the beans and bread.
- Toast your bread in the same pan used for the onions to soak up any leftover flavor, and serve everything family-style on a large board to elevate the presentation.
How to bake protein bites?

Why we love this
These little nuggets are the ultimate afternoon pick-me-up, tasting more like a decadent truffle than a health food. They have a dense, fudgy texture that satisfies a sweet tooth while providing a steady stream of energy thanks to the nuts and seeds. The aroma of toasted oats and dark chocolate chips is intoxicating, making your kitchen smell like a high-end bakery. They are the perfect ‘grab-and-go’ addition to your food board, bridging the gap between a snack and a treat.
Ingredients
- 2 cups rolled oats
- 1 cup creamy almond or peanut butter
- 1/2 cup honey or maple syrup
- 1/4 cup ground flaxseeds
- 1/2 cup dark chocolate chips
- 1 teaspoon vanilla extract
How to make it
- Toast the rolled oats in a dry skillet over medium heat for 3-5 minutes until they smell nutty and turn slightly golden; this step adds a professional depth of flavor and better crunch.
- In a large bowl, microwave the nut butter and honey for 20 seconds to soften, then whisk in the vanilla extract until smooth.
- Fold in the toasted oats, flaxseeds, and chocolate chips. If the mixture is too dry, add a teaspoon of water; if too wet, add more oats. Let the dough chill in the fridge for 30 minutes to make rolling easier.
- Scoop rounded tablespoons of the mixture and roll them between your palms into tight balls. For a fancy finish, roll them in shredded coconut or sea salt before storing them in an airtight container in the freezer.
How to meal prep steak?
Why we love this
Steak often feels like an ‘order-out’ luxury, but prepping it at home brings a sense of mastery to your kitchen. When sliced thinly against the grain, the meat reveals a beautiful, rosy interior that contrasts perfectly with the dark, salty crust on the outside. It adds a premium, iron-rich element to your food board that feels incredibly satisfying. The savory, umami-rich scent of seared beef is enough to make anyone’s mouth water, turning an ordinary weekday lunch into something truly special.
Ingredients
- 1 lb flank steak or skirt steak
- 3 tablespoons soy sauce
- 1 tablespoon honey
- 2 cloves minced garlic
- 1 teaspoon cracked black pepper
- High-smoke point oil (like avocado oil)
How to make it
- Marinate the steak for at least 2 hours (or overnight) in the soy sauce, honey, and garlic mixture; the salt in the soy sauce acts as a brine to tenderize the tougher fibers of these specific cuts.
- Remove the steak from the fridge 30 minutes before cooking to take the chill off; a cold steak won’t cook evenly and will stay tough in the center.
- Heat your skillet until it is screaming hot—literally wisps of smoke should be appearing. Sear the steak for 3-4 minutes per side for medium-rare. Do not move it while it’s searing to ensure a deep crust.
- Crucial Step: Let the steak rest on a cutting board for a full 10 minutes before slicing. Use a very sharp knife to slice across the grain at a 45-degree angle; this shortens the muscle fibers, making every bite melt-in-your-mouth tender.
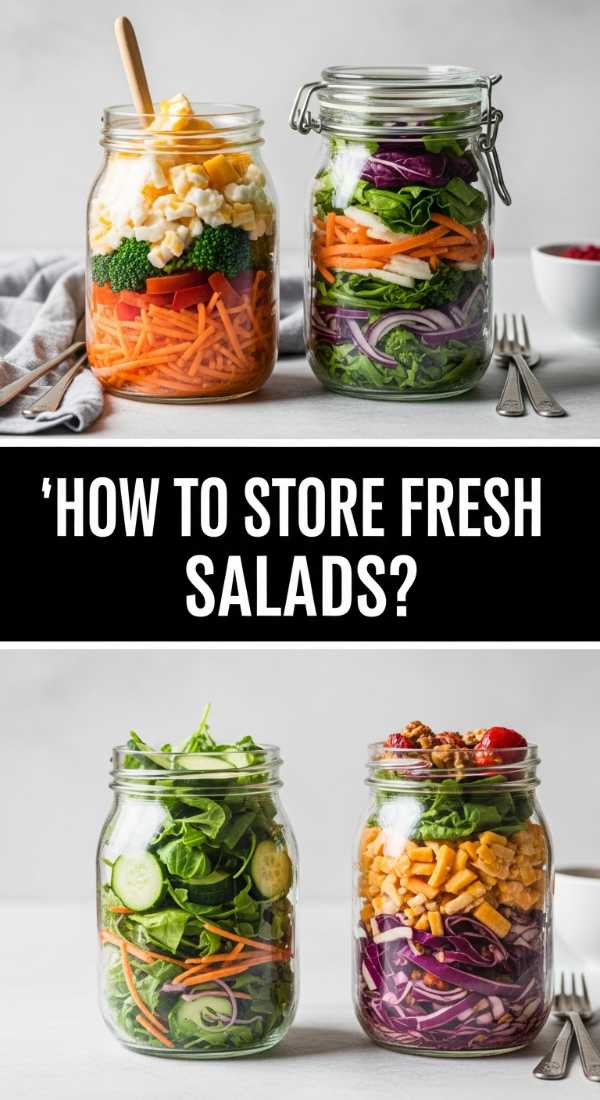
How to store fresh salads?

Why we love this
There is nothing more tragic than a soggy salad. Mastering the art of storage means your greens stay as crisp and vibrant as the moment they were picked. A fresh salad should feel like a celebration of spring—cool, hydrating, and full of life. By using the right techniques, you can keep your food board looking lush and bright for days, ensuring that every bite of spinach or arugula has that satisfying ‘snap’ that makes healthy eating feel like a treat rather than a chore.
Ingredients
- Fresh mixed greens (spinach, arugula, romaine)
- Paper towels
- Airtight glass jars or containers
- Dressing kept in a separate small vial
How to make it
- Wash your greens in ice-cold water and use a salad spinner to remove every drop of moisture. If you don’t have a spinner, lay them on a clean kitchen towel and pat them dry thoroughly.
- Place a dry paper towel at the bottom of your storage container; this will absorb any residual moisture that causes wilting and ‘slimy’ leaves.
- Layer your salad components by putting the ‘heavy’ and ‘wet’ items (like cherry tomatoes or chickpeas) at the bottom and the delicate greens at the very top. Do not add salt or dressing until the very moment you are ready to eat, as salt draws out moisture and causes immediate wilting.
- Store the container in the crisper drawer of your fridge, which is designed to maintain the specific humidity levels greens need to stay turgid and fresh.
How to make veggie trays?

Why we love this
A veggie tray shouldn’t be an afterthought; it should be the star of the show. When you arrange crisp radishes, vibrant bell peppers, and snap peas with intention, it becomes a canvas of colors and shapes. The crunch is auditory satisfaction at its best, and the cool, watery sweetness of fresh vegetables provides the perfect balance to the savory meats and grains on your board. It’s nature’s candy, presented in a way that makes you actually want to reach for a carrot over a cracker.
Ingredients
- Rainbow carrots (with tops for aesthetic)
- Snap peas and sliced radishes
- Bell pepper strips (red, yellow, orange)
- Blanched broccoli florets
- Hummus or Greek yogurt dip
How to make it
- Prepare your veggies with ‘visual texture’ in mind: slice radishes into paper-thin rounds, cut carrots on a long bias, and keep snap peas whole for a variety of shapes.
- Blanch the broccoli by dipping it in boiling water for 60 seconds and then immediately into an ice bath; this ‘shocks’ the vegetable, locking in a neon-bright green color and a perfect tender-crisp bite.
- Group your vegetables by color in clusters on the board to create a ‘rainbow’ effect, which is more visually appealing than mixing them randomly.
- Place your dip in a small bowl nestled directly into the vegetables, and garnish the dip with a swirl of olive oil and a sprinkle of za’atar or paprika to make it look professional.
How to roast sheet meals?
Why we love this
Sheet pan meals are the ‘one-pot wonders’ of the roasting world. There is a specific magic that happens when juices from the protein mingle with the vegetables on a hot pan, creating a built-in sauce that flavors everything. You get those crispy, charred edges on the potatoes and the softened, sweet garlic cloves that spread like butter. It’s a low-effort, high-reward technique that fills your home with the warm, comforting scent of caramelizing sugars and roasting herbs.
Ingredients
- 1 lb smoked sausage or chicken sausage, sliced
- 2 cups cubed butternut squash or sweet potatoes
- 1 bunch of asparagus or green beans
- 3 tablespoons olive oil
- Fresh rosemary and thyme
- Sea salt and cracked pepper
How to make it
- Preheat your baking sheet in the oven at 425°F while you prep the ingredients; placing food onto a pre-heated pan ensures an immediate sear on the bottom, preventing sogginess.
- Toss the squash and sausage in a bowl with oil and herbs first, as they require more time to cook than delicate greens like asparagus.
- Spread the squash and sausage in a single layer on the hot pan—avoid overlapping, or the vegetables will steam rather than roast. Bake for 15-20 minutes.
- Slide the tray out, add the asparagus to the remaining space, toss quickly, and bake for another 8-10 minutes. This ‘staggered roasting’ method ensures that the squash is tender and the asparagus remains bright green and crisp.
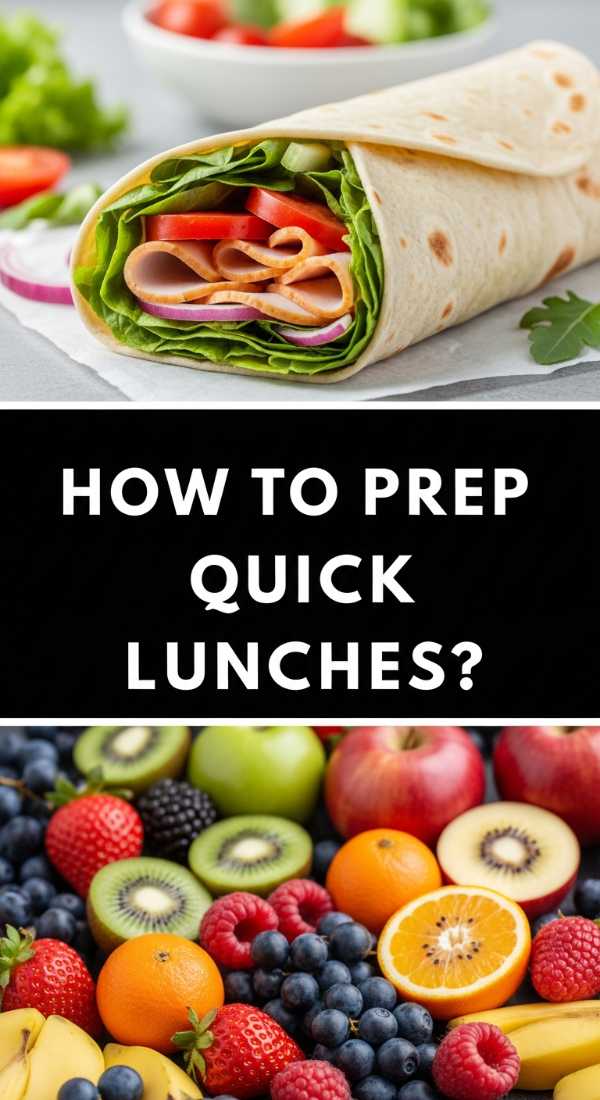
How to prep quick lunches?
[IMAGE_10]
Why we love this
The 15-minute lunch is a survival skill for the modern era. When you have the components of your food board ready, ‘assembling’ becomes an act of creativity rather than a chore. These lunches are light yet filling, designed to keep your brain sharp and your body fueled. There’s a certain pride in sitting down to a meal that looks like it cost $20 at a bistro, knowing you put it together in the time it takes to brew a pot of coffee. It’s the ultimate way to respect your time and your health simultaneously.
Ingredients
- Pre-cooked protein (chicken or steak)
- Pre-washed greens
- A handful of nuts or seeds for crunch
- Pre-made vinaigrette
- 1 fruit element (sliced apple or dried cranberries)
How to make it
- Use a ‘base, bulk, bright’ formula: Start with your greens (base), add your prepped protein and grains (bulk), and finish with something acidic or sweet like pickled onions or fruit (bright).
- To keep it ‘quick,’ keep your prepped components in clear containers at eye-level in the fridge so you don’t have to hunt for ingredients.
- Utilize a ‘jar assembly’ if you’re heading out: Pour the dressing at the very bottom, then the protein, then the hard veggies, then the grains, and finally the greens at the top. When you flip it into a bowl, the dressing perfectly coats everything from the top down.
- Always finish with a ‘finishing salt’ or a crack of fresh pepper to elevate the flavors of prepped food, making it taste freshly made rather than like leftovers.
The Art of the Board
Building a Simple Food Board is about more than just food; it’s about creating a visual and nutritional foundation for your week. By mastering these individual components—from the perfect sear on a steak to the crisp longevity of your salads—you turn your kitchen into a source of peace rather than a source of stress. So, grab your largest wooden board, gather your colorful containers, and start prepping. Your future self will thank you for every delicious, organized bite.