

We’ve all been there—scrolling through TikTok at 11 PM, mesmerized by those stunning, over-the-top food boards that look like they belong in a high-end gallery. There is something so deeply satisfying about seeing a rainbow of textures and flavors perfectly curated on a rustic wooden plank. It’s more than just food; it’s an invitation to slow down, gather your favorite people, and celebrate the art of a shared meal. The secret to a truly viral board isn’t just buying expensive cheese; it’s about those homemade, soul-warming components that make your guests lean in and ask, ‘How did you make this?’
Bringing these viral vibes into your own kitchen doesn’t have to be a source of stress. Whether you are hosting a cozy movie night or a full-blown dinner party, the key is mastering a few signature staples that provide that ‘wow’ factor. Today, I’m sharing my ultimate guide to creating the components of a TikTok-famous food board. We are diving deep into everything from the crustiest focaccia to the juiciest roasted chicken, ensuring your next gathering is as delicious as it is aesthetically pleasing.
HOW TO BAKE FUDGY BROWNIES?

Why we love this
There is nothing quite like the scent of dark chocolate wafting through the house to make it feel like a home. These brownies are the ultimate indulgence, featuring a crackly, tissue-thin top that gives way to a dense, fudgy center that almost melts on your tongue. The deep, rich aroma of high-quality cocoa paired with a hint of sea salt creates a sophisticated flavor profile that satisfies the most intense sweet tooth. Every bite is a decadent journey through layers of texture, making them the undeniable star of any dessert board.
Ingredients
- 1 cup unsalted butter, melted and slightly cooled
- 2 cups granulated sugar
- 3 large eggs, room temperature
- 1 tablespoon pure vanilla extract
- 1 cup Dutch-process cocoa powder
- 1 cup all-purpose flour
- 1/2 teaspoon sea salt
- 1 cup dark chocolate chunks
How to make it
- Preheat your oven to 350°F (175°C) and line an 8×8 inch baking pan with parchment paper, leaving an overhang on the sides for easy removal.
- In a large mixing bowl, whisk the melted butter and granulated sugar vigorously for about 2 minutes. This high-speed whisking helps create that coveted shiny, crackly top.
- Add the eggs one at a time, beating well after each addition until the mixture looks pale and fluffy. Stir in the vanilla extract.
- Sift the cocoa powder, flour, and salt directly into the wet ingredients. Using a rubber spatula, gently fold the dry ingredients in until just combined; do not overmix, as this will introduce too much air and make them cakey instead of fudgy.
- Fold in the dark chocolate chunks. Pour the batter into the prepared pan and smooth the top with a spatula.
- Bake for 25-30 minutes. The visual cue for doneness is when the edges are set and pull away slightly from the pan, but the center still has a very slight wobble. A toothpick inserted should come out with moist crumbs, not liquid batter.
- Allow the brownies to cool completely in the pan before slicing to ensure the fudgy texture sets perfectly.
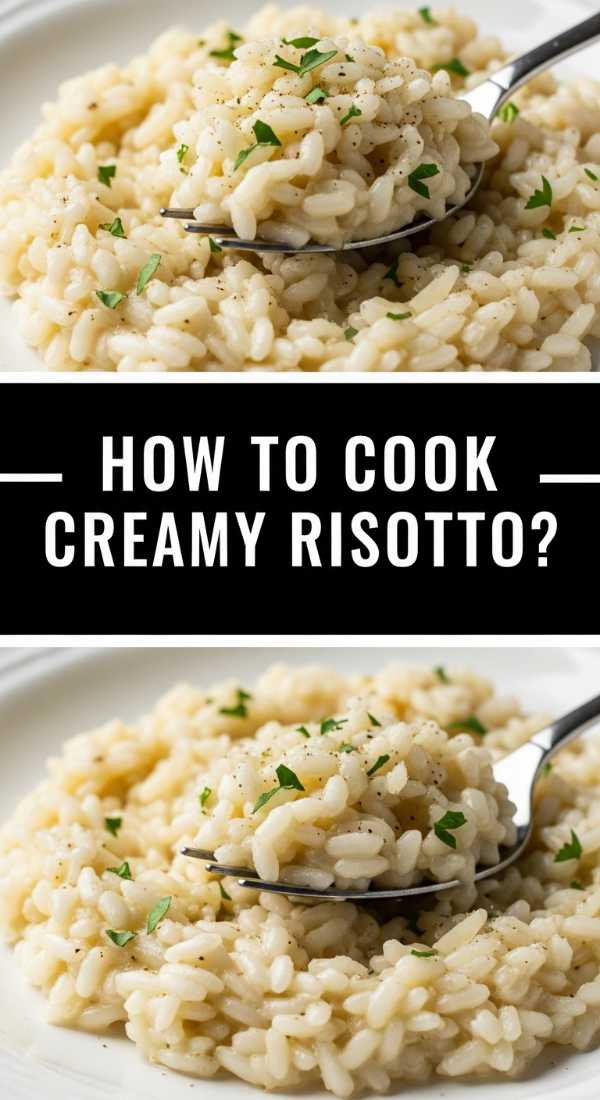
HOW TO COOK CREAMY RISOTTO?
Why we love this
Risotto is the ultimate culinary hug, a dish that demands patience but rewards you with a velvet-like texture that is purely hypnotic. As the rice releases its starch, it transforms into a rich, golden pool of comfort that carries the bright notes of white wine and the nutty depth of aged Parmesan. The gentle ritual of stirring over a warm stove becomes a sensory experience, where the rhythmic sound of the wooden spoon against the pot and the savory aroma of shallots and garlic fill the kitchen, promising a meal that is both elegant and deeply satisfying.
Ingredients
- 1.5 cups Arborio or Carnaroli rice
- 5-6 cups chicken or vegetable stock, kept warm
- 1/2 cup dry white wine (like Pinot Grigio)
- 2 tablespoons olive oil
- 2 tablespoons unsalted butter
- 1 small shallot, finely minced
- 2 cloves garlic, minced
- 1/2 cup freshly grated Parmesan cheese
- Salt and black pepper to taste
How to make it
- In a medium saucepan, bring your stock to a low simmer. It must be hot when added to the rice to maintain a consistent cooking temperature.
- In a wide, heavy-bottomed skillet, heat the olive oil over medium heat. Add the shallot and sauté for 2-3 minutes until translucent but not browned. Add the garlic for the last 30 seconds.
- Add the rice to the skillet. Toast the grains for 2 minutes, stirring constantly, until the edges look translucent and the rice smells slightly nutty. This step is crucial for preventing the risotto from becoming mushy.
- Pour in the white wine to deglaze the pan. Stir continuously until the wine is fully absorbed by the rice.
- Add one ladle of hot stock at a time to the rice. Stir frequently. Wait until the liquid is almost completely absorbed before adding the next ladle. The constant stirring agitates the rice and releases the starches, creating the creamy sauce.
- Continue this process for about 18-22 minutes. Taste the rice frequently; it should be ‘al dente’—tender with a slight bite in the center.
- Once the rice is cooked, remove from heat. Vigorously stir in the butter and Parmesan cheese. This final ‘mantecatura’ step adds the signature glossy finish. Season with salt and pepper and serve immediately.
HOW TO EAT ANTI INFLAMMATORY?

Why we love this
Eating for wellness doesn’t have to mean sacrifice; in fact, an anti-inflammatory approach is a celebration of the earth’s most vibrant colors and potent flavors. Imagine a plate filled with the earthy sweetness of roasted turmeric-spiced cauliflower, the zing of fresh ginger, and the buttery richness of wild-caught salmon or walnuts. The textures are varied—crunchy seeds, leafy greens, and juicy berries—all working together to soothe the body and energize the spirit. It’s a way of eating that feels clean, bright, and incredibly nourishing, leaving you feeling light yet fully satisfied.
Ingredients
- 2 cups leafy greens (kale or spinach)
- 1 cup blueberries or pomegranate seeds
- 1/4 cup walnuts or chia seeds
- 1 teaspoon ground turmeric
- 1 tablespoon fresh grated ginger
- Extra virgin olive oil and lemon juice
- Optional: Grilled wild salmon or roasted chickpeas
How to make it
- Start with a base of dark, leafy greens. If using kale, massage it with a drizzle of olive oil and a pinch of salt for 2 minutes to break down the tough fibers, making it tender and easier to digest.
- Incorporate healthy fats, which are essential for absorbing fat-soluble vitamins. Add sliced avocado or a handful of raw walnuts for crunch and Omega-3 fatty acids.
- Add ‘power’ spices. Whisk together a dressing using extra virgin olive oil, fresh lemon juice, grated ginger, and turmeric. The black pepper in your seasoning will help activate the curcumin in the turmeric for maximum benefit.
- Incorporate high-antioxidant fruits like blueberries or blackberries. Their natural sweetness balances the earthy tones of the greens and spices.
- Choose a clean protein. If cooking salmon, sear it in a pan over medium-high heat with minimal oil for 4 minutes per side until the skin is crispy and the flesh flakes easily.
- Assemble the bowl by layering the greens, adding the toppings, and drizzling the turmeric-ginger dressing generously over the top.
HOW TO MAKE STICKY MOCHI?

Why we love this
Mochi is a masterclass in textural delight, offering a soft, pillowy chew that is unlike any other dessert in the world. There is a playful magic in the way the dough stretches and bounces, dusted with a fine layer of cornstarch that feels like silk against your fingertips. Whether filled with a sweet red bean paste or flavored with delicate matcha, each bite provides a subtle, milky sweetness that lingers pleasantly. It is a whimsical addition to any food board, providing a tactile and visual element that guests find absolutely irresistible.
Ingredients
- 1 cup Glutinous Rice Flour (Mochiko)
- 1/4 cup granulated sugar
- 1 cup water
- Cornstarch or potato starch for dusting
- Optional: Food coloring or matcha powder
How to make it
- In a microwave-safe glass bowl, whisk together the glutinous rice flour, sugar, and water until the mixture is smooth and no lumps remain. If you want colored mochi, add a drop of food coloring now.
- Cover the bowl loosely with plastic wrap. Microwave on high for 1 minute. Remove and stir with a wet rubber spatula. The mixture will be sticky and partially translucent.
- Cover and microwave for another 1 minute. Stir again. The dough should now be very sticky, thick, and translucent. If it still looks white and opaque, microwave in 30-second intervals until done.
- Generously dust a clean work surface or a silicone mat with cornstarch. Scrape the hot mochi dough onto the starch. Dust the top of the dough with more starch to prevent sticking.
- While the dough is still warm (but safe to touch), flatten it out. Use a bench scraper or a knife dusted in starch to cut the dough into small, bite-sized squares or circles.
- If filling the mochi, place a small ball of filling in the center, pinch the edges of the dough together to seal, and roll it gently between your palms to form a smooth ball.
- Brush off excess starch with a dry pastry brush before serving.
HOW TO ROAST JUICY CHICKEN?

Why we love this
A perfectly roasted chicken is the hallmark of a confident home cook, offering a symphony of textures and aromas that define comfort food. The skin should be a deep, shimmering gold, shattering with a satisfying crunch to reveal meat that is incredibly tender and dripping with savory juices. Infused with the scents of fresh rosemary, thyme, and lemon, the chicken becomes the centerpiece of the board, its warmth and richness providing a hearty anchor for lighter sides. It’s a timeless classic that feels both rustic and grand.
Ingredients
- 1 whole chicken (approx 4 lbs), patted dry
- 3 tablespoons softened unsalted butter
- 2 tablespoons olive oil
- 1 whole lemon, halved
- 1 head of garlic, sliced in half crosswise
- Fresh herbs (rosemary, thyme, sage)
- Kosher salt and cracked black pepper
How to make it
- Remove the chicken from the fridge 30 minutes before cooking to bring it to room temperature. This ensures even cooking. Preheat your oven to 425°F (220°C).
- Pat the chicken extremely dry with paper towels. Moisture is the enemy of crispy skin.
- Generously season the cavity with salt and pepper. Stuff the lemon halves, garlic head, and half of the fresh herbs inside.
- Tuck the wing tips under the body and tie the legs together with kitchen twine (trussing). This keeps the bird compact so the breast doesn’t dry out before the legs are done.
- Rub the softened butter and olive oil all over the skin. Season the exterior liberally with salt and pepper, ensuring every inch is covered.
- Place the chicken on a roasting rack in a pan. Roast for about 60-75 minutes. The visual cue for doneness is a deep golden-brown skin. The internal temperature must reach 165°F (74°C) in the thickest part of the thigh.
- Crucially, let the chicken rest for at least 15-20 minutes before carving. This allows the juices to redistribute, ensuring the meat stays incredibly moist.
HOW TO COOK SPICY CURRY?

Why we love this
Spicy curry is an explosion of sensory details, a vibrant bowl of heat and depth that awakens the palate instantly. The base of toasted spices—cumin, coriander, and turmeric—blooms in the pan, creating a heady aroma that fills the entire house with warmth. When the coconut milk hits the pan, it creates a creamy, luxurious sauce that coats every vegetable and piece of protein in a golden embrace. The balance of fiery chili, zesty lime, and fresh cilantro creates a complex flavor profile that is both invigorating and deeply comforting.
Ingredients
- 2 tablespoons neutral oil
- 1 large onion, finely chopped
- 3 tablespoons curry paste (red, green, or yellow)
- 1 can (14oz) full-fat coconut milk
- 1 cup broth (chicken or vegetable)
- 2 cups chopped vegetables (bell peppers, sweet potatoes, peas)
- 1 lb protein (chicken, shrimp, or tofu)
- 1 tablespoon fish sauce or soy sauce
- 1 tablespoon lime juice
How to make it
- Heat the oil in a large pot or wok over medium-high heat. Add the onions and sauté for 5 minutes until soft and golden.
- Add the curry paste to the center of the pan. Fry the paste for 2 minutes, stirring constantly. You want the oils to separate from the paste and the aroma to become very pungent; this ‘blooming’ process is vital for deep flavor.
- Pour in about 1/4 of the coconut milk. Stir it into the paste until it forms a smooth, thick sauce. Let it simmer for a minute until small bubbles of oil appear on the surface.
- Add your protein and cook until browned on the outside. Add the vegetables and stir to coat.
- Pour in the remaining coconut milk and the broth. Bring to a gentle simmer, then turn the heat down to low. Do not boil vigorously, or the coconut milk may break and lose its creaminess.
- Simmer for 15-20 minutes until the vegetables are tender and the protein is cooked through.
- Finish by stirring in the fish sauce and lime juice. Taste and adjust the heat with more chili or the acidity with more lime before serving.
HOW TO MAKE LEMON ORZO?

Why we love this
Lemon orzo is the epitome of brightness, a side dish that acts like a ray of sunshine on your food board. Each tiny, rice-shaped pasta grain is infused with the zesty tang of fresh lemon and the salty punch of feta cheese, creating a profile that is incredibly refreshing. The texture is silky and light, making it the perfect companion to heavier roasted meats or spicy dishes. Garnished with a handful of fresh parsley and a drizzle of premium olive oil, it looks as beautiful as it tastes, bringing a Mediterranean flair to your spread.
Ingredients
- 1 cup orzo pasta
- 2 cups chicken or vegetable broth
- Zest and juice of 1 large lemon
- 2 tablespoons extra virgin olive oil
- 1/4 cup crumbled feta cheese
- 2 tablespoons fresh parsley, chopped
- Salt and pepper to taste
How to make it
- In a medium saucepan, heat 1 tablespoon of olive oil over medium heat. Add the dry orzo and toast it for 2 minutes, stirring frequently, until it smells slightly nutty and turns a golden color.
- Pour in the broth and a pinch of salt. Bring to a boil, then reduce heat to low, cover, and simmer for about 8-10 minutes. The orzo should absorb most of the liquid and be tender.
- While the orzo is cooking, zest your lemon and squeeze the juice into a small bowl, removing any seeds.
- Once the orzo is done, remove from heat. If there is excess liquid, you can drain it, but a little residual moisture helps keep it creamy.
- Stir in the lemon juice, lemon zest, and the remaining tablespoon of olive oil. The heat from the pasta will release the oils in the zest, making it incredibly fragrant.
- Fold in the crumbled feta and fresh parsley. The feta should soften slightly but not melt completely.
- Season with cracked black pepper and serve warm or at room temperature.
HOW TO BAKE FLUFFY FOCCACIA?

Why we love this
Focaccia is a bread-lover’s dream, characterized by its deep dimples filled with pools of golden olive oil and sprinkles of flaky sea salt. The exterior is wonderfully crisp and fried, while the interior remains airy, soft, and riddled with beautiful fermentation bubbles. As it bakes, the scent of yeast and rosemary fills the air, creating an irresistible invitation to tear off a piece while it’s still warm. It’s a tactile, communal bread that is meant to be shared, dipped, and savored, making it a visual and flavorful anchor for any viral board.
Ingredients
- 4 cups all-purpose flour
- 2 teaspoons instant yeast
- 2 cups warm water
- 2 teaspoons honey or sugar
- 1/4 cup + 2 tablespoons extra virgin olive oil
- 1 tablespoon flaky sea salt
- 2 sprigs fresh rosemary
How to make it
- In a large bowl, whisk together the warm water, honey, and yeast. Let it sit for 5 minutes until it becomes foamy.
- Add the flour and 1 teaspoon of salt. Mix with a spatula until a shaggy dough forms. Cover and let it rest for 30 minutes.
- Perform ‘stretch and folds’ by grabbing the edge of the dough, pulling it up, and folding it over itself. Do this 4 times, rotating the bowl. Cover and let rise in a warm spot for 1.5 to 2 hours, or until doubled in size and jiggly.
- Generously coat a 9×13 inch baking pan with 2 tablespoons of olive oil. Gently transfer the dough to the pan. Do not force it to the corners yet. Let it rest, uncovered, for another 45 minutes; it will naturally spread out.
- Preheat your oven to 425°F (220°C).
- The ‘Dimpling’: Drizzle more olive oil over the top. Use your fingertips to press straight down into the dough to create deep dimples all over the surface.
- Sprinkle with flaky sea salt and fresh rosemary leaves. Bake for 20-25 minutes until the top is a deep golden brown and the bottom is crisp.
- Remove from the pan immediately and cool on a wire rack to keep the bottom from getting soggy.
HOW TO MAKE SOFT NAAN?

Why we love this
There is something primitive and perfect about a piece of naan fresh off the heat, featuring charred ‘leopard spots’ and a buttery, garlic-scented sheen. This bread is incredibly soft and pliable, designed for scooping up thick curries or wrapping around grilled meats. The addition of yogurt to the dough provides a subtle tang and a characteristic tenderness that is hard to achieve with water alone. Watching the dough puff up and bubble in the pan is a rewarding experience that culminates in a warm, pillowy bite that feels like pure luxury.
Ingredients
- 2 cups all-purpose flour
- 1/2 cup plain Greek yogurt
- 1/2 cup warm water
- 1 teaspoon instant yeast
- 1 teaspoon sugar
- 1/2 teaspoon salt
- Melted butter and minced garlic for brushing
How to make it
- In a small bowl, combine warm water, sugar, and yeast. Let it sit for 5-10 minutes until frothy.
- In a large bowl, mix the flour and salt. Create a well in the center and add the yeast mixture and the Greek yogurt.
- Stir until a dough forms, then knead on a lightly floured surface for 3-5 minutes until smooth and slightly tacky. Cover and let rise in a warm spot for 1 hour.
- Divide the dough into 6-8 equal pieces. Roll each piece into an oval shape about 1/4 inch thick.
- Heat a heavy cast-iron skillet over medium-high heat. Do not use oil in the pan; you want dry heat to create the char.
- Place one piece of dough in the hot skillet. Cook for about 1-2 minutes. You will see large bubbles forming on the surface. Flip the naan and cook for another 30-60 seconds until the bottom has charred spots.
- Immediately after removing from the pan, brush with melted garlic butter and stack them in a clean kitchen towel to keep them soft and warm.
HOW TO STEAM PERFECT DUMPLINGS?

Why we love this
Dumplings are little parcels of joy, hiding a treasure trove of savory flavors inside a delicate, translucent wrapper. When steamed to perfection, the dough becomes slightly chewy and elegant, allowing the ginger-spiced meat or vegetable filling to shine. The moment you lift the lid of the bamboo steamer and the clouds of aromatic steam clear, you are greeted by a beautiful array of perfectly pleated gems. Dipped in a salty, spicy soy sauce, they provide a burst of umami that is both sophisticated and incredibly fun to eat.
Ingredients
- 1 pack of round dumpling wrappers
- 1/2 lb ground pork or finely chopped mushrooms
- 1 cup finely shredded cabbage (salted and squeezed dry)
- 2 green onions, minced
- 1 tablespoon soy sauce
- 1 teaspoon toasted sesame oil
- 1 teaspoon grated ginger
How to make it
- In a large bowl, combine your filling: the protein/mushrooms, cabbage, green onions, soy sauce, sesame oil, and ginger. Mix vigorously in one direction until the mixture becomes sticky and cohesive.
- Prepare a small bowl of water. Place a wrapper in your palm. Put 1 tablespoon of filling in the center.
- Moisten the edge of the wrapper with water. Fold the wrapper in half and pinch the center. Create 3-4 pleats on each side, pressing them firmly toward the center to seal. Ensure there are no air pockets.
- Prepare a steamer (bamboo or metal). Line it with parchment paper or cabbage leaves to prevent the dumplings from sticking.
- Bring an inch of water to a boil in a pot or wok that fits your steamer.
- Place the dumplings in the steamer, leaving an inch of space between them. Cover and steam for 8-10 minutes. The visual cue for doneness is when the wrappers look translucent and the filling feels firm.
- Serve immediately with a dipping sauce of soy sauce, rice vinegar, and chili oil.
The Art of the Final Assembly
Now that you’ve mastered these individual stars, it’s time to bring your TikTok-famous board to life. Start by placing your larger items—like the roasted chicken and the loaf of focaccia—on the board first to create anchor points. Fill in the gaps with bowls of creamy risotto, spicy curry, and the lemon orzo. Use the naan and dumplings to create movement across the board, and finish with the sweet mochi and fudgy brownies in the corners. The key is to overlap textures and colors, creating a sense of abundance that invites everyone to dig in. Remember, the best boards are messy, vibrant, and filled with love!