
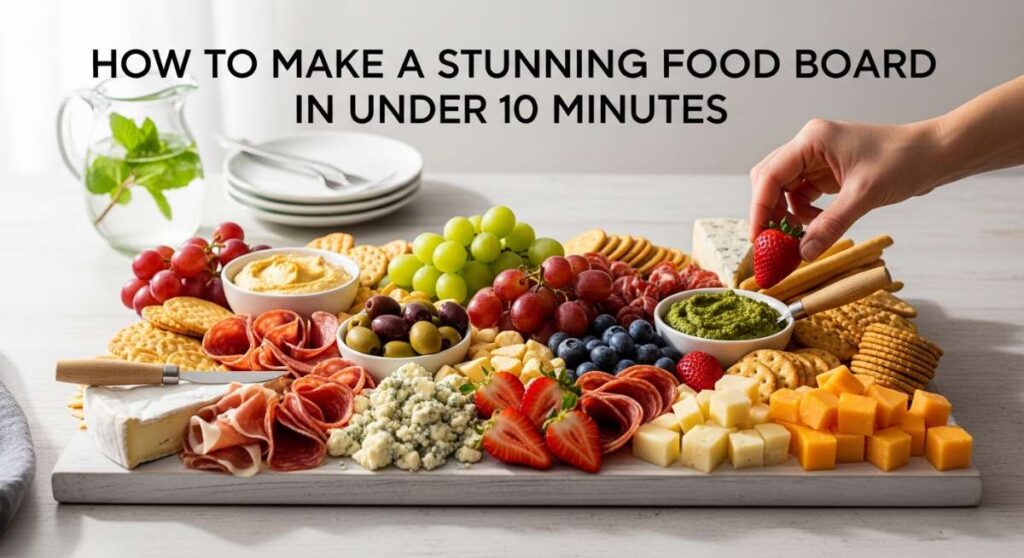
There is something almost magical about the way a beautifully arranged food board can transform a regular Tuesday night into a celebration. I remember the first time I set one out; the house was a mess, the kids were restless, and I felt completely drained. Instead of plating individual meals, I threw our favorite components onto a large wooden slab, and suddenly, the atmosphere shifted. It wasn’t just dinner; it was an experience that invited everyone to slow down and linger over their favorite bites.
Making a stunning food board doesn’t require a culinary degree or hours of labor. In fact, the secret to that viral, effortless look is all about layering textures and colors. By focusing on a few high-quality, comforting elements, you can create a centerpiece that looks like it took all day but actually came together in under ten minutes. Let’s dive into the core components that will make your board the talk of the table.
How to make crockpot chicken?

Why we love this
This crockpot chicken is the ultimate soul-soother, offering a succulent and tender texture that literally melts the moment it hits your tongue. The aroma of slow-cooked herbs and garlic wafts through the house all afternoon, creating an inviting atmosphere that promises a cozy evening ahead. Every bite is infused with a deep, savory richness that only hours of low-heat simmering can provide, making it the perfect protein anchor for a rustic board. It feels like a warm hug in food form, especially when paired with a few sprigs of fresh rosemary for that earthy visual pop.
Ingredients
- 2 lbs boneless skinless chicken thighs
- 1 cup high-quality chicken bone broth
- 4 cloves smashed garlic
- 1 tbsp dried Italian seasoning
- 1 tsp smoked paprika
- Sea salt and cracked black pepper to taste
- 2 tbsp unsalted butter, cubed
How to make it
- Pat the chicken thighs completely dry with paper towels to ensure the seasoning sticks and the meat doesn’t steam excessively; season generously with salt and pepper on both sides.
- Place the chicken in the bottom of a 6-quart slow cooker, ensuring they are in a relatively even layer for consistent cooking.
- Whisk the garlic, Italian seasoning, and smoked paprika into the chicken broth, then pour the mixture around the edges of the chicken—not directly over it—to keep the spices on the meat.
- Dot the top of the chicken with the butter cubes, which will melt down and create a velvety, glossy finish on the meat as it cooks.
- Set the crockpot to the “Low” setting and cook for 5 to 6 hours; you’ll know it’s done when the internal temperature reaches 165°F and the meat pulls apart effortlessly with a fork.
- Once cooked, let the chicken rest in the juices for 10 minutes before shredding to ensure every fiber remains moist and flavorful.
How to cook quick dinner?

Why we love this
The beauty of a quick dinner board lies in its vibrant, fresh energy and the satisfying crunch of crisp vegetables paired with zesty dips. It’s a sensory explosion where the brightness of lemon zest meets the creamy smoothness of hummus, creating a balanced palate that feels light yet incredibly fulfilling. This approach saves you from the heat of a heavy stove while providing a rainbow of colors that make your social media feed—and your appetite—come alive. It’s about the joy of assembly over the stress of cooking, allowing you more time to enjoy the company of your loved ones.
Ingredients
- 1 rotisserie chicken, carved into slices
- 1 cup pre-made classic hummus
- 1 bag mini sweet peppers, sliced lengthwise
- 1 cucumber, sliced into thick rounds
- 1/2 cup Kalamata olives
- 1 pack warm pita bread, cut into triangles
- Fresh parsley for garnish
How to make it
- Start by carving your rotisserie chicken into clean, elegant slices while it is still warm; this provides the main warm element for your board.
- Arrange a large, shallow bowl of hummus in the center of your board, creating a well in the middle of the dip with the back of a spoon for a drizzle of olive oil.
- Toast the pita triangles in a dry pan over medium-high heat for about 30 seconds per side until they show light charred marks and feel soft to the touch.
- Fan the cucumber slices and sweet peppers around the hummus bowl, creating a visual gradient of greens and oranges.
- Intersperse the chicken slices and olives in the remaining gaps, ensuring there are no large empty spaces on the board.
- Garnish the entire board with a handful of rough-chopped parsley to add a final hit of freshness and a professional culinary finish.
How to make creamy pasta?

Why we love this
There is an undeniable indulgence in the way a silky, garlic-infused cream sauce clings to every ridge of a perfectly al dente pasta. This dish is all about the tactile pleasure of a rich, velvety mouthfeel and the comforting scent of toasted Parmesan cheese filling the kitchen. The subtle heat from a pinch of red pepper flakes cuts through the decadence, providing a gentle tingle that keeps you coming back for just one more forkful. It’s the kind of food that makes the world go quiet for a moment, leaving only the sound of clinking forks and satisfied sighs.
Ingredients
- 12 oz fettuccine or pappardelle
- 1 cup heavy whipping cream
- 1/2 cup freshly grated Parmigiano-Reggiano
- 2 tbsp unsalted butter
- 3 cloves garlic, minced finely
- 1/4 tsp red pepper flakes
- Reserved pasta water (approx. 1/2 cup)
How to make it
- Boil a large pot of heavily salted water; cook the pasta until it is just shy of al dente, as it will finish cooking in the sauce.
- In a large skillet over medium-low heat, melt the butter and gently sauté the minced garlic until it is fragrant and translucent, being careful not to let it brown or turn bitter.
- Pour in the heavy cream and bring to a very gentle simmer; let it reduce slightly for about 3 minutes until it begins to thicken and coat the back of a spoon.
- Whisk in the grated cheese slowly, adding it in small handfuls to ensure it melts into a smooth emulsion rather than clumping.
- Transfer the pasta directly from the water into the skillet using tongs, allowing some of the starchy water to hitch a ride into the sauce.
- Toss vigorously over low heat, adding extra pasta water a tablespoon at a time until the sauce is glossy and perfectly coats every strand of pasta.
How to cook midwest stew?

Why we love this
A Midwest stew is the definition of hearty, slow-cooked love, featuring chunks of beef that are so tender they practically fall apart at the touch of a spoon. The deep, umami-rich broth is thickened naturally by the starches of root vegetables, creating a rustic texture that is incredibly satisfying and grounding. You can taste the patience in the layers of flavor—from the seared crust of the meat to the sweetness of carrots that have spent hours soaking up the savory juices. It’s a dish that demands a crusty piece of bread to mop up every last drop, celebrating the simple bounty of the heartland.
Ingredients
- 1.5 lbs beef chuck roast, cut into 1-inch cubes
- 3 large carrots, peeled and sliced into thick coins
- 2 gold potatoes, cubed into bite-sized pieces
- 1 yellow onion, diced
- 3 cups beef stock
- 2 tbsp tomato paste
- 2 sprigs fresh thyme
How to make it
- Heat a heavy-bottomed Dutch oven over medium-high heat with a splash of oil until shimmering; sear the beef cubes in batches until a deep brown crust forms on all sides.
- Remove the beef and add the diced onions to the pot, scraping the brown bits (the fond) from the bottom of the pan to incorporate all that concentrated flavor.
- Stir in the tomato paste and cook for 2 minutes until it turns a deep rust color, which indicates the sugars have caramelized and lost their raw acidic edge.
- Return the beef to the pot and add the carrots, potatoes, beef stock, and thyme sprigs, ensuring the liquid just barely covers the ingredients.
- Bring to a boil, then immediately reduce the heat to the lowest setting, cover tightly, and simmer for at least 2.5 to 3 hours.
- Check the beef for tenderness; once it yields easily to a fork, remove the thyme stems and serve in wide bowls alongside your food board components.
How to grill outdoor meals?

Why we love this
Outdoor grilling brings a primal, smoky element to your food board that indoor cooking simply can’t replicate. The char marks on grilled vegetables and meats add a bitter-sweet complexity and a satisfying snap that contrasts beautifully with soft cheeses or fresh fruits. There is a specific joy in the sound of the sizzle and the sight of smoke rising against a sunset, turning a simple meal into an event. It’s about that perfect balance of a caramelized exterior and a juicy, tender interior that makes every grilled component feel like a special treat.
Ingredients
- 4 chicken skewers or bratwursts
- 2 zucchini, sliced into long planks
- 1 bunch thick asparagus, ends trimmed
- Olive oil for brushing
- 1 tsp garlic powder
- 1 tsp dried oregano
- Flaky sea salt
How to make it
- Preheat your grill to medium-high heat (about 400°F) and ensure the grates are clean and lightly oiled to prevent sticking and create clean sear marks.
- Toss the zucchini and asparagus in a bowl with olive oil, garlic powder, and oregano until every surface is lightly coated and seasoned.
- Place the protein (chicken or brats) on the hottest part of the grill, searing for 4-5 minutes per side until charred and cooked through to an internal temp of 165°F.
- Arrange the vegetables on the outer edges of the grill where the heat is slightly lower; cook for 3 minutes per side until they are tender-crisp with visible grill lines.
- Use a pair of long-handled tongs to flip items only once; frequent flipping prevents the development of a proper crust and those coveted char marks.
- Remove everything from the heat and let the meat rest for 5 minutes before slicing and arranging it on the board to keep the juices locked in.
How to cook mama recipes?
Why we love this
Mama’s recipes are less about the exact measurements and more about the intuition and warmth passed down through generations. These dishes often feature a specific blend of aromatic spices and a “low and slow” philosophy that fills the kitchen with a sense of safety and nostalgia. The textures are usually soft and yielding, designed to be eaten with family around a crowded table where laughter is the main side dish. There is a unique depth to these flavors that feels incredibly personal, as if every stir of the pot was an act of quiet devotion to the people being fed.
Ingredients
- 1 lb lean ground beef or turkey
- 1 small onion, grated (to hide from picky eaters!)
- 1/2 cup breadcrumbs soaked in 1/4 cup milk
- 1 large egg
- 1 tsp dried parsley
- 2 cups marinara sauce
- 1/2 cup shredded mozzarella
How to make it
- In a large mixing bowl, combine the ground meat, grated onion, milk-soaked breadcrumbs, egg, and parsley; mix with your hands just until combined to avoid overworking the meat.
- Gently roll the mixture into small, golf-ball-sized meatballs, ensuring they are uniform in size so they cook at the exact same rate.
- Heat a splash of oil in a skillet over medium heat and brown the meatballs on all sides—don’t worry about cooking them through yet; we just want a golden exterior.
- Pour the marinara sauce over the meatballs, reduce the heat to low, and cover the pan to let them simmer for 15-20 minutes until they are incredibly tender.
- In the last 2 minutes of cooking, sprinkle the shredded mozzarella over the top and cover again until the cheese is bubbly and stretching.
- Serve these “mama-style” meatballs in a small cast-iron crock directly on the board for a rustic, communal feel.
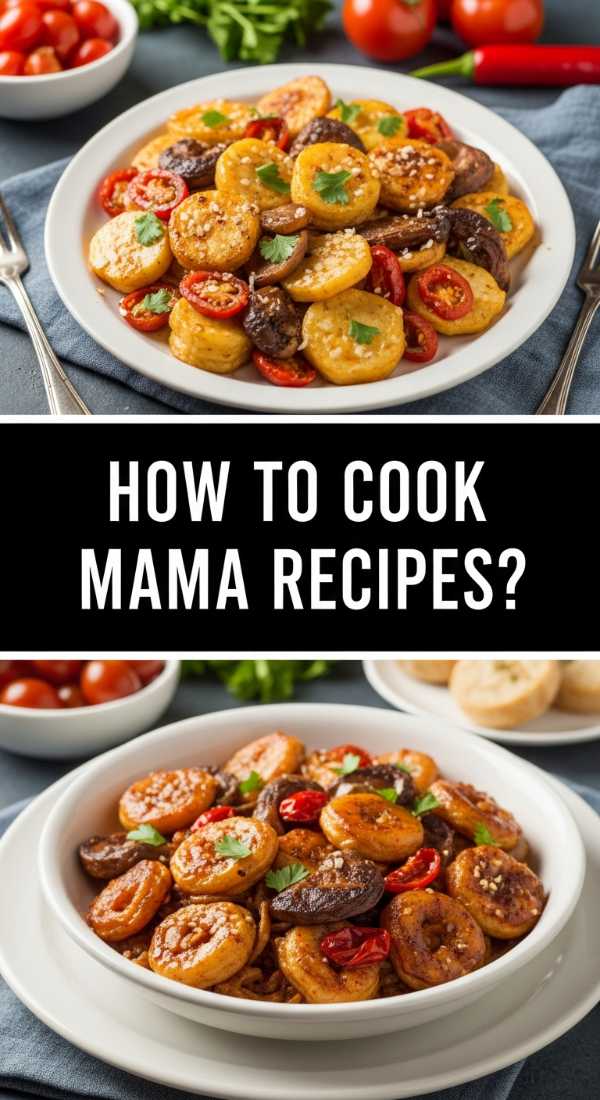
How to make crispy potatoes?

Why we love this
A perfectly crispy potato is a masterclass in textural contrast—a glass-like, golden exterior that shatters upon impact to reveal a cloud-like, fluffy center. The sound of that first crunch is incredibly satisfying, especially when followed by the salty, earthy flavor of a well-roasted spud. These are the ultimate crowd-pleasers on any board, acting as the perfect vessel for dipping into cool aioli or spicy mustard. When they are seasoned just right with a touch of rosemary and coarse salt, they become more than just a side; they become the star of the show.
Ingredients
- 1.5 lbs Yukon Gold potatoes, cut into 1-inch chunks
- 3 tbsp extra virgin olive oil
- 1 tsp coarse kosher salt
- 1/2 tsp black pepper
- 1/2 tsp onion powder
- 2 sprigs fresh rosemary, chopped
How to make it
- Par-boil the potato chunks in salted water for about 5-7 minutes until the edges are just starting to soften but they still hold their shape.
- Drain the potatoes and give them a rough shake in the colander; this “scuffs” the edges, creating more surface area for maximum crispiness in the oven.
- Preheat your oven to 425°F and place a large baking sheet inside to get hot while you prep the potatoes.
- Toss the scuffed potatoes with olive oil, salt, pepper, onion powder, and rosemary until every nook and cranny is coated.
- Carefully spread the potatoes onto the preheated baking sheet in a single layer, ensuring they aren’t crowded so they roast instead of steam.
- Roast for 25-30 minutes, flipping once halfway through, until they are deep golden brown and sound hollow when tapped with a spatula.
How to cook slow roasts?
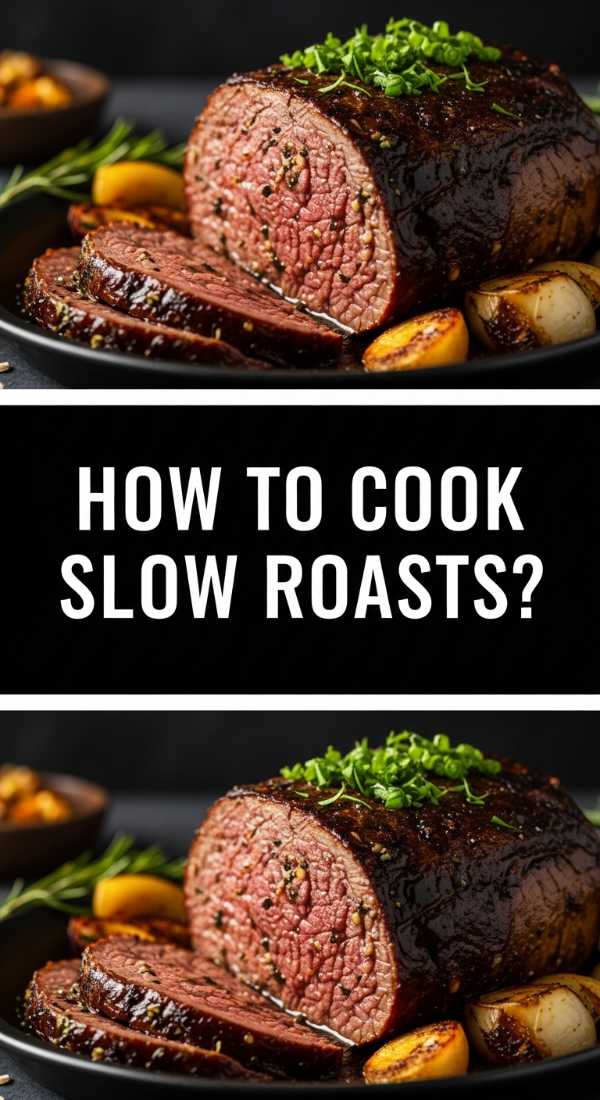
Why we love this
Slow roasts represent the height of culinary luxury, turning a humble cut of meat into a masterpiece of concentrated flavor and buttery texture. The long, gentle cooking process allows the connective tissues to break down completely, resulting in a rich, savory experience that feels immensely sophisticated. There is a deep, caramel-colored crust on the outside that provides a sweet and salty counterpoint to the tender interior. It’s the kind of dish that anchors a board with its presence, looking impressive and tasting even better as the juices mingle with the other elements on the platter.
Ingredients
- 3 lb pork shoulder or beef brisket
- 2 tbsp brown sugar
- 1 tbsp chili powder
- 1 tbsp garlic powder
- 1 cup apple cider or beef broth
- 2 tbsp apple cider vinegar
How to make it
- Rub the entire surface of the roast with a mixture of brown sugar, chili powder, and garlic powder, pressing the spices firmly into the meat to form a thick crust.
- Place the roast in a heavy roasting pan or slow cooker; pour the apple cider and vinegar into the bottom of the vessel without washing off the spice rub.
- If using an oven, roast at 275°F for 6-8 hours; if using a slow cooker, use the “Low” setting for 8-10 hours until the meat is fork-tender.
- During the last hour of cooking, baste the meat with its own juices every 20 minutes to create a glossy, flavorful glaze on the exterior.
- The most critical step: let the roast rest for at least 20 minutes under a loose tent of foil after removing it from the heat to allow the fibers to reabsorb the juices.
- Slice or shred the meat against the grain to ensure every piece is as tender as possible before arranging it on your food board.
How to make savory soups?

Why we love this
A savory soup adds a wonderful vertical element and a warming temperature contrast to a cold food board, served in small, charming mugs or bowls. The steam carrying the scent of simmered leeks, thyme, and cream creates an immediate sensory draw that invites guests to lean in and get comfortable. The texture is usually smooth and comforting, providing a silky backdrop for crunchy croutons or a sprinkle of fresh chives. It’s a liquid hug that cleanses the palate between bites of cheese and cured meats, making the whole dining experience feel more cohesive and thoughtful.
Ingredients
- 1 tbsp olive oil
- 2 leeks, white parts only, cleaned and sliced
- 3 cups cauliflower florets
- 4 cups vegetable broth
- 1/2 cup heavy cream
- Salt and white pepper to taste
- Chives for garnish
How to make it
- Sauté the sliced leeks in olive oil over medium heat until they are soft and translucent, avoiding any browning to keep the soup’s color bright and clean.
- Add the cauliflower florets and vegetable broth to the pot, ensuring the liquid covers the vegetables completely.
- Bring to a gentle boil, then lower the heat and simmer for about 15-20 minutes until the cauliflower is completely tender when pierced with a knife.
- Use an immersion blender to purée the soup directly in the pot until it is absolutely smooth and devoid of any lumps.
- Stir in the heavy cream and season with salt and white pepper; heat through for another 2 minutes but do not let it boil again once the cream is added.
- Ladle the hot soup into small ramekins or espresso cups and place them strategically around the food board, finishing each with a sprinkle of fresh chives.
How to prep dinner fast?

Why we love this
Prepping dinner fast is an art form that prioritizes efficiency without sacrificing the soul of a meal, focusing on smart shortcuts that deliver high impact. It’s the thrill of seeing a beautiful spread come together in minutes using pre-washed greens, high-quality deli finds, and pantry staples that look like they belong in a gourmet bistro. This method appeals to our desire for balance—eating well while still having time for a hobby, a book, or just a quiet moment. It proves that a “stunning” meal doesn’t have to be a stressful one; it just requires a little bit of strategic assembly and a focus on color and variety.
Ingredients
- 1 pack pre-washed arugula
- 1 jar marinated artichoke hearts
- 1 log goat cheese, crumbled
- 1/4 cup toasted walnuts
- Store-bought balsamic glaze
- Pre-sliced prosciutto or salami
How to make it
- Lay the arugula down as a “bed” or base on one corner of your board; this adds immediate volume and a professional aesthetic layer.
- Drain the marinated artichoke hearts and scatter them over the greens, allowing some of the flavored oil to dress the leaves naturally.
- Roll the prosciutto slices into loose “ribbons” or roses and tuck them into the gaps between the larger items on the board for a luxurious look.
- Sprinkle the goat cheese crumbles and toasted walnuts over the top of the arugula and artichokes to add creamy and crunchy textures.
- Finish the salad portion with a dramatic drizzle of balsamic glaze, moving your hand in a quick zig-zag motion to create thin, elegant lines.
- The final step is to fill any remaining small holes with dried fruit or nuts, ensuring the board looks abundant and overflowing with variety.
Bringing it All Together
A food board is more than just a meal; it’s a canvas for your creativity and a tool for connection. By mixing these warm, cooked elements with fresh, easy-to-prep snacks, you create a dynamic dining experience that appeals to every sense. Whether you are hosting a large party or just making a special Wednesday night dinner for two, remember that the best boards are the ones made with love and shared with even more. Now, grab your favorite wooden board and start building!