
How to Create a Viral Food Board with Ingredients You Already Have
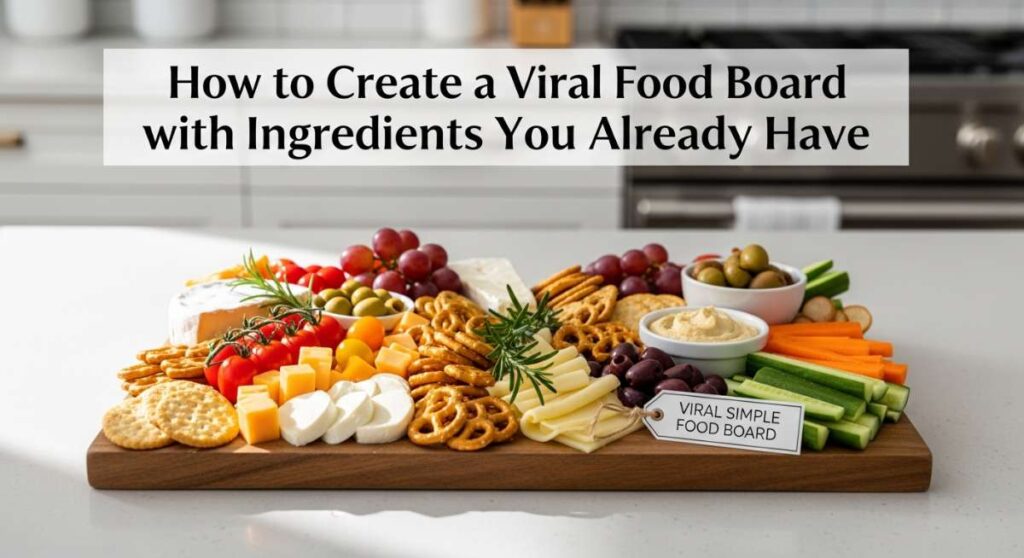
There is something undeniably magical about the way a thoughtfully curated food board can turn a simple Tuesday afternoon into a celebration. We’ve all scrolled through those mesmerizing social media feeds, feeling a mix of awe and intimidation at the perfectly placed sprigs of rosemary and the artistic swirls of artisanal cheeses. But here’s the secret: the most viral, heart-tugging boards aren’t about the price tag of the ingredients; they are about the stories they tell and the warmth they radiate from your very own kitchen.
I remember the first time I hosted a small gathering with nothing but a few half-empty boxes of crackers and some leftover fruit. By focusing on color, texture, and a bit of styling magic, that ‘scavenged’ board became the talk of the evening. Creating a viral food board is about embracing the beauty of what you already have, leaning into the seasons, and inviting your loved ones to gather around a table that feels lived-in and loved. Let’s dive into how you can master this art, one seasonal delight at a time.
How to make spring brunch?

Why we love this
Spring brunch is the ultimate awakening for the senses, bringing a burst of garden-fresh vibrance to your table after a long winter. We love it because it balances the decadent, buttery crunch of toasted pastries with the bright, zesty snap of seasonal greens. Imagine the aroma of freshly snipped chives and the delicate, earthy scent of steamed asparagus mingling with the sweet perfume of macerated berries. It’s a meal that feels like a warm hug from the sun, offering a variety of textures from creamy soft-scrambled eggs to the refreshing, crisp bite of a radish salad.
Ingredients
- Free-range eggs
- Fresh asparagus spears
- Smoked salmon or prosciutto
- Sourdough bread or croissants
- Radishes and microgreens
- Salted butter and flaky sea salt
- Fresh berries and honey
How to make it
- Begin by preparing your greens: blanch the asparagus in boiling salted water for exactly two minutes until vibrant green, then immediately plunge into an ice bath to stop the cooking and preserve the crunch.
- Toast your bread of choice until golden brown; if using sourdough, brush with olive oil and grill for a charred, smoky finish.
- Whisk your eggs with a splash of heavy cream and cook over low heat, using a silicone spatula to gently push the curds from the edges to the center for a custard-like, velvety texture.
- Assemble the board by placing the warm eggs in a central bowl, fanning out the crisp radishes and asparagus around it, and draping the smoked salmon in delicate ribbons.
- Finish with a sprinkle of flaky sea salt and a drizzle of honey over the berries for a sweet-and-savory balance that looks professionally styled.
How to decorate spring cookies?

Why we love this
Decorating spring cookies is a meditative, artistic escape that yields edible masterpieces. We love this process because it transforms a simple sugar cookie into a canvas of pastel dreams and floral whimsy. The feeling of the smooth, cool icing flowing through a piping tip is incredibly satisfying, and the visual reward of a perfectly dried, matte finish is second to none. There’s a wonderful contrast between the snap of the royal icing and the soft, melt-in-your-mouth texture of the cookie underneath, all scented with a hint of almond and vanilla that fills the room.
Ingredients
- Batch of round sugar cookies
- Royal icing (stiff and flood consistency)
- Gel food coloring (pastel pink, green, and yellow)
- Piping bags and small round tips
- Toothpicks or scribes
- Edible gold leaf or sprinkles
How to make it
- Outline your cooled cookies using the stiff consistency icing, moving the piping bag steadily to create a clean, raised border that acts as a dam.
- Fill the center with flood-consistency icing, using a toothpick to swirl the liquid toward the edges until the surface is perfectly flat and tension-free.
- While the base is still wet, use the ‘wet-on-wet’ technique by dropping small dots of a different color into the icing to create effortless polka dots or floral swirls.
- Allow the base layer to dry completely for at least 4 hours before adding dimensional details like piped leaves or flower petals on top using the stiff icing.
- For a viral-ready finish, use a dry brush to apply tiny flecks of edible gold leaf or a dusting of shimmer to the centers of your flowers.
How to cook summer soups?

Why we love this
Summer soups are a revelation, proving that warmth can be refreshing and flavors can be incredibly deep without being heavy. We love these dishes because they capture the absolute peak of garden produce—the sun-drenched sweetness of tomatoes and the cooling silkiness of cucumbers. The aroma is herbal and bright, dominated by torn basil and sharp garlic that wakes up the palate. Whether served chilled or at room temperature, these soups offer a light, hydrating experience that feels like the essence of a July afternoon in a bowl.
Ingredients
- Ripe heirloom tomatoes
- English cucumbers
- Red bell peppers
- Red onion and garlic
- Extra virgin olive oil
- Sherry vinegar
- Fresh basil and crusty bread
How to make it
- Core and roughly chop your tomatoes, cucumbers, and peppers, ensuring you keep the juices that run off the cutting board as they contain the most intense flavor.
- Sauté the onions and garlic in a generous amount of olive oil over medium-low heat just until translucent; do not brown them, as you want to maintain a clean, vegetal sweetness.
- Combine the raw vegetables with the cooked aromatics and a splash of sherry vinegar, letting them macerate for 30 minutes to allow the salt to draw out the natural liquids.
- Simmer the mixture gently for 15 minutes to marry the flavors, or keep it raw for a traditional gazpacho style, depending on your preference for depth versus brightness.
- Taste for acidity and salt, adjusting with more vinegar if the soup feels flat, and serve with a heavy swirl of high-quality olive oil and torn herbs.
How to master grilling recipes?

Why we love this
Mastering the grill is about harnessing the primal, smoky power of fire to transform simple proteins into charred perfection. We love grilling because it’s a sensory theater—the sizzle of the fat hitting the hot grates, the billowing clouds of hickory-scented smoke, and the beautiful cross-hatched sear marks that signify a job well done. The texture is unmatched: a crispy, caramelized exterior that gives way to a tender, juicy interior that has absorbed the subtle nuances of the charcoal or wood flame.
Ingredients
- High-quality protein (steak, chicken, or tofu)
- Dry rub (salt, pepper, garlic powder, paprika)
- High-smoke point oil (avocado or canola)
- Fresh rosemary or thyme sprigs
- Lemon wedges for finishing
How to make it
- Preheat your grill to high heat, ensuring the grates are scrubbed clean and lightly oiled to prevent sticking and ensure those perfect, viral-worthy sear lines.
- Season your ingredients generously at least 40 minutes before grilling; this allows the salt to penetrate the fibers, ensuring the center is as flavorful as the crust.
- Place the food on the hottest part of the grill and leave it undisturbed for 3-4 minutes to develop a proper crust; moving it too soon will tear the surface.
- Flip once using tongs (never a fork, which pierces the meat and lets juices escape) and move to a slightly cooler zone to finish cooking to your desired internal temperature.
- Rest the food for at least 10 minutes under a loose tent of foil to allow the juices to redistribute, ensuring every bite is succulent and flavorful.
How to bake moist cupcakes?

Why we love this
A truly moist cupcake is a small, handheld piece of heaven that balances a delicate crumb with a rich, decadent mouthfeel. We love this because it solves the age-old problem of the ‘dry cake,’ replacing it with a texture that is springy, soft, and almost velvety. The scent of warm vanilla and melting butter is intoxicating, promising a treat that is both light and satisfying. When topped with a cloud of frosting, the contrast between the airy cake and the dense, creamy topping creates a perfect harmony of sweetness.
Ingredients
- Cake flour
- Granulated sugar
- Unsalted butter (room temperature)
- Large eggs and sour cream
- Whole milk and vegetable oil
- Baking powder and salt
- Pure vanilla extract
How to make it
- Cream the softened butter and sugar for at least 5 minutes until the mixture is pale and noticeably fluffy; this aeration is key to a light, moist structure.
- Incorporate both oil and sour cream into the wet ingredients; the oil provides moisture that stays liquid at room temperature, while the sour cream adds fat and acidity for a tender crumb.
- Sift the cake flour and baking powder together to remove lumps and ensure even distribution, then fold into the wet mixture alternating with the milk.
- Fill your cupcake liners only two-thirds full to allow for a flat, even rise that is perfect for decorating, rather than a domed, cracked top.
- Bake at 350°F and remove the moment a toothpick comes out with a few moist crumbs attached—do not wait for it to be completely dry, or you have overbaked them.
How to bake spring cake?

Why we love this
Spring cakes are the showstoppers of any seasonal gathering, often featuring layers of citrus-infused sponge and light-as-air fillings. We love them because they embody the lightness of the season, moving away from heavy chocolates toward flavors like lemon, lavender, and strawberry. The visual of a tall, elegantly frosted cake decorated with edible flowers is pure viral gold. The texture is a delightful journey—soft layers of sponge separated by silky curds or jams that provide a bright, tart counterpoint to the sweet frosting.
Ingredients
- All-purpose flour
- Fresh lemon zest and juice
- Granulated sugar
- Buttermilk (for tenderness)
- Egg whites (for a white, fluffy sponge)
- Strawberry jam or lemon curd for filling
- Swiss meringue buttercream
How to make it
- Whip your egg whites to soft peaks before folding them into the main batter; this folding technique preserves the air bubbles, resulting in a ‘springy’ and light texture.
- Use buttermilk instead of regular milk to provide a slight tang and a chemical reaction with the baking soda that yields an incredibly soft, fine-textured cake.
- Once the layers are cooled, level the tops with a serrated knife to ensure a perfectly flat surface for stacking, which prevents the cake from leaning or sliding.
- Apply a thin ‘crumb coat’ of frosting to lock in any loose bits of cake, chill for 20 minutes, and then apply your final smooth layer of Swiss meringue buttercream.
- Decorate with a rustic ‘naked’ finish or pressed edible pansies for a look that feels fresh, organic, and perfectly suited for a spring board display.
How to grill juicy burgers?

Why we love this
The quest for the perfect juicy burger is a culinary rite of passage, and when you get it right, the result is pure, unadulterated joy. We love this because of the dramatic contrast between the salty, crispy ‘smash’ crust and the dripping, tender center that melts into a toasted bun. The aroma of rendering beef fat and melting sharp cheddar is a siren song for any backyard cookout. It’s messy, it’s bold, and it’s the kind of food that demands you use two hands and a lot of napkins.
Ingredients
- 80/20 ground chuck (freshly ground is best)
- Kosher salt and coarse black pepper
- Sharp cheddar cheese slices
- Brioche buns
- Butter for toasting
- Secret sauce (mayo, mustard, relish)
How to make it
- Form your patties gently, avoiding over-working the meat; make a small thumbprint indentation in the center of each patty to prevent it from puffing into a ball while cooking.
- Ensure the grill is screaming hot (around 450°F); the goal is a rapid sear that caramelizes the exterior without overcooking the very middle.
- Season the patties only right before they hit the grill; salting too early can change the protein structure, making the burger tough rather than tender.
- Flip the burger once and immediately place the cheese on top, closing the grill lid for 30 seconds to create a perfect, gooey melt that drapes over the edges.
- Toast the buttered brioche buns on the grill until they are dark golden; this provides a structural barrier that keeps the juices from making the bread soggy.
How to blend summer soups?

Why we love this
The act of blending a summer soup is where the alchemy happens, turning chunky garden scraps into a sophisticated, silky emulsion. We love this technique because it creates a luxurious mouthfeel without the need for heavy cream, relying instead on the natural pectins and fibers of the vegetables. There is something deeply satisfying about watching a vibrant orange gazpacho or a bright green chilled pea soup turn perfectly smooth. The flavors become more integrated, ensuring that every spoonful contains the perfect balance of every ingredient you’ve added.
Ingredients
- Cooked or macerated summer vegetables
- High-quality vegetable stock or coconut milk
- Fresh lemon juice or white balsamic
- Cold butter or olive oil (for emulsification)
- Ice cubes (optional for keeping it chilled)
How to make it
- Transfer your soup base to a high-speed blender, filling it no more than halfway to avoid ‘explosions’ caused by steam pressure if the soup is warm.
- Start the blender on the lowest speed and gradually increase to high; this ensures that every single fiber is pulverized into a microscopic smooth texture.
- While the blender is running, slowly drizzle in extra virgin olive oil or a knob of cold butter; this creates an emulsion that gives the soup a professional, glossy sheen.
- For the smoothest possible ‘viral’ results, pass the blended liquid through a fine-mesh sieve (chinois) to remove any remaining skins or seeds.
- Chill the blended soup in the refrigerator for at least two hours; as it cools, the flavors will deepen and the texture will thicken slightly for a better pour.
How to host spring brunch?

Why we love this
Hosting a spring brunch is as much about the atmosphere as it is about the menu. We love this because it allows for a relaxed, flowy pace where guests can linger over coffee and conversation for hours. It’s an opportunity to bring the outdoors in, using bud vases and linen napkins to create a table that feels light and effortless. The shared nature of a food board at a brunch encourages interaction, as people reach across the table to share a piece of brie or a cluster of grapes, creating a sense of community and warmth that is hard to replicate at a formal dinner.
Ingredients
- A variety of savory and sweet food boards
- Fresh floral arrangements
- Assorted teas and a coffee station
- Mimosas or sparkling cider
- Linen napkins and ceramic plates
- A curated ‘slow morning’ playlist
How to make it
- Set the stage by choosing a location with the best natural light; spring brunch is all about that morning glow, so clear away heavy curtains and let the sun in.
- Prepare as much as possible the night before—macerate berries, set the table, and arrange your flowers—so you can actually enjoy your guests rather than being stuck at the stove.
- Designate a specific ‘beverage zone’ with glasses, ice, and garnishes like sprigs of mint or frozen berries so guests can serve themselves easily.
- Arrange your food boards with a mix of heights using small bowls or wooden blocks to create visual interest and make the table look abundant and lush.
- Focus on ‘build-your-own’ elements, like a yogurt parfait station or a bagel bar, which reduces your serving duties and lets guests customize their experience.
How to frost spring cookies?
[IMAGE_10]
Why we love this
Frosting spring cookies is the final, glorious step in the baking process where color and texture take center stage. We love this because it’s where personality shines—from elegant, minimalist designs to exuberant, multi-colored floral patterns. The smooth, sweet icing provides a satisfying crackle when bitten into, followed by the soft yield of the cookie. It is a creative outlet that results in a gift that people are almost too afraid to eat because it looks so beautiful, making it the perfect addition to any viral-worthy dessert board.
Ingredients
- Cooled sugar cookies
- Buttercream or Royal icing
- Food coloring in soft greens, pinks, and lavenders
- Offset spatula for smoothing
- Decorating tips (star, petal, and leaf tips)
- Pearl sprinkles
How to make it
- If using buttercream, start with a cool cookie and apply a thin base layer using an offset spatula, swirling the edges to create a soft, cloud-like texture.
- Fit your piping bag with a petal tip to create easy ‘ribbon’ flowers; hold the bag at a 45-degree angle and move in a circular motion, overlapping the ‘petals’ as you go.
- Use a leaf tip to add tiny pops of green around your flowers; the key is to squeeze firmly and then pull away quickly to create a pointed, realistic leaf shape.
- For a more modern look, try the ‘dip’ method: thin your icing slightly, dip the face of the cookie into the bowl, and twist as you lift to create a perfect, marbleized surface.
- Set the cookies on a wire rack and do not move them until the frosting has formed a slight ‘crust,’ ensuring your designs remain crisp and smear-free for the camera.
Conclusion
Creating a viral food board is less about following a rigid set of rules and more about embracing the joy of the ingredients you have. Whether you’re grilling juicy burgers for a summer bash or delicately frosting spring cookies for a quiet afternoon, the key is the love and attention you put into the presentation. Your kitchen is already full of potential; all it takes is a little bit of styling and a passion for sharing good food to make something truly unforgettable. Now, grab a board, raid your pantry, and start creating!