

Have you ever walked through your front door and felt like the space didn’t quite match the vibrant, creative soul living inside it? We’ve all been there—scrolling through endless feeds of perfect homes, feeling that tiny ache of ‘I wish I could do that.’ But here’s the secret: that high-end look isn’t reserved for those with a professional design team and a massive budget. It’s born from a bit of elbow grease, a splash of paint, and the courage to try something new in your own backyard.
Creating a home that feels like a sanctuary is about more than just aesthetics; it’s about the memories you build while getting your hands dirty and the satisfaction of looking at a finished project and saying, ‘I did that.’ Today, I’m sharing my favorite viral trends that are sweeping the design world, translated into actionable, DIY-friendly projects that will elevate your lifestyle without breaking the bank.
How to Remodel a Vintage Ranch Exterior for Incredible Curb Appeal

Why we love this
There is something undeniably romantic about breathing new life into a mid-century ranch, turning a dated ‘cookie-cutter’ exterior into a modern masterpiece. We love the way crisp white lime-wash interacts with the natural, honey-toned grain of cedar accents, creating a visual warmth that welcomes you home before you even reach the porch. Imagine the scent of fresh mulch and the soft glow of updated lantern lighting reflecting off a newly smoothed facade—it’s a total sensory reset for your home’s personality.
Essential Elements:
- Romabio Classico Limewash
- Cedar wood slats for shutters or porch columns
- Modern matte black house numbers
- Large-scale outdoor lanterns
- Pressure washer and masonry brushes
How to make it
- Begin by pressure washing the entire exterior to remove decades of dust and debris; ensure the brick is damp but not dripping before applying any product to help it bond correctly.
- Mix your limewash in a large bucket, diluting with water according to the manufacturer’s instructions until it reaches the consistency of heavy cream.
- Apply the limewash using a large masonry brush in random, overlapping strokes to ensure full coverage of the grout lines and brick faces.
- Wait about 20 to 30 minutes (depending on humidity) and then use a spray bottle or garden hose to gently wash away product in high-traffic areas to reveal the brick beneath for that authentic, aged European look.
- Measure and cut your cedar boards to create modern horizontal shutters, then seal them with a clear UV-resistant finish to prevent graying over time.
- Install your new cedar accents and matte black hardware, ensuring all screws are countersunk for a professional, high-end finish.
How to Design Rock Flower Beds for a Low Maintenance Front Yard
Why we love this
The transition from messy mulch to a structured rock flower bed is like trading a worn-out t-shirt for a tailored blazer. We love the tactile contrast between smooth, cool river stones and the soft, feathery texture of ornamental grasses swaying in the breeze. This design isn’t just about the look; it’s the peaceful sound of rain filtering through the stones and the relief of never having to pull weeds in the sweltering heat again, allowing you to enjoy your garden rather than just laboring in it.
Essential Elements:
- Professional-grade landscape fabric
- Galvanized steel or heavy-duty plastic edging
- Bulk river rock or Mexican beach pebbles
- Drought-resistant perennials (like Lavender or Hosta)
- U-shaped landscape staples
How to make it
- Clear the existing vegetation by digging out grass and old mulch to a depth of at least three inches to provide a clean slate for your new drainage system.
- Install your edging along the perimeter, using a rubber mallet to drive it deep into the soil to prevent ‘frost heave’ or movement during heavy rains.
- Roll out your landscape fabric, overlapping edges by at least six inches and securing it firmly with staples every 12 inches to create an impenetrable barrier for weeds.
- Cut ‘X’ shapes into the fabric where you intend to plant, then dig your holes and settle your perennials into the soil, ensuring the root ball is level with the ground.
- Rinse your bulk rock with a hose while it’s still in the wheelbarrow to remove dust before spreading it in a consistent two-inch layer across the fabric.
- Level the rocks by hand or with a garden rake, focusing on a smooth transition toward the edging for a clean, professional aesthetic.
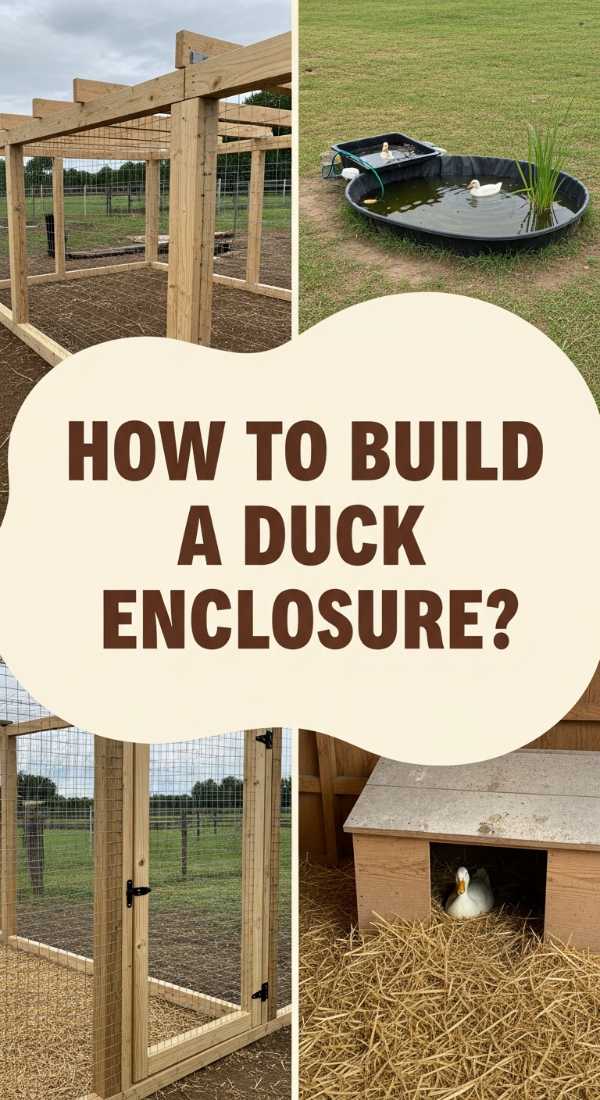
How to Build a Duck Enclosure for a Happy Backyard Flock
Why we love this
Ducks bring a whimsical, lively energy to a backyard that chickens just can’t match, and a well-designed enclosure makes their care a joy rather than a chore. We love the sight of happy ducks splashing in clear water, their feathers shimmering under the sun, and the rustic-chic look of a coop that blends into the landscape. This project creates a sanctuary that smells of fresh pine shavings and clean water, offering a peaceful retreat for both you and your feathered friends at the end of a long day.
Essential Elements:
- Pressure-treated lumber for the frame
- Hardware cloth (1/2 inch gauge for predator protection)
- Corrugated roofing panels
- A pre-formed pond or heavy-duty tub
- Leveling sand and straw bedding
How to make it
- Level the ground where the enclosure will sit, laying down a thin layer of sand to prevent mud buildup which can lead to foot infections in ducks.
- Construct the main frame using 2×4 lumber, ensuring the height is at least four feet to allow for easy cleaning access and plenty of airflow.
- Attach hardware cloth to the frame using heavy-duty staples or screws with washers, burying the mesh at least six inches into the ground to deter burrowing predators.
- Install the corrugated roofing at a slight pitch to ensure rainwater runoff is directed away from the sleeping area and the pond.
- Excavate a shallow hole for your pond insert, ensuring it is level and easy to drain; ducks require daily water changes to keep their environment sanitary.
- Finish the interior with a thick layer of straw and add a ramp with grip slats to help the ducks enter and exit their nesting box safely.
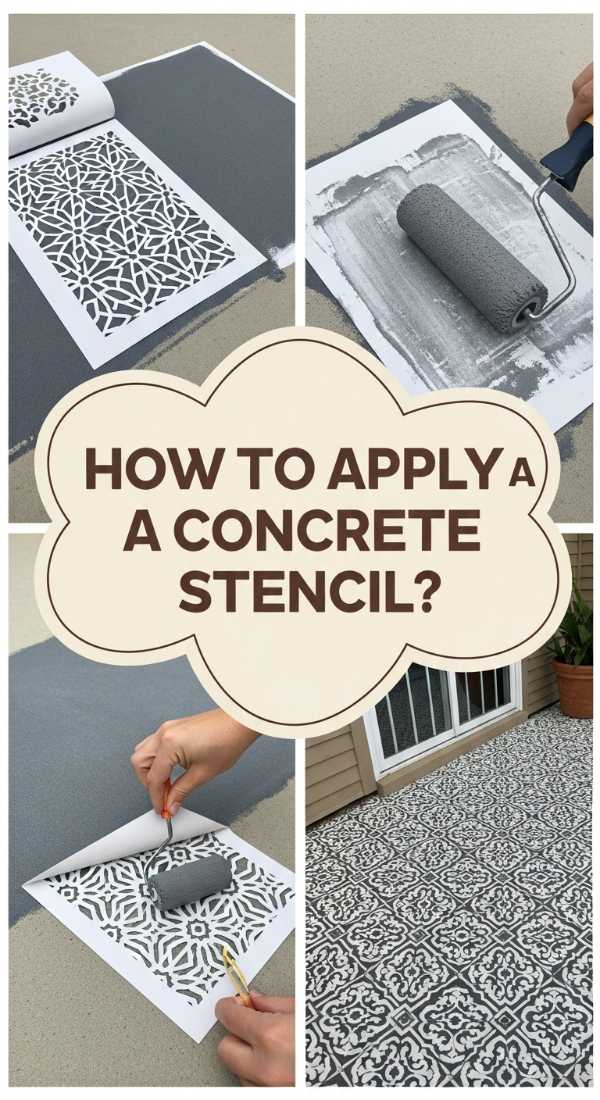
How to Apply a Concrete Stencil for a Designer Patio Finish
Why we love this
There is nothing quite as satisfying as turning a dull, gray concrete slab into a high-end patterned patio that looks like expensive tile. We love the way a Moroccan or geometric stencil adds an architectural ‘rug’ to your outdoor space, defining the seating area and making everything feel more intentional. The smooth, cool finish underfoot and the way the pattern catches the shifting shadows of nearby trees creates an enchanting atmosphere for alfresco dining and summer evening cocktails.
Essential Elements:
- Large-scale floor stencil
- Concrete-specific porch and patio paint
- High-density foam rollers
- Painter’s tape and stencil adhesive spray
- Concrete sealer (satin or gloss finish)
How to make it
- Clean the concrete thoroughly with a degreaser and a stiff brush, then let it dry for at least 24 hours to ensure the paint adheres to the porous surface.
- Apply two base coats of your primary color using a long-handled roller, allowing at least four hours of drying time between coats.
- Lightly coat the back of your stencil with adhesive spray, let it become tacky for a minute, then press it firmly onto the center of your patio.
- Load your foam roller with a small amount of the accent color and ‘off-load’ most of it onto a paper towel; the secret to no bleeding is a very dry roller.
- Apply the paint in light, thin layers rather than one heavy coat, checking for crisp edges before moving the stencil to the next section.
- Once the entire pattern is dry, apply two coats of high-quality concrete sealer to protect the design from UV rays and foot traffic.
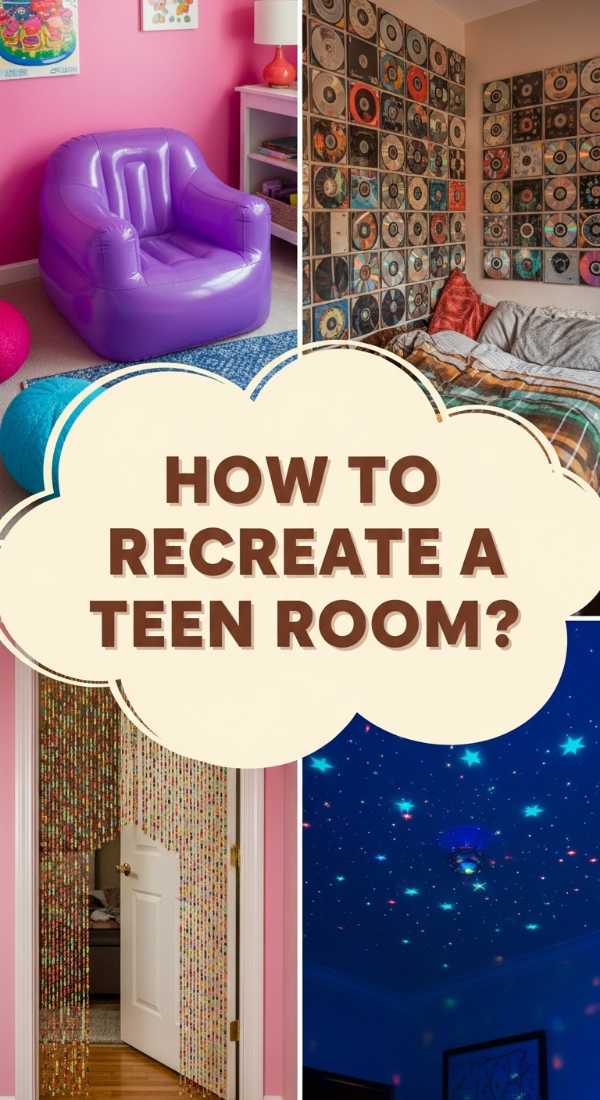
How to Recreate a Nostalgic Teen Room for the Ultimate Retro Vibe

Why we love this
Stepping into a retro-inspired room is like an instant hit of dopamine—it’s all about comfort, color, and a touch of teenage rebellion. We love the tactile mix of faux-fur rugs, velvet pillows, and the soft, rhythmic bubbling of a lava lamp that creates a cozy cocoon. It’s a space that celebrates personality over perfection, filled with the visual rhythm of vintage posters and the warm, analog sound of a spinning record, making it the ultimate sanctuary for relaxation.
Essential Elements:
- Retro color palette (mustard yellow, teal, and burnt orange)
- LED neon signs or lava lamps
- Washi tape for ‘damage-free’ poster walls
- Macramé plant hangers
- Thrifted vintage furniture or bean bag chairs
How to make it
- Start with a neutral base on the walls but choose one ‘accent’ wall to fill entirely with vintage magazine clippings, vinyl covers, or retro-style prints using washi tape.
- Layer your lighting by adding a warm-toned LED strip behind the bed frame and placing a lava lamp or neon sign on a desk to create a moody, multi-dimensional glow.
- Integrate texture by placing a shag rug in the center of the room and layering the bed with various knit throws and velvet cushions.
- Incorporate ‘living’ elements like pothos or spider plants in macramé hangers to bring a 70s earthy vibe that cleans the air and adds movement.
- Arrange a dedicated ‘tech-free’ zone with a record player or a stack of board games to encourage a slower, more nostalgic pace of life.
- Organize small trinkets and collectibles on floating shelves, grouping them by color to keep the retro clutter feeling curated rather than chaotic.
How to Achieve Pantry Organization for a Stress Free Kitchen
Why we love this
An organized pantry is the ultimate form of self-care for the home cook; it turns a chaotic search for ingredients into a streamlined, peaceful experience. We love the visual harmony of uniform glass jars filled with colorful grains, the clean scent of cedar liners, and the crisp click of airtight lids. There is a profound sense of calm that comes from knowing exactly what you have on hand, which not only saves money but makes the act of preparing a meal feel like a creative joy rather than a chore.
Essential Elements:
- Airtight glass or BPA-free plastic canisters
- Customizable labels (chalkboard or vinyl)
- Tiered ‘stadium’ shelving for cans
- Woven baskets for bulky items
- Lazy Susans for oils and vinegars
How to make it
- Empty the entire pantry and wipe down every shelf with a mild vinegar solution to remove dust and crumbs, creating a fresh, hygienic environment.
- Group your items into categories—baking, snacks, pasta, breakfast—so you can measure exactly how much space each category requires.
- Decant dry goods like flour, sugar, and cereal into airtight containers, which preserves freshness and eliminates the visual clutter of branded packaging.
- Install tiered shelves on higher levels to ensure that every can is visible, preventing you from buying duplicates of items you already own.
- Use Lazy Susans in the corners or on deep shelves to make bottles of oils and sauces easily accessible with a quick spin.
- Apply uniform labels at the same height on every jar to create a professional, high-end look that makes it easy for the whole family to maintain the system.
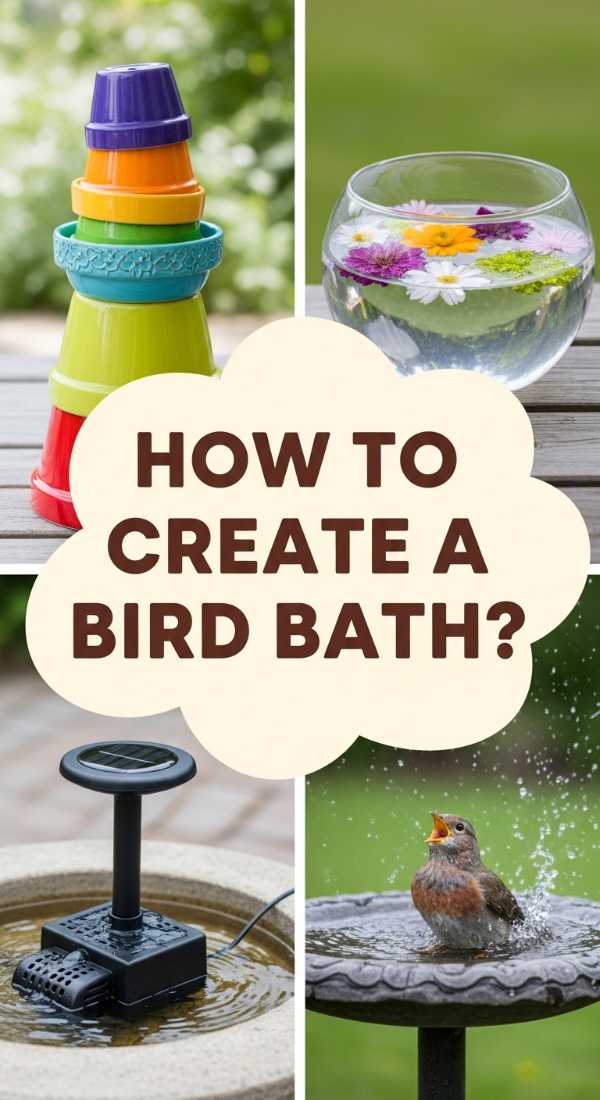
How to Create a Bird Bath for an Enchanted Garden Space

Why we love this
Adding a bird bath to your garden is like installing a piece of living art that invites the music of nature right to your window. We love the sight of sparkling water catching the afternoon sun and the gentle, rhythmic sound of wings fluttering in a cool pool. It adds a sense of verticality to your flower beds and creates a focal point that feels both classic and magical, turning a simple patch of dirt into a sanctuary for local wildlife.
Essential Elements:
- A shallow basin (terracotta, stone, or glass)
- A sturdy pedestal or stacked stones
- Solar-powered fountain pump
- River stones for perching
- Algaecide (bird-safe) or white vinegar
How to make it
- Choose a location that is visible from your house but offers nearby ‘escape cover’ for birds, like a shrub or a small tree.
- Level the ground and place your pedestal or stack flat fieldstones to a height of about two to three feet, ensuring the base is completely stable.
- Place your basin on top; it should be no more than two inches deep at the center, as birds are hesitant to bathe in deep water.
- Add a few larger river stones that break the surface of the water to give smaller birds a safe place to land and drink without getting fully submerged.
- Install a small solar-powered fountain in the center; the moving water prevents mosquitoes from breeding and the sound is highly effective at attracting birds.
- Commit to a cleaning schedule: scrub the bath twice a week with a mixture of one part vinegar to nine parts water to keep the environment healthy and sparkling.
How to Style Mud Kitchen Accessories for Creative Outdoor Play

Why we love this
A mud kitchen is a gateway to the best kind of childhood memories—the messy, imaginative, sun-soaked kind. We love the rustic charm of weathered wood paired with gleaming stainless steel pots and the earthy, rich aroma of damp garden soil mixed with crushed herbs. It’s a sensory playground that looks beautiful in your backyard, replacing bright plastic toys with natural materials that encourage kids to engage deeply with the environment around them.
Essential Elements:
- Upcycled wooden pallet or potting bench
- Old stainless steel bowls, whisks, and spoons
- A functional ‘tap’ (a water jug with a spigot)
- Storage hooks and small crates
- Natural ‘ingredients’ (pinecones, petals, pebbles)
How to make it
- Sand your wooden base thoroughly to ensure there are no splinters, then apply a non-toxic outdoor sealer to protect the wood from the elements.
- Mount a piece of pegboard or a row of hooks to the back of the station to keep utensils organized and within reach of little hands.
- Install a large, shallow bowl as a ‘sink’ by cutting a hole in the countertop or simply placing it in a designated cutout.
- Place a large water dispenser with a child-friendly spigot at one end of the bench to allow for independent water access during play.
- Style the area with small wooden crates filled with ‘nature treasures’ like smooth stones, dried lavender, and acorns to act as play ingredients.
- Keep the accessories curated: stick to a palette of wood, metal, and stone to ensure the play area looks like a chic garden feature rather than a toy dump.
How to Arrange Glass Yard Art for a Sparkling Garden Display

Why we love this
Glass art adds a layer of sophisticated shimmer to a garden, acting like jewelry for your landscape. We love the way hand-blown globes or recycled glass totems catch the light, casting dancing prisms of color across your lawn as the sun moves. The smooth, cool texture of the glass contrasts beautifully with the organic roughness of bark and leaf, creating a curated, gallery-like feel that stays vibrant even in the depths of winter when the flowers have faded.
Essential Elements:
- Glass garden stakes or ‘totems’
- Copper or rebar rods for mounting
- UV-resistant glass adhesive (if DIYing totems)
- Recycled glass bottles or vases
- Strategically placed spotlights
How to make it
- If making your own totems, source vintage glassware from thrift stores and stack them to find a silhouette that is visually balanced.
- Clean the glass surfaces with rubbing alcohol to remove oils, then use a clear, heavy-duty glass adhesive to bond the pieces together; allow to cure for 48 hours.
- Drive a copper or rebar rod into the ground at least 12 inches deep to provide a secure anchor for your glass art.
- Position your art in ‘pocket’ gardens or near the edges of pathways where they won’t be hidden by tall summer growth.
- Group pieces in odd numbers (threes or fives) at varying heights to create a more natural, rhythmic flow through the garden bed.
- Angle a low-voltage outdoor spotlight toward the glass to ensure your garden continues to sparkle with ethereal color long after the sun goes down.
How to Plan a Backyard Layout for the Perfect Entertaining Space
[IMAGE_10]
Why we love this
A well-planned backyard is more than just a patio; it’s an extension of your home’s living room where the boundaries between indoors and out disappear. We love the flow of a space that has ‘rooms’ for different moods—a cozy fire pit for intimate chats, a sun-drenched table for loud family lunches, and a quiet corner for morning coffee. It’s the ultimate lifestyle upgrade, scented by jasmine and woodsmoke, designed to make every weekend feel like a luxury getaway in your own zip code.
Essential Elements:
- Outdoor rugs to define ‘zones’
- String lights (Edison bulbs)
- A mix of soft seating and dining furniture
- Large planters for privacy screening
- A focal point (fire pit or water feature)
How to make it
- Sketch your yard to scale and identify the ‘traffic patterns’—leave clear paths from the door to the primary seating areas to avoid a cramped feel.
- Create ‘zones’ by placing outdoor rugs; use a large one for the dining table and a smaller, plush one for the lounge area to visually separate the functions.
- Install a focal point, such as a stone fire pit, at the furthest point of the layout to draw guests into the yard and make the space feel larger.
- Use tall planters filled with clumping bamboo or tall grasses to create ‘living walls’ that provide privacy from neighbors and dampen street noise.
- Hang string lights in a ‘zig-zag’ pattern above the main entertaining zone, ensuring the lowest point is at least eight feet high to keep the space feeling open.
- Layer your lighting with solar path lights and candles on tables to create a warm, inviting glow that mimics the cozy ambiance of an indoor living room.
The Final Word on DIY Elegance
Transforming your home doesn’t require a miracle—it just requires a Saturday and a vision. Whether you’re refreshing your pantry or building a sanctuary for your garden birds, these projects prove that high-end style is truly about the care and creativity you pour into your surroundings. Happy DIYing!