
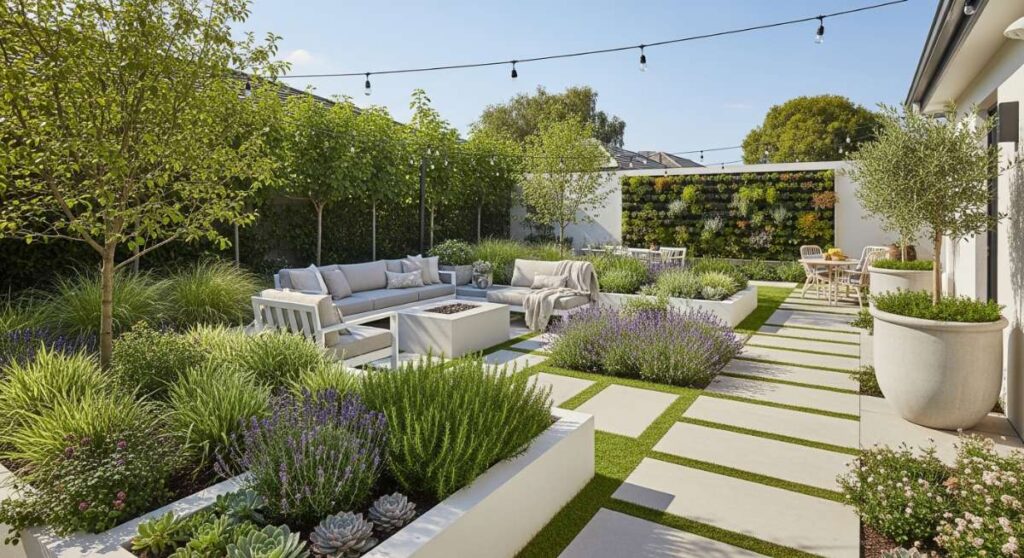
Have you ever spent a rainy afternoon scrolling through Pinterest, sighing over those perfectly curated backyards that look more like a boutique resort than a suburban patch of grass? I used to do the exact same thing, clutching my lukewarm coffee and staring out at my own chaotic tangle of weeds and mismatched patio chairs. There is a specific kind of magic in a well-designed garden—it’s the way the sunlight catches the dew on a petal or the grounding scent of damp earth and cedar that makes you feel instantly at peace.
The truth is, those viral outdoor aesthetics aren’t reserved for the rich or the professional landscapers. Achieving that ‘Pinterest-perfect’ look is all about intentionality, texture, and a few clever design hacks that bridge the gap between nature and architecture. Today, I’m sharing the ultimate guide to transforming your backyard into a sanctuary that feels lush, modern, and uniquely yours. Let’s roll up our sleeves and turn those garden goals into your daily reality.
How to Arrange Flower Bed Ideas for Instant Curb Appeal
Why we love this
There is nothing quite like the sensory explosion of a well-arranged flower bed to greet you after a long day. Imagine the intoxicating scent of lavender wafting through the air as you pull into your driveway, paired with the visual delight of varying heights and soft, velvety textures. A thoughtfully curated bed adds a layer of sophisticated charm that makes even the simplest home feel like a storybook cottage. It’s about creating a living tapestry that dances in the breeze, offering a vibrant welcome to both you and your neighbors.
Essential Elements:
- Layered perennials (tall Delphiniums, mid-height Salvia, low-growth Creeping Thyme)
- Organic mulch for a clean finish
- Natural stone edging
- Statement focal point (like a birdbath or a large ornamental grass)
- Pollinator-friendly blooms
How to make it
- Begin by sketching a ‘wave’ pattern for your bed rather than a straight line; organic curves create a softer, more professional look.
- Prepare the soil by tilling to a depth of 12 inches and mixing in organic compost until the texture is crumbly and rich in nutrients.
- Place your tallest plants at the back (or center if the bed is visible from all sides), ensuring they have enough space to reach their full maturity without overcrowding.
- Nestle mid-sized ‘fillers’ in front of the tall plants, staggering them so there are no visible gaps; look for foliage that offers color even when the flowers aren’t in bloom.
- Finish with ‘spillers’ or groundcover along the very edge, then apply a 2-inch layer of dark mulch, being careful not to touch the stems of the plants directly to prevent rot.
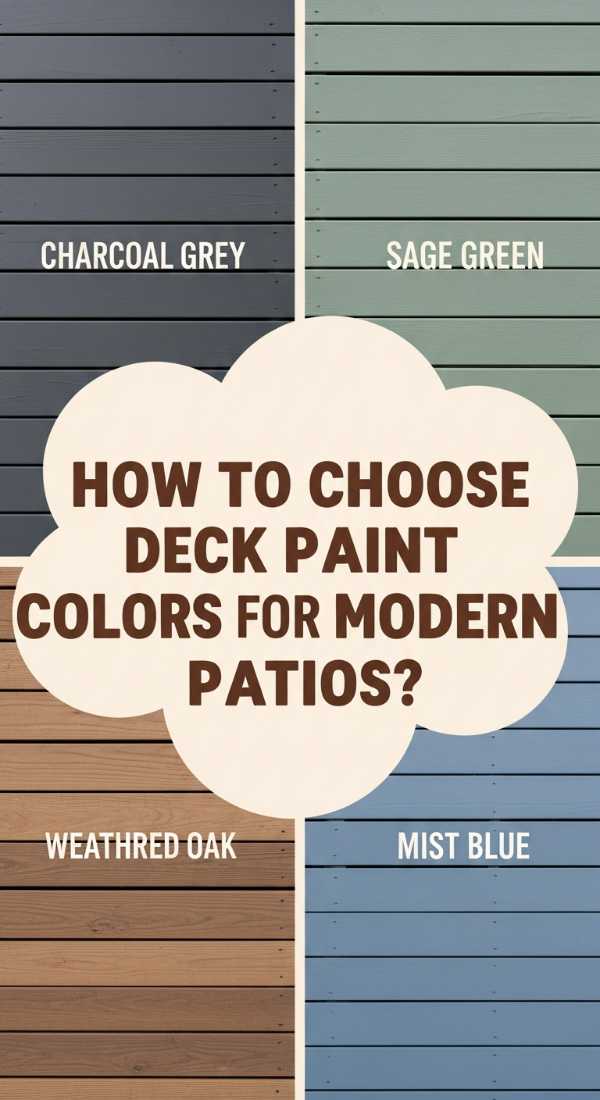
How to Select Deck Paint Colors for a Modern Backyard

Why we love this
The right deck paint acts as the ultimate anchor for your entire outdoor living room, setting a mood that can range from edgy and industrial to soft and ethereal. A modern palette transforms weathered wood into a sleek, intentional surface that feels cool underfoot and looks incredible in photos. We love how a fresh coat of high-quality pigment can mask imperfections while providing a crisp backdrop for your colorful outdoor rugs and sculptural furniture, making the whole space feel brand new and expensive.
Essential Elements:
- High-solids acrylic deck stain or paint
- Sandpaper (80-100 grit)
- Power washer
- Painter’s tape and heavy-duty rollers
- Anti-slip additive
How to make it
- Inspect the wood for any rot or loose boards; secure or replace them before cleaning the entire surface with a power washer on a medium setting to strip away old debris.
- Once completely dry (usually 48 hours), sand the surface lightly to open the wood grain, which allows the paint to ‘bite’ into the fibers for a longer-lasting finish.
- Select a color with cool undertones, like charcoal grey or a deep navy, which hides dirt and provides a striking contrast against green foliage.
- Apply the first coat using a long-handle roller for the main boards and a brush for the cracks; work in the direction of the grain, maintaining a ‘wet edge’ to avoid lap marks.
- Wait for the specific dry time mentioned on the can (usually 4-6 hours) before applying a second coat for full opacity and maximum weather protection.
How to Style Brown Rentry Dividers for Organic Textures

Why we love this
Incorporating brown entry dividers—especially those made of natural wood or woven rattan—adds an immediate sense of warmth and ‘hygge’ to your garden. These pieces act as functional art, breaking up large spaces into intimate ‘rooms’ while introducing beautiful vertical lines and earthy tones. The way the golden-brown hues of the wood glow during the golden hour is simply breathtaking, providing a textured contrast to the green leaves and soft petals of your surrounding plants.
Essential Elements:
- Folding or stationary wooden lattice panels
- Zip ties or heavy-duty anchors
- Climbing vines (like Clematis or Jasmine)
- Weather-resistant wood sealant
- Solar-powered fairy lights
How to make it
- Choose a divider with a warm walnut or cedar finish that complements your existing outdoor furniture to ensure a cohesive aesthetic.
- Position the dividers to create a ‘foyer’ effect for your garden, blocking out unsightly views like trash cans or AC units.
- Secure the panels firmly to the ground or existing structures using brackets; ensure they are plumb and level to maintain that high-end, professional look.
- Weave climbing plants through the slats of the divider to soften the hard edges and integrate the piece into the natural environment.
- Drape warm-toned LED string lights across the top of the divider to highlight the wood texture and provide a cozy ambiance during evening gatherings.
How to Use Rentry Dividers Blue for a Coastal Sanctuary
Why we love this
There is something inherently calming about the color blue, and using blue dividers in your backyard immediately evokes the serene, breezy feeling of a seaside retreat. Whether it’s a soft seafoam or a deep Mediterranean cobalt, these dividers act as a refreshing visual pop that mimics the horizon line where the ocean meets the sky. It’s the perfect way to inject a vacation vibe into your daily life, creating a sanctuary that feels cool, crisp, and revitalizing even on the hottest summer afternoons.
Essential Elements:
- Blue-stained or painted privacy screens
- Whitewashed planters
- Sandy-colored outdoor rugs
- Ornamental grasses (like Blue Fescue)
- Nautical hardware accents
How to make it
- Select a shade of blue that reflects your desired vibe: pale sky blue for a cottage feel or deep navy for a more sophisticated, modern coastal look.
- Place the dividers in a zigzag pattern to create a windbreak and a sense of movement, much like sails on a boat.
- Coordinate the divider color with accessories like turquoise outdoor pillows or glass lanterns to tie the ‘coastal’ theme together throughout the space.
- Ensure the paint is UV-resistant, as blue pigments tend to fade faster in direct sunlight; apply a clear topcoat for extra durability.
- Pair the dividers with white flowering plants (like white hydrangeas) to make the blue color truly stand out and maintain that clean, airy aesthetic.
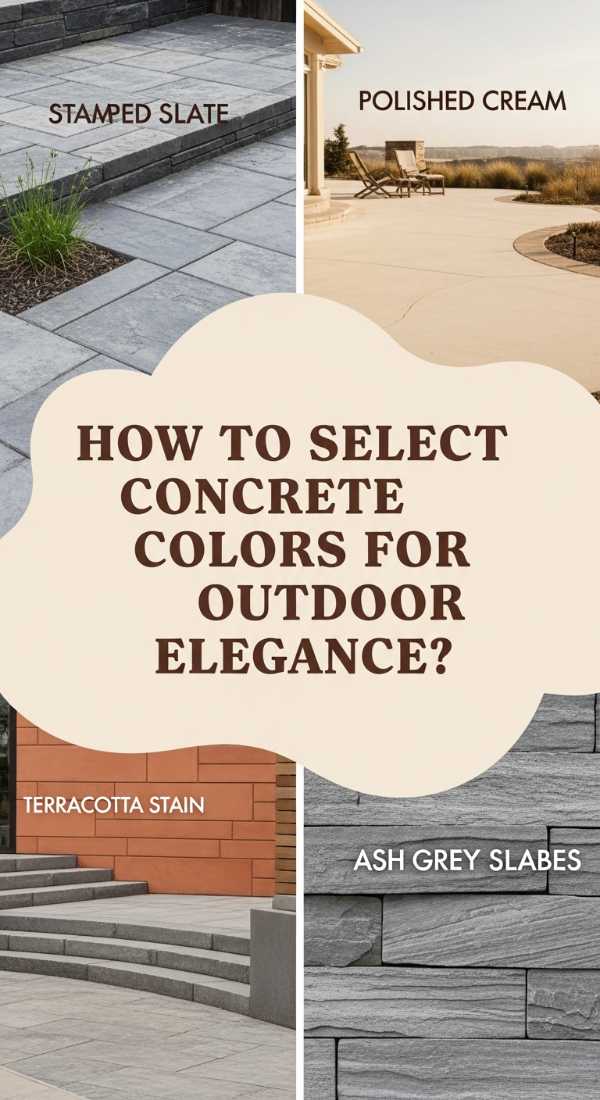
How to Choose Concrete Colors Outdoor for a Sophisticated Patio

Why we love this
Gone are the days of boring, institutional grey slabs; modern outdoor concrete is a design powerhouse that can be customized to look like natural stone or polished marble. A sophisticated concrete color choice—like a warm ‘Sandstone’ or a moody ‘Slate’—provides a seamless, high-end foundation that grounds your entire backyard design. We love the tactile, smooth finish and the way a custom-colored patio reflects light, making small spaces feel larger and more intentional.
Essential Elements:
- Integral color pigments or reactive acid stains
- High-gloss or matte concrete sealer
- Reinforcement mesh
- Consistency in batch mixing
- Bull float and edging tools
How to make it
- Decide between integral color (mixed into the wet concrete) for a consistent hue throughout, or acid staining for a mottled, stone-like variegated appearance.
- Prepare your site with a 4-inch base of compacted gravel to prevent shifting and cracking, which would ruin the high-end look of the colored surface.
- When mixing, use precise measurements for the pigment-to-concrete ratio to ensure every batch matches perfectly, avoiding unsightly color blocks.
- Pour and level the concrete, using a bull float to bring the ‘cream’ to the top; this layer is what holds the most color and provides that smooth, professional finish.
- After the concrete has cured for 28 days, apply two coats of a solvent-based sealer to deepen the color and protect it from grease stains and UV fading.
How to Create an Island Theme for a Tropical Escape

Why we love this
An island-themed garden is the ultimate form of escapism, turning your backyard into a lush, private jungle that feels worlds away from the daily grind. We are obsessed with the oversized, waxy leaves of tropical plants and the way they filter the sunlight into a soft, dappled glow. The combination of deep greens, vibrant exotic blooms, and natural bamboo textures creates an immersive environment that stimulates all the senses, making every weekend feel like a luxury getaway to the South Pacific.
Essential Elements:
- Large-leaf plants (Banana trees, Canna lilies, Elephant ears)
- Bamboo fencing or accents
- Tiki torches or brass lanterns
- A water feature (like a simple bubbling rock)
- Vibrant pops of color (Hibiscus or Birds of Paradise)
How to make it
- Start by ‘zoning’ your space to include a central seating area surrounded by dense, tall foliage to create a sense of being ‘enclosed’ in a jungle.
- Improve soil drainage by adding perlite or sand, as tropical plants love moisture but hate ‘wet feet’ or stagnant water around their roots.
- Install a bamboo screen against existing fences to instantly hide suburban architecture and provide a textured, organic backdrop.
- Layer your lighting with low-voltage spotlights pointing upward into the palm fronds, creating dramatic shadows that add to the tropical mystery at night.
- Incorporate a small water element; the sound of trickling water is essential for masking neighborhood noise and reinforcing the island atmosphere.
How to Incorporate a Red Rentry Divider for a Bold Statement
Why we love this
Red is a power color, and using it in a garden setting is a bold, designer-level move that commands attention. A red entry divider serves as a stunning focal point, drawing the eye through the landscape and providing a high-contrast background for deep green foliage. We love the energy and warmth it brings to a space—it feels modern, artistic, and incredibly confident. It’s the perfect way to break up a monochromatic green garden with a splash of fiery personality.
Essential Elements:
- Barn red or crimson outdoor paint
- Sleek, minimalist divider panels
- Dark-foliaged plants (like ‘Black Lace’ Elderberry)
- Modern black hardware
- Minimalist furniture
How to make it
- Choose a red with slightly blue undertones for a modern look, or a brick-red for a more traditional, rustic feel.
- Position the red divider at the end of a path or ‘vista’ to act as a destination point that pulls visitors through the garden.
- Paint only the divider this bold color; keeping the surrounding elements (like pots and furniture) in neutral blacks, whites, or greys allows the red to pop without being overwhelming.
- Apply the paint using a HVLP (High Volume Low Pressure) sprayer for a flawless, automotive-style finish that looks incredibly sleek.
- Pair the divider with plants that have white or lime-green flowers to create a sophisticated color palette that feels intentional and curated.
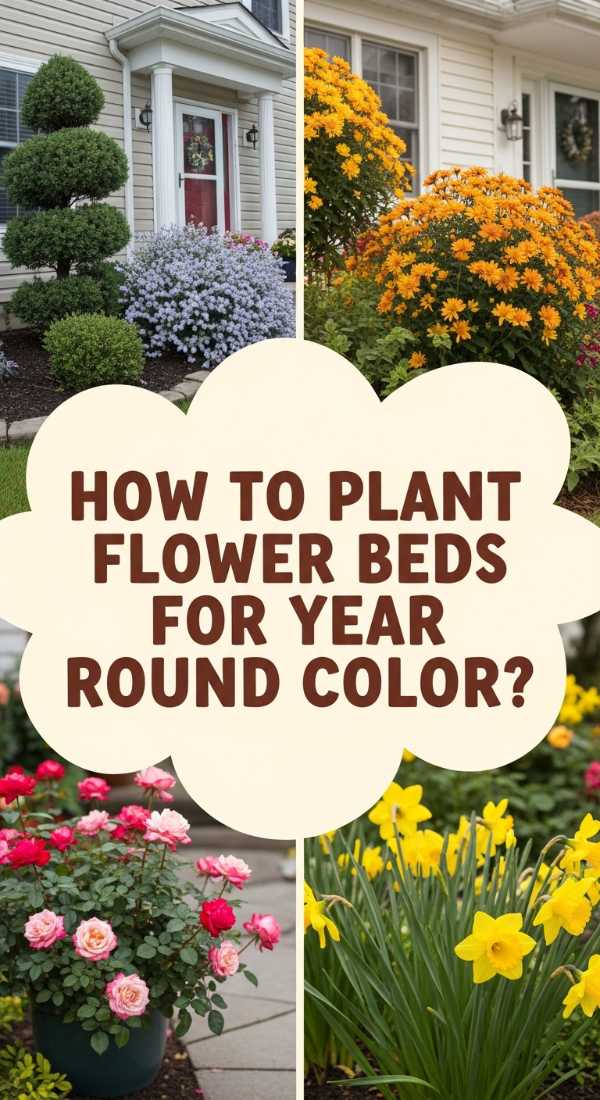
How to Plant Flower Bed Ideas for Year Round Beauty

Why we love this
The hallmark of a professional garden is that it never looks ‘dead,’ even in the depths of winter. Creating a year-round flower bed is like composing a symphony where different instruments take the lead at different times. We love the anticipation of the first snowdrops in late winter, the riot of color in summer, and the structural beauty of dried seed heads and evergreens against a frosty landscape. It’s a garden that evolves with you, offering beauty and interest through every single season.
Essential Elements:
- Evergreen shrubs for ‘bones’ (Boxwood, Yew, or Holly)
- Seasonal bulbs (Tulips for spring, Alliums for summer)
- Autumn-interest plants (Sedum, Ornamental grasses)
- Winter berries or interesting bark (Red-twig Dogwood)
- Succession planting plan
How to make it
- Map out your bed on a calendar, ensuring that at least 30% of your plants are ‘evergreen’ to provide structure when everything else goes dormant.
- Plant bulbs in clusters of 10 or more rather than single lines; this creates a ‘viral-worthy’ drift of color that looks much more natural and impactful.
- Incorporate ‘Chelsea Chop’ techniques in late May—cutting back certain perennials by half to delay their blooming and ensure the garden stays colorful later into the fall.
- Leave ornamental grasses standing throughout the winter; their tan plumes provide movement and texture when the ground is covered in snow.
- Use mulch religiously to protect roots from temperature swings and to keep the bed looking tidy even when the plants are in their ‘quiet’ phase.
How to Mix Concrete Colors Outdoor for a Custom Pathway
Why we love this
A custom-colored concrete pathway is like a permanent ‘red carpet’ for your backyard. It guides the journey through your garden with a sense of purpose and style. By mixing your own custom colors, you can perfectly match the stone on your house or the palette of your favorite blooms. We love the artisan feel of a hand-poured path, especially when the color is subtly swirled or textured to look like aged Mediterranean tile or weathered slate.
Essential Elements:
- Dry-shake color hardener or liquid integral dye
- Stepping stone molds or wood forms
- Trowel and texture mats
- Concrete mixing tub or electric mixer
- UV-stable pigment
How to make it
- Calculate the volume of concrete needed for your path and pre-measure your pigment; consistency is key to avoiding a ‘patchwork’ look.
- Mix the concrete to a ‘peanut butter’ consistency—too wet and the pigment will wash out, too dry and it won’t take the texture of your molds or stamps.
- For a custom marbled effect, mix two slightly different shades of the same color family and lightly fold them together just before pouring; do not over-mix.
- Once poured into the forms, use a magnesium float to smooth the surface, then wait for the ‘bleed water’ to disappear before applying any texture or stamping.
- Edge the path with a specialized edging tool to create a rounded, professional ‘lip’ that prevents chipping and makes the pathway look like it was installed by a pro.
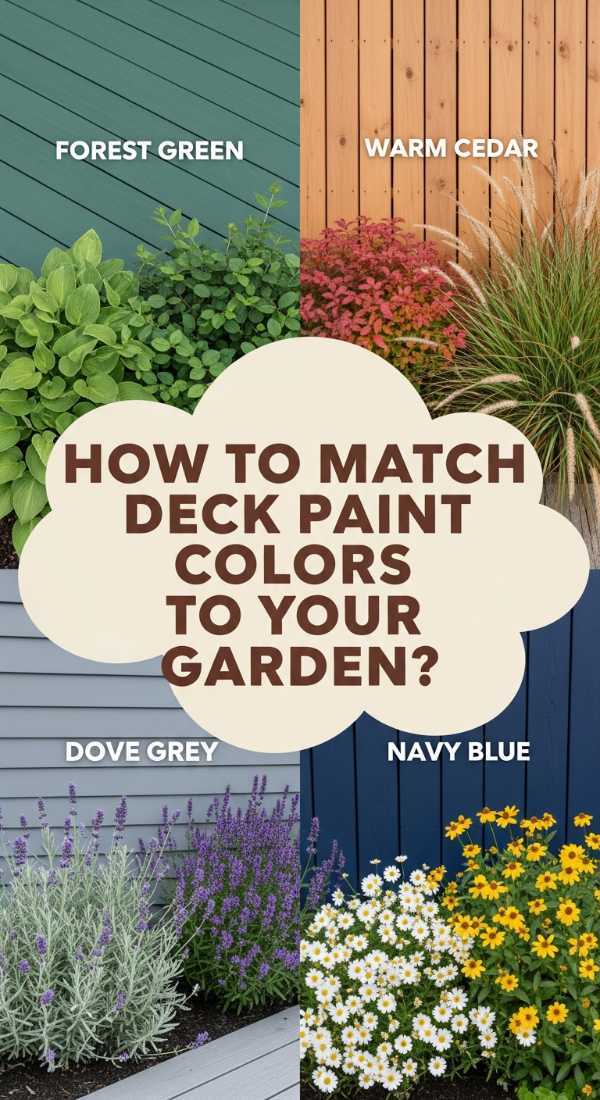
How to Coordinate Deck Paint Colors with Your Garden
[IMAGE_10]
Why we love this
Coordination is the secret sauce that makes a backyard look ‘designed’ rather than ‘decorated.’ When your deck color speaks to the tones in your garden—perhaps a sage green that mirrors your succulents or a warm taupe that matches your stone walls—it creates a seamless flow between the built environment and the natural one. We love how this harmony makes the deck feel like an organic extension of the earth, blurring the lines between indoors and out for a truly tranquil experience.
Essential Elements:
- Color wheel for harmony (analogous or complementary)
- Paint samples (test on wood scraps first)
- Knowledge of your garden’s ‘dominant’ color
- Matching outdoor textiles
- High-quality deck stain or enamel
How to make it
- Identify the ‘hero’ plant or feature in your garden; if you have a lot of purple lavender, a deck with slightly yellow-tan undertones will provide a stunning complementary contrast.
- Paint large test patches on different areas of the deck and observe them at morning, noon, and sunset, as the shifting light will dramatically change how the color interacts with the plants.
- Consider the ‘temperature’ of your garden; cool-toned gardens (blues/whites) pair beautifully with grey or ‘driftwood’ decks, while warm-toned gardens (reds/yellows) look best with rich browns or terracottas.
- Don’t forget the vertical surfaces—painting the deck railings a slightly darker shade than the floor can frame your garden view like a piece of art.
- Once the deck is painted, pull that color into the garden using matching planters or ceramic garden stools to create a cohesive, ‘viral’ aesthetic that ties everything together.
Conclusion
Transforming your backyard into a Pinterest-worthy sanctuary doesn’t happen overnight, but by focusing on these intentional design elements—from the perfect deck hue to the structural beauty of a well-planned flower bed—you can create a space that feels like a true reflection of your style. Remember, the best gardens are those that are lived in and loved. So, pick one project, grab your gardening gloves, and start building the outdoor escape of your dreams. Your future sunset-watching self will thank you!