

Have you ever found yourself scrolling through TikTok at 2 AM, mesmerized by a home transformation that looks like it belongs in a high-end magazine? We’ve all been there—lost in the rhythmic ‘tap-tap’ of a DIYer hanging the perfect gallery wall or the satisfying reveal of a backyard oasis. There’s something so deeply comforting about curating a space that reflects your soul, a place where the light hits the walls just right and every corner tells a story of comfort and style.
Today, I’m taking those viral trends off your screen and bringing them directly into your living room (and patio, and bedroom!). Whether you are a seasoned decorator or someone who just bought their first set of command strips, these ideas are designed to be approachable yet breathtaking. Let’s dive into the art of the ‘aesthetic’ home together, transforming those blank vertical spaces into masterpieces that will have your guests asking for your interior designer’s number.
How to Elevate Outdoor Wall Decor for a Serene Garden Retreat
Why we love this
There is a profound sense of tranquility that comes from blending the structural elements of your home with the wild, untamed beauty of a garden. We love this trend because it utilizes vertical space to create a ‘living wall’ effect that feels both lush and architectural. Imagine the scent of star jasmine climbing a cedar trellis, the cool touch of weathered stone, and the sight of delicate ironwork casting intricate shadows across your patio as the afternoon sun wanes. It turns a simple backyard into a multisensory sanctuary where you can truly breathe.
Essential Elements:
- Weather-resistant cedar or bamboo trellises
- Floating metal planters for succulents
- Solar-powered warm-glow sconces
- Wrought iron wall art or medallions
- Climbing vines like Clematis or Ivy
How to make it
- Assess the light exposure of your chosen outdoor wall to ensure your climbing plants will thrive; South-facing walls are perfect for sun-lovers, while North-facing walls suit ferns and ivy.
- Install your heavy-duty mounting hardware, ensuring you use masonry anchors if drilling into brick or stone to prevent the weight of wet soil from pulling the decor down.
- Mount the trellis or vertical planter grid, leaving a 2-inch gap between the wall and the structure to allow for air circulation, which prevents mold and helps the plants grip the surface.
- Plant your greenery in lightweight, well-draining pots and secure them to the wall structure starting from the bottom and working your way up for a balanced look.
- Finish by weaving waterproof fairy lights or installing solar sconces at eye level to create a soft, inviting ambiance for evening relaxation.
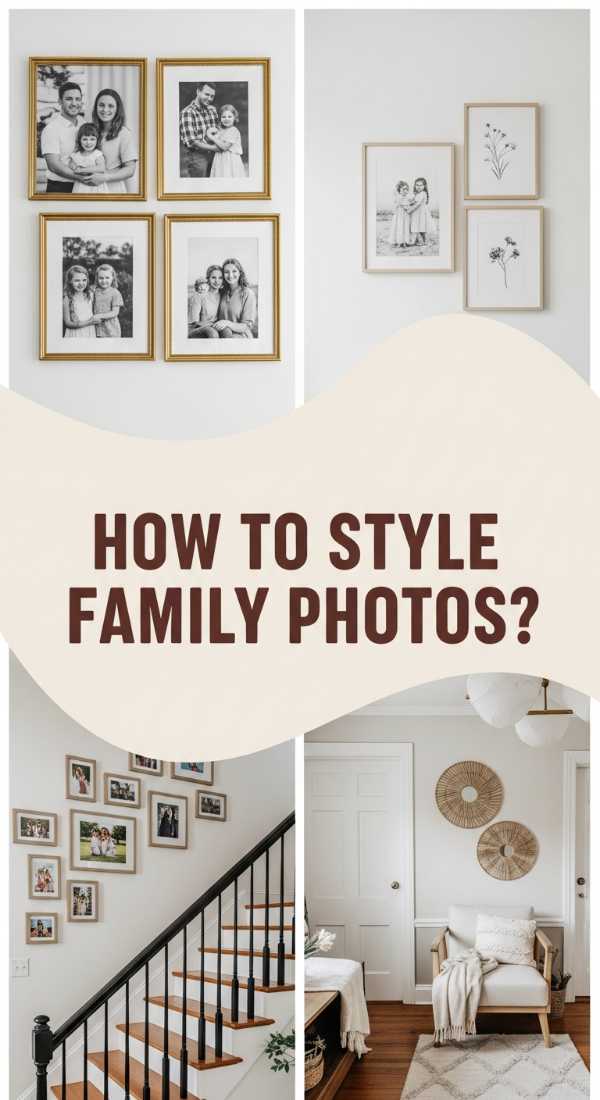
How to Arrange Family Photos Wall Decor for a Heartwarming Home Gallery
Why we love this
A home gallery is more than just decor; it’s a visual heartbeat of your most cherished memories, frozen in time and displayed with intention. We love the way a well-arranged photo wall can instantly make a room feel warm, personal, and grounded. The mix of smooth glass, textured wooden frames, and the nostalgic grain of black-and-white photography creates a sophisticated yet cozy focal point that invites guests to linger and share in your family’s journey, making every glance up from the sofa a small moment of joy.
Essential Elements:
- A mix of frame sizes (8×10, 5×7, and 11×14)
- Uniform frame colors or a curated mix of wood and metal
- Acid-free photo mats for a professional look
- A leveling tool and painter’s tape
- Printed high-resolution photographs
How to make it
- Select your photos and decide on a color story; for a modern viral look, convert all images to black and white or sepia to create a cohesive, timeless aesthetic regardless of when the photos were taken.
- Lay all your framed photos out on the floor in front of the wall you intend to use to experiment with the arrangement without making unnecessary holes in the drywall.
- Start with your largest ‘anchor’ piece in the center or slightly off-center and build the smaller frames around it, maintaining a consistent 2-to-3-inch gap between each frame for a clean, professional grid.
- Trace each frame onto kraft paper, cut out the shapes, and tape them to the wall using painter’s tape to visualize the final layout and adjust heights to eye level (typically 57-60 inches from the floor).
- Drive your nails or hooks directly through the paper templates, then tear the paper away and hang your frames, using a spirit level to ensure every piece is perfectly straight.
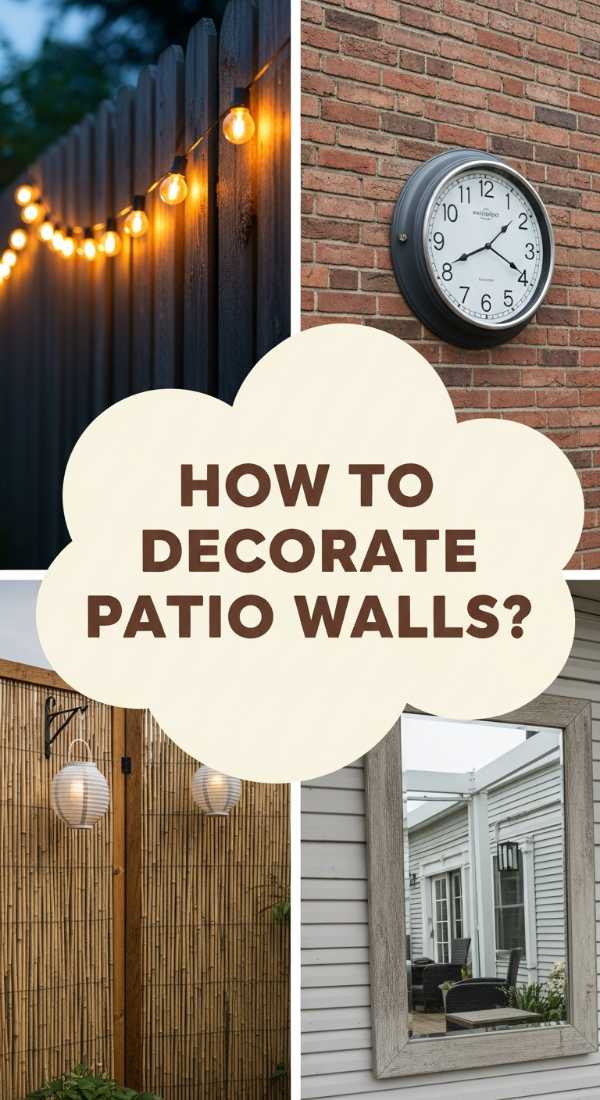
How to Style Patio Wall Decor Outdoor for the Ultimate Summer Sanctuary
Why we love this
Transforming a plain patio wall into a summer sanctuary is all about creating an ‘outdoor living room’ that feels just as curated as your interior. We are obsessed with the use of oversized woven baskets and weather-proof tapestries that add softness to the rugged textures of the outdoors. The sound of the wind catching a decorative chime and the visual warmth of wicker against a sunset-painted sky creates an atmosphere of permanent vacation, making every weekend feel like a getaway in your own backyard.
Essential Elements:
- Set of varied seagrass or wicker baskets
- Outdoor-rated macramé wall hangings
- Antique-style outdoor mirrors to reflect light
- Zinc or galvanized steel wall pockets for herbs
- String lights with Edison bulbs
How to make it
- Clean the patio wall thoroughly to remove dust and cobwebs, providing a fresh canvas for your decorative elements.
- Apply heavy-duty, outdoor-rated adhesive hooks if you prefer not to drill into siding, or use stainless steel screws to prevent rust streaks from forming over time.
- Layer your textures by hanging the largest woven baskets first in an asymmetrical cluster, which mimics the natural, relaxed flow of a high-end resort.
- Integrate a wall-mounted mirror to reflect your garden’s greenery, which trick the eye into thinking the patio space is much larger and brighter than it actually is.
- Tuck small bundles of dried lavender or fresh rosemary into wall pockets to add an olfactory layer to your decor, enhancing the ‘sanctuary’ vibe.
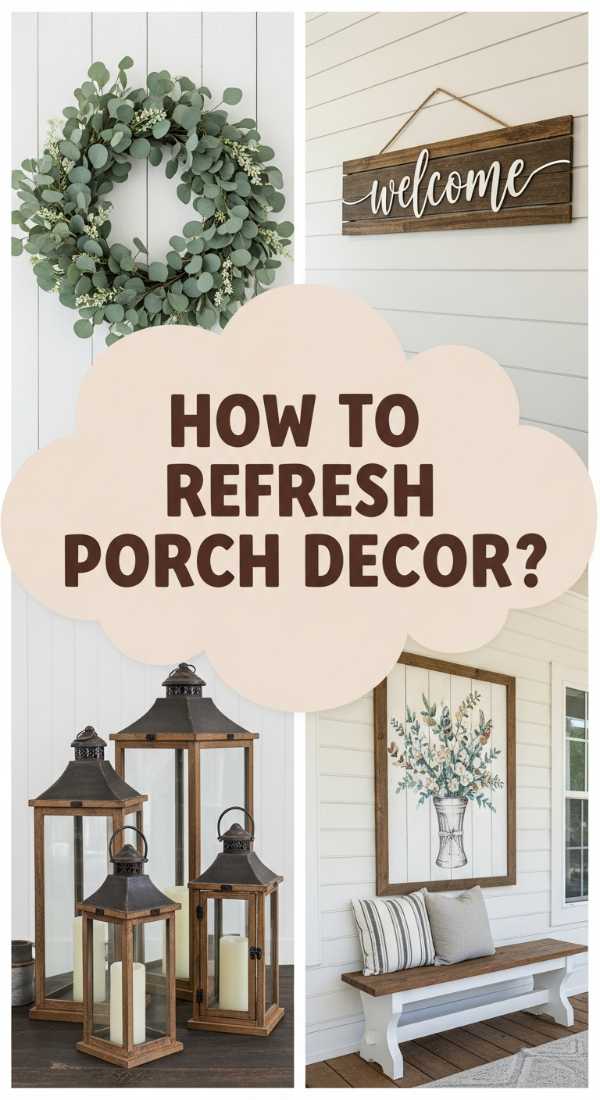
How to Refresh Porch Wall Decor for a Welcoming Entrance
![]()
Why we love this
The porch is the handshake of your home, and refreshing its wall decor is the quickest way to boost curb appeal and welcome guests with open arms. We love how a simple change—like a bold, oversized ‘Welcome’ sign or a seasonal wreath—can change the entire mood of a house. The combination of crisp paint, the organic texture of a boxwood wreath, and the glow of a lantern creates a transition space that feels safe, curated, and deeply inviting from the moment you step onto the property.
Essential Elements:
- Vertical wooden ‘Welcome’ or family name sign
- Large seasonal wreath (eucalyptus or magnolia)
- Modern matte black wall mailbox
- Coordinating porch light fixture
- Wall-mounted doorbell with vintage flair
How to make it
- Identify the ‘sightline’ from the street; you want your primary piece of decor, like a large sign or wreath, to be visible and balanced within the frame of your front door.
- Sand and stain a tall wooden plank if you are DIY-ing your sign, using outdoor-grade polyurethane to protect it from humidity and UV fading.
- Mount the sign or mailbox at a height that is functional yet visually pleasing—typically, mailboxes should be around 48 inches from the porch floor for easy access.
- Hang a wreath using an over-the-door hook or a discreet magnetic hanger if you have a metal door, ensuring it is perfectly centered on the upper third of the door.
- Upgrade your porch lighting to a fixture that complements your wall decor; a modern lantern style adds height and provides a warm, yellow-toned light that is much more welcoming than harsh white LEDs.
How to Curate Stairs Wall Decor Ideas for a Stylish Transition Space

Why we love this
Staircases are often neglected, but they are actually the most dynamic ‘galleries’ in a home because you view them from different heights and angles. We love this trend because it turns a functional transition into a curated experience. As you ascend, the texture of matted artwork and the rhythmic placement of frames create a visual story that moves with you. It’s an opportunity to use bold colors and eclectic shapes that might feel overwhelming in a smaller room, but feel perfectly at home in this soaring, vertical space.
Essential Elements:
- Matching or complementary picture frames
- Stair-step template for spacing
- Wall-mounted sconces for accent lighting
- Architectural elements like corbels or shallow shelves
- Art prints or canvas wraps
How to make it
- Measure the angle of your staircase by following the line of the handrail; your artwork should follow this same diagonal incline to maintain visual harmony.
- Determine your ‘center line’—this is usually 57 inches up from each individual step—and use this as the guide for the middle of your frames.
- Start at the landing and work your way down, placing the largest pieces at the turns where the eye naturally rests before continuing up or down the stairs.
- Use ‘museum putty’ or adhesive strips on the bottom corners of each frame to prevent them from shifting or becoming crooked due to the vibrations of people walking on the stairs.
- Incorporate 3D elements like a decorative clock or a small wall shelf to break up the flat surfaces of the frames and add a layer of sophisticated depth.
How to Design Dorm Wall Decor for a Personalized Study Space

Why we love this
Dorm life is all about expressing identity within a tiny footprint, and the wall decor trend is the ultimate way to make a sterile cinderblock room feel like home. We love the mix of soft textiles, glowing fairy lights, and grid walls that serve as both organization and inspiration. It creates a ‘cocooon’ effect that is essential for late-night study sessions, where the soft buzz of neon lights and the sight of photos of friends from back home provide the perfect balance of motivation and comfort.
Essential Elements:
- Wire grid wall organizer
- Removable ‘peel and stick’ wallpaper
- Battery-operated clip string lights
- Fabric tapestries or lightweight felt banners
- Command hooks (various sizes)
How to make it
- Clean the dorm walls with rubbing alcohol to ensure your adhesive hooks will stick to the typically glossy or textured paint used in campus housing.
- Apply a ‘feature wall’ of peel-and-stick wallpaper behind your desk; this adds a pop of pattern without violating housing contracts, as it removes cleanly at the end of the year.
- Mount a wire grid using heavy-duty Command hooks, ensuring the grid is level so your planners and photos don’t look lopsided.
- Drape string lights across the top of the wall or around the perimeter of the ceiling, using clear ‘decor clips’ to keep the wire taut and nearly invisible.
- Layer in personal touches like postcards, polaroids, and motivational quotes using mini clothespins on the grid, allowing you to easily swap them out as your style evolves through the semester.
How to Incorporate Mexican Wall Decor for a Vibrant Cultural Vibe
Why we love this
Mexican-inspired decor is a masterclass in the use of color and hand-crafted texture. We love this style for its ability to inject immediate energy and soul into a room through the use of sun-drenched terracottas, cobalt blues, and intricate Talavera patterns. There’s a beautiful ‘perfectly imperfect’ quality to hand-painted tiles and woven textiles that feels incredibly human. It celebrates heritage and craftsmanship, turning a blank wall into a vibrant celebration of life that feels warm, festive, and deeply storied.
Essential Elements:
- Hand-painted Talavera ceramic plates
- Woven ‘Oaxacan’ style wall hangings
- Tin ‘Ex-Voto’ or heart-shaped milagros
- Terracotta wall planters
- Bold, multi-colored woven fans
How to make it
- Select a focal point, such as a large hand-woven rug or a cluster of ceramic plates, and choose a color palette based on the traditional ‘pigment’ colors like ochre, indigo, and carmine.
- Arrange ceramic plates in a circular or ‘starburst’ pattern on the wall, using specialized plate hangers that grip the edges securely without damaging the art.
- Mix in metallic elements like punched tin mirrors or ‘corazón’ (heart) wall art to add a shimmering, reflective quality that balances the matte textures of the ceramics.
- Install terracotta wall pockets and fill them with cascading ‘Burro’s Tail’ succulents or bright bougainvillea for a look that mimics the sun-soaked courtyards of Mexico.
- Ensure you use warm-toned lighting in the room to enhance the rich reds and oranges of the decor, making the space feel cozy and authentic.
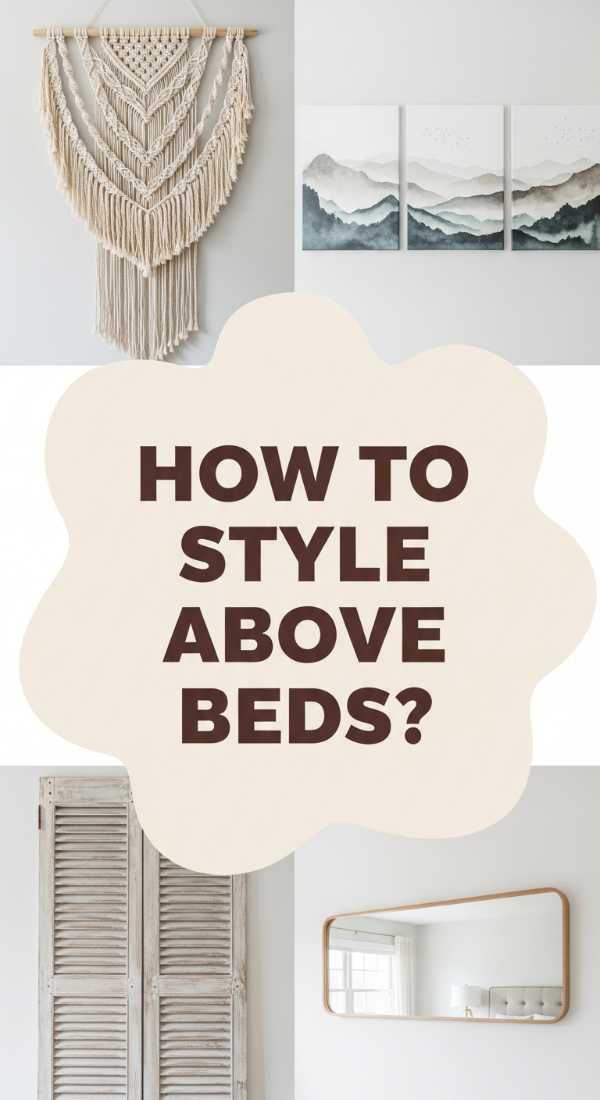
How to Select Above Bed Wall Decor for a Dreamy Master Bedroom

Why we love this
The space above the bed is the most important real estate in a bedroom, and the current trend favors ‘soft’ and ‘serene’ over ‘heavy’ and ‘imposing.’ We love the use of oversized macramé, light wood frames, or even vintage-inspired screens that add a layer of dreamy texture without the anxiety of a heavy frame hanging over your head. It creates a visual canopy that anchors the bed, making the entire room feel like a high-end boutique hotel suite where sleep is the priority and the aesthetic is pure, unadulterated calm.
Essential Elements:
- Large-scale macramé or textile art
- Minimalist line art prints
- Floating wooden shelves for small plants
- Frameless canvas paintings
- Woven round ‘Juju’ hats
How to make it
- Measure the width of your headboard; your wall decor should ideally span about two-thirds to three-quarters of that width to look proportional and intentional.
- Hang textile art like a large macramé piece about 6-10 inches above the headboard to create a seamless transition from the bed to the wall.
- If using frames, opt for acrylic ‘glass’ instead of real glass for safety and to reduce the weight, ensuring they are anchored into studs or with heavy-duty wall toggles.
- Center your piece precisely with the middle of the mattress, not the wall, to ensure the bed feels like the true anchor of the room’s design.
- Add a soft backlight or a pair of adjustable wall-mounted reading lamps on either side of the art to highlight the textures and provide a warm glow for nighttime.
How to Create Coastal Wall Decor for a Relaxing Beach House Feel
![]()
Why we love this
Coastal decor has moved away from cheesy ‘beach this way’ signs and toward a sophisticated ‘Coastal Grandmother’ aesthetic that we simply can’t get enough of. Think bleached driftwood, the matte finish of sea glass, and the airy feel of linen-matted botanical prints. It brings the outdoors in, capturing the essence of the shoreline—the salt air, the soft sand, and the rhythmic waves—through a palette of whites, creams, and soft seafoam greens. It’s a style that feels perpetually clean, fresh, and deeply relaxing.
Essential Elements:
- Framed sea fan or coral silhouettes
- Weathered driftwood wall sculptures
- Round mirrors with rope or rattan frames
- Blue and white watercolor landscapes
- Oversized decorative oars or paddles
How to make it
- Stick to a ‘high-end’ coastal color palette: crisp white walls, light oak frames, and various shades of watery blues and sandy beiges.
- Group objects in odd numbers—like a trio of framed sea fans—to create a look that feels organic and curated rather than stiff and formal.
- Incorporate natural materials by hanging a large piece of found driftwood; clean it thoroughly first and seal it with a matte clear coat to preserve the silvered patina.
- Use a large porthole-style mirror as a centerpiece to bounce natural light around the room, mimicking the bright, airy feel of a house on the water.
- Keep the spacing generous; coastal style relies on ‘white space’ and a lack of clutter to maintain that breezy, effortless vibe.
How to Master Apartment Wall Decor for a Chic Small Space Transformation
[IMAGE_10]
Why we love this
Apartment living often comes with ‘no-drill’ rules and limited square footage, but that’s where the most creative viral decor hacks are born! We love the way large mirrors and ‘vertical zoning’ can make a studio feel like a penthouse. By using removable products and leaning large pieces against the wall, you can create a high-end, chic environment that feels bespoke and luxurious without risking your security deposit. It’s all about the clever use of scale—going big with one or two pieces rather than cluttering the space with many small ones.
Essential Elements:
- Floor-to-ceiling leaning mirrors
- Command-style picture hanging strips
- Fabric wall decals or ‘washi’ tape frames
- Lightweight foam-core mounted art
- Tension-rod wall hanging systems
How to make it
- Choose one ‘power wall’ to focus on—usually the one visible from the entryway—and use a large-scale mirror to instantly double the perceived depth of the room.
- Use ‘Velcro’ style hanging strips for all your frames, ensuring you press them firmly for 30 seconds and let the adhesive cure for an hour before actually hanging the weight of the frame.
- Create a ‘faux’ gallery wall by using high-quality washi tape to create ‘frames’ around lightweight prints or postcards directly on the wall for a zero-damage, modern look.
- Lean oversized art pieces on top of low bookshelves or sideboards rather than hanging them; this adds a casual, ‘artist-loft’ vibe while saving you from making holes.
- Utilize the space above doorways for small, lightweight floating shelves to display trailing plants, drawing the eye upward and making the ceilings feel much higher.
Conclusion
Transforming your home from a series of blank walls into a curated, viral-worthy sanctuary doesn’t require a professional degree or a massive budget. It’s about the small, intentional choices—the way a frame catches the light, the texture of a woven basket, or the greenery that breathes life into a quiet corner. By taking these TikTok-inspired ideas and infusing them with your own personality, you create a space that doesn’t just look good in a photo, but feels incredible to live in every single day. Go ahead, grab those command strips and start creating the home of your dreams!