
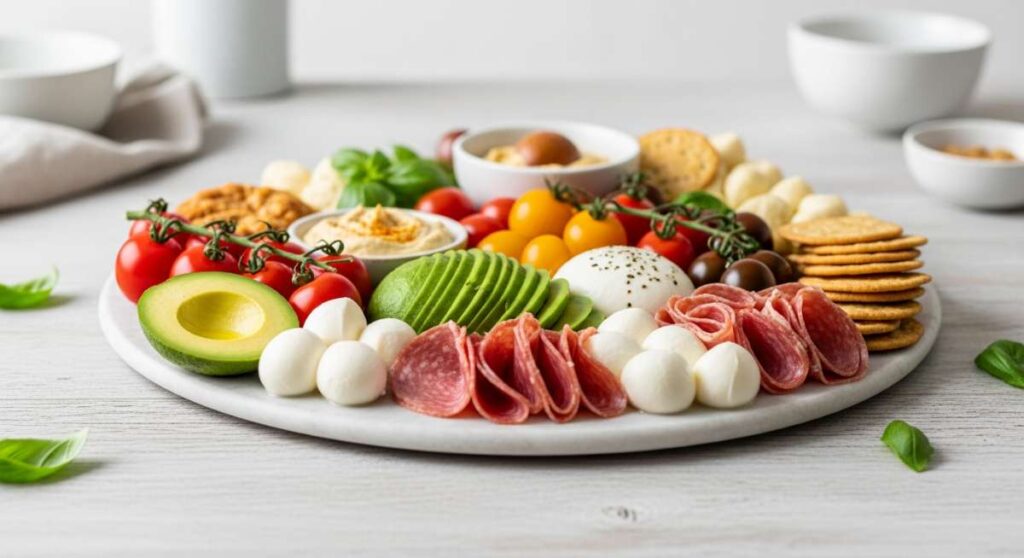
From TikTok to Table: Mastering the Viral Simple Food Board Trend
We’ve all been there—curled up on the couch, thumb mindlessly scrolling through TikTok, when suddenly a video appears that makes our mouth water and our creative gears start turning. It’s the viral food board trend, a visual symphony of colors, textures, and flavors that looks like it belongs in a high-end magazine but feels approachable enough for a Tuesday night. There is something deeply communal and comforting about a board filled with delicious bites; it invites us to linger longer at the table, sharing stories and snacks in equal measure.
As a blogger who lives for those ‘perfect bite’ moments, I’ve found that the secret to a great food board isn’t just about the aesthetics—it’s about the soul of the food. Whether you are hosting a summer soirée or just trying to make a weekday lunch feel a bit more special, these dishes are designed to be the stars of your spread. From the nostalgia of a classic strawberry pie to the smoky char of perfectly grilled vegetables, we are diving deep into the recipes that are currently taking the internet by storm.
Let’s transform your kitchen into a content-creator’s dream while keeping the flavors grounded, rustic, and absolutely irresistible. Grab your favorite wooden board, a glass of something cold, and let’s get cooking!
Easy Shoneys Strawberry Pie

Why we love this
This pie is pure, unadulterated nostalgia served on a plate. The vibrant, glossy red glaze clings to the fresh, juicy strawberries, creating a texture that is both silky and snappy. When you take a bite, the buttery, flaky crust crumbles against the cool, sweet filling, releasing the aroma of sun-ripened berries that reminds us of childhood summers and roadside diners. It’s a showstopper on any dessert board because of its brilliant color and the way the light catches the gelatinous glaze, making it look almost like edible rubies.
Ingredients
- 1 pre-baked 9-inch pie crust
- 1.5 lbs fresh strawberries, hulled and cleaned
- 1 cup granulated sugar
- 3 tablespoons cornstarch
- 1 cup water
- 3 tablespoons strawberry-flavored gelatin powder
- Whipped cream for garnish
How to make it
- Begin by preparing your berries; ensure they are completely dry after washing, as any excess moisture will thin out the glaze. Place the whole berries (or halved if they are very large) into the pre-baked and cooled pie crust, arranging them points-up for a professional look.
- In a medium saucepan, whisk together the sugar and cornstarch until no lumps remain. Gradually whisk in the water until the mixture is smooth.
- Place the saucepan over medium heat. Bring the mixture to a boil, stirring constantly with a whisk or silicone spatula. You will notice the liquid transition from cloudy to a clear, thick consistency. Continue to boil for about 1-2 minutes until it heavily coats the back of a spoon.
- Remove the pan from the heat and immediately stir in the strawberry gelatin powder. Whisk vigorously until the powder is fully dissolved and the glaze is a uniform, vibrant red.
- Allow the glaze to cool for about 10 minutes—it should still be pourable but not scalding hot. Slowly pour the glaze over the strawberries in the pie crust, ensuring every berry is tucked under a layer of red.
- Refrigerate the pie for at least 3-4 hours, or until the glaze is completely set and firm. Serve with a generous dollop of whipped cream for that classic finish.
Ultimate Party Rotel Dip

Why we love this
There is a reason this dip is a staple at every tailgate and house party; it is the epitome of comfort food. The velvety, molten cheese creates a rich, salty base that perfectly carries the zesty acidity of the tomatoes and the mild heat of the green chilies. As you dip a crunchy tortilla chip into the warm pool of cheese, the aroma of browned savory meat and spices fills the air, creating an irresistible invitation to keep dipping. It’s hearty, indulgent, and has that perfect ‘stretch’ that makes it a visual favorite for social media foodies.
Ingredients
- 1 lb ground breakfast sausage or lean ground beef
- 1 loaf (32 oz) processed cheese product (like Velveeta), cubed
- 2 cans (10 oz each) Ro-Tel diced tomatoes and green chilies, undrained
- 1/2 teaspoon garlic powder
- 1/4 teaspoon cumin
- Fresh cilantro for garnish
- Tortilla chips for serving
How to make it
- In a large skillet or Dutch oven over medium-high heat, brown the ground sausage or beef. Use a wooden spoon to break the meat into very small, uniform crumbles. Cook until no pink remains and the meat has developed a slightly crispy, browned exterior.
- Drain the excess grease from the skillet thoroughly. This is a critical step to ensure your dip isn’t oily.
- Reduce the heat to low. Add the cubed cheese to the skillet along with the two cans of Ro-Tel (keep the juice in the cans for flavor and consistency).
- Add the garlic powder and cumin. Stir the mixture frequently with a sturdy spatula. The goal is to melt the cheese slowly to prevent scorching; if the heat is too high, the cheese will become grainy.
- Continue stirring until the mixture is completely smooth and the meat is evenly distributed. This should take about 8-10 minutes.
- Transfer the dip to a slow cooker on the ‘warm’ setting if you are serving a crowd, or pour into a bowl and garnish with chopped cilantro. Serve immediately while the cheese is at its peak silkiness.
Healthy Beach Snack Packing
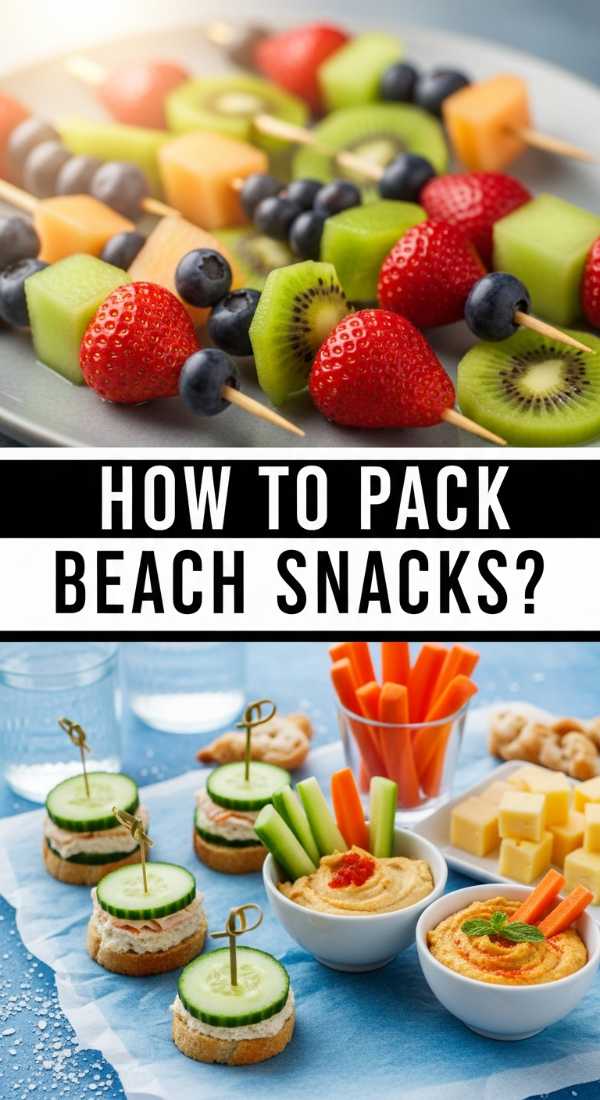
Why we love this
Packing snacks for the beach is an art form that balances hydration, nutrition, and sand-resistance. We love this approach because it focuses on crisp, refreshing textures that provide a burst of energy without the heavy ‘slump’ that comes from processed snacks. Imagine the satisfying snap of a cold carrot or the juicy explosion of a frozen grape while the salty sea breeze hits your face. These snacks stay fresh in the heat and look incredibly appetizing when arranged in a bento-style box or a compartmentalized board, making your beach setup the envy of the shoreline.
Ingredients
- English cucumbers, sliced into thick rounds
- Baby carrots and celery sticks
- Frozen red and green grapes
- Watermelon wedges with lime zest
- Individual hummus cups
- Salted almonds or walnuts
- Beef jerky or turkey sticks
How to make it
- The first step to successful beach snacking is moisture management. Slice your cucumbers and watermelon, then pat them dry with a paper towel before packing to prevent them from becoming mushy.
- Freeze your grapes overnight. These act as edible ice packs in your cooler, staying cold for hours and providing a sorbet-like texture when eaten under the sun.
- Use airtight, compartmentalized containers (like a ‘snackle box’) to keep different textures separate. Place the heavy, wet items like watermelon at the bottom and the dry snacks like nuts and jerky in separate, upper sections.
- To prevent the hummus from separating, keep it in its original sealed individual cups until the moment of consumption.
- Zest a fresh lime over the watermelon wedges and sprinkle with a tiny pinch of sea salt. This enhances the sweetness and adds an electrolyte boost.
- Pack everything into an insulated cooler bag with at least two large ice packs. Pro tip: place a thin kitchen towel over the top of the food inside the cooler to catch any condensation drips, keeping your crackers or nuts perfectly crunchy.
Homemade Soft Butter Guide

Why we love this
There is a profound sense of culinary accomplishment that comes from making your own butter. The texture of homemade butter is incomparably silky—it glides across warm bread like a dream, melting into every nook and cranny. The aroma is purely dairy-fresh, lacking the flat scent of store-bought sticks. When you whip it to a soft, spreadable consistency, it becomes a canvas for flavors like sea salt, honey, or fresh herbs. It turns a simple piece of toast into a gourmet experience and adds a touch of rustic elegance to any food board.
Ingredients
- 2 cups high-quality heavy cream (minimum 36% fat content)
- 1/4 teaspoon fine sea salt (optional)
- Ice-cold water for rinsing
- Optional: Fresh thyme, honey, or crushed garlic for flavoring
How to make it
- Pour the cold heavy cream into a stand mixer fitted with the whisk attachment (or use a large bowl and a hand mixer). Start on medium-low speed to avoid splashing.
- Gradually increase the speed to high. You will see the cream go through stages: soft peaks, then stiff peaks (whipped cream). Keep going!
- After about 5-7 minutes, the cream will begin to look grainy and yellow. Suddenly, the solid butterfat will separate from the liquid buttermilk. When you hear the liquid splashing against the sides, stop the mixer.
- Drain the buttermilk into a separate jar (save it for pancakes!). Place the solid butter into a bowl.
- This is the most important step: pour ice-cold water over the butter and knead it with a spatula or your hands. Drain the cloudy water and repeat 3-4 times until the water runs completely clear. This removes the remaining buttermilk, which prevents the butter from going rancid.
- Pat the butter dry with a paper towel. Mix in your salt and any herbs or honey. Leave it at room temperature for an hour to ensure it stays perfectly soft and spreadable, then store in a butter crock or an airtight jar.
Stress Free Camping Meals

Why we love this
Camping meals should be about the crackle of the fire and the smoky flavor of the great outdoors, not about washing a mountain of dishes. We love the ‘foil pack’ or ‘one-pot’ approach because it allows the ingredients to steam in their own juices, creating tender proteins and infused vegetables. The aroma of garlic and charred peppers mingling with woodsmoke is the ultimate outdoor fragrance. These meals are designed to be prepped at home, meaning you spend less time chopping and more time enjoying the stars with a hot, satisfying meal in your hand.
Ingredients
- Smoked sausage links, sliced
- Baby potatoes, quartered
- Bell peppers and onions, roughly chopped
- Olive oil and Montreal steak seasoning
- Heavy-duty aluminum foil
- Fresh parsley for finishing
How to make it
- At home, before you leave, chop your sausage, potatoes, and vegetables into uniform, bite-sized pieces. Uniformity ensures that everything cooks at the same rate.
- Toss the ingredients in a large bowl with a generous glug of olive oil and your choice of seasoning. Ensure the potatoes are well-coated, as they need the oil to crisp up.
- Tear off four large sheets of heavy-duty aluminum foil. Divide the mixture evenly among the sheets, placing the food in the center.
- Fold the foil over the food and crimp the edges tightly to create a sealed pouch. This ‘tent’ allows steam to circulate inside.
- When at the campsite, wait for your fire to burn down to a bed of glowing coals—cooking directly over high flames will burn the foil. Place the pouches on a grate over the coals or directly on the edges of the heat.
- Cook for 20-25 minutes, flipping once halfway through using tongs. To check for doneness, carefully open one pouch (watch out for the steam!) and pierce a potato with a fork. If it’s tender, it’s ready. Serve directly from the foil for zero cleanup.
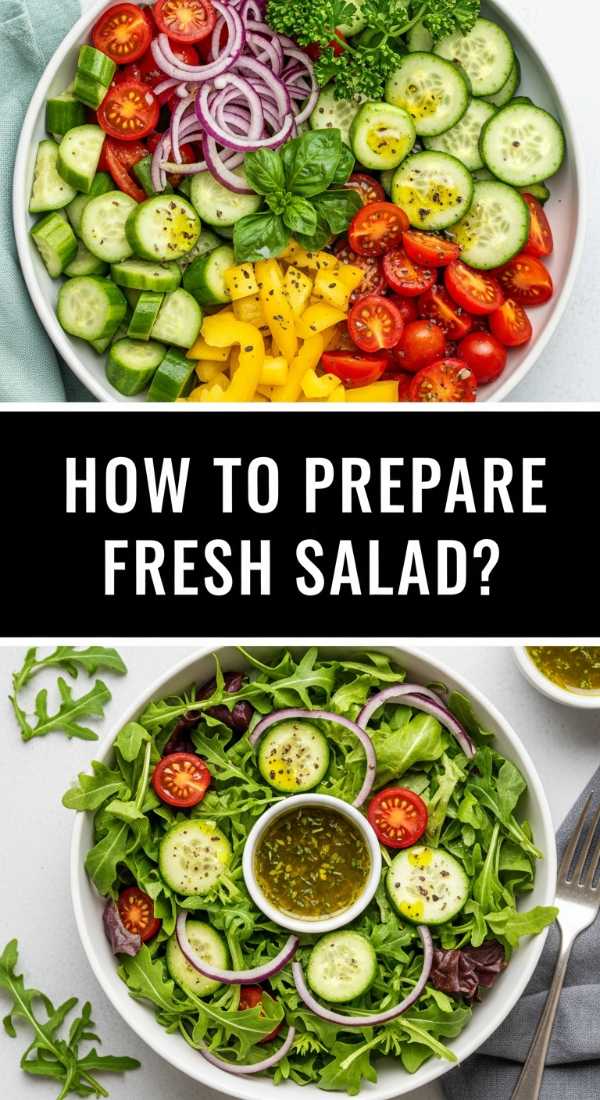
Fresh Tomato Cucumber Salad
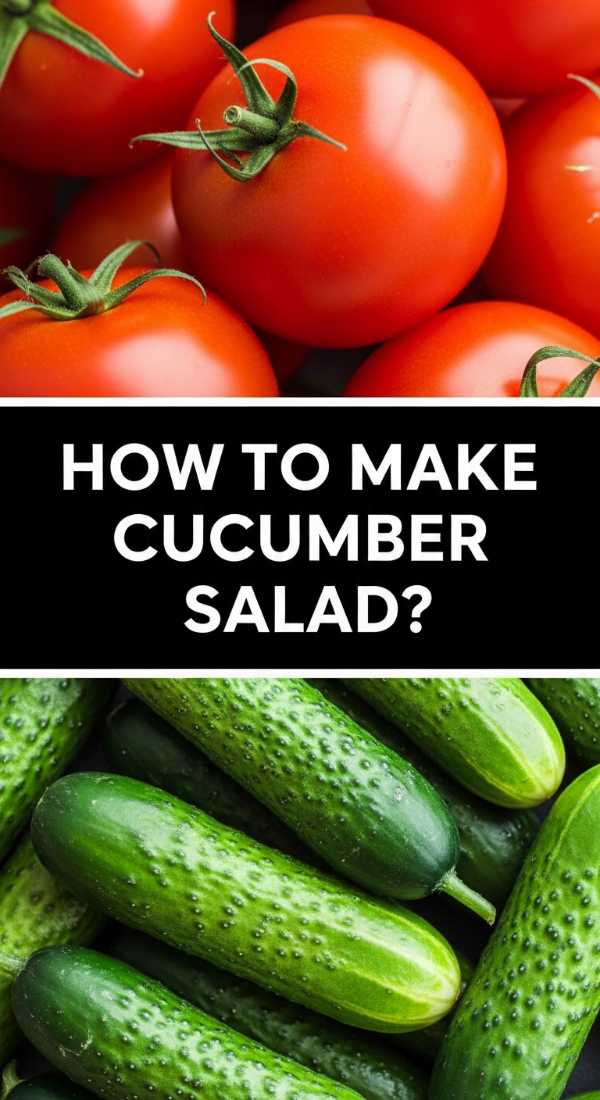
Why we love this
This salad is the definition of ‘garden fresh.’ It’s a vibrant, crunchy, and hydrating dish that balances the acidity of tomatoes with the cool, watery snap of cucumbers. The addition of sharp red onion and tangy feta cheese creates a complex flavor profile that feels both light and deeply satisfying. The smell of fresh dill and lemon zest tied together with a high-quality olive oil is intoxicating. It’s the perfect palate cleanser on a food board filled with richer items, providing a bright pop of color and a refreshing zing.
Ingredients
- 3 large Roma tomatoes, chopped
- 1 large English cucumber, halved and sliced
- 1/4 red onion, thinly sliced
- 1/2 cup crumbled feta cheese
- 2 tablespoons extra virgin olive oil
- 1 tablespoon red wine vinegar
- Fresh dill and parsley, chopped
- Salt and cracked black pepper to taste
How to make it
- Start by prepping your vegetables. For the cucumber, I recommend leaving some of the skin on in a ‘striped’ pattern for extra crunch and visual appeal. Slice the red onion paper-thin to ensure it doesn’t overpower the other flavors.
- Place the chopped tomatoes, cucumbers, and onions in a large glass bowl.
- In a small jar, whisk together the olive oil, red wine vinegar, salt, and pepper. Shake vigorously until the dressing is emulsified.
- Drizzle the dressing over the vegetables and toss gently with large spoons. You want to coat everything without bruising the tomatoes.
- Add the crumbled feta and the fresh herbs last. Tossing the feta too much will turn the dressing cloudy; a light fold keeps the white cheese looking bright against the red and green.
- Let the salad sit for at least 15 minutes before serving. This ‘marinating’ time allows the salt to draw a bit of juice out of the tomatoes, which mingles with the oil and vinegar to create a delicious ‘sop’ at the bottom of the bowl.
Perfect Grilled Vegetables
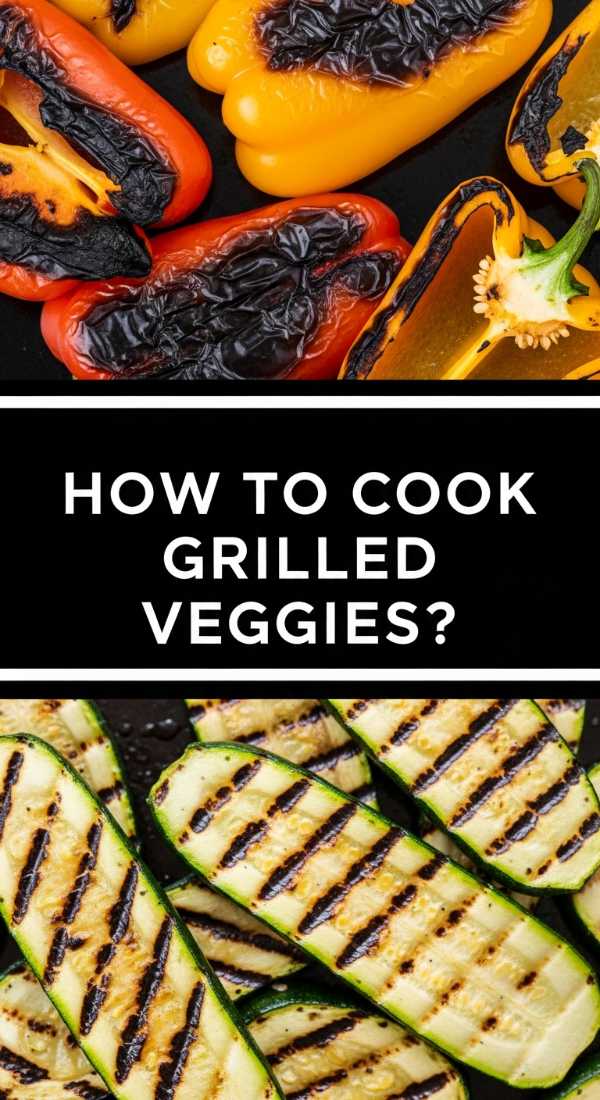
Why we love this
Grilling vegetables transforms them from simple side dishes into the main event. The high heat caramelizes the natural sugars in veggies like zucchini and corn, creating a smoky sweetness that is impossible to achieve in an oven. We love the visual of those dark, defined char marks against the bright yellows and greens of summer produce. The texture is the perfect ‘fork-tender’—soft enough to eat easily but with enough structural integrity to hold up on a platter. It’s a healthy, rustic addition that brings the essence of outdoor cooking to your board.
Ingredients
- 2 zucchini, sliced into long planks
- 1 bunch asparagus, woody ends trimmed
- 2 bell peppers, cut into wide strips
- 1 red onion, cut into thick wedges
- 1/4 cup olive oil
- 2 tablespoons balsamic glaze
- 1 teaspoon dried oregano and garlic salt
How to make it
- Preheat your grill to medium-high heat (about 400°F). Ensure the grates are clean and lightly oiled to prevent sticking.
- In a large baking sheet, spread out all your prepared vegetables in a single layer. Drizzle with olive oil and sprinkle with garlic salt and oregano. Use your hands to toss the vegetables, ensuring every surface is lightly coated in oil—this is the secret to getting those perfect char marks.
- Place the vegetables on the grill. Put the sturdier items like onions and peppers on first, as they take longer. Add the zucchini and asparagus a few minutes later.
- Do not move the vegetables once they hit the grill! Leave them for 3-4 minutes to develop those iconic sear lines.
- Flip the vegetables using long tongs and cook for another 3-5 minutes on the other side. You are looking for a vibrant color and a slight softening, but they should still have a ‘snap.’
- Remove from the grill and arrange on a platter. Immediately drizzle with the balsamic glaze while the vegetables are still hot so they absorb the tangy flavor.
Quick Easy Summer Dinners

Why we love this
Summer dinners should be effortless, allowing you to spend more time on the porch and less time standing over a hot stove. We love these ‘assembly-style’ meals because they rely on the quality of fresh ingredients rather than complex cooking techniques. Think of a cold pasta salad loaded with herbs or a rotisserie chicken transformed with a zesty chimichurri. The goal is a meal that feels light, bright, and vibrant. It’s about the sensory joy of a meal that doesn’t weigh you down, filled with the aromas of citrus, basil, and garlic.
Ingredients
- 1 lb cooked rotini or farfalle pasta
- 1 rotisserie chicken, shredded
- 1 jar of basil pesto
- Cherry tomatoes, halved
- Fresh mozzarella pearls
- Arugula or baby spinach
- Lemon wedges
How to make it
- The key to a quick summer dinner is the ‘component’ method. Start by boiling your pasta in heavily salted water until al dente. Drain and immediately rinse with cold water to stop the cooking process and remove excess starch.
- While the pasta cools, shred your store-bought rotisserie chicken. This is a massive time-saver that still provides high-quality, flavorful protein.
- In a massive mixing bowl, combine the cold pasta and the pesto. Toss thoroughly until every noodle is green and fragrant.
- Gently fold in the shredded chicken, cherry tomatoes, and mozzarella pearls. The variety of shapes and colors makes this dish look like it was catered.
- Just before serving, toss in two handfuls of fresh arugula. The residual moisture from the dressing will wilt it just slightly, adding a peppery bite.
- Finish with a big squeeze of fresh lemon juice and a crack of black pepper. Serve at room temperature or chilled, making it the perfect stress-free centerpiece for a weeknight board.
The Ultimate Garden Salad
Why we love this
This isn’t your average side salad; this is a masterpiece of texture and nutrition. We love it because it utilizes ‘layers’ of flavor—crunchy radishes, creamy avocado, nutty seeds, and crisp greens. It smells like a rainy morning in a vegetable patch—earthy, fresh, and alive. Every forkful offers a different combination of tastes, making it an engaging and delicious experience rather than just a healthy chore. It’s the ultimate way to show off the bounty of the season, and it adds a lush, green verticality to your food board layout.
Ingredients
- Mixed spring greens or butter lettuce
- 1 avocado, sliced
- 4-5 radishes, thinly sliced
- 1/2 cup sugar snap peas
- 1/4 cup toasted sunflower seeds
- Shaved parmesan cheese
- Dressing: 3 parts olive oil, 1 part lemon juice, 1 teaspoon dijon mustard
How to make it
- Wash and thoroughly dry your greens. Use a salad spinner if possible; water is the enemy of a good salad, as it prevents the dressing from sticking.
- Prepare your ‘crunch’ elements. Slice the radishes into translucent rounds using a mandolin or a very sharp knife. Cut the sugar snap peas on a diagonal to reveal the tiny peas inside.
- In a small bowl, whisk the lemon juice, dijon mustard, and olive oil until thick and creamy. This is a simple emulsion that provides a bright, sharp contrast to the creamy avocado.
- Layer your greens in a wide, shallow bowl. Do not toss yet.
- Arrange the avocado, radishes, and snap peas on top of the greens. This ‘composed’ look is what makes it ‘ultimate.’
- Drizzle the dressing over the top just before serving. Sprinkle with the sunflower seeds and shaved parmesan. The seeds provide a salty, nutty finish that rounds out the freshness of the vegetables.
Spicy Homemade Rotel Dip

Why we love this
For those who find the standard dip a bit too tame, the spicy version is a revelation. We love the way the heat builds slowly, warmed by the melted cheese and intensified by fresh jalapeños and spicy sausage. The aroma is bold—heavy on the cumin, chili powder, and the sharp scent of peppers hitting the heat. It has a beautiful, speckled orange-and-red appearance that looks fantastic next to blue corn chips. It’s the kind of dish that gets people talking and reaching for a cold drink, making it a high-energy addition to any party spread.
Ingredients
- 1 lb spicy ‘Hot’ pork sausage
- 1 lb white American cheese or Pepper Jack, cubed
- 2 cans (10 oz) ‘Hot’ Ro-Tel tomatoes
- 2 fresh jalapeños, finely diced (seeds included for maximum heat)
- 1 teaspoon smoked paprika
- 1/2 teaspoon cayenne pepper (optional)
- Sliced jalapeños for garnish
How to make it
- In a heavy skillet, brown the hot pork sausage over medium-high heat. Use your spatula to crumble the meat into very small bits. Once fully cooked, drain the fat completely.
- Lower the heat to medium-low. Add the finely diced fresh jalapeños to the sausage and sauté for 2 minutes until they are fragrant and slightly softened.
- Add the cubed white cheese or Pepper Jack. Using white cheese gives this version a ‘Queso Blanco’ look that contrasts beautifully with the red tomatoes.
- Pour in both cans of the hot Ro-Tel. Stir in the smoked paprika and cayenne pepper. The smoked paprika adds a deep, woodsy note that complements the heat.
- Stir constantly as the cheese melts. If the dip feels too thick, you can add a splash of whole milk or heavy cream to reach your desired consistency.
- Once the dip is bubbling and smooth, transfer to a serving bowl. Garnish with fresh jalapeño slices and a sprinkle of extra paprika. Serve with sturdy chips or even toasted baguette slices.
Wrapping Up the Board
Creating a viral-worthy food board is about more than just following a recipe; it’s about the joy of assembly and the pleasure of seeing people enjoy what you’ve made. Whether you’re layering a spicy dip next to a fresh cucumber salad or serving up a nostalgic strawberry pie, these dishes bring a sense of warmth and creativity to your home. Remember, the best boards are the ones that reflect your personality—so don’t be afraid to mix, match, and add your own signature touch. Happy grazing!