

There is something almost magical about the way a beautifully arranged board brings people together. Whether it is the soft glow of a late-afternoon sun hitting a spread of fresh fruit or the satisfying clink of a wine glass against a wooden platter, food boards have transformed from a simple TikTok trend into a lifestyle staple. They represent a shift toward effortless entertaining, where the focus is less on standing over a hot stove and more on the shared experience of picking, grazing, and laughing with the people we love most.
I remember the first time I set out a DIY board for a few friends; the conversation flowed so much more freely because nobody was tied to a formal dinner setting. It felt intimate, relaxed, and incredibly chic without the stress. In this guide, we are taking those viral ‘TikTok to Table’ vibes and applying them to every summer craving you could possibly have. From slow-cooked comforts to the ultimate ‘snackle box,’ let’s dive into the art of the effortless summer spread.
12 Easy Summer Crockpot Recipes To Save Time
Why we love this
There is no greater luxury during the sweltering summer months than keeping the kitchen cool while a delicious meal prepares itself. We love these crockpot recipes because they allow you to reclaim your afternoon at the beach or in the garden while the aroma of slow-simmered pulled pork or tangy citrus chicken fills your home. The texture of meat cooked low and slow becomes buttery and succulent, melting away at the touch of a fork, while the flavors have hours to meld into a rich, complex profile that tastes like you spent all day prepping. It is the ultimate ‘set it and forget it’ hack for busy hosts.
Ingredients
- 3 lbs Pork shoulder or chicken thighs
- 1 cup Artisanal BBQ sauce or citrus marinade
- 1 Sliced red onion
- 3 cloves Minced garlic
- 1/2 cup Apple cider vinegar
- Salt, pepper, and smoked paprika to taste
How to make it
- Begin by patting your protein dry with paper towels to ensure the seasonings stick effectively. Generously coat all sides with salt, pepper, and smoked paprika, rubbing it into the grain of the meat.
- Layer the sliced red onions and minced garlic at the bottom of the slow cooker to create a flavor base that also prevents the meat from sticking to the ceramic.
- Place the seasoned meat on top of the onions. Pour your chosen liquid (vinegar or a splash of broth) around the edges, being careful not to wash off the dry rub.
- Set the crockpot to the ‘Low’ heat setting. For pork shoulder, aim for 8 to 10 hours; for chicken, 4 to 6 hours is sufficient. The visual cue for doneness is when the meat easily pulls apart with two forks with zero resistance.
- Once tender, remove the meat to a separate bowl and shred it. Skim the excess fat from the liquid left in the pot, then toss the shredded meat back in with your favorite BBQ sauce to glaze it for an additional 20 minutes on ‘High’.
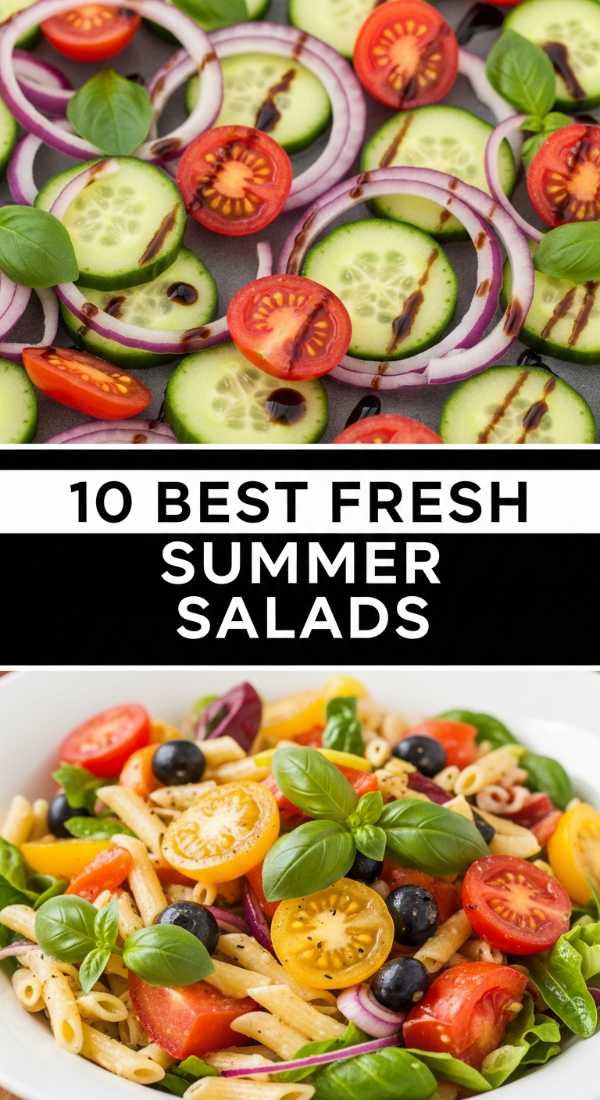
10 Refreshing Summer Salad Recipes You’ll Love
Why we love this
When the temperature rises, our bodies naturally crave the crisp, hydrating crunch of fresh produce. These summer salads are a symphony of textures: the snap of chilled cucumbers, the creamy crumble of salty feta, and the juicy burst of seasonal peaches or heirloom tomatoes. There is a cooling sensation that comes with every bite, enhanced by zesty citrus vinaigrettes that wake up the palate. Eating these salads feels like an act of self-care, providing a vibrant, nutrient-dense meal that leaves you feeling energized rather than weighed down by the heat.
Ingredients
- 5 cups Fresh arugula or baby spinach
- 2 cups Sliced seasonal fruit (peaches, strawberries, or watermelon)
- 1/2 cup Toasted nuts (walnuts or pecans)
- 4 oz Crumbled goat cheese or feta
- Vinaigrette: Olive oil, balsamic glaze, honey, and dijon mustard
How to make it
- Start by chilling your serving bowl in the refrigerator for at least 30 minutes; a cold bowl keeps the greens crisp throughout the meal.
- Wash and thoroughly dry your greens using a salad spinner. Excess water is the enemy of a good salad, as it prevents the dressing from adhering to the leaves.
- In a small glass jar, combine 3 parts olive oil to 1 part balsamic vinegar, a teaspoon of honey, and a dab of dijon. Shake vigorously until the mixture is emulsified and creamy.
- Toss the greens lightly with half of the dressing just before serving. Use your hands or large tongs to ensure every leaf is kissed by the vinaigrette without being drowned.
- Artfully layer your sliced fruits and toasted nuts on top. Finish with the crumbled cheese and a final drizzle of the remaining dressing. This layering technique ensures the heavy ingredients don’t all sink to the bottom.
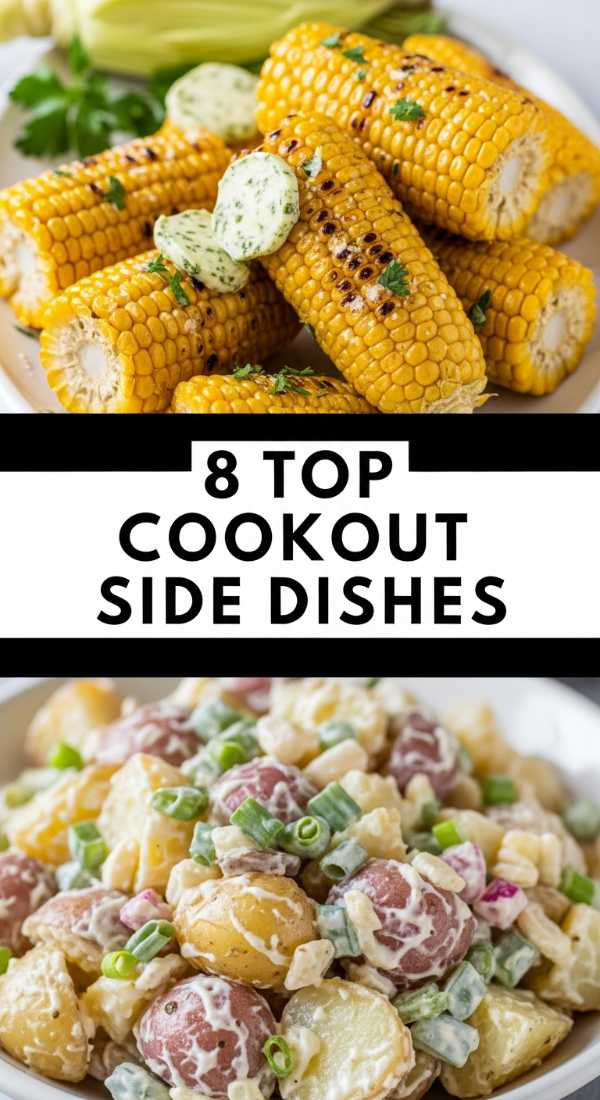
8 Best Cookout Side Dishes For Every Grill
Why we love this
While the main protein often gets the spotlight, the side dishes are the true soul of any backyard cookout. We love these because they bring a rustic, charred depth to the table that only a flame can provide. Imagine biting into sweet corn on the cob slathered in lime butter, or a smoky potato salad that carries the scent of hickory smoke. These dishes offer the perfect balance of salt, acid, and heat, cutting through the richness of grilled meats and providing a colorful variety that makes your food board look like a professional catering spread.
Ingredients
- 4 ears of Sweet corn
- 1 lb Fingerling potatoes
- 1 bunch Fresh cilantro
- 2 tbsp Smoked paprika and sea salt
- 1/4 cup Melted salted butter
- 2 Limes, halved
How to make it
- Preheat your grill to a medium-high heat, roughly 400°F. Ensure the grates are clean and lightly oiled to prevent sticking.
- For the corn, peel back the husks but leave them attached at the base to act as a handle. Remove the silk, then brush the kernels with melted butter and a sprinkle of smoked paprika.
- Boil the fingerling potatoes in salted water for about 10 minutes until ‘fork-tender’ but not mushy. Drain and let them air dry for 5 minutes; this allows the skins to crisp up better on the grill.
- Place the corn and potatoes directly over the flames. Grill the corn for 8-10 minutes, turning occasionally until charred spots appear. Grill the potatoes for 4-5 minutes per side until the skins are crispy and golden.
- In the final two minutes of grilling, place the lime halves face down on the grates. The heat caramelizes the natural sugars, making the juice extra sweet and smoky. Squeeze the warm lime juice over everything before serving.
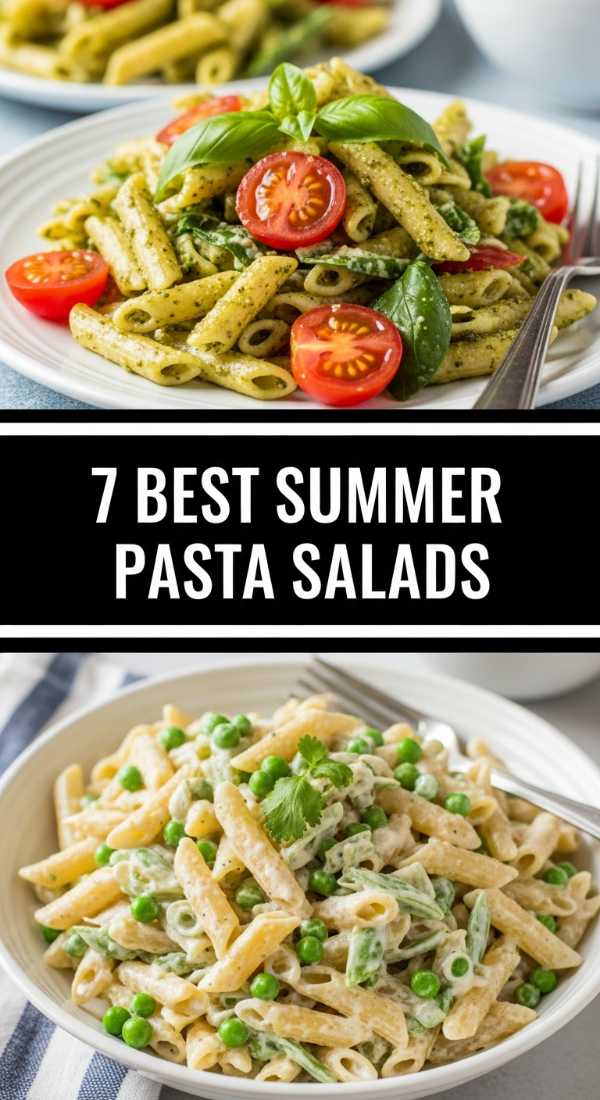
7 Creamy Summer Pasta Salad Recipes

Why we love this
Pasta salad is the ultimate nostalgia food, evoking memories of block parties and family reunions. We love these recipes because they achieve that perfect ‘al dente’ bite combined with a silky, herb-flecked dressing that coats every spiral and crevice. The contrast between the chilled pasta and the crunchy additions like diced bell peppers or celery provides a satisfying sensory experience. It’s a dish that actually tastes better the next day, as the pasta absorbs the flavors of the dressing, making it a dream for meal prep or stress-free entertaining.
Ingredients
- 1 lb Rotini or Bowtie pasta
- 1 cup Real mayonnaise or Greek yogurt base
- 2 tbsp Fresh dill, chopped
- 1 cup Frozen peas, thawed
- 1/2 cup Diced sharp cheddar cheese
- 1/4 cup Red onion, finely minced
How to make it
- Cook the pasta in a large pot of heavily salted water—it should taste like the sea. Cook for exactly one minute less than the package instructions suggest for ‘al dente.’
- Immediately drain the pasta and plunge it into a large bowl of ice water. This ‘shocking’ process stops the cooking instantly and prevents the pasta from becoming gummy.
- In a large mixing bowl, whisk together the mayonnaise (or yogurt), chopped dill, minced red onion, and a splash of vinegar or lemon juice. Season with plenty of black pepper.
- Drain the chilled pasta thoroughly and add it to the dressing bowl. Fold gently with a spatula to ensure the pasta doesn’t break.
- Add the peas and cheddar cheese. Refrigerate for at least two hours before serving. This resting period is critical for the starches to settle and the flavors to fully develop.
5 Best Summer Dips For Every Party

Why we love this
A good dip is the centerpiece of any food board; it is the anchor that everything else revolves around. These summer dips are light, airy, and bursting with Mediterranean-inspired flavors. We love the way a whipped feta or a zesty hummus feels sophisticated yet totally approachable. There is something deeply satisfying about the ritual of dipping a warm piece of pita or a crisp radish into a bowl of something creamy and vibrant. The aroma of fresh lemon zest and cold-pressed olive oil immediately transports your guests to a seaside terrace, making even a simple Tuesday feel like a vacation.
Ingredients
- 8 oz Block feta cheese
- 1/2 cup Plain Greek yogurt
- 1 Lemon (zested and juiced)
- 2 tbsp Extra virgin olive oil
- 1 tsp Dried oregano
- Fresh honey for drizzling
How to make it
- Place the block of feta and the Greek yogurt into a high-speed food processor. Do not use pre-crumbled feta, as it contains anti-caking agents that prevent a smooth texture.
- Pulse the mixture on high for 2-3 minutes. You are looking for a ‘whipped’ consistency—it should look like thick clouds. If it seems too stiff, add a teaspoon of cold water or olive oil while the motor is running.
- Add the lemon zest, lemon juice, and oregano. Pulse for another 30 seconds to incorporate. This adds the brightness needed to cut through the saltiness of the cheese.
- Transfer the dip to a shallow bowl. Use the back of a spoon to create ‘swirls’ and ‘wells’ in the surface of the dip.
- Drizzle the extra virgin olive oil and honey into those wells. The honey provides a necessary floral sweetness that balances the tang of the feta perfectly.
9 Best Kabobs On The Grill Recipes
Why we love this
Kabobs are the quintessential ‘party on a stick.’ We love them because they offer a customizable dining experience where every guest gets a bit of everything in one bite. The high-heat grilling creates those coveted ‘bits of char’ on the edges of the vegetables while keeping the centers juicy and sweet. There is an primal, smoky aroma that wafts from the grill as the juices from the meat drip onto the coals, seasoning the air around you. Plus, they look absolutely stunning on a board, arranged in a colorful fan that showcases the best of the season’s harvest.
Ingredients
- 1.5 lbs Sirloin steak or chicken breast, cubed
- 2 Large Bell peppers (various colors)
- 1 Red onion, cut into chunks
- 1 cup Whole mushrooms
- Marinade: Soy sauce, olive oil, garlic, and ginger
How to make it
- If using wooden skewers, soak them in water for at least 30 minutes prior to use. This prevents them from catching fire on the grill.
- Cut your meat and vegetables into uniform 1-inch cubes. Uniformity is the secret to even cooking; if the pieces are different sizes, some will burn while others remain raw.
- Marinate the meat for at least 2 hours in a mixture of soy sauce, oil, garlic, and ginger. Do not marinate the vegetables; they are better when brushed with oil just before hitting the heat.
- Thread the ingredients onto the skewers, alternating between meat and vegetables. Leave about a quarter-inch of space between each item to allow the heat to circulate and brown the sides.
- Grill over direct medium-high heat. For steak kabobs, 3-4 minutes per side (roughly 12 minutes total) will result in a perfect medium-rare. Rotate the skewers 90 degrees every few minutes for those professional-looking grill marks.
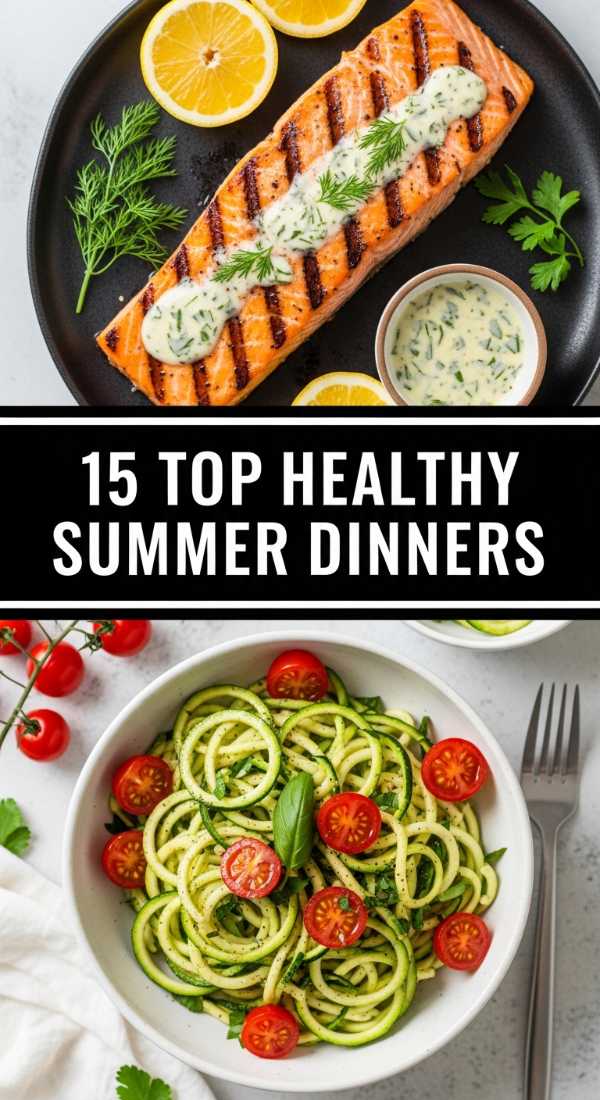
15 Healthy Summer Dinner Recipes To Try

Why we love this
Eating healthy during the summer shouldn’t feel like a chore; it should feel like a celebration of lightness. We love these recipes because they focus on ‘zoodles,’ lean proteins, and bright herbs that satisfy your hunger without making you feel sluggish in the heat. The texture of pan-seared shrimp paired with zesty zucchini noodles is light and bouncy, while the scent of fresh basil and garlic creates a kitchen atmosphere that feels like a high-end Italian bistro. These dinners are proof that you can have a viral-worthy, beautiful meal that also fuels your body for all your summer adventures.
Ingredients
- 1 lb Large shrimp, peeled and deveined
- 3 Large Zucchini (spiraled into noodles)
- 4 cloves Garlic, thinly sliced
- 1/2 tsp Red pepper flakes
- 1/4 cup Fresh parsley, chopped
- 2 tbsp Butter or avocado oil
How to make it
- Pat the shrimp completely dry with a paper towel. Season with salt and pepper. A dry shrimp is the only way to get a proper golden-brown sear in a hot pan.
- Heat a large skillet over medium-high heat with your choice of oil or butter. Once the oil shimmers, add the shrimp in a single layer. Do not crowd the pan, or they will steam instead of sear.
- Cook the shrimp for about 90 seconds per side until they turn opaque and form a pink ‘C’ shape. Remove them from the pan immediately to avoid overcooking.
- In the same pan, add the sliced garlic and red pepper flakes. Sauté for 30 seconds until fragrant but not brown. Add the zucchini noodles and toss with tongs for only 2 minutes. Any longer and the zucchini will release too much water and become mushy.
- Return the shrimp to the pan, toss with fresh parsley and a squeeze of lemon, and serve immediately while the textures are at their peak.
10 Best Summer Dessert Recipes To Cool Down

Why we love this
Summer desserts are all about the ‘chill factor.’ We love these because they lean into the natural sweetness of sun-ripened berries and the cooling properties of whipped cream and frozen bases. There is a sheer joy in cracking through a frozen graham cracker crust to find a tart, velvety fruit filling underneath. The sensation of a cold dessert melting on your tongue after a hot day is one of life’s simple pleasures. These treats are visually stunning, often featuring bright magentas and creamy whites that pop against a dark wooden serving board.
Ingredients
- 2 cups Fresh strawberries or raspberries
- 1 can (14 oz) Sweetened condensed milk
- 2 cups Heavy whipping cream
- 1 tsp Vanilla bean paste
- 1 Prepared graham cracker crust
How to make it
- Purée the fresh berries in a blender until smooth. If you prefer a more refined texture, press the purée through a fine-mesh sieve to remove the seeds.
- In a large chilled bowl, beat the heavy whipping cream and vanilla bean paste until stiff peaks form. Stiff peaks mean when you lift the whisk, the cream stands straight up without drooping.
- Gently fold the sweetened condensed milk into the whipped cream using a silicone spatula. Use a ‘cut and fold’ motion to keep the air in the mixture so the dessert stays light.
- Swirl the berry purée into the cream mixture. Do not over-mix; you want beautiful, viral-ready streaks of color throughout.
- Pour the mixture into the graham cracker crust and freeze for at least 6 hours, or ideally overnight. Remove from the freezer 10 minutes before slicing to allow it to soften just enough for a clean cut.
8 Fun Summer Drinks For Hot Days

Why we love this
A summer board isn’t complete without a signature drink to wash it all down. We love these beverages because they prioritize effervescence and botanical notes that are incredibly refreshing. Imagine the sound of ice cubes clinking against glass and the scent of bruised mint and fresh lime wafting up as you take a sip. These drinks—whether they are mocktails or cocktails—add a level of sophistication to your gathering. They are beautiful to look at, especially when garnished with edible flowers or frozen fruit skewers, making every sip feel like a special occasion.
Ingredients
- 4 cups Cubed watermelon
- 1/2 cup Fresh lime juice
- 1 bunch Fresh mint leaves
- 1 liter Sparkling mineral water
- Agave nectar (optional for sweetness)
- Plenty of crushed ice
How to make it
- Place the watermelon cubes in a blender and process until completely liquid. Strain the juice through a sieve into a large pitcher to remove any pulp for a crystal-clear drink.
- In the bottom of individual glasses, place 4-5 mint leaves and a teaspoon of agave if desired. Use a muddler to gently bruise the leaves—you want to release the oils, not shred the leaves into bits.
- Fill each glass to the brim with crushed ice. Crushed ice has more surface area than cubes, which chills the drink much faster.
- Fill the glasses halfway with the watermelon juice and top with the sparkling mineral water. This creates a beautiful gradient effect.
- Garnish with a sprig of fresh mint and a thin slice of lime. Serve immediately while the carbonation is at its peak.
12 Genius Snackle Box Ideas For Adults
[IMAGE_10]
Why we love this
The ‘Snackle Box’ is the ultimate evolution of the food board, and we are obsessed with its practicality. It takes the beauty of a charcuterie spread and makes it portable and organized. We love the way it appeals to our ‘grazing’ instincts, offering a little bit of everything—salty, sweet, crunchy, and soft—in perfectly portioned compartments. It’s the perfect companion for a boat day, a picnic, or a beach trip where traditional plates just won’t work. Seeing all those colors and textures neatly tucked into their own little squares is incredibly satisfying and makes snacking feel like an adventure.
Ingredients
- Assorted Charcuterie meats (Prosciutto, Salami)
- Gourmet Cheeses (Manchego, Brie, Sharp Cheddar)
- Crunchy elements (Marcona almonds, pretzels)
- Sweet bites (Dried apricots, dark chocolate squares)
- Fresh items (Grapes, snap peas)
How to make it
- Purchase a clean, BPA-free craft organizer or a dedicated ‘snackle box’ with removable dividers. Wash and dry it thoroughly before use.
- Start with your ‘anchors’—place the items that might roll around, like grapes or nuts, in the smaller, deeper compartments.
- Fold your meats into ‘roses’ or ribbons. To make a salami rose, fold the slices over the rim of a small glass and then press them into a compartment. This saves space and looks beautiful.
- Cube your hard cheeses and slice your soft cheeses. To keep the soft cheese like Brie from sticking to everything else, place it on a small square of parchment paper within its compartment.
- Fill in any remaining ‘white space’ with small items like blueberries or pomegranate seeds. The goal is for the box to look overflowing and abundant. Close the lid and keep it in a cooler until the moment you’re ready to graze.
The Final Word on Summer Boards
Creating a viral-worthy food board is less about professional culinary skills and more about the love you put into the presentation. Whether you are filling a ‘snackle box’ for a trip to the lake or arranging grilled kabobs for a backyard dinner, these ideas are meant to make your summer easier and more delicious. So, grab a board, pick a theme, and start assembly—your guests (and your Instagram feed) will thank you!