

From Soil to Soul: Elevate Your Home Life with These Greenery Tips
There is a profound, rhythmic magic that happens when we invite nature across the threshold of our homes. For years, I viewed gardening and interior styling as separate chores on a never-ending to-do list, until I realized that our surroundings are the silent narrators of our daily lives. When we nurture a seedling or curate a corner with intentionality, we aren’t just decorating; we are creating a sanctuary that breathes with us, offering a soft place to land after a chaotic day in the outside world.
This journey from soil to soul is about more than just aesthetics—it is about the tactile joy of cool earth between your fingers, the visual feast of a blossoming wall, and the peace that comes with a home that reflects your inner landscape. Whether you have a sprawling backyard or a tiny studio apartment, these viral-inspired tips are designed to help you cultivate a life that feels as good as it looks. Let’s dive into the art of living green and vibrant.
How to Build a Custom Planter Light Post for a Magical Garden Entrance
Why we love this
The gentle flicker of a lantern combined with the lush overflow of trailing vines creates an immediate sense of wonder. Walking up to a home framed by these custom light posts feels like stepping into a fairytale, where the warmth of the light catches the dew on the leaves and the scent of damp earth and blooming petunias fills the evening air. It’s a sensory greeting that says ‘welcome home’ before you even reach the front door, providing both safety and a high-end architectural detail that is surprisingly easy to achieve.
Essential Elements:
- Pressure-treated 4×4 timber post
- Large wooden or ceramic planter pot
- Solar or hardwired outdoor lantern
- Quick-set concrete mix
- Pea gravel for drainage
- High-quality potting soil
- Trailing plants (like Creeping Jenny or Ivy) and upright flowers
How to make it
- Prepare the post by measuring the height of your planter and adding the desired height of the light post above it. Sand the timber smooth and apply a weather-resistant stain or paint, allowing it to dry for at least 24 hours in a low-humidity environment.
- Position the 4×4 post exactly in the center of your planter. While holding it level, pour dry quick-set concrete into the pot until it reaches about 3-4 inches from the rim. Carefully add water according to the manufacturer’s instructions, stirring slightly to ensure no air pockets remain.
- Use a spirit level on two adjacent sides of the post to ensure it is perfectly vertical. Brace the post with scrap wood or tape if necessary while the concrete cures—this usually takes about 30 to 60 minutes for initial set, but wait 4 hours before moving.
- Once the concrete is rock hard, drill a few drainage holes through the side of the planter just above the concrete line to prevent water from pooling and rotting the wood or drowning the plants.
- Install your lantern fixture to the top of the post. If using a solar light, simply screw the bracket into the wood; if hardwired, you will need to have routed a channel for the wire previously.
- Layer 1 inch of pea gravel over the concrete for drainage, then fill the remaining space with premium potting soil. Plant your greenery, placing taller focal plants near the post and ‘spillers’ near the edges of the pot for that lush, overflowing look.
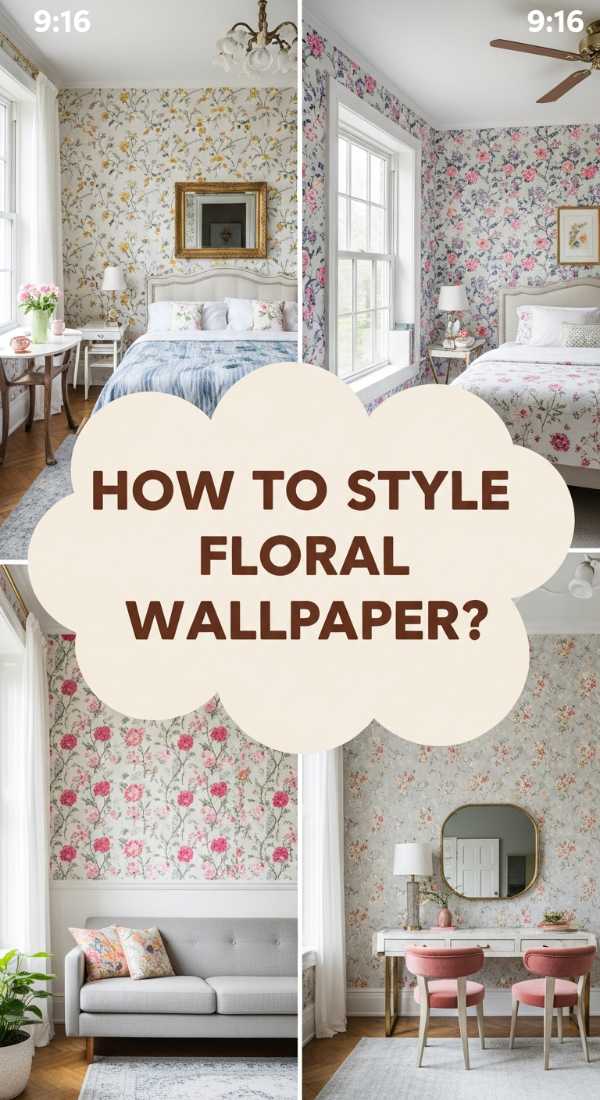
How to Choose Stunning Spring Flowers Wallpaper for a Refreshing Home Makeover

Why we love this
Nothing transforms the ‘vibe’ of a room faster than a bold, botanical print that mimics the wild beauty of a spring meadow. We adore this because it brings a permanent sense of renewal into spaces that might otherwise feel stagnant or dark, like a hallway or a powder room. The intricate textures of painted petals and the deep greens of illustrated leaves create a visual depth that makes walls seem to recede, opening up the room while wrapping you in a cozy, garden-inspired embrace.
Essential Elements:
- High-quality non-woven floral wallpaper
- Wallpaper paste (if not pre-pasted)
- Smoothing tool or squeegee
- Seam roller
- Sharp utility knife with extra blades
- Plumb line or laser level
- Sponge and clean water
How to make it
- Start with a perfectly prepped surface; remove all outlet covers and sand down any bumps on the wall. Wipe the wall with a damp cloth to remove dust, as even a tiny speck can create a bubble under the paper.
- Measure the height of your wall and cut your first strip of wallpaper, adding 2-3 inches of ‘bleed’ at the top and bottom. Carefully identify where the pattern repeats to ensure subsequent strips align perfectly.
- Use a plumb line or laser level to draw a perfectly vertical line on the wall where the first strip will go. This is the most critical step, as walls are rarely perfectly straight; if the first piece is crooked, the whole room will be.
- Apply the adhesive evenly to the back of the paper (the ‘book it’ method) or directly to the wall if using ‘paste-the-wall’ paper. Ensure you reach every edge without over-saturating the material.
- Line up the edge of the paper with your vertical line and smooth it from the center outwards using your smoothing tool to remove air bubbles. Work slowly to avoid stretching the paper, which can cause gaps later.
- Use your seam roller to gently press down the edges where two strips meet, ensuring a flush fit. Trim the excess at the ceiling and baseboard using a very sharp blade and a straight edge for a crisp, professional finish.
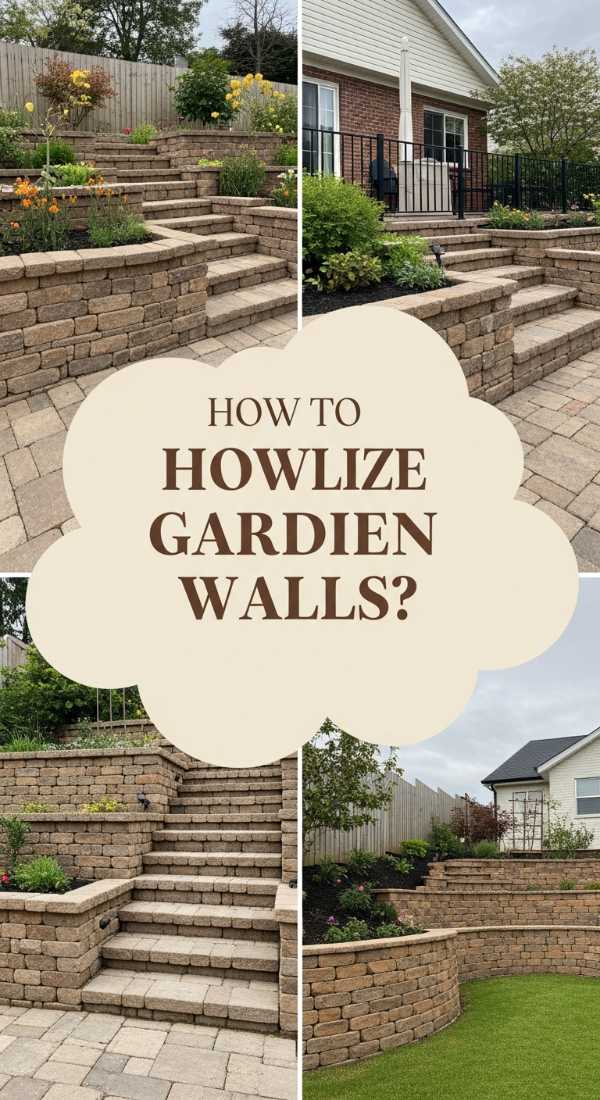
How to Design a Low Retaining Wall for an Elegant Garden Structure

Why we love this
There is a grounded, timeless elegance in a well-constructed low retaining wall that defines the architecture of an outdoor space. We love how it creates ‘outdoor rooms,’ turning a flat, uninspired lawn into a multi-dimensional landscape with built-in seating or raised flower beds. The contrast between the rugged, cool stone and the soft, swaying grasses planted behind it creates a sophisticated balance that feels both curated and natural, adding a sense of permanent luxury to any property.
Essential Elements:
- Wall blocks or natural stone
- Crushed stone (base material)
- Landscape fabric
- Leveling sand
- Perforated drainage pipe
- Rubber mallet
- Construction adhesive (for the top cap)
How to make it
- Dig a trench roughly 12 inches wide and 6 inches deep along the path of your wall. Ensure the bottom of the trench is firmly compacted and level to prevent future shifting or sagging.
- Fill the trench with 4 inches of crushed stone, compacting it thoroughly with a hand tamper. Add a thin layer of leveling sand on top to provide a smooth surface for the first course of blocks.
- Lay the first course of blocks with extreme precision. Use a level on every single block, both side-to-side and front-to-back. If the first layer isn’t perfect, the wall will look skewed as it gets taller. Use your rubber mallet to tap blocks into place.
- Backfill behind the first course with more crushed stone and lay down your perforated drainage pipe to ensure water doesn’t build up pressure behind the wall, which is the leading cause of wall failure.
- Stack subsequent courses, staggering the vertical joints (like a brick pattern) for maximum structural integrity. If your blocks have a lip on the back, ensure they are hooked tightly against the row below.
- Once you reach the desired height (usually 12-18 inches for a low wall), apply beads of heavy-duty outdoor construction adhesive to the top row and set your capstones in place. This provides a finished look and a stable surface for people to sit on.
How to Create a Cute Campsite Setup for a Cozy Outdoor Retreat

Why we love this
Creating a ‘glamping’ nook in your own backyard or at a local site is the ultimate way to disconnect from digital noise and reconnect with the simple joys of life. We love the juxtaposition of the rugged outdoors with soft, high-thread-count linens, the smell of woodsmoke mingling with lavender-scented candles, and the golden hour glow reflected in a glass of cider. It’s an aesthetic that prioritizes comfort and whimsy, turning a standard camping trip into a soul-soothing retreat that feels like a boutique hotel under the stars.
Essential Elements:
- Canvas bell tent or high-quality A-frame
- Outdoor-rated rugs and floor cushions
- Battery-powered fairy lights and lanterns
- Portable fire pit
- Folding wooden chairs
- Wool blankets and faux fur throws
- Woven baskets for storage
How to make it
- Select a level, well-drained spot for your campsite. Clear away any sharp rocks or branches that could puncture the tent floor or make for an uncomfortable walking surface.
- Pitch your tent with tension in mind; a taut canvas not only looks more ‘Instagrammable’ but also sheds wind and rain more effectively. Ensure the entrance faces the best view or away from prevailing winds.
- Layer the interior starting with a heavy-duty tarp under the tent, followed by colorful outdoor rugs inside. This creates a thermal barrier against the cold ground and provides a soft texture for bare feet.
- Set up your sleeping area using an elevated air mattress or cot. Instead of a sleeping bag, use real quilts and pillows to elevate the ‘cozy’ factor. Layer textures like chunky knits and linens to add visual warmth.
- Create a ‘living’ area outside the tent entrance. Arrange your folding chairs around a portable fire pit, and string fairy lights between nearby trees or on poles to define the space with a warm, amber glow.
- Use woven baskets to hide plastic gear or snacks, and place small lanterns at the foot of the tent door to act as a welcoming beacon when the sun goes down.
How to Style a Dreamy Pink Layout for a Chic Workspace Aesthetic
Why we love this
A workspace shouldn’t just be functional; it should be a source of inspiration. Styling a desk with soft rose, blush, and copper tones creates a calming yet energizing environment that wards off the ‘Sunday scaries.’ We love how the softness of the pink palette contrasts with crisp white tech and lush green desk plants, creating a balanced aesthetic that feels professional yet deeply personal. It’s about creating a space where your creativity feels safe to bloom and your focus feels effortless.
Essential Elements:
- Matte pink desk mat
- Rose gold or copper desk accessories
- White or light wood desk
- Soft pink ergonomic chair
- Fresh flowers or a pink-toned plant (like a Triostar Stromanthe)
- Warm-toned task lighting
- Framed motivational art in blush tones
How to make it
- Clear everything off your desk and start with a clean slate. A white or light wood surface provides the best neutral backdrop to make pink accents ‘pop’ without feeling overwhelming.
- Lay down a large matte pink vegan leather desk mat. This defines your primary work zone and provides a tactile, soft surface for your hands and mouse.
- Organize your tech. Use cable clips to hide messy black cords, replacing them with white or braided rose-gold cables where possible to maintain the color story.
- Incorporate ‘living’ elements. Place a small vase of pink peonies or a potted plant with variegated pink leaves on one corner. The organic shapes break up the sharp lines of your computer and monitor.
- Add height with rose gold desk organizers for your pens, notebooks, and tablets. Group items in odd numbers (the rule of three) to create a visual flow that feels intentional rather than cluttered.
- Adjust your lighting. Use a desk lamp with a warm-toned LED bulb (2700K) to enhance the pink hues in the room. Cool white light can make pink look grey or muddy, while warm light makes it glow.
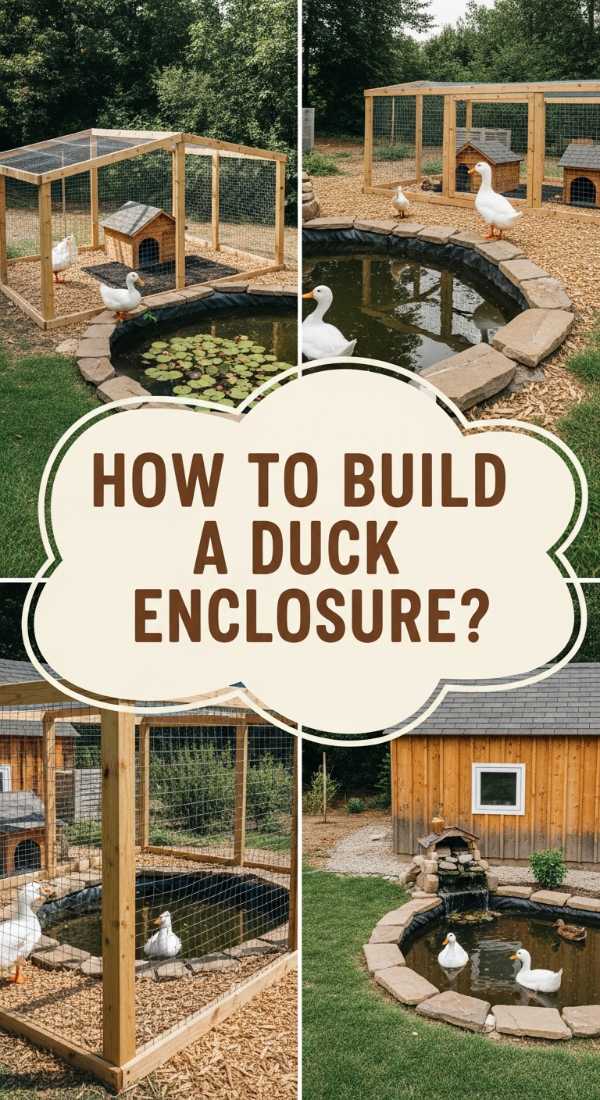
How to Construct a Safe DIY Duck Enclosure for a Charming Backyard Farm
Why we love this
There is nothing quite as charming as the soft ‘waddle-quack’ of happy ducks in a backyard. We love this project because it combines practical farm steadying with a storybook aesthetic. A well-designed enclosure offers a safe haven for your feathered friends while adding a rustic, cottage-core vibe to your garden. Watching ducks splash in a clean pond surrounded by sturdy wood and wire gives a sense of self-sufficiency and peace that is hard to find in modern city life.
Essential Elements:
- Hardware cloth (not chicken wire)
- Pressure-treated lumber for the frame
- Corrugated roofing panels
- Pre-formed pond or large heavy-duty tub
- Secure latching mechanism (predator-proof)
- Straw or wood shavings for bedding
How to make it
- Plan your footprint, allowing at least 4 square feet of house space and 10 square feet of run space per duck. Choose a spot with partial shade to keep the ducks cool during summer months.
- Build the frame using 2×4 lumber. Dig a 6-inch deep trench around the perimeter and bury the hardware cloth. This ‘apron’ prevents predators like foxes or raccoons from digging under the fence to get to your ducks.
- Construct a raised ‘house’ section with a solid floor and a large door for easy cleaning. Ensure there are vents near the roofline for airflow; ducks produce a lot of moisture, and good ventilation is key to their health.
- Install a pre-formed pond in the run. Dig a hole slightly larger than the tub, level the bottom with sand, and drop the tub in. Surround it with flat stones to prevent the ducks from turning the area into a mud pit.
- Cover the run with hardware cloth, securing it with heavy-duty staples every 3 inches. Do not use chicken wire, as predators can easily tear through it or reach their paws through the large holes.
- Add a sloped corrugated roof over the house and at least part of the run to provide dry areas during rain. Finish with a predator-proof latch (like a carabiner or a two-step sliding bolt) on all gates.
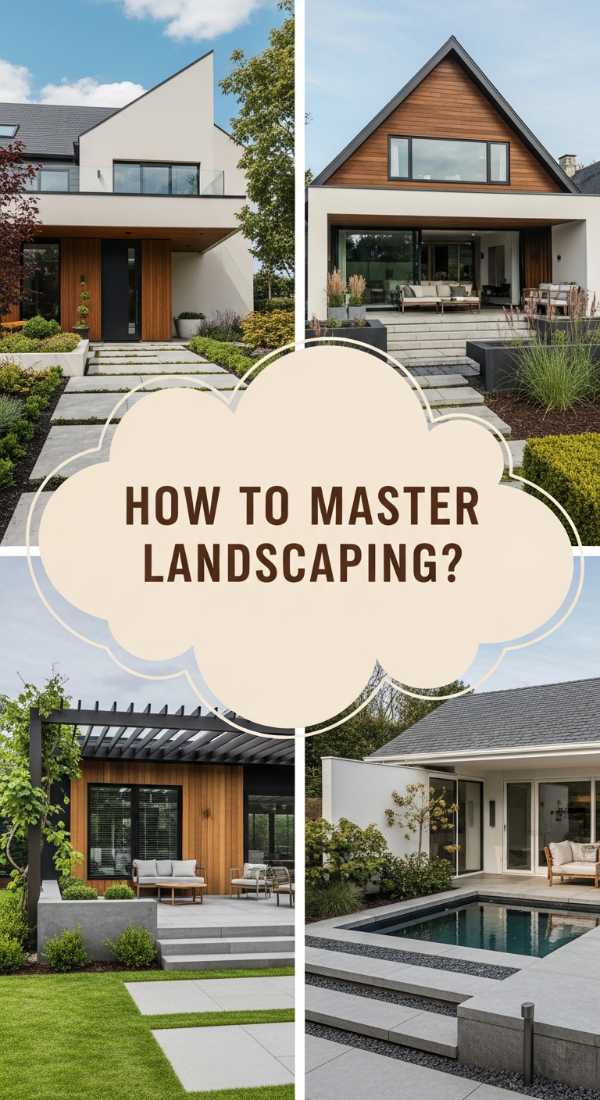
How to Master Modern Landscaping Ideas for Incredible Property Value

Why we love this
Modern landscaping is all about the ‘quiet luxury’ of clean lines, intentional negative space, and a curated color palette. We love it because it transforms a home’s exterior into a high-end retreat that looks expensive but is often easier to maintain than traditional gardens. The use of geometric hardscaping, dramatic uplighting on ornamental trees, and mass plantings of ornamental grasses creates a rhythm that guides the eye and adds massive curb appeal and financial value to your property.
Essential Elements:
- Black or dark grey mulch or river stones
- Low-voltage LED landscape lighting
- Large-format concrete pavers
- Ornamental grasses (like Mexican Feather Grass)
- Minimalist metal edging
- Strategic focal point (a sculpture or specimen tree)
How to make it
- Create a master plan focused on zones. Use a garden hose to ‘draw’ the shapes of your beds on the lawn, opting for long, sweeping curves or sharp, 90-degree angles to establish a modern theme.
- Install professional-grade metal or composite edging. This creates a crisp ‘knife-edge’ between your lawn and your garden beds, which is the hallmark of a high-end landscape.
- Focus on mass planting rather than variety. Instead of ten different flowers, plant ten of the same ornamental grass in a grid or a tight cluster. This creates a bold, architectural statement that feels modern and cohesive.
- Lay large-format concrete pavers for walkways, leaving 2-3 inch gaps between them. Fill these gaps with dark river stones or a low-growing groundcover like ‘Elfin’ Thyme for a high-contrast, geometric look.
- Install a low-voltage lighting system. Place spotlights at the base of trees with interesting bark or structure, and use path lights that direct light downward to avoid glare. Lighting should be subtle and highlight the textures of the plants.
- Finish with a 3-inch layer of dark mulch or black basalt rock. The dark color makes the green of the plants look more vibrant and provides a clean, uniform finish that hides soil and weeds.
How to Curate a Serene Blue Layout for a Relaxing Interior Atmosphere
Why we love this
Blue is the color of the horizon and the deep sea; it is psychologically proven to lower the heart rate and evoke a sense of serenity. We love a serene blue layout because it acts as a ‘visual exhale.’ When you walk into a room layered in dusty blues, navy accents, and soft slate tones, the mental chatter of the day begins to fade. It’s a sophisticated, gender-neutral palette that feels timeless, airy, and deeply restorative, making it perfect for bedrooms and living sanctuaries.
Essential Elements:
- Sky blue or slate wall paint (matte finish)
- Navy velvet accent pillows
- Natural linen curtains in a light blue or cream
- Ceramic vases in varied shades of cobalt and cerulean
- Light-toned wood furniture
- Soft white or blue-toned area rug
How to make it
- Choose your ‘anchor’ blue. For a relaxing space, go with a desaturated blue (one with grey undertones). Apply this to the walls to create an immersive, ‘enveloping’ feel without it being too bright or distracting.
- Layer textures to keep the blue from feeling cold. Mix a navy velvet sofa or chair with a light blue linen throw and a chunky knit cream blanket. The variety of materials adds warmth and visual interest.
- Use the ’60-30-10′ rule: 60% of the room in your primary blue, 30% in a secondary neutral (like light oak or white), and 10% in a punchy accent (like a deep navy or a soft metallic).
- Incorporate natural elements to ground the color. Light-toned wooden coffee tables or wicker baskets prevent the blue from looking too ‘preppy’ and add an organic, earthy touch.
- Switch out your hardware for brushed brass or matte black. Brass warms up blue tones beautifully, creating a sun-drenched feel, while black makes the blue look modern and crisp.
- Style your shelves with blue-toned glass or ceramics. Group items by color rather than size to create ‘color blocks’ that are pleasing to the eye and reinforce the serene atmosphere.
How to Utilize Low Retaining Wall Ideas for a Balanced Outdoor Space

Why we love this
Beyond just holding back soil, a low retaining wall is a masterclass in spatial balance. We love using these walls to solve grading issues while simultaneously creating ‘gallery spaces’ for your favorite plants. By elevating a section of the garden, you bring the flowers closer to eye level, allowing you to appreciate the intricate details of a petal or the aroma of herbs without leaning over. It creates a structured, ‘walled garden’ feel that provides a sense of privacy and intentional design even in smaller yards.
Essential Elements:
- Timber sleepers or interlocking stone blocks
- Leveling tools
- Gravel for backfill
- Geo-textile fabric
- Selection of ‘spiller’ plants (like Lobelia or Bacopa)
- Solar cap lights for the wall corners
How to make it
- Mark the area using marking paint. For a ‘balanced’ look, consider a semi-circle or a tiered approach with two lower walls rather than one high wall, as this feels less imposing.
- Excavate the base, ensuring you go deep enough to accommodate a sturdy gravel foundation. If using timber sleepers, pre-treat any cut ends with a wood preservative to prevent rot.
- Lay the first level, ensuring it is perfectly horizontal. If using timber, secure the corners with long galvanized timber screws. If using stone, ensure the blocks are tightly abutted.
- Line the inside of the wall with geo-textile fabric before adding soil. This allows water to pass through but keeps the fine soil particles from washing through the gaps in your wall and staining the exterior.
- Backfill the first few inches with gravel to ensure excellent drainage. Fill the rest with a nutrient-rich garden soil mix, tamping it down lightly to prevent significant settling later.
- Select plants based on ‘layers.’ Plant evergreens in the back for year-round structure, and flowering annuals in the front that will ‘spill’ over the edge of the wall, softening the hard lines of the stone or wood.
How to Refresh Your Home with Spring Flowers Wallpaper for a Seasonal Glow
[IMAGE_10]
Why we love this
There is no more dramatic way to signal the arrival of spring than by covering a tired wall in a riot of blossoms. We love this seasonal refresh because it’s a commitment to joy. Choose a removable peel-and-stick option to switch things up without the guilt, or go for a permanent luxury paper to make a bold statement. The glow of a sunlit room hitting a floral-patterned wall creates a soft, diffused light that makes the entire house feel like it’s in perpetual bloom, regardless of the weather outside.
Essential Elements:
- Peel-and-stick or traditional floral wallpaper
- Measuring tape
- Plastic smoother
- Pencil
- Sponge and mild soap
- Step ladder
How to make it
- Clean the wall thoroughly with a mixture of water and a drop of dish soap to remove any oils or residues that might prevent the adhesive from sticking. Let the wall dry for at least 2 hours.
- Start from the most visible corner of the room. Measure the width of the wallpaper and mark a light pencil line on the wall to guide your first panel.
- Peel back about 6-12 inches of the backing paper (if using peel-and-stick) and align the top of the panel with the ceiling line. Don’t worry if it’s not perfectly flush with the ceiling; leave an inch of overhang to trim later.
- Slowly pull the backing paper down with one hand while using the smoothing tool with the other to press the paper onto the wall. Move from the center toward the edges to push out any trapped air.
- Match the pattern for the second panel. Most floral wallpapers have an ‘offset match,’ meaning you’ll need to slide the paper up or down to find where the flowers align. This is the most time-consuming part, so be patient!
- Once all panels are up, use a fresh utility blade to trim the excess along the ceiling and baseboard. Run the back of your fingernail or the smoother along the edge first to create a ‘crease’ to guide your blade for a perfectly straight cut.
Cultivating Your Own Sanctuary
As we’ve explored, elevating your home life is an act of love—for your space, for your family, and for yourself. From the structural elegance of a stone wall to the whimsical charm of a pink-hued workspace, every choice you make is a seed planted for a more beautiful, more peaceful way of living. Don’t feel like you need to do everything at once. Pick one project that speaks to your soul, get your hands a little dirty, and watch as your home transforms into the sanctuary you’ve always dreamed of. After all, life is too short for boring walls and empty gardens.