

From Neon to Pastels: This June’s Hottest Summer Nail Art
Hello, my loves! As the golden June sun begins to peek through our windows, there is something so magical about that shift in the air, isn’t there? It’s like a cloud-soft embrace from the universe, whispering that it’s finally time to shed those heavy layers and let our inner radiance shine. This season, I’ve been feeling a total transformation—moving away from the loud, aggressive neons of the past and leaning into the dreamiest, most buttery pastels you can imagine.
Our hands tell so much of our story, whether we’re clutching a cold iced latte or waving hello to a friend at a beach bonfire. That’s why I’ve spent the last few weeks curating the ultimate guide to June nails just for you. We’re talking about textures that catch the light, colors that soothe the soul, and designs that make every day feel like a tiny vacation. Grab a cozy seat, and let’s dive into the artistry of summer together.
5 steps to master June Nails trends

Why to love this Design:
This design is all about that ‘soft girl’ aesthetic that’s taking over June. It’s like wearing a sunset on your fingertips, blending the warmth of a June afternoon with the coolness of a summer breeze. It’s effortless, chic, and looks incredible with a white linen dress.
Essential Elements:
- Creamy Lavender Polish
- Peach Sorbet Hue
- Fine Gold Striping Tape
- High-Gloss Top Coat
- Nail Buffer
How to Prepare:
- Gently push back cuticles to create a clean canvas.
- Shape nails into a soft almond or oval shape.
- Apply a ridge-filling base coat for a smooth finish.
- Paint each nail an alternating pastel shade.
- Seal with a UV-protectant top coat to prevent yellowing in the sun.
Budget Range
- Essie ‘Soothe Move’ – $10
- OPI ‘Peach-a-boo’ – $11
- Seche Vite Top Coat – $9
4 ways to prep your Summer Trip Nails
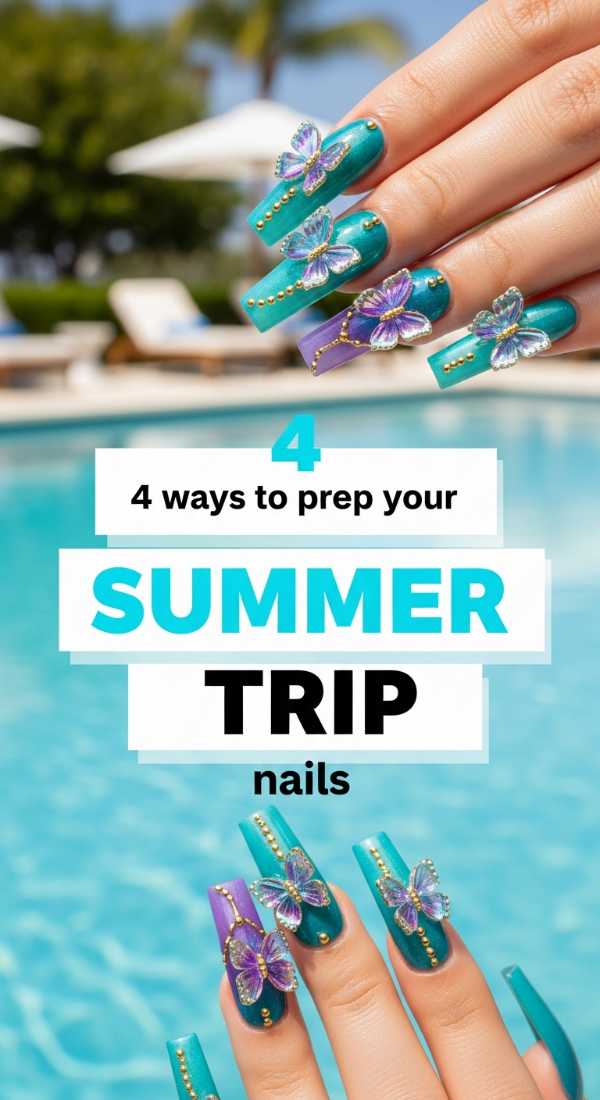
Why to love this Design:
When you’re traveling, the last thing you want is a chipped nail while you’re exploring a new city. This prep method ensures your nails look salon-fresh from the airport terminal to the beach club. It’s about durability without sacrificing that delicate, airy summer glow.
Essential Elements:
- Nail Dehydrator
- Protein Bond Primer
- Soft Nude Gel Polish
- Portable LED Lamp
How to Prepare:
- Sanitize and remove all oils from the nail plate.
- Apply a thin layer of protein bond for maximum adhesion.
- Apply two thin coats of a sheer ‘your-nails-but-better’ shade.
- Cure under LED light for 60 seconds between layers.
Budget Range
- Modelones Gel Kit – $25
- Young Nails Protein Bond – $15
- Mini LED Lamp – $12
Create Holidays Nails in 6 simple steps
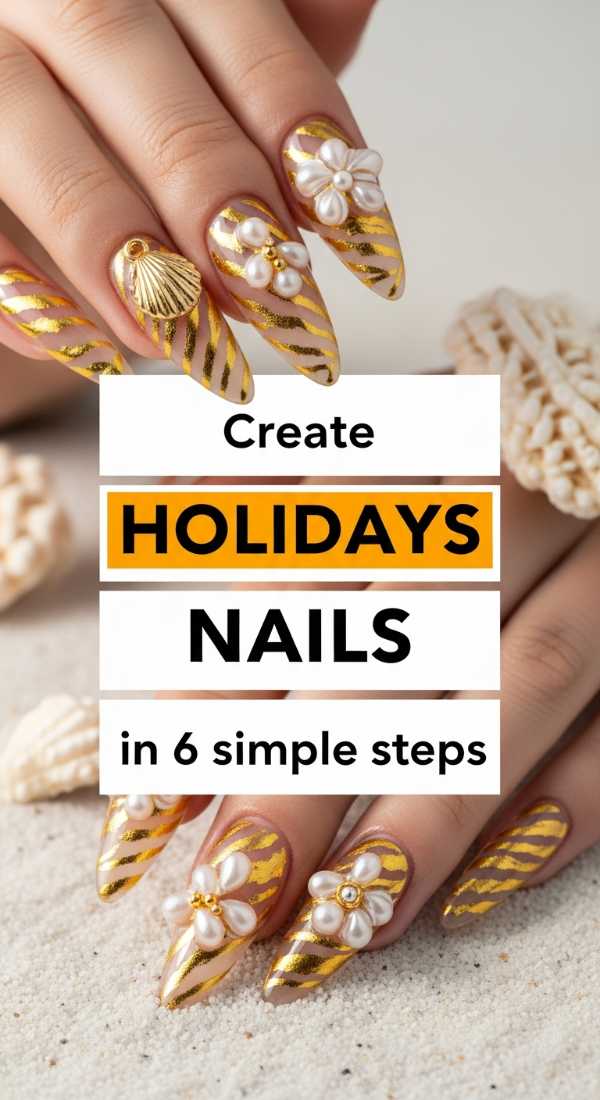
Why to love this Design:
Holidays are for celebrating, and what better way than with a vibrant, tropical-inspired palette? This look captures the energy of a seaside getaway, using gradients that mimic the ocean meeting the sand. It’s fun, expressive, and purely joyful.
Essential Elements:
- Turquoise Teal Polish
- Sand-colored Beige
- Makeup Sponge
- Latex Barrier
- Gold Flakes
How to Prepare:
- Apply a base coat of sandy beige.
- Protect your skin with a liquid latex barrier.
- Apply teal and beige to a sponge in a horizontal line.
- Dab the sponge onto the nail to create a gradient effect.
- Press small gold flakes into the tacky layer.
- Finish with a thick gel-effect top coat.
Budget Range
- Sally Hansen Insta-Dri Teal – $7
- Holo Taco Gold Flakes – $13
- Liquid Latex Barrier – $8
3 easy tricks for Summer Nails designs
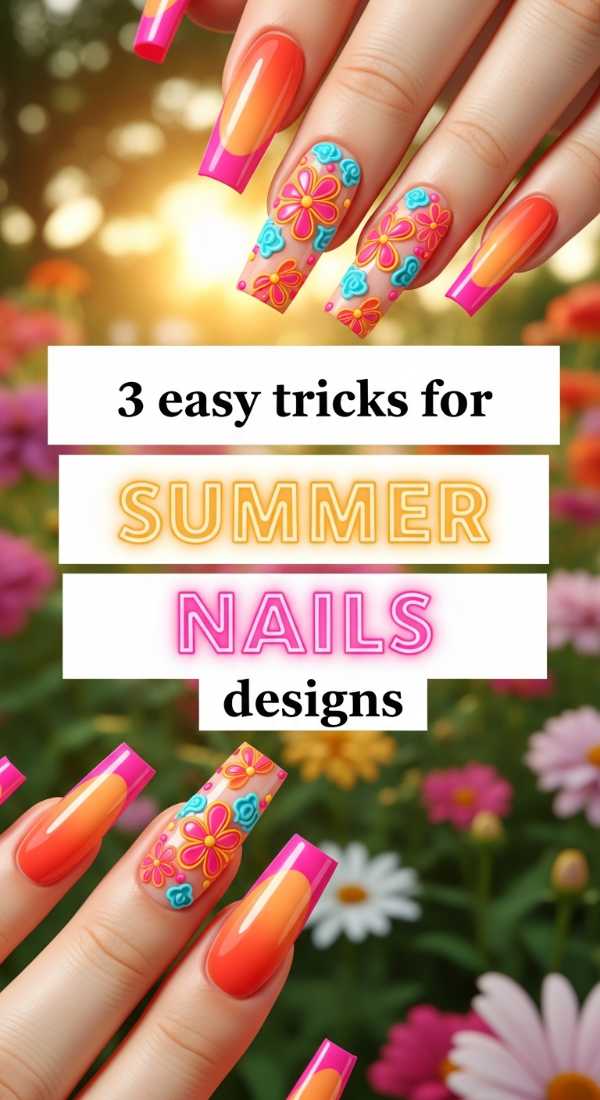
Why to love this Design:
Negative space designs are my absolute favorite for June because they grow out so gracefully. You don’t have to rush back to the salon the second your nails grow a millimeter. It’s a minimalist’s dream—sophisticated, modern, and very ‘quiet luxury’.
Essential Elements:
- Detailing Brush
- Mint Green Polish
- Matte Top Coat
- Nail Art Stencils
How to Prepare:
- Use a detailing brush to draw organic wavy lines across bare nails.
- Fill in only half of the nail to leave ‘negative space’ exposed.
- Apply a matte top coat for a high-fashion, velvety finish.
Budget Range
- Zoya ‘Tiana’ Mint – $12
- Nail Art Brush Set – $6
- OPI Matte Top Coat – $11
5 secrets to perfect Summer Holidays Nails

Why to love this Design:
The secret to perfect holiday nails is the chrome finish. It reflects the sun beautifully and looks expensive even if you did it at home. It’s that pearlescent ‘glazed donut’ look but updated with a soft June pink for a romantic, dreamy vibe.
Essential Elements:
- Pearl Chrome Powder
- Sponge Applicator
- Pale Pink Gel Base
- No-wipe Top Coat
How to Prepare:
- Apply and cure your pink base color.
- Apply a no-wipe top coat and cure for only 30 seconds.
- Rub the chrome powder onto the nail until it glows.
- Dust off excess powder with a soft brush.
- Seal with a final layer of top coat and cure fully.
Budget Range
- Artdone Chrome Powder – $8
- Gelish Soft Pink – $14
- Makartt Top Coat – $10
Design June Nails in 7 quick steps

Why to love this Design:
June is the month of blooming flowers, so a floral French tip is simply essential. It combines the timeless elegance of a French manicure with the whimsical charm of a summer garden. It’s delicate, feminine, and oh-so-sweet.
Essential Elements:
- White Tip Polish
- Dotting Tool
- Yellow and Pink Acrylic Paint
- Fine Tip Liner
How to Prepare:
- Paint a classic white French tip.
- Let it dry completely.
- Use a dotting tool to place five pink dots in a circle.
- Add a tiny yellow dot in the center for the flower bud.
- Draw tiny green leaves using a fine liner.
- Repeat on two accent nails.
- Seal with a glossy top coat.
Budget Range
- Orly White Tip – $12
- Dual-ended Dotting Tools – $5
- Apple Barrel Acrylic Paint Set – $10
4 steps to blend June Nails colors
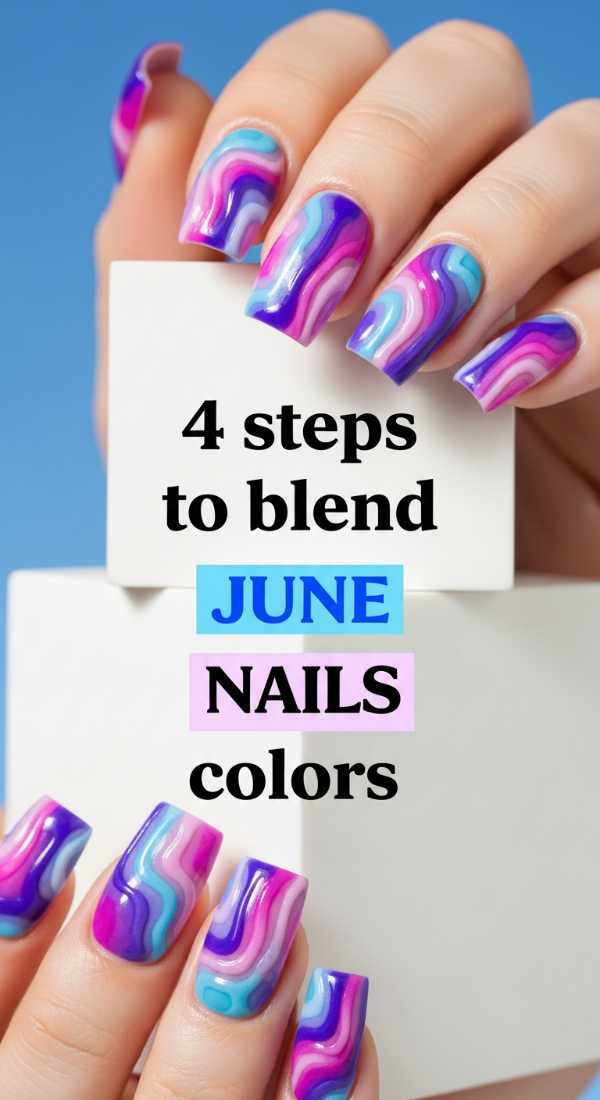
Why to love this Design:
Blending colors is like painting a watercolor masterpiece on your hands. This technique uses the ‘blooming’ method to create soft, ethereal transitions between sky blue and sunset orange. It’s art you can wear!
Essential Elements:
- Blooming Gel
- Sky Blue Polish
- Soft Orange Polish
- Mixing Palette
How to Prepare:
- Apply a layer of blooming gel but do not cure.
- Drop small beads of blue and orange onto the wet gel.
- Watch the colors spread and marble naturally.
- Cure once the desired blend is achieved.
Budget Range
- Kupa Blooming Gel – $18
- DND Sky Blue – $9
- DND Sunset Orange – $9
3 tips to style your Summer Nails charms

Why to love this Design:
Charms add that 3D dimension that makes your nails a conversation starter. Think tiny seashells or pearls that remind you of a walk on the beach. It’s a tactile, luxury experience that feels very ‘maximalist summer’.
Essential Elements:
- Nail Glue or Resin
- Tiny Pearl Charms
- Seashell Studs
- Tweezers
How to Prepare:
- Apply a small bead of resin where you want the charm.
- Use tweezers to carefully place a pearl or shell into the resin.
- Hold in place for 10 seconds and seal the edges with top coat.
Budget Range
- Amazon Nail Charm Variety Pack – $12
- IBD 5-Second Nail Glue – $6
- Precision Tweezers – $5
Make 5 types of June Nails at home
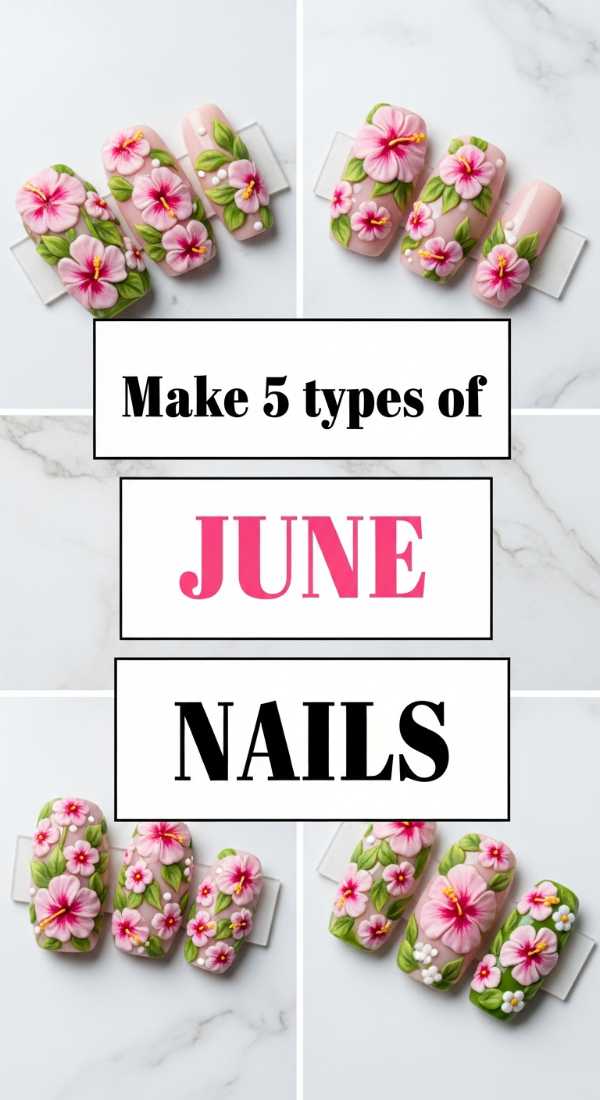
Why to love this Design:
This is for my busy loves who want variety! You can mix and match five different simple patterns—dots, stripes, hearts, stars, and solid colors—all within the same pastel family. It’s playful, youthful, and incredibly easy to achieve.
Essential Elements:
- Pastel Polish Bundle
- Toothpicks (for dots)
- Tape (for stripes)
- Heart Stickers
How to Prepare:
- Choose five coordinating pastel shades.
- On the thumb, do a solid color.
- On the index, use a toothpick to make polka dots.
- On the middle, use tape to create a crisp stripe.
- On the ring finger, apply a heart sticker.
Budget Range
- Beetles Pastel Gel Set (20 colors) – $20
- Nail Art Stickers – $4
- Household toothpicks – $1
Add water drops in 4 easy steps
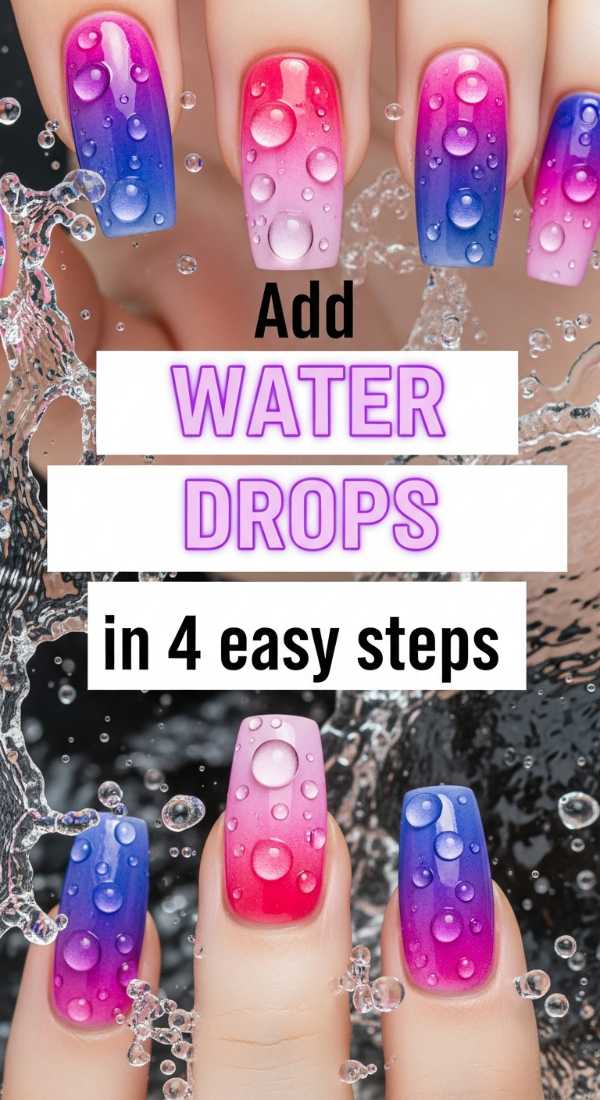
Why to love this Design:
This is the ultimate ‘cool’ trend for 2024. It looks like actual droplets of morning dew are sitting on your nails. It’s refreshing, unique, and gives a 3D texture that looks incredible in photos. Perfect for a pool day!
Essential Elements:
- Clear Builder Gel (Hard Gel)
- Dotting Tool
- Matte Base Color
- No-wipe Top Coat
How to Prepare:
- Apply a matte base color and cure.
- Dip a dotting tool into clear builder gel.
- Place random ‘drops’ of the thick gel onto the matte surface.
- Cure immediately for 60 seconds so the ‘drops’ stay raised.
Budget Range
- Saviland Builder Gel – $15
- Gelish Matte Top Coat – $13
- Dotting Tool Set – $5
Embrace Your Summer Glow
As we wrap up this journey through June’s most beautiful trends, I want you to remember that nail art is more than just a beauty routine—it’s a form of self-love. Whether you choose the softest pastels or a striking 3D water drop effect, let your nails be a reflection of the joy you’re feeling this season. Go forth, stay radiant, and let your hands tell a story of sunshine and soft embraces. I can’t wait to see which look you choose, my loves!