
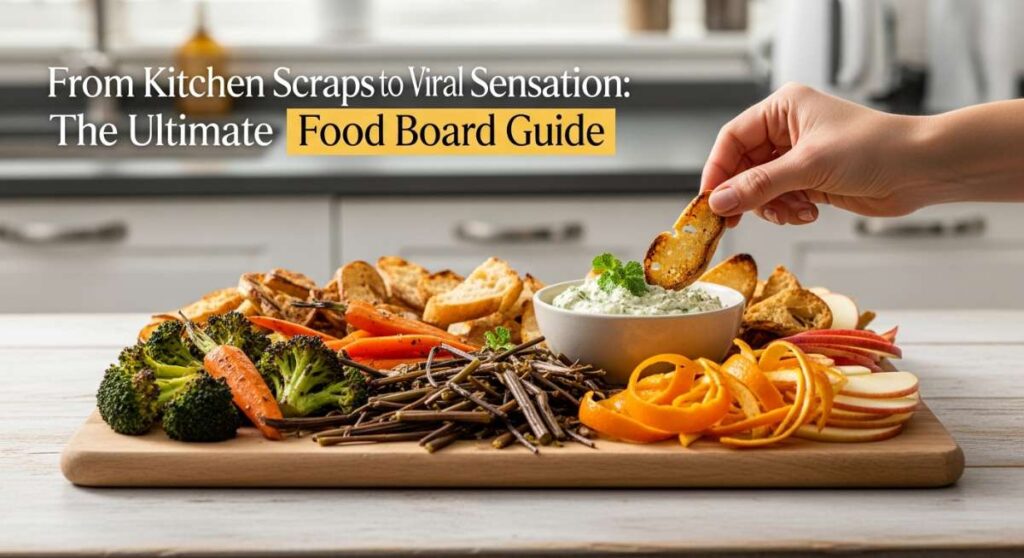
From Kitchen Scraps to Viral Sensation: The Ultimate Food Board Guide
There is something undeniably magical about the moment you open your fridge on a frantic Tuesday evening and realize you don’t have to cook from scratch. We’ve all been there—staring into the abyss of a crisper drawer, wondering how we let that bundle of kale lose its will to live. But what if I told you that those very scraps, combined with a little weekend rhythm, could become the viral-worthy food board of your dreams? It’s not just about eating; it’s about creating a ritual that honors your time and your body, turning the chore of ‘meal prep’ into a beautiful, tactile experience of colors and textures.
My journey into the world of food boards started out of pure necessity. I was tired of wilted salads and expensive takeout, so I began treating my weekly prep like an art project. The secret isn’t in fancy tools or expensive ingredients; it’s in the way we assemble the elements. By laying out our proteins, grains, and greens on a massive board, we invite a sense of abundance into our kitchens. Today, I’m sharing the exact blueprints for ten viral-inspired prep styles that will transform your kitchen from a site of stress into a sanctuary of flavor.
How to prep healthy meals?

Why we love this
Healthy meal prepping is like giving a gift to your future self, wrapping up vitality in a glass container. We adore this approach because it focuses on high-vibrancy ingredients—think the snap of fresh sugar peas, the earthy richness of roasted sweet potatoes, and the zesty brightness of a lemon-tahini drizzle. There is a profound sensory satisfaction in seeing a rainbow of nutrients laid out before you, smelling the nutty aroma of toasted quinoa mingling with fresh herbs. It’s a way to feel light and energized, ensuring every bite is a crunch of pure, unadulterated goodness that keeps your brain sharp and your heart happy.
Ingredients
- 2 cups tri-color quinoa
- 1 bunch organic kale, stemmed and chopped
- 1 can chickpeas, drained and patted dry
- 2 large sweet potatoes, cubed
- 1 cup cherry tomatoes, halved
- Fresh parsley and mint
- Homemade lemon-tahini dressing
How to make it
- Start by preheating your oven to 400°F (200°C). This high heat is essential for achieving that elusive golden-brown crust on your vegetables.
- Spread your cubed sweet potatoes and chickpeas on a large parchment-lined baking sheet. Drizzle with olive oil and a pinch of sea salt. Roast for 25-30 minutes, tossing halfway through, until the potatoes are tender and the chickpeas are slightly crispy.
- While the oven works its magic, rinse your quinoa under cold water to remove the bitter saponin coating. Combine with 4 cups of water in a pot, bring to a boil, then simmer on low for 15 minutes. You’ll know it’s done when the tiny ‘tails’ sprout and the water is fully absorbed.
- Place your chopped kale in a large bowl and massage it with a teaspoon of olive oil and a pinch of salt for 3 minutes. This breaks down the tough fibers, making it silky and much easier to digest.
- Assemble by layering the fluffy quinoa as a base, followed by the roasted gems and fresh tomatoes. Garnish with a heavy hand of herbs for an aromatic finish.
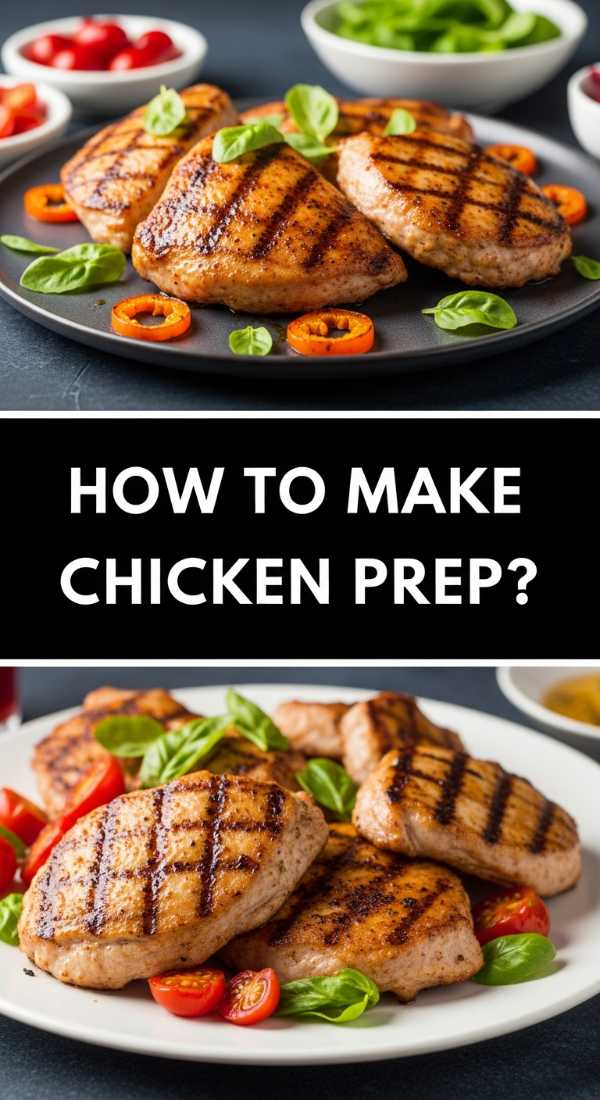
How to make chicken prep?
Why we love this
Chicken prep is the undisputed backbone of a successful kitchen board. We love it for that nostalgic, home-cooked aroma that fills the house—the smell of garlic and rosemary sizzling in a pan. There is nothing quite like the texture of a perfectly seared chicken breast: a thin, savory crust on the outside giving way to a juicy, tender interior that melts in your mouth. It’s the ultimate versatile protein that can take on spicy, sweet, or savory profiles, making it the perfect canvas for your culinary creativity throughout the week.
Ingredients
- 1.5 lbs boneless, skinless chicken breasts
- 3 tablespoons extra virgin olive oil
- 4 cloves garlic, minced
- 1 teaspoon smoked paprika
- 1 teaspoon dried oregano
- Salt and cracked black pepper to taste
- Lemon wedges for finishing
How to make it
- Begin by evening out your chicken breasts. Place them between two sheets of plastic wrap and use a meat mallet to gently pound them to a uniform thickness of about 1/2 inch. This ensures even cooking so the edges don’t dry out before the center is done.
- In a small bowl, whisk together the olive oil, garlic, paprika, and oregano. Rub this mixture over every inch of the chicken, letting it marinate for at least 20 minutes at room temperature.
- Heat a heavy-bottomed skillet (cast iron is best!) over medium-high heat. You want to see a slight shimmer in the oil before adding the meat.
- Place the chicken in the pan and sear without moving it for 5-6 minutes. Look for a deep golden-brown edge to appear before flipping.
- Flip and cook for another 5 minutes. Use a meat thermometer to ensure the internal temperature reaches 165°F (74°C).
- Remove from the heat and let the chicken rest for a full 10 minutes before slicing. This allows the juices to redistribute, ensuring every slice is moist.
How to prep weekly dinners?

Why we love this
The beauty of weekly dinner prep lies in the ‘mix-and-match’ freedom it offers. We love the feeling of being a conductor of a culinary orchestra, where all the components are ready to be assembled into a masterpiece at a moment’s notice. Imagine the smoky scent of roasted broccoli, the fluffiness of jasmine rice, and the savory depth of a soy-glaze. It’s about creating a ‘pantry’ of cooked items that make dinner feel like an effortless assembly rather than a daunting task after a long workday.
Ingredients
- 3 cups cooked jasmine rice or farro
- 2 heads of broccoli, cut into florets
- 1 lb extra firm tofu or pre-cooked sausage
- 1 jar of high-quality pesto or romesco sauce
- Roasted red peppers (jarred is fine)
- Toasted pine nuts or sunflower seeds
How to make it
- Divide your prep into ‘Stations’: Grains, Greens, and Proteins. This mental organization makes the process much faster.
- Cook your grains in bulk. For jasmine rice, use a 1:1.5 ratio of rice to water. Bring to a boil, then cover and simmer on the lowest heat for 12 minutes. Fluff with a fork and spread on a tray to cool quickly—this prevents it from getting mushy.
- Toss broccoli florets in olive oil and salt. Roast at 425°F (220°C) for 15-20 minutes until the tips are charred and crispy. That char adds a wonderful depth of flavor.
- If using tofu, press it for 20 minutes to remove excess water, then cube and pan-fry with a splash of soy sauce until the edges are golden.
- Store each component in separate airtight glass containers. This allows you to combine them in different ways throughout the week—one night as a bowl, the next as a stir-fry, or even cold in a hearty salad.
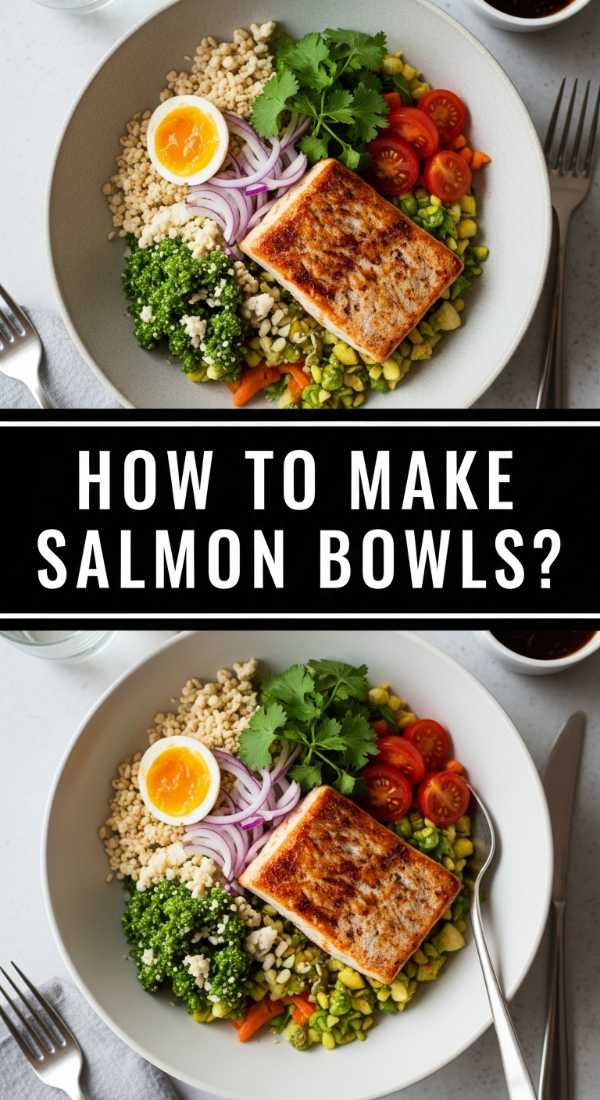
How to make salmon bowls?
Why we love this
Salmon bowls are the epitome of ‘spa food’ brought into the home kitchen. We love the contrast of temperatures and textures—the warmth of the flaky, fatty fish against the cold, refreshing crunch of cucumber and the creamy richness of ripe avocado. The aroma is clean and oceanic, highlighted by the zing of pickled ginger. It’s a meal that feels incredibly indulgent yet leaves you feeling light and nourished, capturing that viral ‘glow-up’ energy in every single bite.
Ingredients
- 2 large salmon fillets (skin-on preferred)
- 2 cups cooked sushi rice (seasoned with rice vinegar)
- 1 cucumber, thinly sliced
- 1 avocado, sliced
- 2 tablespoons edamame, shelled
- Shredded carrots and nori strips
- Sriracha mayo and sesame seeds
How to make it
- Pat the salmon fillets extremely dry with paper towels. This is the secret to getting a crispy skin. Season generously with salt on both sides.
- Heat a non-stick pan over medium heat with a tablespoon of neutral oil. Place the salmon skin-side down and press gently with a spatula for 30 seconds to prevent curling.
- Cook for about 5-6 minutes skin-side down until the skin is golden and shatters when touched with a fork. Flip and cook for only 1-2 minutes on the other side for a medium-rare finish.
- While the salmon rests, prepare your bowl base with the seasoned sushi rice. The rice should be slightly sticky and tangy from the vinegar.
- Arrange the cucumber, avocado, and edamame in distinct sections around the bowl. This visual separation is what makes it look like a viral sensation.
- Place the salmon in the center, drizzle with Sriracha mayo, and sprinkle with sesame seeds and nori for that authentic umami-rich finish.
How to prep breakfast jars?

Why we love this
Breakfast jars are the ultimate morning hack for anyone who hits the snooze button one too many times. We love the convenience of grabbing a chilled glass jar filled with creamy, overnight-soaked oats and bursting berries. The texture is thick and pudding-like, with the crunch of chia seeds providing a delightful pop. The scent of vanilla and maple syrup wafting from the jar as you unscrew the lid is the perfect gentle wake-up call for your senses, making a busy morning feel like a slow, curated experience.
Ingredients
- 2 cups rolled oats (not instant)
- 2.5 cups almond milk (or milk of choice)
- 1/4 cup chia seeds
- 2 tablespoons maple syrup
- 1 teaspoon vanilla extract
- Fresh blueberries and raspberries
- Almond butter for swirling
How to make it
- In a large mixing bowl, combine the rolled oats, chia seeds, milk, vanilla, and maple syrup. Stir thoroughly to ensure the chia seeds aren’t clumping at the bottom.
- Let the mixture sit for 10 minutes on the counter, then give it one more good stir. This second stir is crucial because it redistributes the seeds after they’ve started to swell.
- Portion the mixture into 4-5 mason jars, leaving about an inch of space at the top for toppings.
- Seal the jars and place them in the refrigerator for at least 4 hours, though overnight is ideal for the best texture.
- In the morning (or during prep), top with fresh berries and a generous swirl of almond butter. The fat in the nut butter helps slow down sugar absorption, keeping you full until lunch.
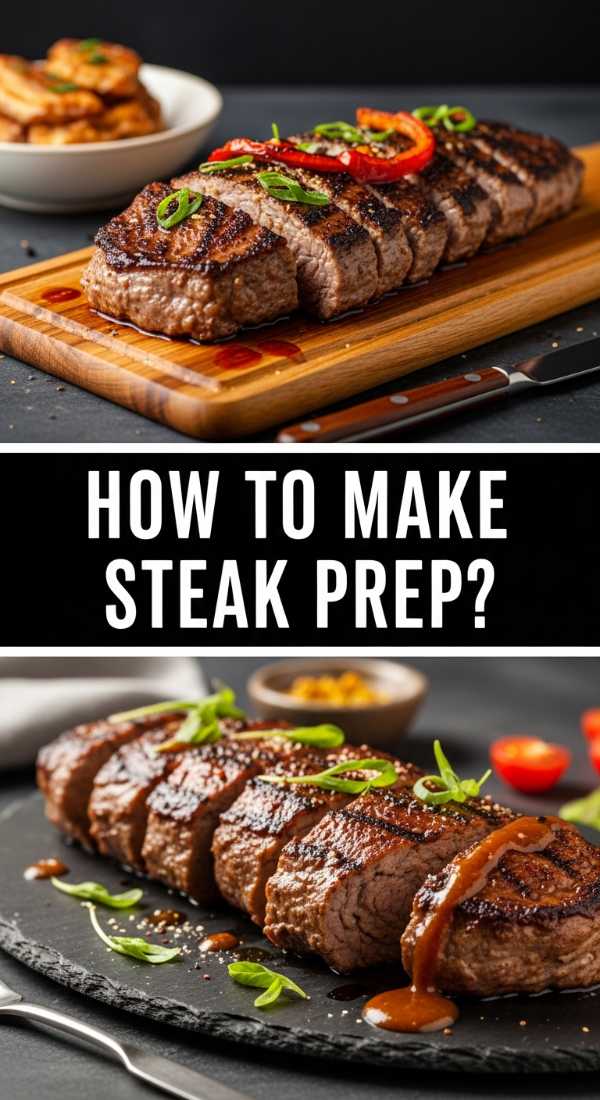
How to make steak prep?
Why we love this
There is a primal satisfaction in a perfectly prepared steak meal prep. We love the rich, deep umami flavor and the way a quality cut of beef holds its own even after a few days in the fridge. The aroma of steak basted in garlic-herb butter is nothing short of intoxicating. When sliced thin, the texture is tender and succulent, providing a hearty, high-protein base that pairs beautifully with roasted roots or a sharp chimichurri sauce. It’s the kind of prep that feels like a luxury dinner every single time you open your lunchbox.
Ingredients
- 1.5 lbs flank steak or sirloin
- 4 tablespoons unsalted butter
- 3 cloves garlic, smashed
- 2 sprigs fresh rosemary
- Coarse sea salt and cracked black pepper
- Olive oil
How to make it
- Take the steak out of the fridge at least 30-45 minutes before cooking. Bringing meat to room temperature is the only way to ensure it cooks evenly from edge to center.
- Pat the steak dry and season very aggressively with salt and pepper. You want a visible crust of seasoning.
- Heat a cast-iron skillet over high heat until it’s smoking slightly. Add a tablespoon of high-smoke-point oil (like avocado oil).
- Place the steak in the pan. For a 1-inch thick steak, sear for 4 minutes per side without moving it to develop a dark, caramelized crust.
- During the last 2 minutes of cooking, drop the butter, garlic, and rosemary into the pan. Once the butter melts and foams, use a large spoon to continuously baste the steak with the hot, aromatic fat.
- Remove the steak when the internal temperature hits 130°F (54°C) for medium-rare. Let it rest for at least 10 minutes on a cutting board to lock in the juices. Slice against the grain into thin strips for maximum tenderness.
How to prep veggie bowls?
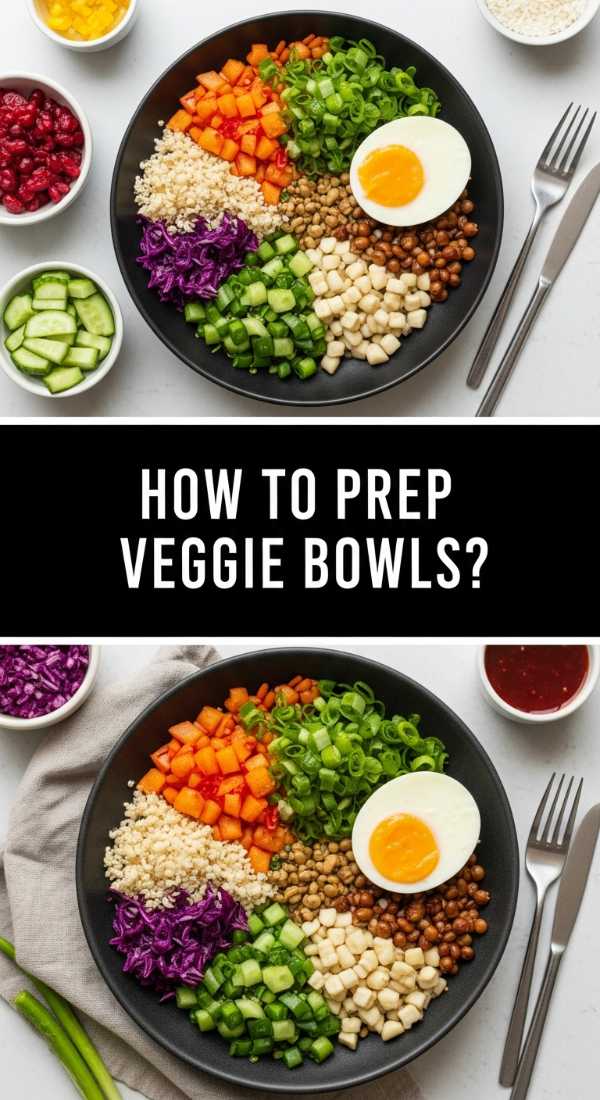
Why we love this
Veggie bowls are a celebration of the earth’s bounty, and we love them for their sheer versatility and vibrant aesthetic. There’s a certain joy in the harmony of different plant textures—the creaminess of a dollop of hummus, the earthy bite of roasted cauliflower, and the spicy kick of fresh arugula. The scent is always fresh and garden-like, often highlighted by the brightness of a squeeze of lime or a sprinkle of za’atar. It’s a meal that proves plant-based eating is never boring, but rather a complex and satisfying journey for the palate.
Ingredients
- 1 head cauliflower, cut into florets
- 1 can black beans, rinsed
- 2 cups baby arugula
- 1/2 red onion, quick-pickled
- 1 cup hummus
- 1/4 cup pumpkin seeds (pepitas)
- Cumin, coriander, and smoked paprika
How to make it
- Toss your cauliflower florets with olive oil, cumin, coriander, and paprika. Roast at 400°F (200°C) for 25 minutes until the edges are charred and the stems are tender.
- While roasting, make a ‘quick pickle’ for your onions. Submerge thinly sliced red onions in a mixture of apple cider vinegar, a pinch of sugar, and salt. Let them sit for 15 minutes until they turn a bright, neon pink.
- Warm the black beans in a small pot with a splash of water and a pinch of salt just until heated through.
- Assemble the bowls by starting with a bed of arugula. Add the roasted cauliflower and beans in separate mounds.
- Add a massive scoop of hummus in the center—this acts as your ‘sauce’ for the entire bowl.
- Top with the pickled onions and pumpkin seeds for a final layer of acidity and crunch.
How to make turkey meals?

Why we love this
Turkey is often the unsung hero of meal prep, and we love it for its ability to absorb flavors like a sponge. When prepared correctly, ground turkey is incredibly juicy and light, providing a savory foundation that works perfectly for taco bowls, stir-frys, or Mediterranean lettuce wraps. The aroma of browning turkey with onions and peppers is a classic kitchen comfort. It’s a lean, efficient protein that keeps you feeling satisfied without any heaviness, making it the ideal fuel for a productive afternoon or a post-workout recovery meal.
Ingredients
- 1 lb lean ground turkey
- 1 yellow onion, diced
- 2 bell peppers, sliced into strips
- 2 tablespoons taco seasoning (or chili powder and cumin)
- 1/2 cup chicken bone broth
- Fresh cilantro and lime
How to make it
- Heat a large skillet over medium-high heat with a drizzle of oil. Add the diced onion and sauté for 3-4 minutes until translucent and slightly sweet-smelling.
- Add the ground turkey to the pan. Use a wooden spoon to break it into small crumbles. Let it cook undisturbed for 2-3 minutes to get some browning before stirring.
- Once the turkey is mostly cooked through, add your taco seasoning and the sliced bell peppers.
- Pour in the bone broth. This is the ‘secret’ step—the liquid will simmer down and create a light sauce that keeps the turkey incredibly moist as it sits in the fridge.
- Cook until the peppers are tender-crisp and the liquid has mostly evaporated, leaving a glossy coating on the meat.
- Finish with a big squeeze of lime juice and fresh cilantro to brighten up the earthy spices.
How to prep shrimp bowls?
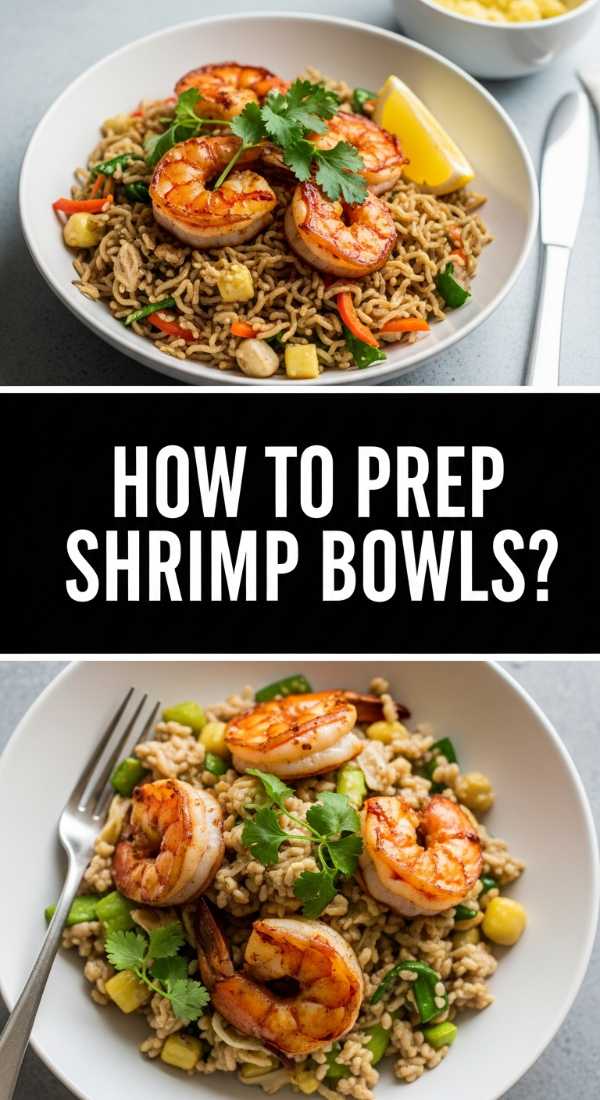
Why we love this
Shrimp bowls are the fast-track to a gourmet meal, taking mere minutes to cook but tasting like a high-end seafood dinner. We love the ‘snap’ of a perfectly cooked shrimp and the way they look like little pink jewels nestled amongst greens. The aroma is bright and garlicky, immediately transporting you to a seaside bistro. Because shrimp cook so quickly, they stay incredibly tender, and when paired with a zesty lime-cilantro dressing and cauliflower rice, they offer a low-carb meal that feels genuinely celebratory and special.
Ingredients
- 1 lb large shrimp, peeled and deveined
- 4 cups cauliflower rice
- 2 cloves garlic, minced
- 1 teaspoon red chili flakes
- 1 tablespoon honey
- 2 limes, juiced
- Fresh cilantro, chopped
How to make it
- The most important step for shrimp is to pat them bone-dry. If they are wet, they will steam instead of searing, and you’ll miss out on that beautiful pink color and snap.
- Whisk together the garlic, chili flakes, honey, and half the lime juice. Toss the shrimp in this mixture for only 5-10 minutes (too long and the acid will ‘cook’ them).
- Heat a skillet over high heat. Add the shrimp in a single layer. Do not overcrowd the pan; cook in two batches if necessary.
- Sear for exactly 2 minutes on the first side, flip, and cook for 1 more minute. They are done the moment they turn opaque and form a ‘C’ shape. If they form an ‘O’, they are overcooked!
- In the same pan, toss your cauliflower rice for 3-4 minutes with the remaining lime juice until just tender.
- Assemble your bowls with the zesty rice and shrimp, garnishing with an extra sprinkle of cilantro for that viral pop of green.
How to make budget prep?
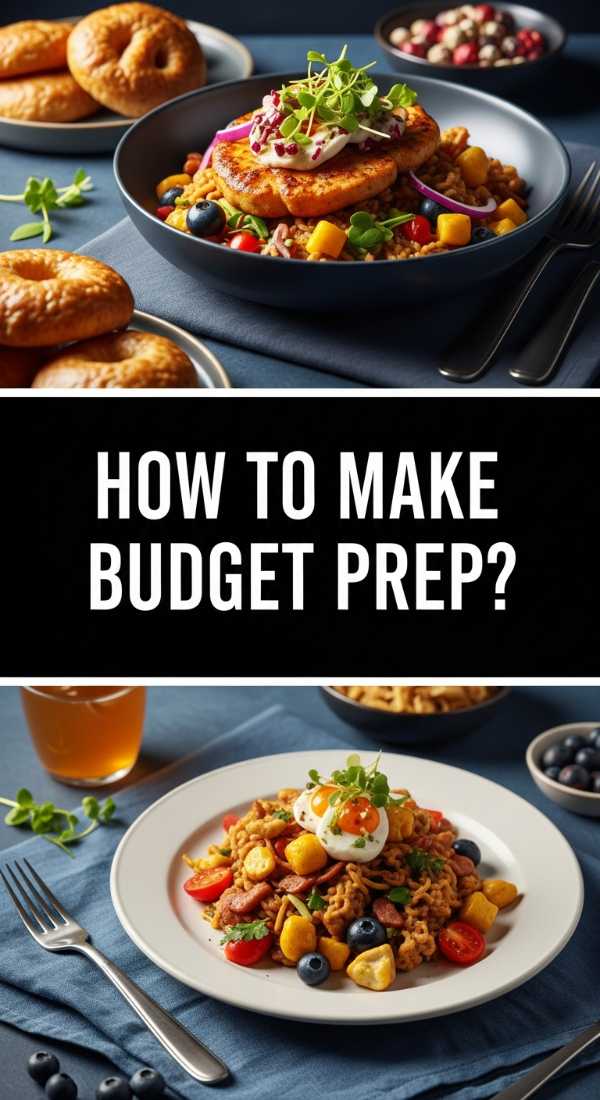
Why we love this
There is a unique pride in budget prep—the challenge of turning humble, inexpensive pantry staples into a meal that tastes like a million dollars. We love the comforting, thick texture of simmered lentils or beans and the way a simple bag of carrots can be transformed through slow roasting. The aroma of a budget curry or stew bubbling on the stove is the ultimate cozy scent. It’s proof that you don’t need a massive grocery budget to eat exceptionally well; you just need a little time, some warm spices, and the creativity to see the potential in a bag of beans.
Ingredients
- 2 cups dried brown or green lentils
- 1 large onion, diced
- 3 carrots, sliced into rounds
- 1 can crushed tomatoes
- 2 tablespoons curry powder
- 4 cups vegetable broth
- Salt and pepper to taste
How to make it
- Rinse your lentils thoroughly in a fine-mesh sieve. Sort through them to ensure no small stones are mixed in.
- In a large pot, sauté the onion and carrots with a bit of oil for about 8 minutes. You want the onions to be golden and the carrots to start softening.
- Stir in the curry powder and toast it with the vegetables for 60 seconds. This ‘blooms’ the spices, waking up the oils and making the flavor much more intense.
- Add the lentils, crushed tomatoes, and vegetable broth. Bring the mixture to a rolling boil.
- Once boiling, reduce the heat to low and cover. Simmer for 25-30 minutes. Check the lentils; they should be soft but still hold their shape.
- Season generously with salt at the *end* of cooking. Adding salt too early can sometimes make the skins of the lentils tough. This batch can be frozen in individual portions for an even easier week later!
The Art of the Everyday Board
Building a food board isn’t just about the mechanics of cooking; it’s about the philosophy of abundance and care. Whether you are searing a steak to perfection or simmering a pot of budget-friendly lentils, you are taking control of your well-being in the most delicious way possible. These viral-style preps are designed to be flexible, beautiful, and most importantly, sustainable for your real life. So, grab your glass containers, put on your favorite playlist, and turn your kitchen into the creative studio it was always meant to be. Happy prepping!